

Let’s start this blog.
First, we create an MVC project.
Go to File-> New-> Project and select “ASP.NET Web Application”.
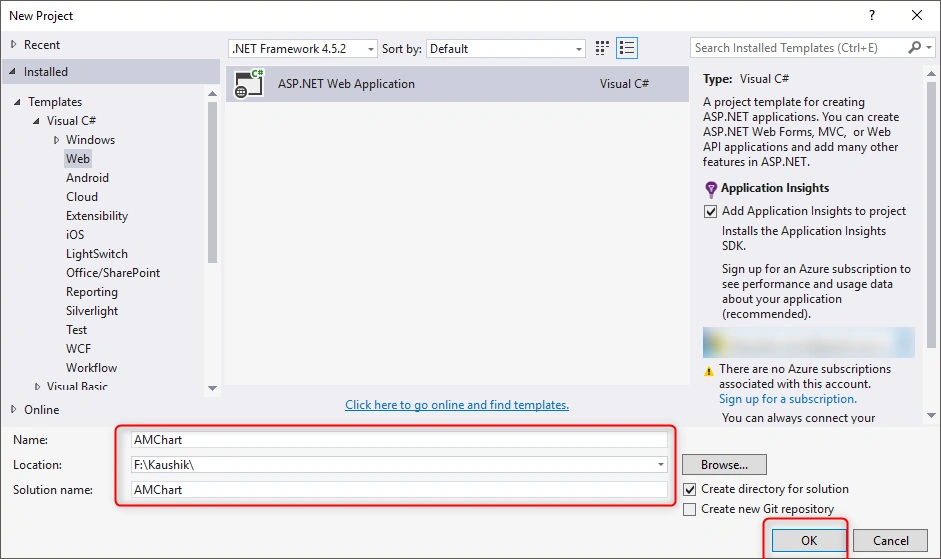
Enter the Project name and give a path in Location, after it clicks on ok button.
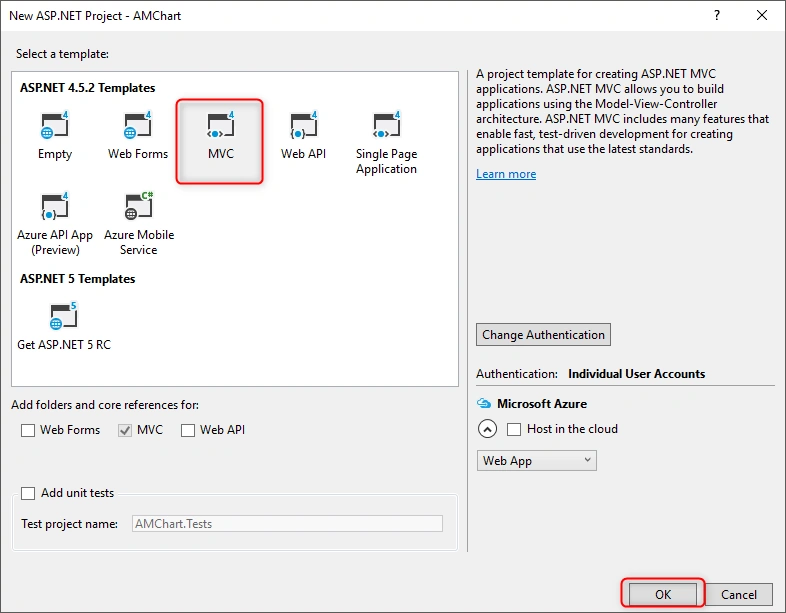
Add below URLs in the view page
- <script src="https://www.amcharts.com/lib/3/amcharts.js"></script>
- <script src="https://www.amcharts.com/lib/3/pie.js"></script>
- <script src="https://www.amcharts.com/lib/3/plugins/export/export.min.js"></script>
- <link rel="stylesheet" href="https://www.amcharts.com/lib/3/plugins/export/export.css" type="text/css" media="all" />
- <script src="https://www.amcharts.com/lib/3/themes/light.js"></script>
Copy below code into view where you want to display the chart.
- @{
- ViewBag.Title = "Home Page";
- }
- <style>
- #MyChart{
- width: 100%;
- height: 500px;
- }
- #exportChart {
- font-size: 18px;
- padding: 5px 10px;
- position: absolute;
- top: 30px;
- right: 30px;
- z-index: 10;
- }
- </style>
- <div id="MyChart" style="width:50%"></div>
- <br />
- <input type="button" id="exportChart" value="Export Chart" onclick="exportChart();" />
- <script>
- var chart = AmCharts.makeChart("MyChart", {
- "type": "pie",
- "theme": "light",
- "dataProvider": [{
- "City": "Surat",
- "litres": 501.9
- }, {
- "City": "Karnavati",
- "litres": 301.9
- }, {
- "City": "Navsari",
- "litres": 201.1
- }, {
- "City": "Junagadh",
- "litres": 165.8
- }, {
- "City": "Amreli",
- "litres": 139.9
- }, {
- "City": "Bhavnagar",
- "litres": 128.3
- }, {
- "City": "Gondal",
- "litres": 99
- }, {
- "City": "Rajkot",
- "litres": 60
- }, {
- "City": "Pune",
- "litres": 50
- }],
- "valueField": "litres",
- "titleField": "City",
- "balloon": {
- "fixedPosition": true
- },
- "export": {
- "enabled": true,
- "menu": []
- }
- });
- function exportChart() {
- chart["export"].capture({}, function () {
- this.toPNG({}, function (base64) {
- $.ajax({
- url: '/Home/SaveImage',
- type: 'POST',
- data: { base64: base64},
- success: function (data) {
- if (data != "") {
- alert("file saved.")
- }
- else {
- alert("file not saved.")
- }
- },
- error: function (r, s, e) {
- alert("Unexpected error:" + e);
- console.log(r);
- console.log(s);
- console.log(e);
- }
- });
- });
- });
- }
- </script>
Now copy and paste below function into your Home controller.
- [HttpPost]
- public JsonResult SaveImage(string base64)
- {
- string filePath = "";
- string FileName = string.Format("{0:yyyy-MM-dd_hh-mm-ss-tt}", DateTime.Now);
- string DomainName = ConfigurationSettings.AppSettings["DomainName"];
- try
- {
- var imageParts = base64.Split(',').ToList<string>();
- byte[] Image = Convert.FromBase64String(imageParts[1]);
- filePath = System.Web.Hosting.HostingEnvironment.MapPath("~/Image/" + FileName + ".png");
- System.IO.File.WriteAllBytes(filePath, Image);
- filePath = DomainName + "Image/" + FileName + ".png";
- }
- catch (Exception ex)
- {
- filePath = "";
- }
- return Json(filePath, JsonRequestBehavior.AllowGet);
- }
In this SaveImage() function, we get the base64 as a string from parameter and convert it to png using convert the base64 to bytes.
For getting the domain name in this article we use the "ConfigurationSettings.AppSettings["DomainName"]"
So, you need to add the "DomainName" key into the web.config like below code.
- <add key="DomainName" value="http://localhost:42213//" />
Right now I'm running my local project so I give the value of localhost but you can add your live domain name and don't forget to give permission to the folder for read and write for save image.

Output
Amit MohantyPosted Jul 23, 2019, 11:18 PM
Very useful..