

In this blog, we will see how to export an HTML table to XML using "tabletoxml" jQuery plugin.
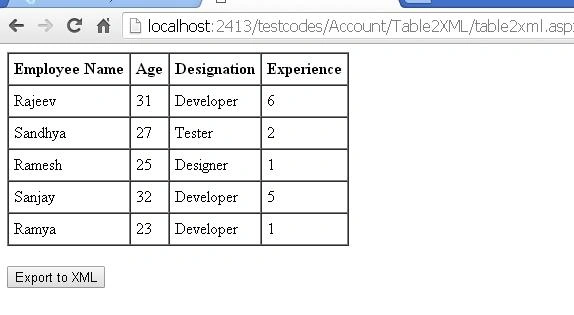
First, we will create an HTML table showing employee details and an "Export to XML" button.
- <div>
- <table id="mytable" cellpadding="5" border="1" cellspacing="0">
- <thead>
- <tr>
- <th>
- Employee Name
- </th>
- <th>
- Age
- </th>
- <th>
- Designation
- </th>
- <th>
- Experience
- </th>
- </tr>
- </thead>
- <tbody>
- <tr>
- <td>
- Rajeev
- </td>
- <td>
- 31
- </td>
- <td>
- Developer
- </td>
- <td>
- 6
- </td>
- </tr>
- <tr>
- <td>
- Sandhya
- </td>
- <td>
- 27
- </td>
- <td>
- Tester
- </td>
- <td>
- 2
- </td>
- </tr>
- <tr>
- <td>
- Ramesh
- </td>
- <td>
- 25
- </td>
- <td>
- Designer
- </td>
- <td>
- 1
- </td>
- </tr>
- <tr>
- <td>
- Sanjay
- </td>
- <td>
- 32
- </td>
- <td>
- Developer
- </td>
- <td>
- 5
- </td>
- </tr>
- <tr>
- <td>
- Ramya
- </td>
- <td>
- 23
- </td>
- <td>
- Developer
- </td>
- <td>
- 1
- </td>
- </tr>
- </tbody>
- </table>
- <br />
- <button onclick="exporttoxml()">
- Export to XML</button>
- </div>
Running the page will look like below.
Now, we reference the jQuery file and "tabletoxml" file in our head section.
- <title>Table 2 XML</title>
- <script src="jquery.min.1.11.1.js" type="text/javascript"></script>
- <script src="jquery.tabletoxml.js" type="text/javascript"></script>
Now, we write our exporttoxml() function.
- <script type="text/javascript">
- function exporttoxml() {
- $("#mytable").tabletoxml({
- rootnode: "Employee",
- childnode: "EmployeeDetails",
- filename: 'EmployeeList'
- });
- }
- </script>
In the above script, "filename" is the name given to the downloading XML file.
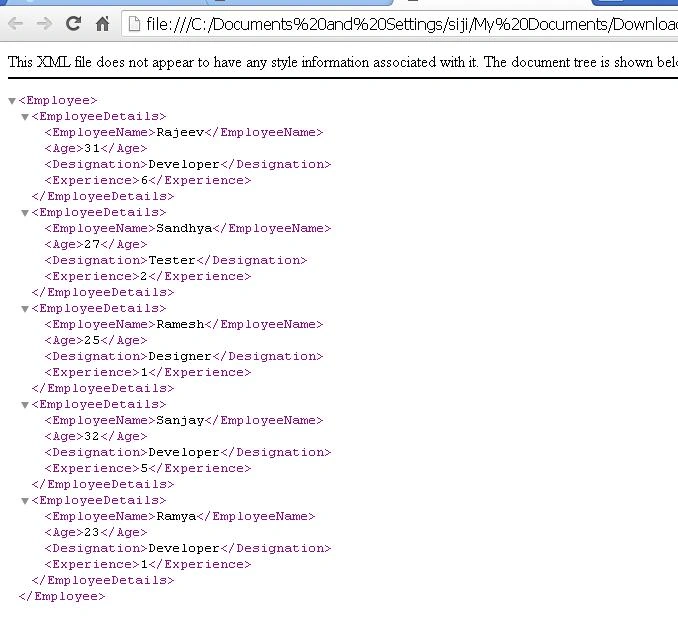
"rootnode" will be the name of the root node of our XML file. "childnode" will be the name of child node in the XML file corresponding to each row of our HTML table.
"rootnode" will be the name of the root node of our XML file. "childnode" will be the name of child node in the XML file corresponding to each row of our HTML table.
So now, we will run the page and click on "Export to XML" button. Our XML file will be downloaded. Opening that file, we can see the data of our table like below.
That's it. Our HTML table is exported to XML!
Please note that the above plugin is not tested in all versions of IE browser and will not work on IE9 and below browsers. Also, there may be issues with huge HTML tables too.
Please note that the above plugin is not tested in all versions of IE browser and will not work on IE9 and below browsers. Also, there may be issues with huge HTML tables too.
Summary
In this blog, we have learned how to export an HTML table to XML file using the "tabletoxml" jQuery plugin. I hope this will be helpful!
Thomas BrunnerPosted Jun 19, 2020, 10:29 AM
Where do I geht this js files?
pg moorthyPosted Feb 12, 2020, 1:48 AM
Sir table has dropdown , so only selected values are export to xml, how work it
harish sharmaPosted Feb 6, 2019, 10:24 PM
How to get the xml string in var instead of downloading it. I tried but Im getting undefined in var.
Ugurcan DemirPosted Nov 13, 2017, 6:15 AM
Thank you very much sir. best regards.
Sris SriPosted Sep 14, 2017, 4:08 AM
Where we have to add jquery files