

In this article, we will create an ASP.NET MVC 4 Application, using AngularJS in Custom directive with multi check box. Previously, I created ASP.NET MVC 4 Application, using AngularJS, perform CRUD operations and Multi-Row Insert, using Web API. Let’s see.
Introduction
The link of my previous article is given below.
In this Angularcontroller folder in StudentViewcontroller.js, we will add custom directive for the child table information.
StudentViewcontroller.js (it is angular controller)
In JS file, we defined the custom directive.
- app.controller("StudentViewcontroller", function ($scope, RohitService, $location, ShareData, $window) {
- getdate();
- $scope.selectedRow = null; // initialize our variable to null
- function getdate() {
- var promisePost = RohitService.ShowStudent();
- promisePost.then(function (pl) {
- var stud = pl.data;
- $scope.student = stud;
- })
- }
- $scope.editEmployee = function (KeyId) {
- ShareData.KeyId = KeyId;
- var earl = "/studentRecord";
- $location.path(earl);
- }
- $scope.deleteEmployee = function (KeyId) {
- if ($window.confirm('Are you sure to delete ?')) {
- var promisePost = RohitService.deleteStudentKey(KeyId);
- promisePost.then(function (pl) {
- var stud = pl.data;
- alert('Your Record Deleted Successfully !');
- getdate();
- })
- }
- }
- $scope.selectEntity = function () {
- // If any entity is not checked, then uncheck the "allItemsSelected" checkbox
- for (var i = 0; i < $scope.student.length; i++) {
- if (!$scope.student[i].isChecked) {
- $scope.allItemsSelected = false;
- return;
- }
- }
- //If not the check the "allItemsSelected" checkbox
- $scope.allItemsSelected = true;
- };
- // This executes when checkbox in table header is checked
- $scope.selectAll = function () {
- for (var i = 0; i < $scope.student.length; i++) {
- $scope.student[i].isChecked = $scope.allItemsSelected;
- }
- };
- });
- //my custome directive for child table data infomation
- app.directive("myGetDirective", function (RohitService) {
- return {
- restrict: 'E',
- scope: {
- datasource: '='
- },
- link: function ($scope) {
- var index = $scope.$parent.$index;
- var id = $scope.$parent.student[index].KeyId;
- var promiseStudentRecord = RohitService.showEduStudent(id);
- promiseStudentRecord.then(function (pl) {
- var stud = pl.data;
- $scope.ClassModel = stud;
- },
- function (errorPl) {
- $scope.error = errorPl;
- });
- },
- templateUrl: "Home/View1"
- }
- });
- <div>
- <table>
- <tr>
- <td>
- Class
- </td>
- <td>
- Board
- </td>
- <td>
- Roll No.
- </td>
- </tr>
- <tr data-ng-repeat="cls in ClassModel">
- <td>
- {{cls.ClassName}}
- </td>
- <td>
- {{cls.BoardName}}
- </td>
- <td>
- {{cls.CRollNo}}
- </td>
- </tr>
- </table>
- </div>
In this view, we will add custom directive myGetDirective.
- @{
- ViewBag.Title = "Student View";
- }
- <h2>Student View</h2>
- <table id="testrohit">
- <tr>
- <thead>
- <td>
- <table>
- <tr>
- <th>
- <input type="checkbox" data-ng-model="allItemsSelected" data-ng-change="selectAll()">
- </th>
- <th>Student Name
- </th>
- <th>Father's Name
- </th>
- <th>Gender
- </th>
- <th>Mobile No.
- </th>
- <th>Action
- </th>
- </tr>
- </table>
- </td>
- </thead>
- </tr>
- <tr>
- <tbody data-ng-repeat="students in student" >
- <td>
- <table class="inner-table">
- <tr>
- <td width="10%">
- <input type="checkbox" data-ng-model="students.isChecked" data-ng-change="selectEntity()">
- </td>
- <td width="20%">{{students.SName | uppercase}}
- </td>
- <td width="20%">{{students.FName}}
- </td>
- <td width="20%">{{students.Gender}}
- </td>
- <td width="20%">{{students.MobileNo}}
- </td>
- <td width="10%">
- <span data-ng-click="toggleModal(students.KeyId)">View</span>
- <span data-ng-click="editEmployee(students.KeyId)">Edit</span>
- <span data-ng-click="deleteEmployee(students.KeyId)">Delete</span>
- </td>
- </tr>
- <tr>
- <td colspan="6">
- <div data-ng-if="students.isChecked">
- <my:get-directive datasource="ClassModel"></my:get-directive>
- </div>
- </td>
- </tr>
- </table>
- </td>
- </tbody>
- </tr>
- </table>
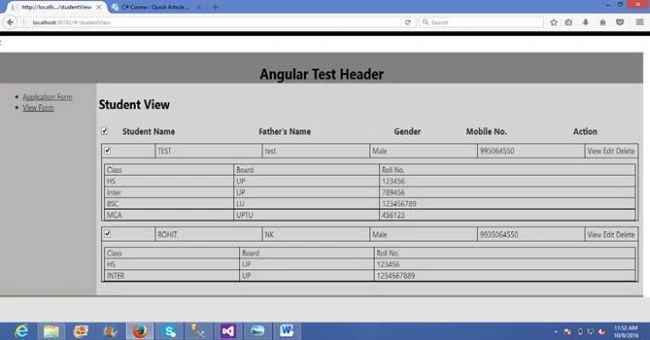
After running your Application, the output is given below.
Sachin ChourasiaPosted Jan 26, 2017, 11:36 PM
Again a fantabulous job...Simple language with easy examples to understand,Carry on...I'm waiting for another article.
Humayun Kabir MamunPosted Oct 13, 2016, 4:23 AM
Nice...
Srishti SrivastavaPosted Oct 12, 2016, 12:39 AM
Great Article Sir!!