

Introduction
Last time, I published an article with the title “Upload Image to blob storage using Xamarin.Android”. In this article, you will learn how you can upload Images to blob storage through Xamarin.forms. I hope you will learn something amazing in xamarin.

Prerequisites
If you don't have an Azure subscription, create a free account before you begin.
Log in to the Azure portal.
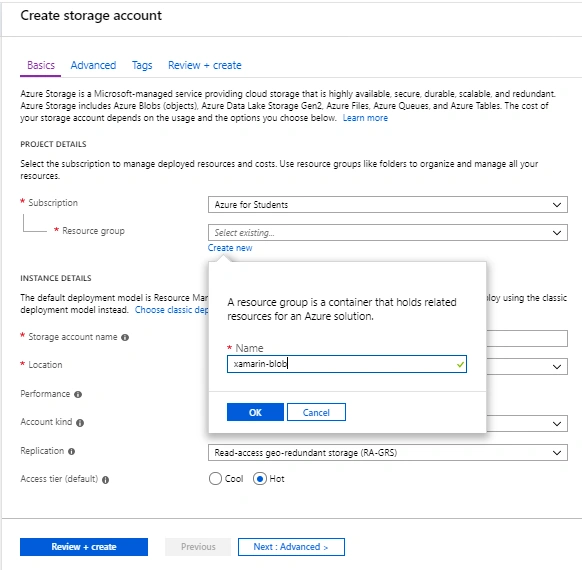
Create a storage account
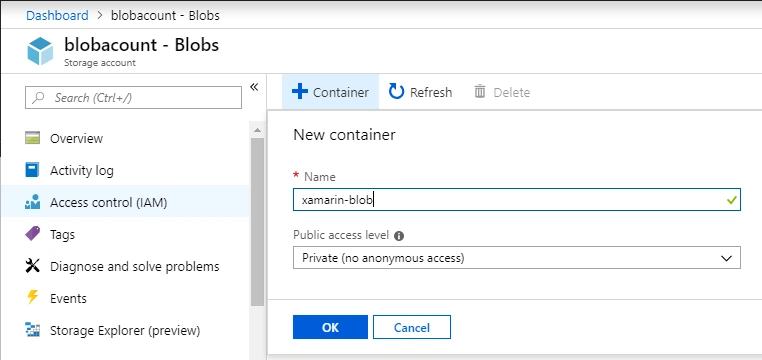
Create a container
Let’s create a xamarin.forms project with .Net standard library.
First of all add the required nuget packages to our application.
- Xam.Plugin.Media
- WindowsAzure.Storage
Step 1 - Create User Interface of App
Open MainPage.xaml file, simply replace the following code inside your ContentPage tages.
- <Grid>
- <Grid.ColumnDefinitions>
- <ColumnDefinitionWidth="*" />
- </Grid.ColumnDefinitions>
- <Grid.RowDefinitions>
- <RowDefinitionHeight="*" />
- </Grid.RowDefinitions>
- <Buttonx:Name="btnSelectPic"Grid.Row="0"Grid.Column="0"Text="Select picture" Clicked="btnSelectPic_Clicked" BackgroundColor="DodgerBlue" TextColor="White" />
- <Buttonx:Name="btnTakePic"Grid.Row="0"Grid.Column="1"Text="Take picture" Clicked="btnTakePic_Clicked" BackgroundColor="DodgerBlue" TextColor="White" />
- </Grid>
- <Imagex:Name="imageView"HeightRequest="300"WidthRequest="400" />
- <ActivityIndicatorx:Name="uploadIndicator"IsVisible="False" IsRunning="False" Color="DodgerBlue" />
- <ButtonText="Upload to Blob"Clicked="btnUpload_Clicked" x:Name="btnUpload" BackgroundColor="Green" TextColor="White" />
- <Editorx:Name="UploadedUrl"TextColor="Black"HeightRequest="85" Text="Image URL:" />
- </StackLayout>
Step 2 - Write Backend Code
Open your MainPage.xaml.cs file, replace the following code inside your ContentPage tages.
Note
In the upload function, I am using my own blob storage connection string. But you will use your own blob storage connection string. Go to Access keys inside this tab you will get two keys (key1 and key2) with also connection strings. You can use either key1 or key2. In this demo we only need the connection string, so you will only copy the connection string.
In the upload function, I am using my own blob storage connection string. But you will use your own blob storage connection string. Go to Access keys inside this tab you will get two keys (key1 and key2) with also connection strings. You can use either key1 or key2. In this demo we only need the connection string, so you will only copy the connection string.
- public partial class MainPage : ContentPage
- {
- public MainPage()
- {
- InitializeComponent();
- }
- private MediaFile _mediaFile;
- private string URL { get; set; }
- //Picture choose from device
- private async void btnSelectPic_Clicked(object sender, EventArgs e)
- {
- await CrossMedia.Current.Initialize();
- if (!CrossMedia.Current.IsPickPhotoSupported)
- {
- await DisplayAlert("Error", "This is not support on your device.", "OK");
- return;
- }
- else
- {
- var mediaOption = new PickMediaOptions()
- {
- PhotoSize = PhotoSize.Medium
- };
- _mediaFile = await CrossMedia.Current.PickPhotoAsync();
- if (_mediaFile == null) return;
- imageView.Source = ImageSource.FromStream(() => _mediaFile.GetStream());
- UploadedUrl.Text = "Image URL:";
- }
- }
- //Upload picture button
- private async void btnUpload_Clicked(object sender, EventArgs e)
- {
- if (_mediaFile == null)
- {
- await DisplayAlert("Error", "There was an error when trying to get your image.", "OK");
- return;
- }
- else
- {
- UploadImage(_mediaFile.GetStream());
- }
- }
- //Take picture from camera
- private async void btnTakePic_Clicked(object sender, EventArgs e)
- {
- await CrossMedia.Current.Initialize();
- if (!CrossMedia.Current.IsCameraAvailable || !CrossMedia.Current.IsTakePhotoSupported)
- {
- await DisplayAlert("No Camera", ":(No Camera available.)", "OK");
- return;
- }
- else
- {
- _mediaFile = await CrossMedia.Current.TakePhotoAsync(new StoreCameraMediaOptions
- {
- Directory = "Sample",
- Name = "myImage.jpg"
- });
- if (_mediaFile == null) return;
- imageView.Source = ImageSource.FromStream(() => _mediaFile.GetStream());
- var mediaOption = new PickMediaOptions()
- {
- PhotoSize = PhotoSize.Medium
- };
- UploadedUrl.Text = "Image URL:";
- }
- }
- //Upload to blob function
- private async void UploadImage(Stream stream)
- {
- Busy();
- var account = CloudStorageAccount.Parse("DefaultEndpointsProtocol=https;AccountName=ahsanblobaccount;AccountKey=fOvpvzb8jFL0pNfDWvz9n76DzLWSlZu4aw6ZLXMbDId15YYfox15UoKvWMmTCJ6vcNoyk5w+A==;EndpointSuffix=core.windows.net");
- var client = account.CreateCloudBlobClient();
- var container = client.GetContainerReference("images");
- await container.CreateIfNotExistsAsync();
- var name = Guid.NewGuid().ToString();
- var blockBlob = container.GetBlockBlobReference($"{name}.png");
- await blockBlob.UploadFromStreamAsync(stream);
- URL = blockBlob.Uri.OriginalString;
- UploadedUrl.Text = URL;
- NotBusy();
- await DisplayAlert("Uploaded", "Image uploaded to Blob Storage Successfully!", "OK");
- }
- public void Busy()
- {
- uploadIndicator.IsVisible = true;
- uploadIndicator.IsRunning = true;
- btnSelectPic.IsEnabled = false;
- btnTakePic.IsEnabled = false;
- btnUpload.IsEnabled = false;
- }
- public void NotBusy()
- {
- uploadIndicator.IsVisible = false;
- uploadIndicator.IsRunning = false;
- btnSelectPic.IsEnabled = true;
- btnTakePic.IsEnabled = true;
- btnUpload.IsEnabled = true;
- }
- }
Choose From Moible and Upload


UWP Choose From Computer and Upload

Capture From Camera and Upload

UWP Capture From Webcam and Upload
Adeoye TemitayoPosted Aug 12, 2020, 4:23 AM
Great tutorial, its works
Mahesh BalasubramanianPosted Jun 21, 2020, 7:27 AM
I have created as= Xamarin Project to upload images to Azure Blob Storage. While I am trying to access the Blob storage from my Local Machine. I am getting the following error while calling the below methods.await container.CreateIfNotExistsAsync(); await blockBlob.UploadFromStreamAsync(stream);
satish maddiliPosted Apr 16, 2019, 2:31 AM
Using PickPhotoAsync after choose the picture nothing will happen in xamarin forms android