

Introduction
This article demonstrates how to enable support for multiple languages in Xamarin.forms application. This means if the user has enabled the Tamil language to their smartphone, then the application shows the content in Tamil.There is no default function available for multi-language application. So, we need to add a plug-in for this.
NuGet Package: Xamarin: search "Plugin.Multilingual"
- Multilingual Plugin for Xamarin.Forms, Xamarin Android, Xamarin.IOS, Xamarin.Mac, tvOS, watchOS and Universal Windows Platform
- Simple cross-platform plugin for handling languages localization
Multilingual Plugin Features
- Get and set current culture
- Get device culture
- Get culture list
- Get specific culture by name
- More Detail
Let's start :)
Step 1
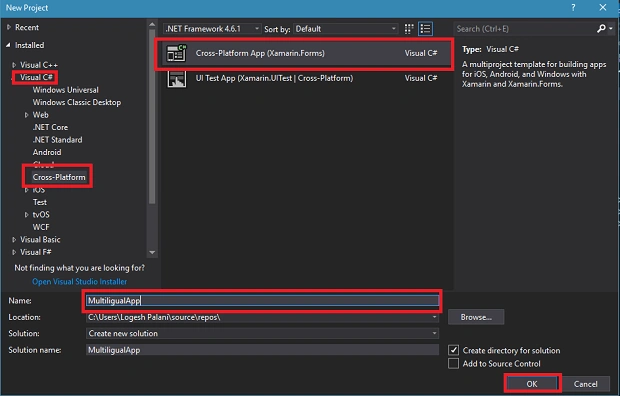
You can create Xamarin.forms app by going to File ->>New ->>Visual C# >>Cross platform >>Cross platform App (Xamarin.Native or Xamarin.Forms), give the application name, and press OK.
(Project name: MultilingualApp)
You can create Xamarin.forms app by going to File ->>New ->>Visual C# >>Cross platform >>Cross platform App (Xamarin.Native or Xamarin.Forms), give the application name, and press OK.
(Project name: MultilingualApp)
Step 2
After the project creation, add the following NuGet packages for your project.
After the project creation, add the following NuGet packages for your project.
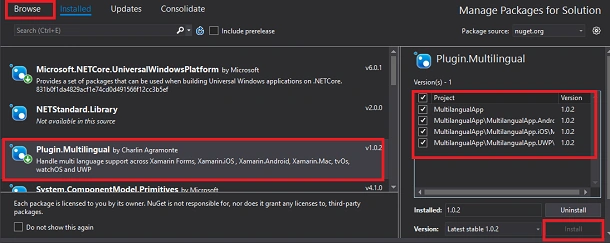
For that, go to Solution Explorer and select your project solution. Right-click and select "Manage NuGet Packages for the Solution". In the popup window, click open "Browse" tab and browse "Plugin.Multilingual". Now, select the NuGet package and select your project to install it.
Step 3
When installing the plugin, it will create a TranslateExtension.txt file in Helpers folder. Rename the extension for this to TranslateExtension.cs. In TranslateExtension.cs file in the constant ResourceId by default, it will assume your resource file is added to the root of the project and the resx file is named as Appresources. If you added a file named the resx file differently, you can change it there.
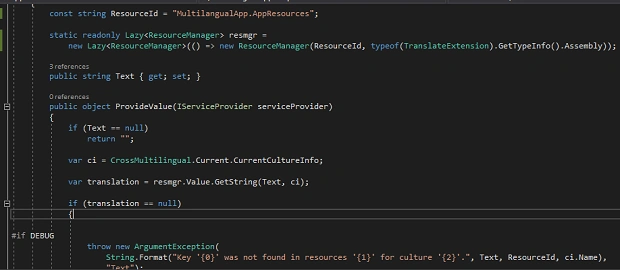
When installing the plugin, it will create a TranslateExtension.txt file in Helpers folder. Rename the extension for this to TranslateExtension.cs. In TranslateExtension.cs file in the constant ResourceId by default, it will assume your resource file is added to the root of the project and the resx file is named as Appresources. If you added a file named the resx file differently, you can change it there.
TranslateExtension.cs
- using System;
- using System.ComponentModel;
- using System.Reflection;
- using System.Resources;
- using Plugin.Multilingual;
- using Xamarin.Forms;
- using Xamarin.Forms.Xaml;
- namespace MultilangualApp.Helpers
- {
- [ContentProperty("Text")]
- public class TranslateExtension : IMarkupExtension
- {
- const string ResourceId = "MultilangualApp.AppResources";
- static readonly Lazy<ResourceManager> resmgr =
- new Lazy<ResourceManager>(() => new ResourceManager(ResourceId, typeof(TranslateExtension).GetTypeInfo().Assembly));
- public string Text { get; set; }
- public object ProvideValue(IServiceProvider serviceProvider)
- {
- if (Text == null)
- return "";
- var ci = CrossMultilingual.Current.CurrentCultureInfo;
- var translation = resmgr.Value.GetString(Text, ci);
- if (translation == null)
- {
- #if DEBUG
- throw new ArgumentException(
- String.Format("Key '{0}' was not found in resources '{1}' for culture '{2}'.", Text, ResourceId, ci.Name),
- "Text");
- #else
- translation = Text; // returns the key, which GETS DISPLAYED TO THE USER
- #endif
- }
- return translation;
- }
- }
- }
Step 4
Create AppResources.resx file. For that, go to Solution Explorer >> MultilingualApp(PCL) >> Visual C# items >> select "Text File" and give the file name AppResources.resx. Double-click to open AppResources.resx file and enter the values, keys.
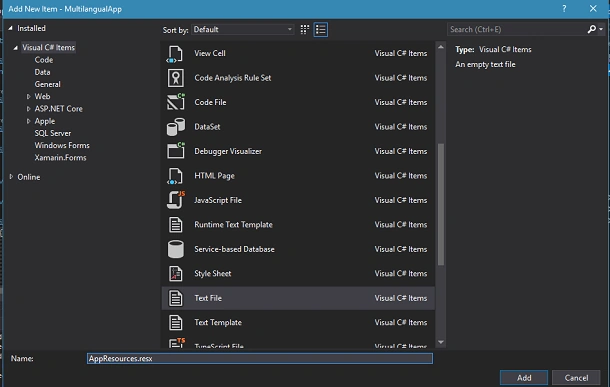
Create AppResources.resx file. For that, go to Solution Explorer >> MultilingualApp(PCL) >> Visual C# items >> select "Text File" and give the file name AppResources.resx. Double-click to open AppResources.resx file and enter the values, keys.
AppResources.resx

Step 5
Similarly, create AppResources.es.resx file and enter the values and keys.
Similarly, create AppResources.es.resx file and enter the values and keys.
AppResources.es.resx

Step 6
Add another AppResources.resx file named AppResources.ar.resx file.Apply the values and keys.
Add another AppResources.resx file named AppResources.ar.resx file.Apply the values and keys.
AppResources.ar.resx

Step 7
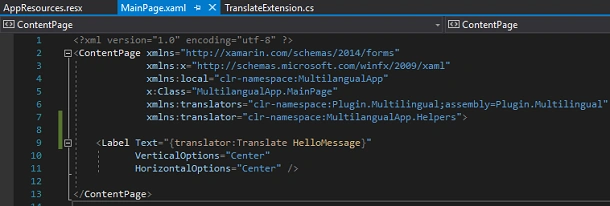
In this step, add a Translate control to your project. For that, go to Solution Explorer >> MultilingualApp(PCL) >> double click on MainPage.xaml.
After opening this, you can add Translate control assembly and XAML code to your project. Write the code given below.
In this step, add a Translate control to your project. For that, go to Solution Explorer >> MultilingualApp(PCL) >> double click on MainPage.xaml.
After opening this, you can add Translate control assembly and XAML code to your project. Write the code given below.
Assembly
- xmlns:translator="clr-namespace:MultilangualApp.Helpers"
Xaml code
- <?xml version="1.0" encoding="utf-8" ?>
- <ContentPage xmlns="http://xamarin.com/schemas/2014/forms"
- xmlns:x="http://schemas.microsoft.com/winfx/2009/xaml"
- xmlns:local="clr-namespace:MultilangualApp"
- x:Class="MultilangualApp.MainPage"
- xmlns:translator="clr-namespace:MultilangualApp.Helpers">
- <Label Text="{translator:Translate HelloMessage}"
- VerticalOptions="Center"
- HorizontalOptions="Center" />
- </ContentPage>
Step 8
Click 'F5' or build to run your project. Running this project, you will have the result like below.
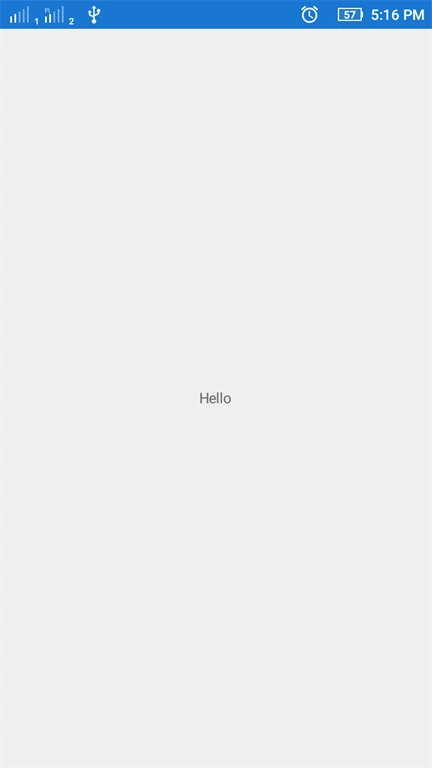
Click 'F5' or build to run your project. Running this project, you will have the result like below.
Now, you can change your simulator language and relaunch you Xamarin.forms application. The result will look like below.
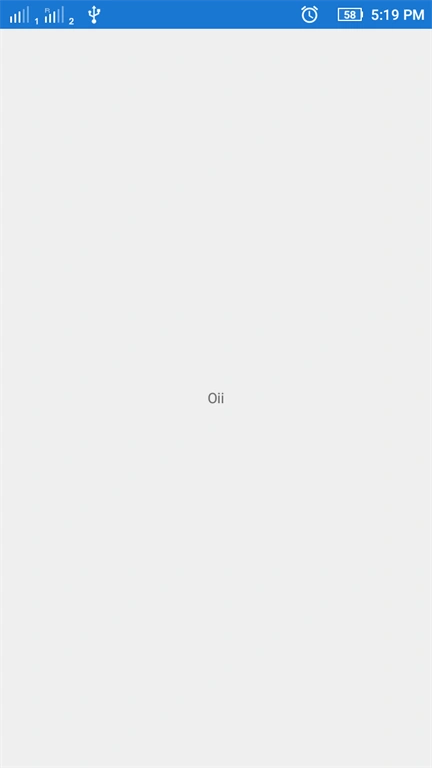
Finally, we have successfully created a Xamarin.forms multilingual application.
santosh KumarPosted May 22, 2020, 6:44 PM
Android not converted language any help?
Ana BellidoPosted Jan 28, 2019, 12:39 PM
I have follow this article, it is not translating at all :(
nandha kumarPosted May 16, 2018, 7:58 AM
After installing the plugin its not creating the Helper folder.What to do
Ravishankar VelladuraiPosted Dec 10, 2017, 10:11 PM
nice article bro... keep sharing