

Introduction
In part one, we had developed the RESTFul API in Node JS and Mongodb. In this article we will consume this RESTFul API in Xamarin.Android.
Client Application
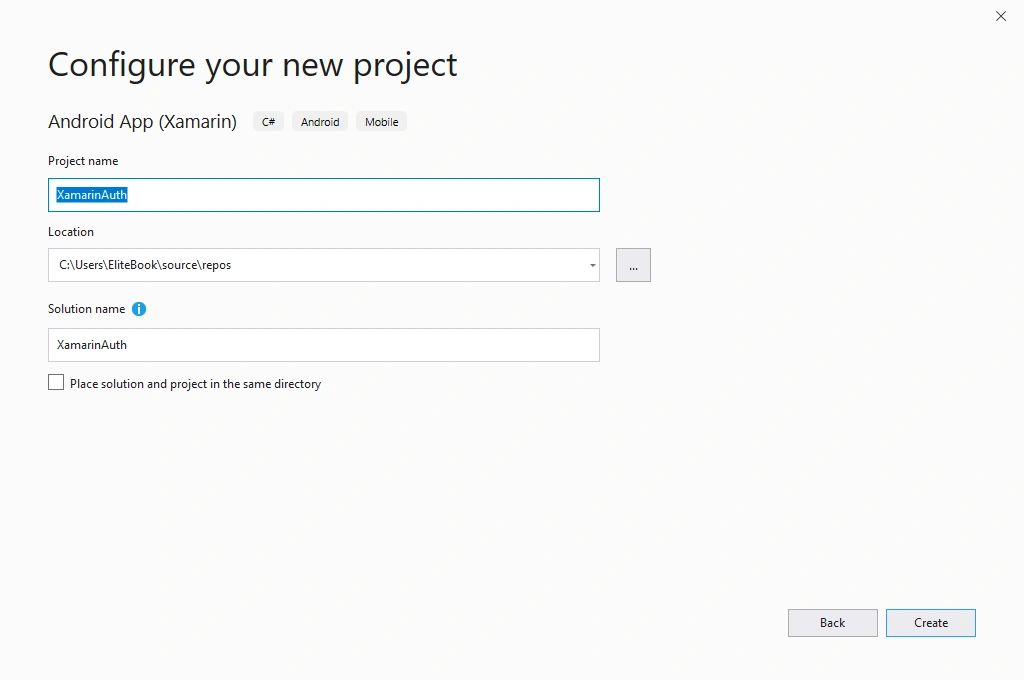
Step 1 - Create a Xamarin Android Project
Open Visual Studio-> New Project-> Templates-> Visual C#-> Android-> Blank app and give the project name XamarinAuth.
(ProjectName: XamarinAuth)
After creating a blank project, first, add Refit NuGet package to this project by right-clicking on References and select manage NuGet packages.
Step 3 - Create Login Layout
Next, open Solution Explorer-> Project Name-> Resources-> Layout-> Main.axml. Open activity_main.axml file and add the following code.
(FileName: activity_main.axml)
- <?xml version="1.0" encoding="utf-8"?>
- <LinearLayout xmlns:android="http://schemas.android.com/apk/res/android"
- xmlns:app="http://schemas.android.com/apk/res-auto"
- xmlns:tools="http://schemas.android.com/tools"
- android:layout_width="match_parent"
- android:orientation="vertical"
- android:background="@android:color/white"
- android:padding="16dp"
- android:layout_margin="16dp"
- android:layout_height="match_parent">
- <TextView
- android:layout_width="match_parent"
- android:layout_height="wrap_content"
- android:textStyle="bold"
- android:text="Login Page"
- android:textSize="25sp"
- android:textAlignment="center"
- android:textColor="@color/colorPrimary"/>
- <EditText
- android:layout_width="match_parent"
- android:layout_height="wrap_content"
- android:hint="Email"
- android:inputType="textEmailAddress"
- android:id="@+id/edt_email"/>
- <EditText
- android:layout_width="match_parent"
- android:layout_height="wrap_content"
- android:hint="Password"
- android:inputType="textPassword"
- android:id="@+id/edt_password"/>
- <LinearLayout
- android:orientation="horizontal"
- android:layout_width="match_parent"
- android:layout_height="wrap_content"
- android:weightSum="2">
- <Button
- android:layout_width="0dp"
- android:layout_height="wrap_content"
- android:layout_weight="1"
- android:hint="Login"
- android:id="@+id/btn_login"
- android:layout_marginTop="15dp"/>
- <Button
- android:layout_width="0dp"
- android:layout_height="wrap_content"
- android:layout_weight="1"
- android:hint="Register"
- android:id="@+id/btn_registeration"
- android:layout_marginTop="15dp"/>
- </LinearLayout>
- </LinearLayout>
Step 3 - Create Registration Layout
Add a new layout by going to Solution Explorer-> Project Name-> Resources-> Layout. Right click to add a new item, select layout, and give it the name activity_register.
Open this layout file and add the following code.
- <?xml version="1.0" encoding="utf-8"?>
- <LinearLayout xmlns:android="http://schemas.android.com/apk/res/android"
- xmlns:app="http://schemas.android.com/apk/res-auto"
- xmlns:tools="http://schemas.android.com/tools"
- android:layout_width="match_parent"
- android:orientation="vertical"
- android:background="@android:color/white"
- android:padding="16dp"
- android:layout_margin="16dp"
- android:layout_height="match_parent">
- <TextView
- android:layout_width="match_parent"
- android:layout_height="wrap_content"
- android:textStyle="bold"
- android:text="Register Page"
- android:textSize="25sp"
- android:textAlignment="center"
- android:textColor="@color/colorPrimary"/>
- <EditText
- android:layout_width="match_parent"
- android:layout_height="wrap_content"
- android:hint="First Name"
- android:inputType="text"
- android:id="@+id/edt_fname"/>
- <EditText
- android:layout_width="match_parent"
- android:layout_height="wrap_content"
- android:hint="Last Name"
- android:inputType="text"
- android:id="@+id/edt_lname"/>
- <EditText
- android:layout_width="match_parent"
- android:layout_height="wrap_content"
- android:hint="Mobile"
- android:inputType="text"
- android:id="@+id/edt_mobile"/>
- <EditText
- android:layout_width="match_parent"
- android:layout_height="wrap_content"
- android:hint="Email"
- android:inputType="textEmailAddress"
- android:id="@+id/edt_email"/>
- <EditText
- android:layout_width="match_parent"
- android:layout_height="wrap_content"
- android:hint="Password"
- android:inputType="textPassword"
- android:id="@+id/edt_password"/>
- <LinearLayout
- android:orientation="horizontal"
- android:layout_width="match_parent"
- android:layout_height="wrap_content"
- android:weightSum="2">
- <Button
- android:layout_width="0dp"
- android:layout_height="wrap_content"
- android:layout_weight="1"
- android:hint="Register"
- android:id="@+id/btn_register"
- android:layout_marginTop="15dp"/>
- <Button
- android:layout_width="0dp"
- android:layout_height="wrap_content"
- android:layout_weight="1"
- android:hint="Cancel"
- android:id="@+id/btn_cancel"
- android:layout_marginTop="15dp"/>
- </LinearLayout>
- </LinearLayout>
Step 4 - Create Dashboard Layout
Similarly add a new layout by going to Solution Explorer-> Project Name-> Resources-> Layout. Right click to add a new item, select layout, and give it the name activity_dashboard. Open this layout file and add the following code.
- <?xml version="1.0" encoding="utf-8"?>
- <LinearLayout xmlns:android="http://schemas.android.com/apk/res/android"
- android:orientation="vertical"
- android:layout_width="match_parent"
- android:layout_height="match_parent">
- <TextView
- android:layout_marginTop="20dp"
- android:layout_width="match_parent"
- android:layout_height="wrap_content"
- android:textStyle="bold"
- android:text="Welcome To Dashboard"
- android:textSize="25sp"
- android:textAlignment="center"
- android:textColor="@color/colorPrimary"/>
- <Button
- android:layout_marginLeft="120dp"
- android:layout_width="wrap_content"
- android:layout_height="wrap_content"
- android:hint="Back To Home"
- android:id="@+id/btn_cancel"
- android:layout_marginTop="30dp"/>
- </LinearLayout>
Step 5 - Create User Model Class
Add a new class to your project with the name User.cs. Add the following properties to getter and setter with an appropriate namespace.
- public class User
- {
- public string FirstName { get; set; }
- public string LastName { get; set; }
- public string Email { get; set; }
- public string Password { get; set; }
- public string Mobile { get; set; }
- }
Step 6 - Create Register Activity
Add a new Activity. For this, open Solution Explorer-> Project Name-> right click to add a new item and select Activity. Give it a name like RegisterActivity and add the following code, using the appropriate namespaces.
(FileName: RegisterActivity)
- using System;
- using System.Collections.Generic;
- using System.Linq;
- using System.Text;
- using Android.App;
- using Android.Content;
- using Android.OS;
- using Android.Runtime;
- using Android.Views;
- using Android.Widget;
- using XamarinAuth.API;
- using XamarinAuth.Model;
- using Refit;
- namespace XamarinAuth.Activities
- {
- [Activity(Label = "RegisterActivity")]
- public class RegisterActivity : Activity
- {
- IAPI _aPI;
- Button btn_register, btn_cancel;
- EditText edt_Email, edt_Password, edt_fname, edt_lname, edt_mobile;
- protected override void OnCreate(Bundle savedInstanceState)
- {
- base.OnCreate(savedInstanceState);
- SetContentView(Resource.Layout.activity_register);
- // Create your application here
- _aPI = RestService.For<IAPI>("http://10.0.2.2:3000");
- var connection = new RestAPI(this, _aPI);
- btn_register = FindViewById<Button>(Resource.Id.btn_register);
- btn_cancel= FindViewById<Button>(Resource.Id.btn_cancel);
- edt_lname = FindViewById<EditText>(Resource.Id.edt_lname);
- edt_mobile = FindViewById<EditText>(Resource.Id.edt_mobile);
- edt_fname = FindViewById<EditText>(Resource.Id.edt_fname);
- edt_Email = FindViewById<EditText>(Resource.Id.edt_email);
- edt_Password = FindViewById<EditText>(Resource.Id.edt_password);
- btn_cancel.Click += delegate { StartActivity(typeof(MainActivity)); };
- btn_register.Click += async delegate
- {
- var user = new User
- {
- FirstName = edt_fname.Text.ToString(),
- LastName = edt_lname.Text.ToString(),
- Mobile = edt_mobile.Text.ToString(),
- Email = edt_Email.Text.ToString(),
- Password = edt_Password.Text.ToString(),
- };
- var result = await connection.RegisterUserAsync(user);
- if(result == true)
- {
- StartActivity(typeof(MainActivity));
- }
- };
- }
- }
- }
Step 7 - Create Dashboard Activity
Add a new Activity. For this, open Solution Explorer-> Project Name-> right click to add a new item and select Activity. Give it a name like DashboardActivity and add the following code, using the appropriate namespaces.
(FileName: DashboardActivity)
- using Android.App;
- using Android.OS;
- using Android.Widget;
- namespace XamarinAuth.Activities
- {
- [Activity(Label = "DashboardActivity")]
- public class DashboardActivity : Activity
- {
- Button btn_backToHome;
- protected override void OnCreate(Bundle savedInstanceState)
- {
- base.OnCreate(savedInstanceState);
- SetContentView(Resource.Layout.activity_dashboard);
- // Create your application here
- btn_backToHome = FindViewById<Button>(Resource.Id.btn_cancel);
- btn_backToHome.Click += delegate
- {
- StartActivity(typeof(MainActivity));
- };
- }
- }
- }
Step 8 - Add API Interface
Before you go further, you need to write your IAPI class with all the getter and setter methods. For this, go to Solution Explorer-> Project Name and right-click. Select Add -> New Item-> Class. Give it a name like IAPI.cs and write the following code.
(File Name: IAPI.cs)
- using Refit;
- using System.Collections.Generic;
- using System.Threading.Tasks;
- namespace XamarinAuth.API
- {
- public interface IAPI
- {
- [Post("/login")]
- Task<string> SignIn([Body(BodySerializationMethod.UrlEncoded)] Dictionary<string, object> data);
- [Post("/register")]
- Task<string> SignUp([Body(BodySerializationMethod.UrlEncoded)] Dictionary<string, object> data);
- }
- }
Step 9 - Add RestAPI Class
Before you go further, you need to write your RestAPI class with all the getter and setter methods. For this, go to Solution Explorer-> Project Name and right-click. Select Add -> New Item-> Class. Give it a name like RestAPI.cs and write the following code.
(File Name: RestAPI.cs)
- using Android.Content;
- using Android.Widget;
- using XamarinAuth.Model;
- using System;
- using System.Collections.Generic;
- using System.Threading.Tasks;
- namespace XamarinAuth.API
- {
- public class RestAPI
- {
- IAPI _aPI;
- Context _context;
- public RestAPI(Context context, IAPI aPI)
- {
- _aPI = aPI;
- _context = context;
- }
- public async Task<bool> RegisterUserAsync(User user)
- {
- if (String.IsNullOrEmpty(user.FirstName))
- {
- Toast.MakeText(_context, "FirstName can not be null or empty!", ToastLength.Short).Show();
- return false;
- }
- if (String.IsNullOrEmpty(user.LastName))
- {
- Toast.MakeText(_context, "LastName can not be null or empty!", ToastLength.Short).Show();
- return false;
- }
- if (String.IsNullOrEmpty(user.Email))
- {
- Toast.MakeText(_context, "Email can not be null or empty!", ToastLength.Short).Show();
- return false;
- }
- if (String.IsNullOrEmpty(user.Mobile))
- {
- Toast.MakeText(_context, "Mobile Number can not be null or empty!", ToastLength.Short).Show();
- return false;
- }
- if (String.IsNullOrEmpty(user.Password))
- {
- Toast.MakeText(_context, "Password can not be null or empty!", ToastLength.Short).Show();
- return false;
- }
- Dictionary<string, object> data = new Dictionary<string, object>();
- data.Add("firstname", user.FirstName);
- data.Add("lastname", user.LastName);
- data.Add("email", user.Email);
- data.Add("mobile", user.Mobile);
- data.Add("password", user.Password);
- var result = await _aPI.SignUp(data);
- Toast.MakeText(_context, result, ToastLength.Short).Show();
- return true;
- }
- public async Task<bool> SignInUserAsync(User user)
- {
- if (String.IsNullOrEmpty(user.Email))
- {
- Toast.MakeText(_context, "Email can not be null or empty!", ToastLength.Short).Show();
- return false;
- }
- if (String.IsNullOrEmpty(user.Password))
- {
- Toast.MakeText(_context, "Password can not be null or empty!", ToastLength.Short).Show();
- return false;
- }
- Dictionary<string, object> data = new Dictionary<string, object>();
- data.Add("email", user.Email);
- data.Add("password", user.Password);
- var result = await _aPI.SignIn(data);
- Toast.MakeText(_context, result, ToastLength.Short).Show();
- return true;
- }
- }
- }
Step 10 - Main Activity Class
Now, go to Solution Explorer-> Project Name-> MainActivity and add the following code to main activity with appropriate namespaces.
(FileName: MainActivity)
- using Android.App;
- using Android.OS;
- using Android.Runtime;
- using Android.Support.V7.App;
- using Android.Widget;
- using XamarinAuth.Activities;
- using XamarinAuth.API;
- using XamarinAuth.Model;
- using Refit;
- namespace XamarinAuth
- {
- [Activity(Label = "@string/app_name", Theme = "@style/AppTheme", MainLauncher = true)]
- public class MainActivity : AppCompatActivity
- {
- IAPI _aPI;
- RestAPI _restApi;
- Button btn_Signin, btn_registeration;
- EditText edt_Email, edt_Password;
- protected override void OnCreate(Bundle savedInstanceState)
- {
- base.OnCreate(savedInstanceState);
- Xamarin.Essentials.Platform.Init(this, savedInstanceState);
- // Set our view from the "main" layout resource
- SetContentView(Resource.Layout.activity_main);
- _aPI = RestService.For<IAPI>("http://10.0.2.2:3000");
- var connection = new RestAPI(this, _aPI);
- btn_registeration = FindViewById<Button>(Resource.Id.btn_registeration);
- btn_Signin = FindViewById<Button>(Resource.Id.btn_login);
- edt_Email = FindViewById<EditText>(Resource.Id.edt_email);
- edt_Password = FindViewById<EditText>(Resource.Id.edt_password);
- btn_Signin.Click += async delegate
- {
- var user = new User
- {
- Email = edt_Email.Text.ToString(),
- Password = edt_Password.Text.ToString()
- };
- var result = await connection.SignInUserAsync(user);
- if(result == true)
- {
- StartActivity(typeof(DashboardActivity));
- }
- };
- btn_registeration.Click += delegate
- {
- StartActivity(typeof(RegisterActivity));
- };
- }
- public override void OnRequestPermissionsResult(int requestCode, string[] permissions, [GeneratedEnum] Android.Content.PM.Permission[] grantResults)
- {
- Xamarin.Essentials.Platform.OnRequestPermissionsResult(requestCode, permissions, grantResults);
- base.OnRequestPermissionsResult(requestCode, permissions, grantResults);
- }
- }
- }
Step 11 - Permissions From Device
We need permission from the device because we can use the device’s INTERNET. Please add internet permission to your AndroidManifest.xml. Let's open Solution Explorer-> Properties-> AndroidManifest and let's add the code inside application tags.
- <uses-permission android:name="android.permission.ACCESS_NETWORK_STATE" />
- <uses-permission android:name="android.permission.INTERNET" />

User Login Testing

User Register Testing
Join the conversation! Your thoughts help the community grow.