

Step 1: Open Visual Studio->New Project->Templates->Visual C#->Android->Blank App.
Select Blank App. Then, give Project Name and Project Location.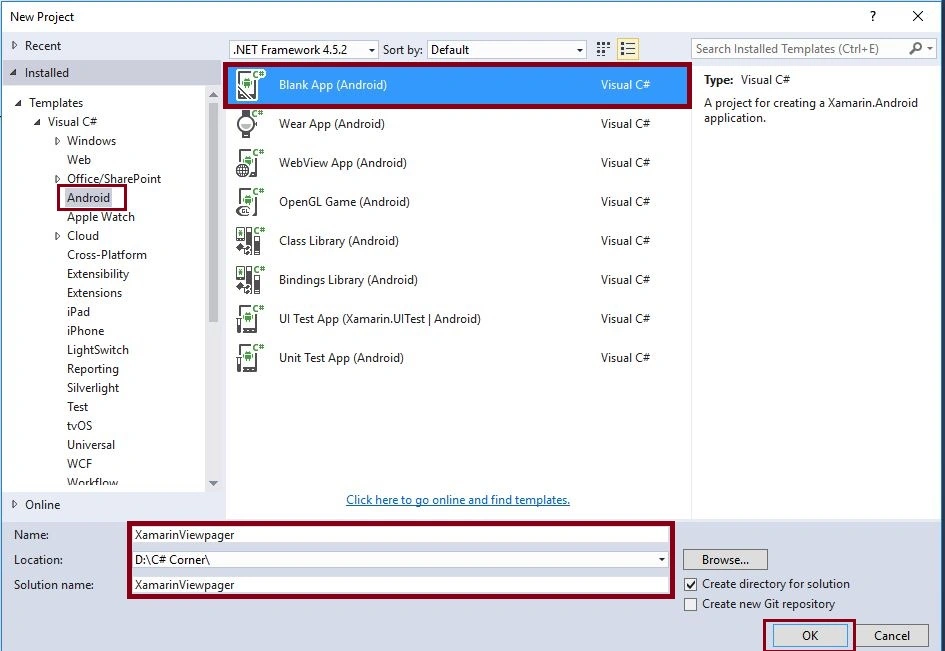
Step 2
Next, go to Solution Explorer-> Project Name-> Components and right click to get More Components. Open a new dialog box. Use this dialog box to search the Support v4. Then, add the Android Support Library v4 packages.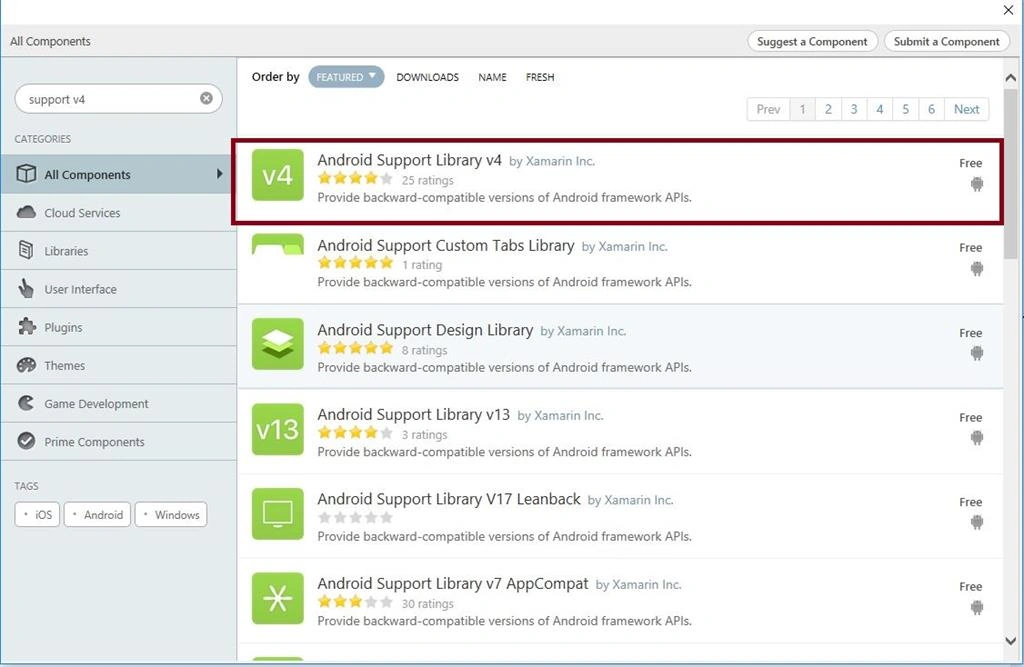
Step 3
Next, go to Solution Explorer-> Project Name-> Components. Right click to get more components and open a new dialog box. In this dialog box, search the Support v7. Then, add the Android Support v7 AppCompat packages.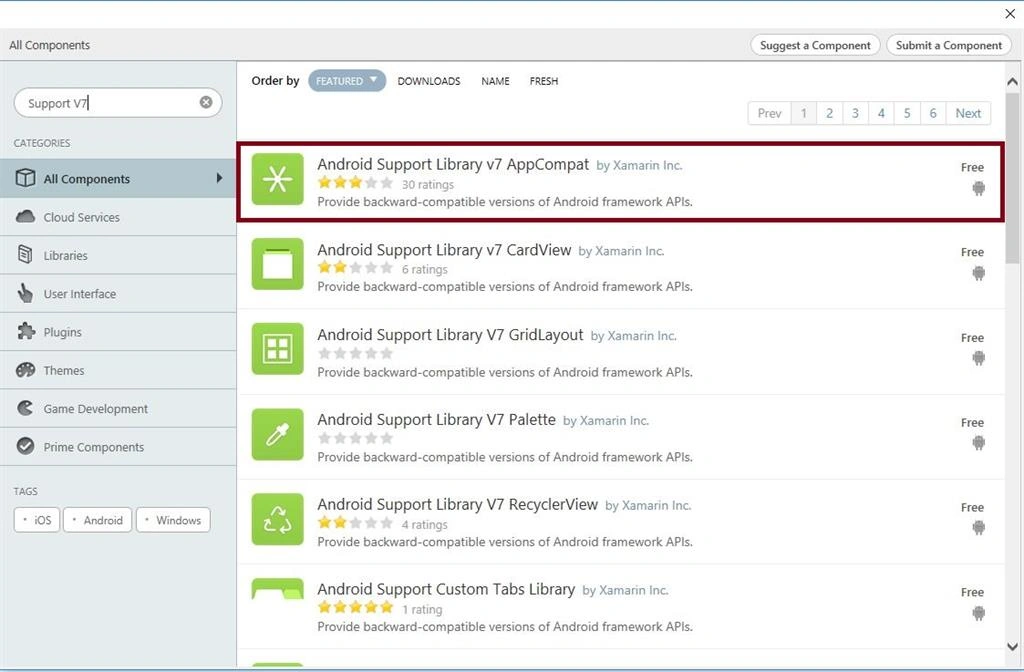
Step 4
Next, go to Solution Explorer-> Project Name-> Components. Right click to get more components and open a new dialog box. In this dialog box, search for the Design. Then, add the Android Support Design Library packages.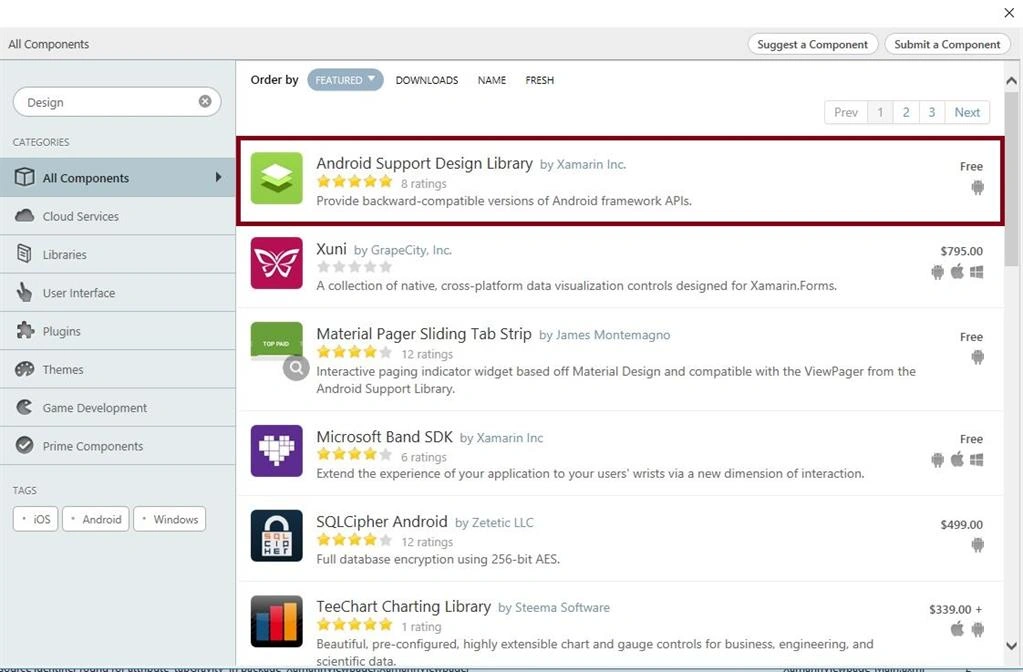
Step 5
Before starting the Design View, it needs Theme.AppCompat.Light.NoActionBar. So, we create style.xml file. Go to Solution Explorer-> Project Name->Resources->values. Right click to Add->New Item and then, open a new dialog box. Then, select xml file and name it as styles.xml.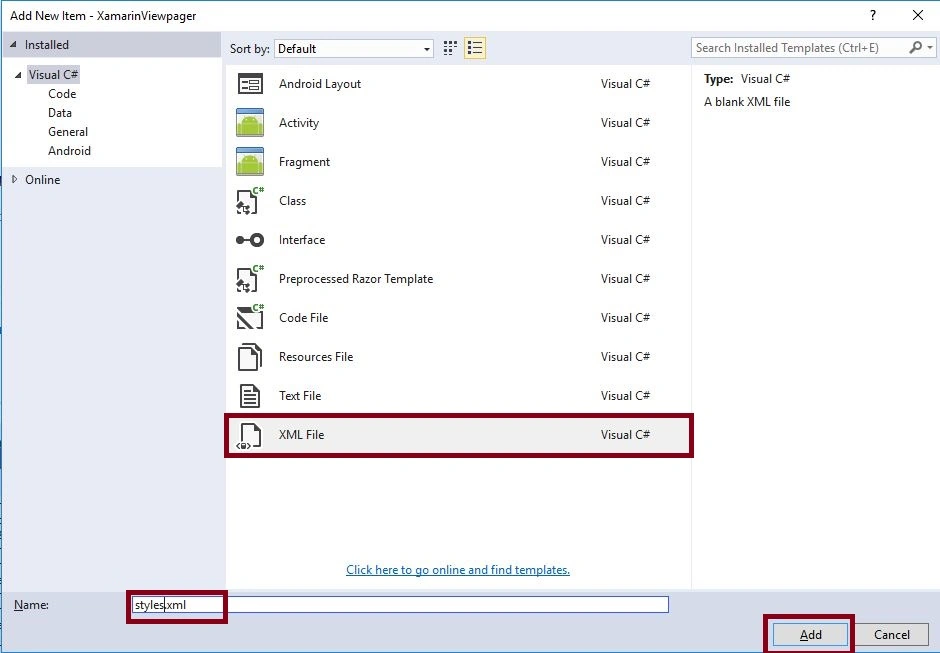
Step 6
Next, we need to create color.xml file. Go to Solution Explorer-> Project Name->Resources->values. Right click to Add->New Item. Then, open a new dialog box. Selet an xml file and name it as colors.xml.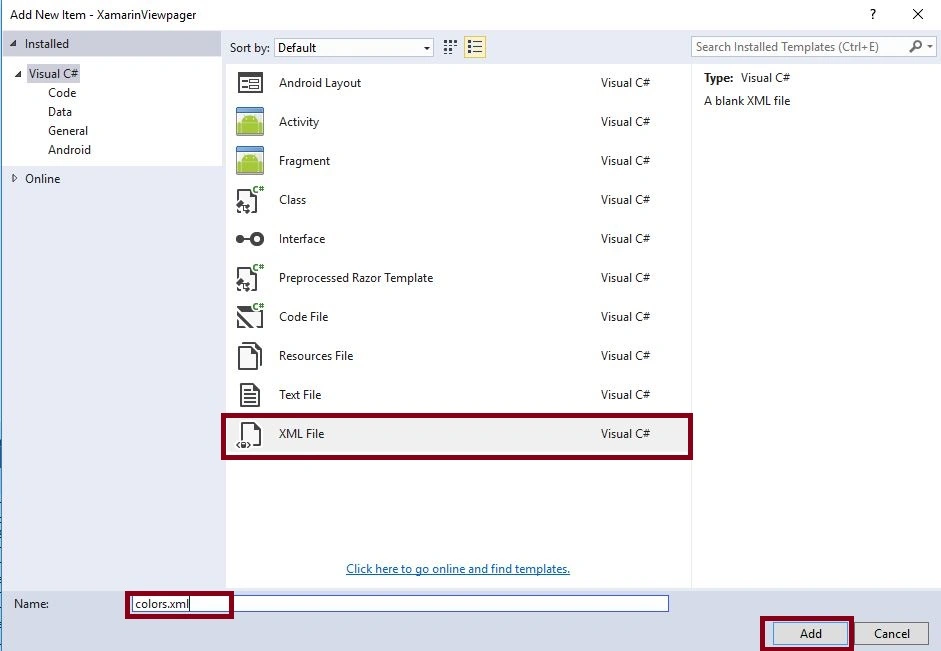
Step 7
Now, open Solution Explorer-> Project Name->Resources->values->colors.xml. Click to open the Design View and give the following code:
- <?xml version="1.0" encoding="utf-8" ?>
- <resources>
- <color name="ColorPrimary">#2196F3</color>
- <color name="ColorPrimaryDark">#1976D2</color>
- </resources>
Step 8
Next, open Solution Explorer-> Project Name->Resources->values->styles.xml. Click to open Design View and paste the following code:
- <?xml version="1.0" encoding="utf-8" ?>
- <resources>
- <style name="Theme.DesignDemo" parent="Base.Theme.DesignDemo">
- </style>
- <style name="Base.Theme.DesignDemo" parent="Theme.AppCompat.Light.NoActionBar">
- <item name="colorPrimary">@color/ColorPrimary</item> <item name="colorPrimaryDark">@color/ColorPrimaryDark</item>
- </style>
- <style name="MyCustomTabLayout" parent="Widget.Design.TabLayout">
- <item name="tabTextColor">#707070</item> <item name="tabSelectedTextColor">#00A859</item> <item name="tabIndicatorColor">#00A859</item> <item name="android:textStyle">bold</item> <item name="tabTextAppearance">@style/TextAppearance.AppCompat.Subhead.Inverse</item>
- </style>
- </resources>
Here, the name for MyCustomTabLayout is showing TabLayout in Design view.
Step 9
Again, open Solution Explorer-> Project Name->Resources->layout ->Main.axml. Click to open the Design View and give the following code:
- <?xml version="1.0" encoding="utf-8"?>
- <android.support.design.widget.CoordinatorLayout
- xmlns:android="http://schemas.android.com/apk/res/android"
- xmlns:app="http://schemas.android.com/apk/res-auto"
- android:id="@+id/main_content"
- android:layout_width="match_parent"
- android:layout_height="match_parent">
- <android.support.design.widget.AppBarLayout
- android:id="@+id/appbar"
- android:layout_width="match_parent"
- android:layout_height="wrap_content"
- android:theme="@style/ThemeOverlay.AppCompat.Dark.ActionBar">
- <android.support.v7.widget.Toolbar
- android:id="@+id/toolbar"
- android:layout_width="match_parent"
- android:layout_height="?attr/actionBarSize"
- android:background="#33B86C"
- app:popupTheme="@style/ThemeOverlay.AppCompat.Light" />
- <android.support.design.widget.TabLayout
- android:id="@+id/tabs"
- android:layout_width="match_parent"
- app:tabGravity="fill"
- app:tabMode="fixed"
- app:tabIndicatorHeight="4dp"
- android:background="#FEFEFE"
- style="@style/MyCustomTabLayout"
- android:layout_height="wrap_content" />
- </android.support.design.widget.AppBarLayout>
- <android.support.v4.view.ViewPager
- android:id="@+id/viewpager"
- android:layout_width="match_parent"
- android:layout_height="match_parent"
- app:layout_behavior="@string/appbar_scrolling_view_behavior" />
- <android.support.design.widget.FloatingActionButton
- android:id="@+id/fab"
- android:layout_width="wrap_content"
- android:layout_height="wrap_content"
- android:layout_gravity="end|bottom"
- android:layout_margin="15dp"
- android:src="@drawable/ic_done" />
- </android.support.design.widget.CoordinatorLayout>
Step 10: After Design view creation open Solution Explorer-> Project Name->MainActivity.cs then following below steps.
Step 11: Add below Namespaces,
- using Android.Support.V4.View;
- using Android.Support.V7.App;
- using Android.Support.Design.Widget;
- using V4Fragment = Android.Support.V4.App.Fragment;
- using V4FragmentManager = Android.Support.V4.App.FragmentManager;
- using System.Collections.Generic;
- using V7Toolbar = Android.Support.V7.Widget.Toolbar;
Step 12
Now, we need to create ViewPager variable and declare the viewpager within the OnCreate(). Before it, we need to change the Activity in AppCompatActivity.
- //SupportActionBar
- SetSupportActionBar(toolbar);
- SupportActionBar.SetIcon(Resource.Drawable.Icon);
- //ViewPager
- viewpager = FindViewById < Android.Support.V4.View.ViewPager > (Resource.Id.viewpager);
- var toolbar = FindViewById < V7Toolbar > (Resource.Id.toolbar);
- setupViewPager(viewpager); //Calling SetupViewPager Method
- //TabLayout
- var tabLayout = FindViewById < TabLayout > (Resource.Id.tabs);
- tabLayout.SetupWithViewPager(viewpager);
- //FloatingActionButton
- var fab = FindViewById < FloatingActionButton > (Resource.Id.fab);
- fab.Click += (sender, e) => {
- Snackbar.Make(fab, "Here's a snackbar!", Snackbar.LengthLong).SetAction("Action", v => Console.WriteLine("Action handler")).Show();
- };
Step 13: Next step is to create setupViewPager() method. We need to create some fragment page. So, we create fragment class and two axml design pages.
Step 14
Go to Solution Explorer-> Project Name->Resources->layout. Right click to Add->New Item and then, open a new dialog box. Then, select Android Layout and name it as Tablayout1.axml.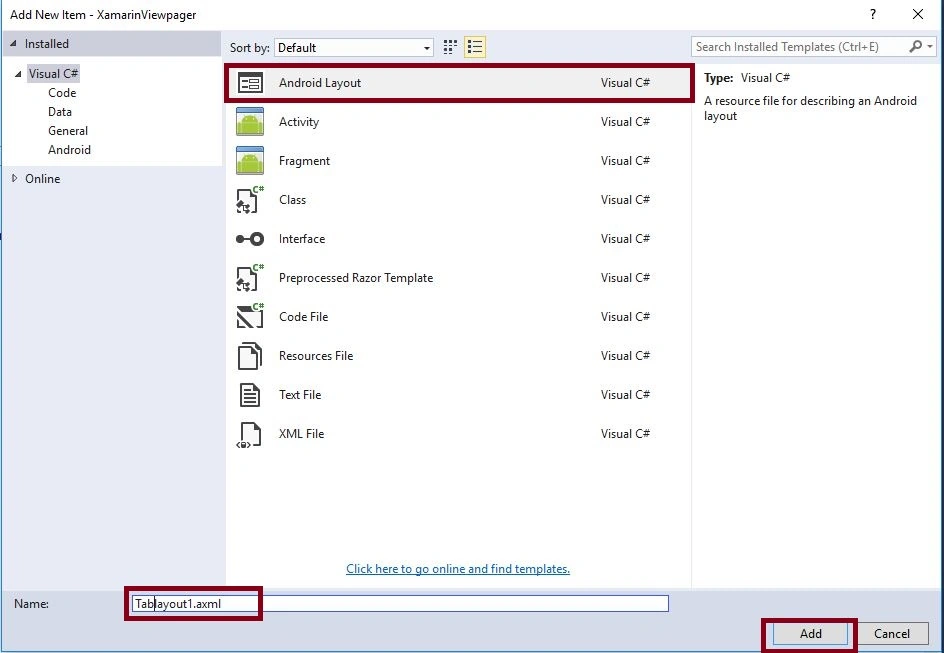
Step 15
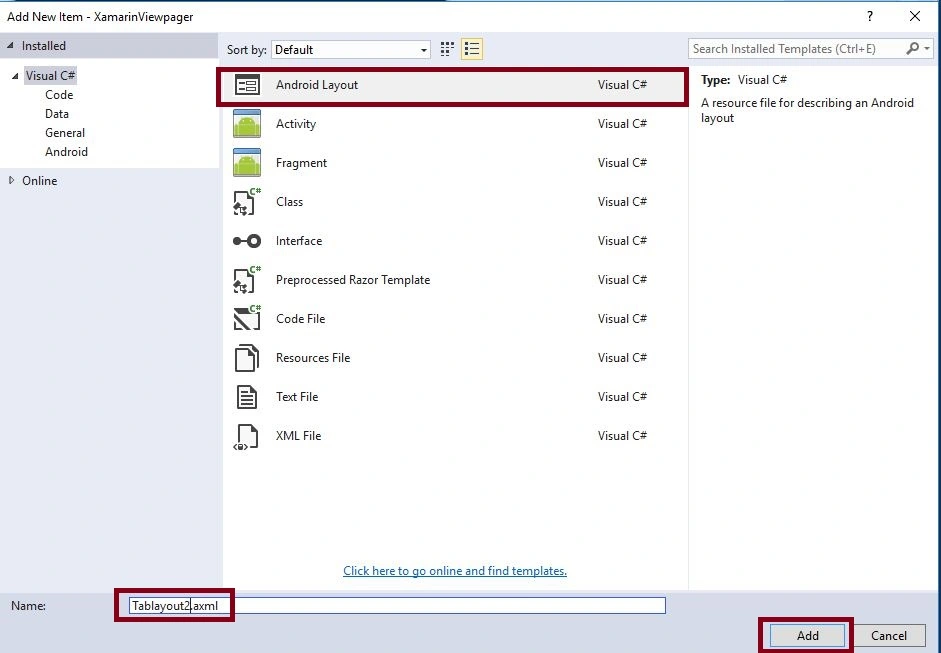
Go to Solution Explorer-> Project Name->Resources->layout. Right click to Add->New Item and open a new dialog box. Then, select Android Layout and give it a name as Tablayout2.axml.
Step 16
Go to Solution Explorer-> Project Name. Right click to Add->New Item and then, open a new dialog box. Then, select Fragment and name it as TabFragment1.cs.
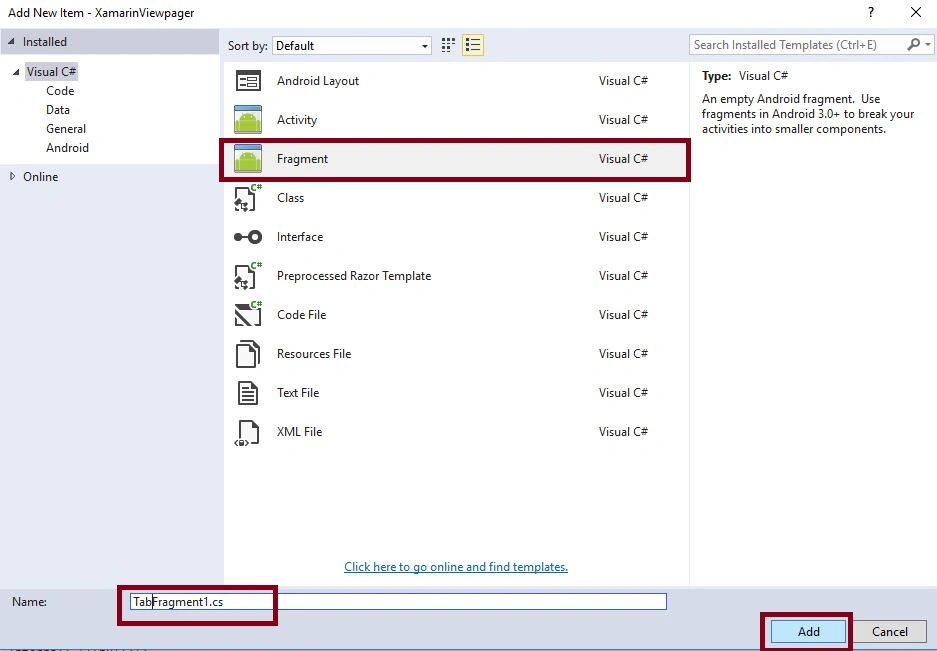
Step 17
Go to Solution Explorer-> Project Name. Right click to Add->New Item and open a new dialog box. Then, select Fragment and give it a name as TabFragment2.cs.
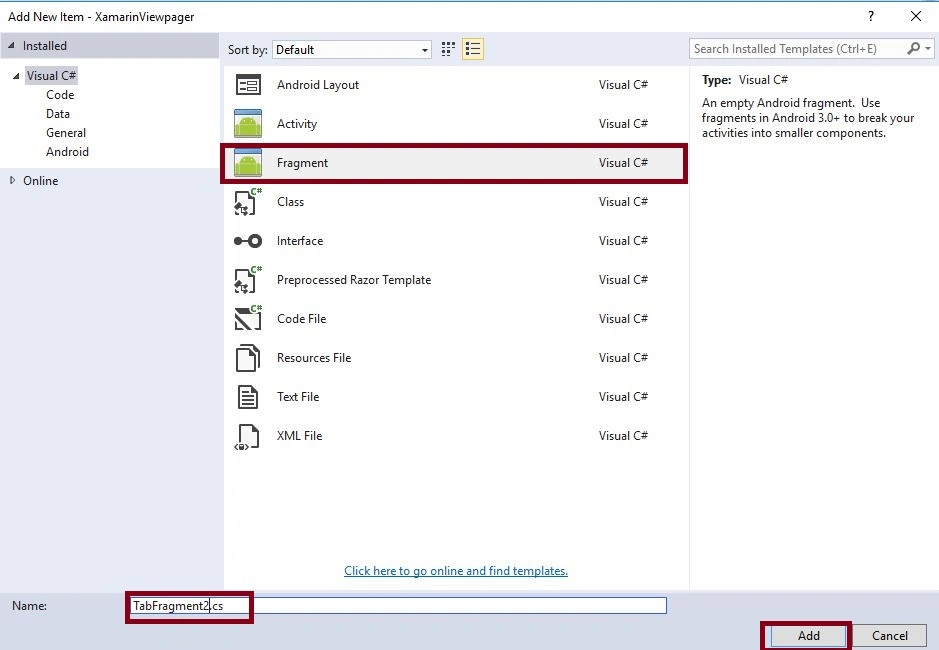
Step 18
Now, open Solution Explorer-> Project Name->Resources->layout ->Tablayout1.axml. Click on open Design View and use following code.
- <TextView
- android:text="First Page"
- android:textAppearance="?android:attr/textAppearanceLarge"
- android:layout_width="match_parent"
- android:layout_height="wrap_content"
- android:id="@+id/textView1" />
Step 19
Next, open Solution Explorer-> Project Name->Resources->layout ->Tablayout2.axml. Click to open Design View and paste the following code:
- <TextView
- android:text="Second Page"
- android:textAppearance="?android:attr/textAppearanceLarge"
- android:layout_width="match_parent"
- android:layout_height="wrap_content"
- android:id="@+id/textView1" />
Step 20
After the creation of Design View, we need to open Solution Explorer-> Project Name->TabFragment1.cs. Then, create View and Change Fragment to Fragment,
- public override View OnCreateView(LayoutInflater inflater, ViewGroup container, Bundle savedInstanceState)
- {
- var v = inflater.Inflate(Resource.Layout.Tablayout1, container, false);
- return v;
- }
Step 21: Next, open Solution Explorer-> Project Name->TabFragment2.cs. Then, create View and Change Fragment to Fragment,
- public override View OnCreateView(LayoutInflater inflater, ViewGroup container, Bundle savedInstanceState)
- {
- var v = inflater.Inflate(Resource.Layout.Tablayout2, container, false);
- return v;
- }
Step 22: Again, we need to open the MainActivity.cs to create SetupViewpager() after OnCreaete().
- void setupViewPager(Android.Support.V4.View.ViewPager viewPager)
- {
- var adapter = new Adapter(SupportFragmentManager);
- adapter.AddFragment(new TabFragment1(), "First Fragment");
- adapter.AddFragment(new TabFragment2(), "Second Fragment");
- viewPager.Adapter = adapter;
- viewpager.Adapter.NotifyDataSetChanged();
- }
Here, we use SupportFragmentManager to create New Adapter Class below the setupViewPager.
Adpater Class
- class Adapter: Android.Support.V4.App.FragmentPagerAdapter {
- List < V4Fragment > fragments = new List < V4Fragment > ();
- List < string > fragmentTitles = new List < string > ();
- public Adapter(V4FragmentManager fm): base(fm) {}
- public void AddFragment(V4Fragment fragment, String title) {
- fragments.Add(fragment);
- fragmentTitles.Add(title);
- }
- public override V4Fragment GetItem(int position) {
- return fragments[position];
- }
- public override int Count {
- get {
- return fragments.Count;
- }
- }
- public override Java.Lang.ICharSequence GetPageTitleFormatted(int position) {
- return new Java.Lang.String(fragmentTitles[position]);
- }
- }
Step 23: Press F5 or Build and Run the Application.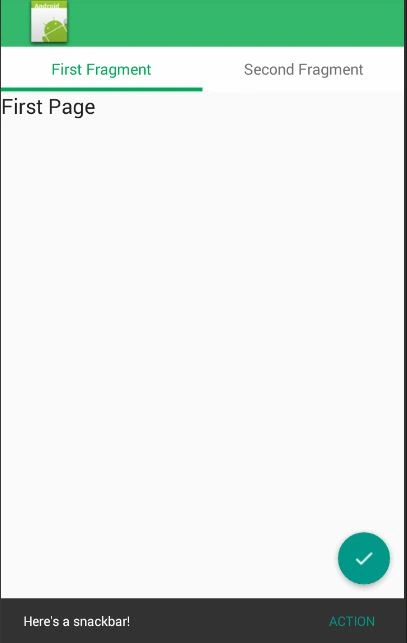
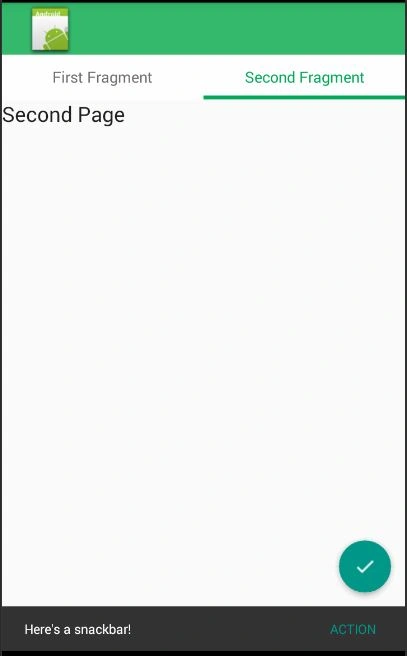
Finally, we have successfully created the Xamarin Android Viewpager, Tablayout, FloactionAction, SupportActionBar using XamarinAndroidSupportDesign.
Sunilkumar MandatiPosted Sep 8, 2019, 11:16 PM
Thanks for the article. This helps me a lot. Keep up the good work.
Thamaraiselvan TPosted Apr 17, 2018, 1:22 AM
Is it possible to load content into each tabs whenever clicks or swipes on tabs?
Thamaraiselvan TPosted Apr 7, 2018, 2:19 AM
Hi, I followed the steps as u mentioned. But when I run the application, it shows object null reference error for viewpager. At the line, 'viewpager.Adapter = adapter;'. It seems viewpager is null. I checked out the layout page and there is an id 'viewpager'. I don't know why that viewpager is null. I need help for this.
Faris RjoubPosted Jan 4, 2018, 5:01 PM
Thanks for your article . i did it exactly step by step . its works fine.
Raichand RayPosted Dec 15, 2017, 6:45 AM
Hi,Please look at this tutorial using Android studio https://raichand-java.blogspot.in/2017/12/createretrieveupdate-and-delete-row-in.html
Vaibhav PatilPosted Jul 27, 2017, 7:02 AM
Please post article on ListFragment with custom row/control
Vaibhav PatilPosted Jul 27, 2017, 6:43 AM
Very Helpfull............
Shawn DaiseyPosted Apr 29, 2017, 5:48 PM
So I took the .dll XamarinVeiwpager and added it to my references from you code zip. Now the code example works fine.
Shawn DaiseyPosted Apr 13, 2017, 3:49 AM
I followed your steps above exactly but could not get the code to compile there was an error. I download your code and it compiled and ran perfectly. The difference between the two is one line that is using XamarinViewpager.Fragments; In the code above it is not listed. In the code that is downloaded it is listed it is used in the namespaces so adapter.AddFragment(new TabFragment1(), "First Fragment"); adapter.AddFragment(new TabFragment2(), "Second Fragment"); work otherwise they are listed as errors without using XamarinViewpager.Fragments; I was wonder why it is not listed above.
Shawn DaiseyPosted Apr 11, 2017, 7:10 PM
Could not get my example to work then I noticed in your download code you have a line added that you do not in the example above. using XamarinViewpager.Fragments; that is need for tabfragments part of the code. Step 22 lines 4 and 5. is that your personal .dll or one I can get and can add?
Anbu ManiPosted Jul 11, 2016, 12:57 PM
Thanks
Vignesh ManiPosted Jul 11, 2016, 12:36 PM
Nice
Anu VPosted Jul 11, 2016, 12:24 AM
Nice share