

Introduction:
In this article, we will talk about how to create a text entry widget that provides auto-complete suggestions using AutoCompleteTextView in Xamarin Android. So, let`s get started.
Steps:
- To get started, open Visual Studio and select File, then Project option. It will open up a new project dialog box as shown below (F: 1),
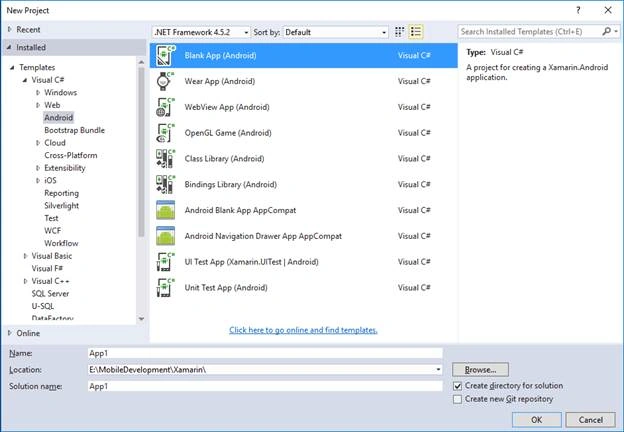
- Select the Blank App (Android) project template and enter the name of the project as AutoCompleteApp and click on OK button. After clicking on Ok button, a blank Xamarin Android application will be created. In this application, we will create an UI in which a user types a technology name, he will get the suggestions for it.
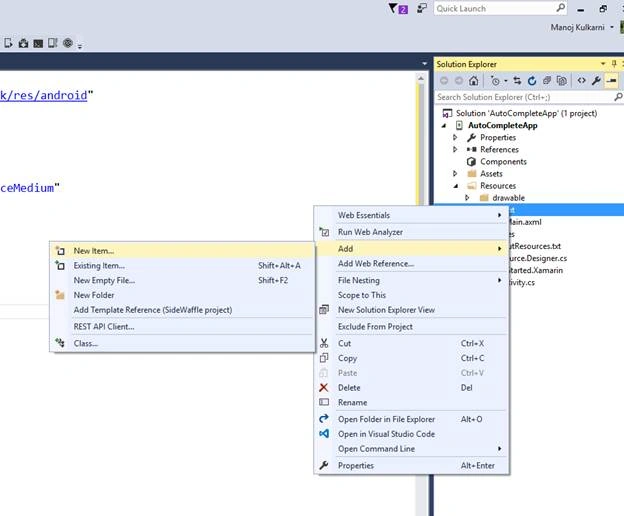
- Let`s add a new XML file in Resources\Layout folder. To add XML file, right click on Resources\Layout folder and select Add, then New Item option as shown below (F:2)
It will open a dialog. Select the XML File item template and give it a name ListItem.xml as shown below (F: 3).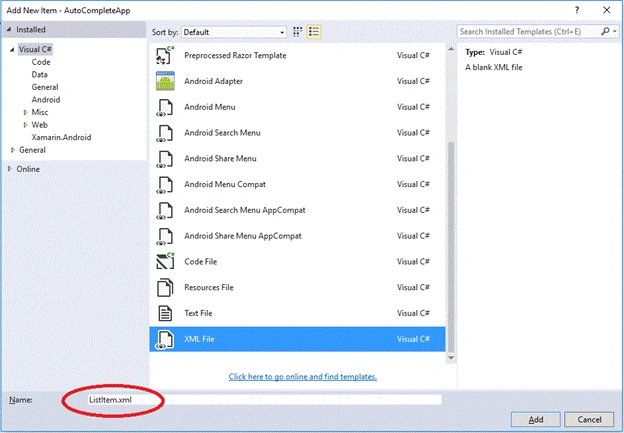
- Add the following code in our ListItem.xml file.
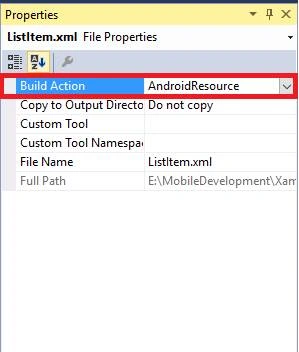
The above TextView will be used for each item that appears in the list of suggestions. We need to set the build action for this XML file as an Android Resource. To set the build action for this XML file, right click on file and select Properties option. It will open up Properties Window as shown below (F: 4). Here, we can set the Build Action of our XML file to Android Resource.- <? xml version="1.0" encoding="utf-8" ?>
- <TextView xmlns:android="http://schemas.android.com/apk/res/android"
- android:layout_width="fill_parent"
- android:layout_height="fill_parent"
- android:padding="10dp"
- android:textSize="16sp">
- </TextView>
- Open the Main.axml file (F: 5),
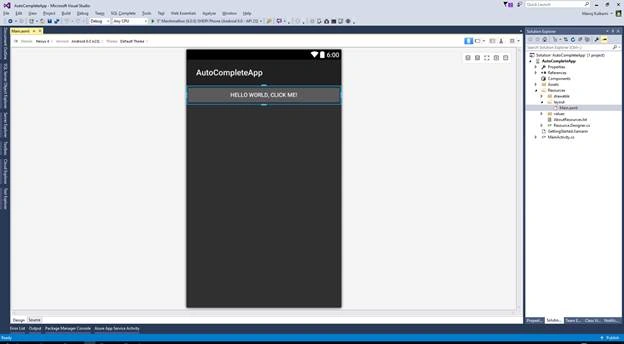
- Delete the default Hello World, Click Me! Button. Go to the source view of Main.axml by clicking on Source View tab as shown below (F: 6)
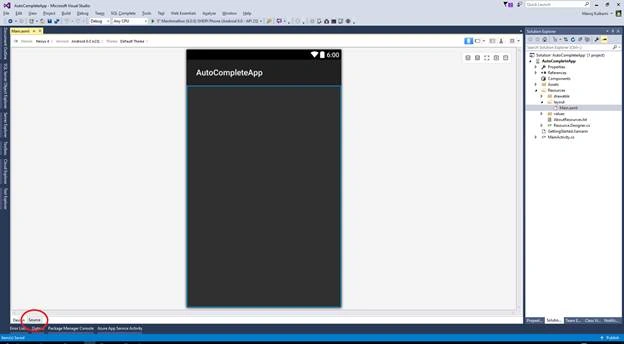
- Add the following code in Main.axml file.
In our Main.axml file, we have added a TextView and an AutoCompleteTextView widget. (We can also drag and drop these controls from Toolbox window on Design View).- <? xml version="1.0" encoding="utf-8"?>
- <LinearLayout xmlns:android="http://schemas.android.com/apk/res/android"
- android:orientation="vertical"
- android:layout_width="fill_parent"
- android:layout_height="fill_parent">
- <TextView
- android:text="Technology"
- android:textAppearance="?android:attr/textAppearanceMedium"
- android:layout_width="match_parent"
- android:layout_height="wrap_content"
- android:id="@+id/textView1"
- android:layout_margin="20dp" />
- <AutoCompleteTextView
- android:layout_width="match_parent"
- android:layout_height="wrap_content"
- android:id="@+id/autoCompleteTextView"
- android:layout_margin="20dp" />
- </LinearLayout>
- Now let`s go to MainActivity.cs file. Default content for MainActivity.cs file is as shown below.
Delete the button, button click event handler and count variable which is declared at the top.- namespace AutoCompleteApp
- {
- [Activity(Label = "AutoCompleteApp", MainLauncher = true, Icon = "@drawable/icon")]
- public class MainActivity: Activity
- {
- int count = 1;
- protected override void OnCreate(Bundle bundle)
- {
- base.OnCreate(bundle);
- // Set our view from the "main" layout resource
- SetContentView(Resource.Layout.Main);
- // Get our button from the layout resource,
- // and attach an event to it
- Button button = FindViewById < Button > (Resource.Id.MyButton);
- button.Click += delegate
- {
- button.Text = string.Format("{0} clicks!", count++);
- };
- }
- }
- }
- Add the following code in our MainActivity.cs file.
Now let`s go through the code.- using Android.App;
- using Android.Widget;
- using Android.OS;
- namespace AutoCompleteApp
- {
- [Activity(Label = "Technologies", MainLauncher = true, Icon = "@drawable/icon")]
- public class MainActivity: Activity
- {
- protected override void OnCreate(Bundle bundle)
- {
- base.OnCreate(bundle);
- // Set our view from the "main" layout resource
- SetContentView(Resource.Layout.Main);
- string[] technologies =
- {
- "Android",
- "ASP.NET MVC",
- "ASP.NET Core",
- "Azure",
- "Angular JS",
- "Big Data",
- "Database",
- "HTML5",
- "Internet of Things",
- "Machine Learning",
- "SQL Server",
- "Xamarin"
- };
- var autoCompleteTextView = FindViewById < AutoCompleteTextView > (Resource.Id.autoCompleteTextView);
- var adapter = new ArrayAdapter < string > (this, Resource.Layout.ListItem, technologies);
- autoCompleteTextView.Adapter = adapter;
- }
- }
- }
a. We have created a list of strings, called technologies, which will be used for providing the suggestions.
b. We captured the reference to our AutoCompleteTextView widget.
c. A new array adapter is created. This array adapter is initialized with our ListItem layout which we have created in step 3 along with the technologies string array which will be used for providing the suggestions.
d. Last step is we need to set this adapter to our AutoCompleteTextView Adapter property.
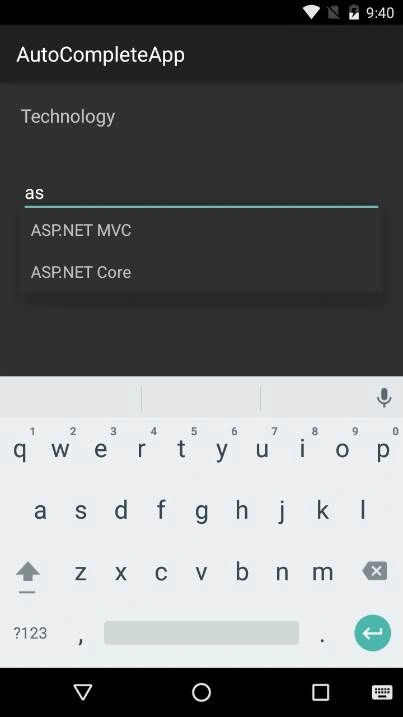
- Now run the application and when we type something, we should get some suggestions as shown below (F: 7)
Conclusion:
In this article, we talked about how to create a text entry widget that provides auto-complete suggestions using AutoCompleteTextView widget in Xamarin Android. I hope you enjoyed reading the article.
Reference : Xamarin Documentation
Davronbek UmirovPosted Jun 9, 2016, 2:58 AM
Good sharing..
Kuppurasu NagarajPosted May 9, 2016, 12:01 PM
Nice Sharing..
Debasis SahaPosted May 9, 2016, 8:42 AM
Good One..
Thiruppathi RPosted May 8, 2016, 3:22 PM
Nice
Neeraj KumarPosted May 8, 2016, 3:21 PM
Good..
Bhuvanesh MohankumarPosted May 8, 2016, 2:17 PM
Nice explanation with screen shot
Anbu ManiPosted May 8, 2016, 5:14 AM
Nice one