

Introduction
Cloud computing (Cloud computing) has several advantages including using it for setting up databases in the cloud to offer Database-as-a-Service (DBaaS) and has several advantages over normal databases that we use in our applications. The databases that come with the application will have smaller boundaries since they are application-specific and cannot be changed centrally to reflect the changes in all apps that consume these databases. Client apps require internet to access the cloud database.
The mobile app platform named Parse (https://parse.com/) provides all facilities required for your mobile apps including analytics, DBaaS (Database), push notification and so on. 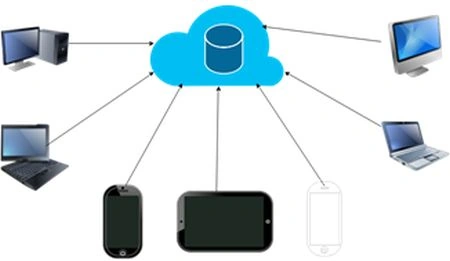
Figure 1: The devices/machines running various operating systems connecting to the Parse Cloud and requesting data from the database setup on the Parse Cloud. 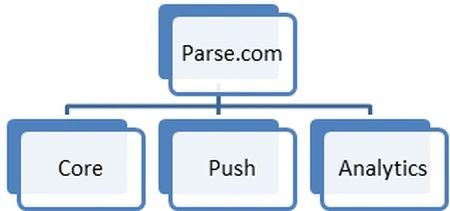
Figure 2: Indicates important facilities that come under Parse.
- Core: Provides all necessary requirements to store and save data that are required by your application. Helps your app to be social.
- Push: Helps to send push notifications to devices. It helps in scheduling notifications as well.
- Analytics: Real-time tracking of the app is made possible using this facility.
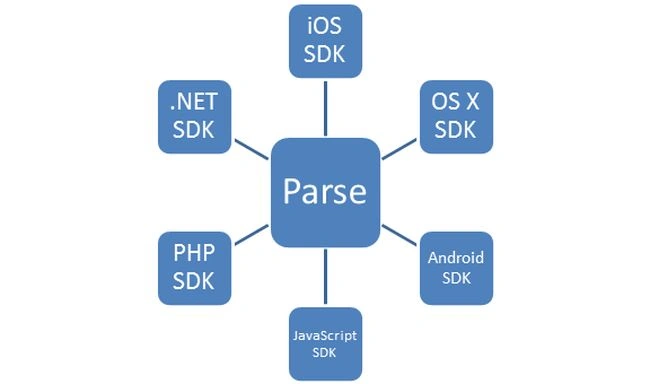
Figure 3: Available SDKs to work with Parse.
To access features provided by Parse in iOS, Parse provides iOS APIs using iOS SDK. OS X programmers can use OS X SDK to access features of Parse using OS X APIs. Similarly the Android SDK is available to provide Android APIs to Android developers, .NET SDK for .NET developers and JavaScript/PHP SDKs for Web developers to utilize them in their JavaScript/PHP based web applications. The .NET SDK supports Windows Phone 8 apps, Windows apps, Unity and Xamarin based applications.
Setting up Parse database
This section covers setting up a Parse Database and setting up your Windows 8 Apps/Metro Style Apps that makes use of this database.
The following is the procedure to work with Parse.
Step 1: Logon to www.parse.com.
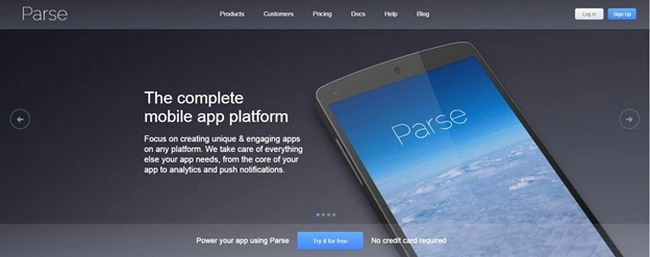
Step 2: Sign up to use Parse.
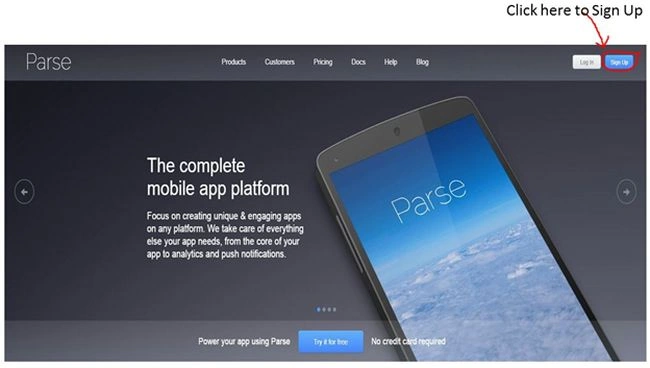
Click on the Sign Up option to proceed to the sign up page. The preceding screen shows the home page of Parse.
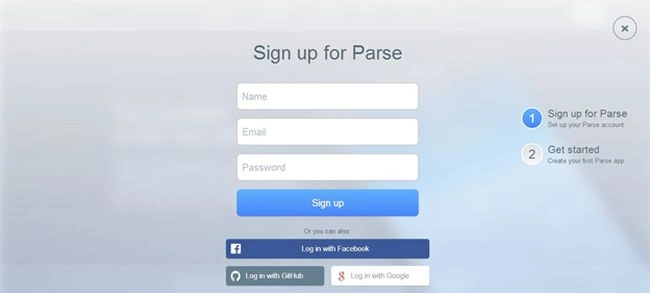
The preceding screen is the place to sign up that is a necessary task before you start using Parse. Once you click on the sign up button, you will proceed to the Get Started screen where you need to fill in your application name and company details.
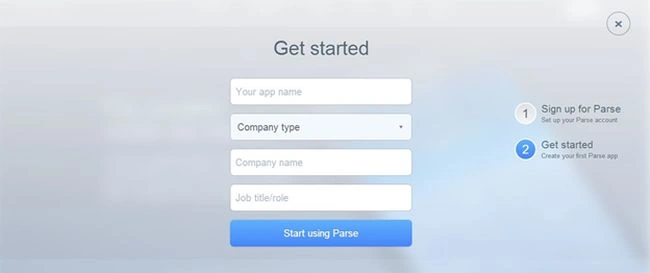
I am currently considering the option to create an “Appointments” application. So, I will keep the app name as “Appointments” and I will select Individual Developer from the second drop down menu.
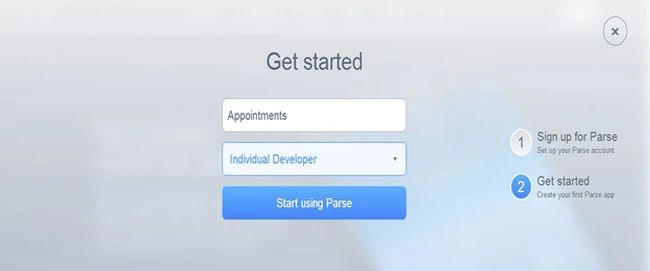
The preceding screen shows the filled-in form from my side and you can try clicking on the “Start using Parse” button present there. When you sign up, you will receive a “Welcome to Parse” e-mail right into your mail box. Open it and see once!
Step 3: Directing to Parse's main product dashboard.
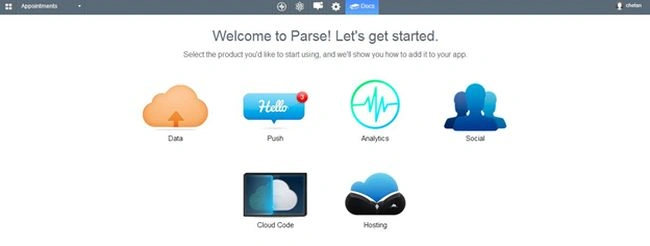
The preceding screen shows the Parse's main feature page. It provides options that represent each of the features provided by Parse for app developers.
Step 4: Select an appropriate product.
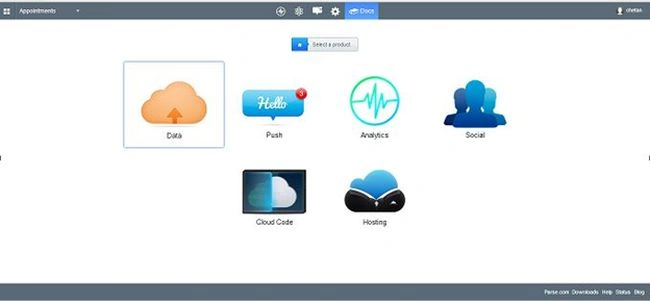
Click on the “Data” option to proceed to the next screen.
Step 5: Select an appropriate environment of the target.
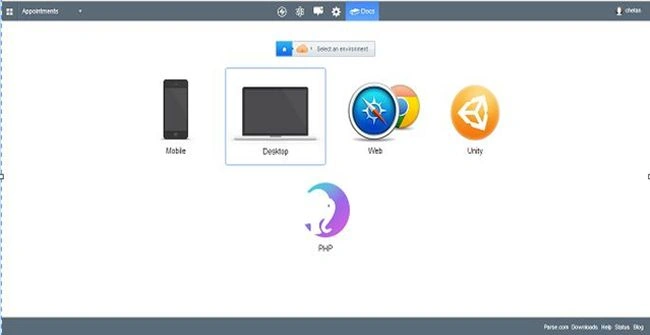
As you see in the preceding screen, there are multiple selection options that include Mobile, Desktop, Web, Unity and PHP. You can choose the one that suits your requirements. Selecting the “Desktop” option will redirect you to a page consisting of the desktop based operating systems supported by Parse. Once you select the platform that you are targeting, all platforms under that specific environment will be displayed.
Step 6: Select a platform of your choice.
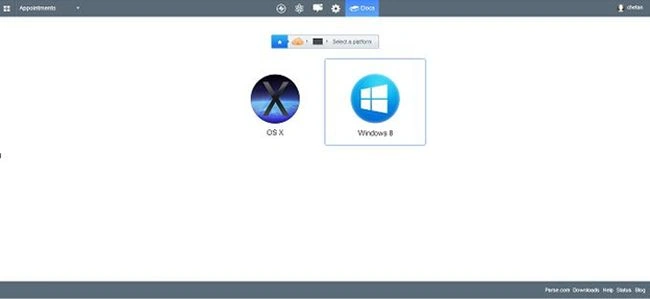
Select the “Windows 8” option to proceed to the next screen. Here, you select the required SDK that you would like to work with. Once you select the platform, the appropriate SDKs linked to the programming languages will be enlisted. I have selected the Windows 8 platform since I will show the integration of Parse database into a Windows Store App.
Step 7: Select the appropriate programming language of your choice.
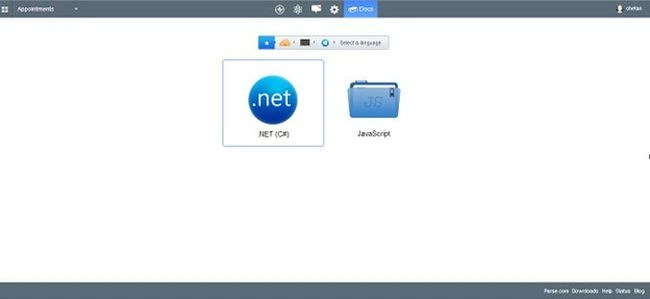
We know that Windows 8 (Windows Store) apps can be created using C# and can also be developed using JavaScript (Create your first Windows Runtime app using JavaScript). I am choosing the C# option since I am using C# to develop a sample Windows Store App.
Step 8: Select the type of project.
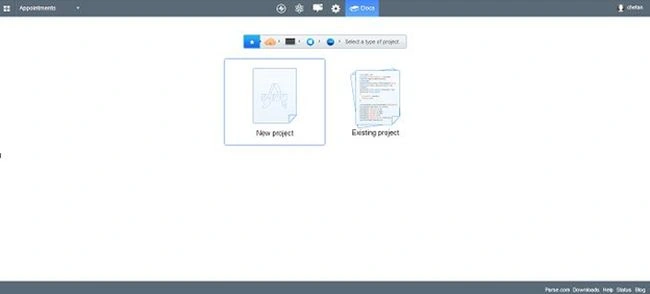
I have selected the New Project option; you can select the Existing Project as well.
Step 9: Install the SDK to continue using Parse.
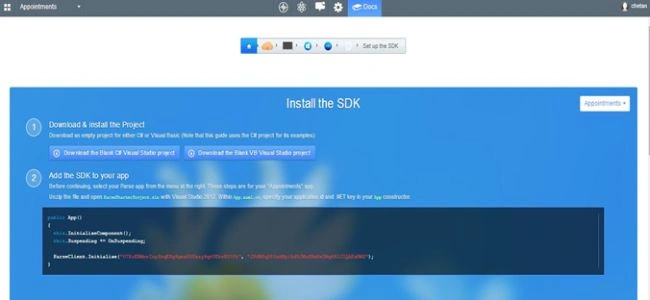
Step 10: Download the Visual Studio solution to start building your application.
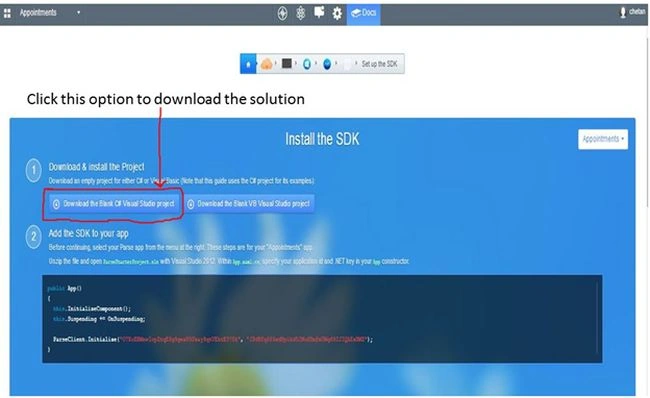
As shown in the preceding screen, select the Download the Blank C# Visual Studio project option. This results in a download of the requested solution. Remember that the solution remains prepared for download and is prepared depending on the compatibility of the selection of your environment, target platform and coding language of your choice. Also remember that these were given as input in your previous steps. This solution is prepared by Parse automatically based on your previous selections.
Step 11: Open the solution to setup the environment required to facilitate building up of the app.
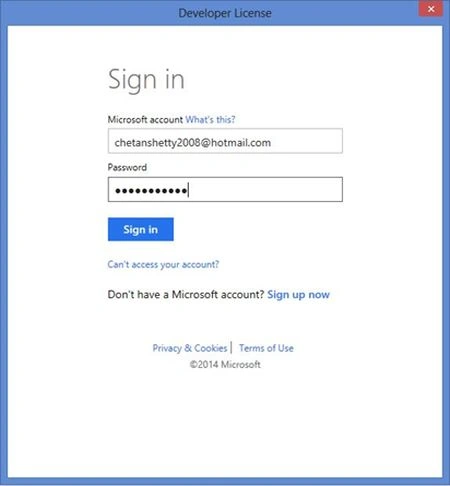
After downloading the solution, unzip it and open the solution file in either Visual Studio 2012 or in the preceding version. When opening the solution, you need to accept the license agreement. Then, the “Developer License” window will pop up post that you are requested to enter your Microsoft Account credentials for sign-in purpose. After logging in, you can get the developer license required to work further as illustrated below:
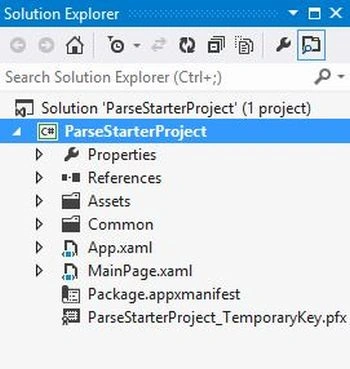
The preceding screen shows the Solution Explorer of the download solution from Parse.
Step 12: See the references present in the solution.
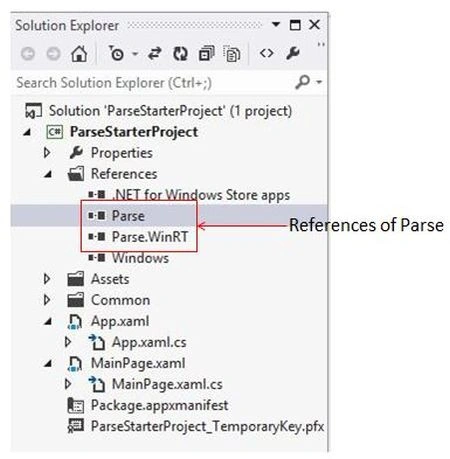
As shown in the preceding screen shot, “Parse” and “Parse.WinRT” references are already added to the solution provided to us by Parse. It indicates that Parse adds all references required by the project while you select the necessary platform of the target and the language of coding. So, our task of manually installing the Parse package using the NuGet Package Installer and adding the reference will be skipped at this point of time.
Step 13: Note down the Client ID and .NET key that appeared in Step 10's screen.
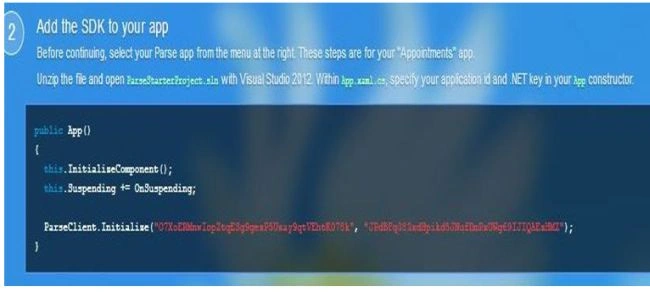
In the preceding screen shot that is a part of the screen taken from Step 10, the two strings that are passed to the ParseClient.Initialize( ) function are your Application ID and the .NET Key respectively.
ParseClient.Initialize("O7XoERMnwIopZtqESg9gezP5Uzay9qtVEhtK078k", "JPdBFq383xdHpikd5JNufDmPxUWg69IJIQAEzHMZ");
Step 14: With respect to our application “Appointments”, O7XoERMnwIopZtqESg9gezP5Uzay9qtVEhtK078k is the Application ID and JPdBFq383xdHpikd5JNufDmPxUWg69IJIQAEzHMZ is the .NET Key. Both of these are passed as parameters to the ParseClient.Initialize( ) function since this function helps in initializing the client application.
The unique Application ID indicates the specific application that is set up on Parse so as to be helpful in dealing with a specific application in the client code for probable futuristic purposes. Place the Application ID and .NET Key into the code.
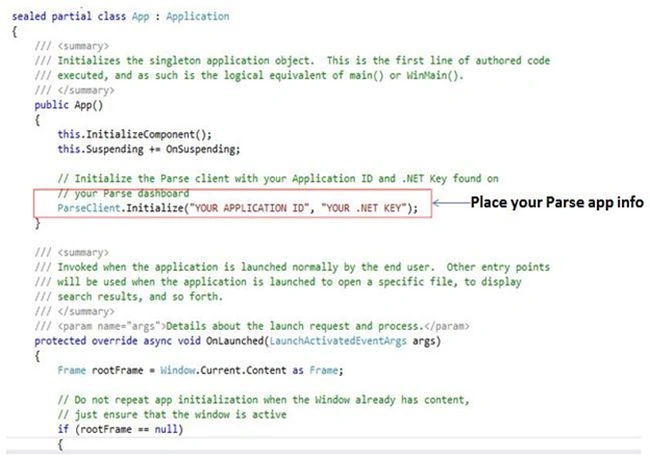
The preceding screen shows the code inside the App.xaml.cs. In the code above, you can see the function marked with Red rectangle. It is a function that takes two string arguments, namely the Application ID and the .NET Key parsed as strings.
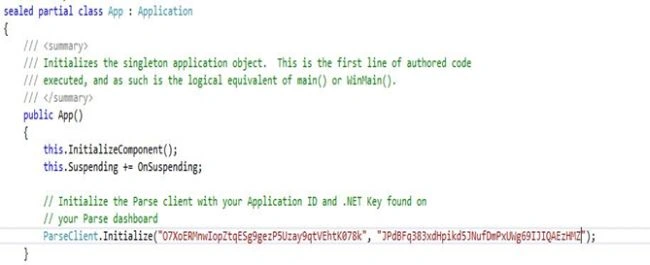
The code above shows a method to specify the Application ID and the .NET Key in the App.xaml.cs file by passing them as two string arguments to the ParseClient.Initialize(string, string) function. The Application ID and .NET Key specified above are specific to my application, in other words “Appointments”. So, it is obvious that the value of the Application ID changes from application to application.
Step 15: Getting all the application specific keys.
Application ID, Client Key, JavaScript Key, .NET Key, REST API Key and Master Key are some of the Application Keys available. We can reach a place in the parse.com where we can get all these keys together. The procedure involved in getting these keys are specified below.
- Move to your application dashboard.
From Step 10, click on menu in the screen where you see the account name present across the top-right corner of your parse account home page. Here, you will find a drop down list wherein you can select your current application name under the Dashboard tab. In my case, Appointments is the application and hence I found an option named Appointments in the menu list as shown in the following screen.
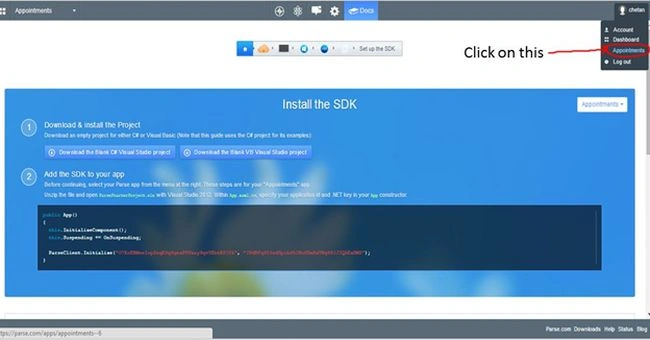
- Move to Settings tab. The default selection will be Analytics. Click on the Settings tab present at the top of the page as shown in the following screen.
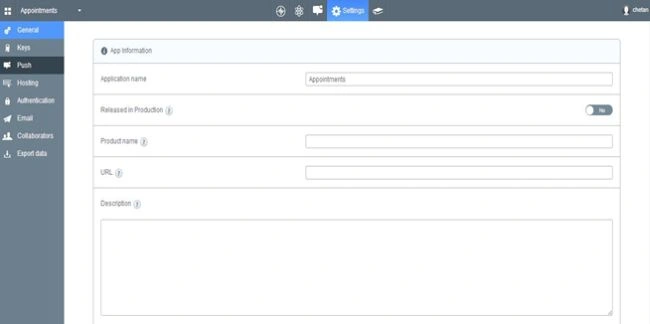
Once you are on Settings, you will find many options as shown in the preceding screen that include General, Keys, Push, Hosting, Authentication, Email, Collaborators, Export Data and so on. Click on Keys present at the left side list of the screen. As shown above, the default selection will be General.
- Viewing all Application Keys.
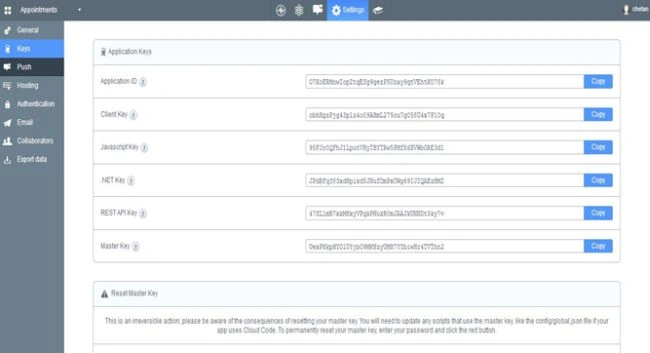
As shown in the preceding screen, all the Application Keys gets listed once you click on the Keys option present on the left side list. You can note down all the keys by copying one after another. You can compare the Application ID and .NET Key specified here with the one that we used in our application. We will notice that both of them are one and the same.
Step 16: Creating the database on Parse.
Let's take the database table data used in my previous article Working With SQLite in Windows Store Apps to create a new table. Consider that our Windows Store App Appointments requires a table named “Appointments”. The appointments table is as given below: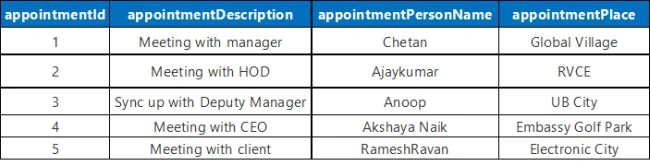
The preceding table represents an “Appointments” table that contains 4 columns, each of which could become properties of the class “Appointments”. appointmentId, appointmentDescription, appointmentPersonName and appointmentPlace are the four columns of the table.
- Click on the Core tab from the main menu that is present on top of the screen and then select the Data option present on the left side list.
- Click on Add a Parse Class to add a new table required for your application.
*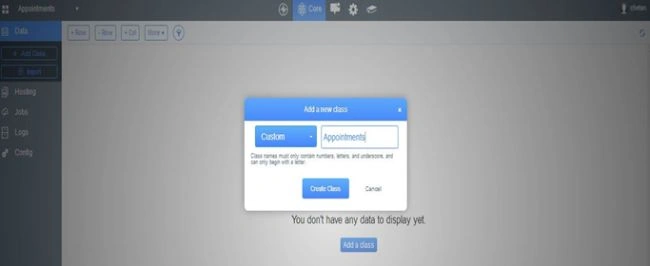
Once you click on Add a Parse Class, “Add a new class” popup appears on the screen that allows you to select the type of class/table along with a TextBox to enter the table name. Here, my class/table name is Appointments. Once you enter the class name and click on the Create Class button, the table/class will be created.
Note: In Parse, creating a class is equivalent to creating a table in the database. In fact, it is just like any another name given to a database table.
- Create a new column and add it to the table.
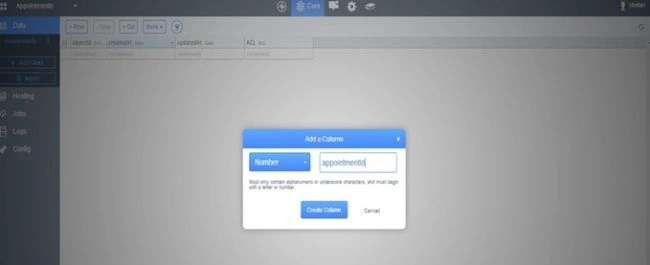
As shown in the preceding screen, I am adding columns one after another. Here, in this screen, I have added a new column appointmentId whose data is of type Number. Once we create the column, it gets added to the “Appointments” table.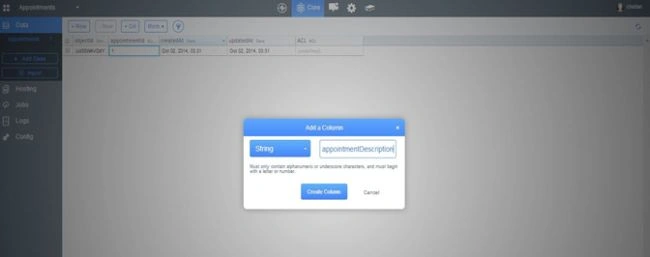
I added another column appointmentDescription of data type String. In a similar way, add all columns specified in the table as shown previously.
- Add a new row to the table.
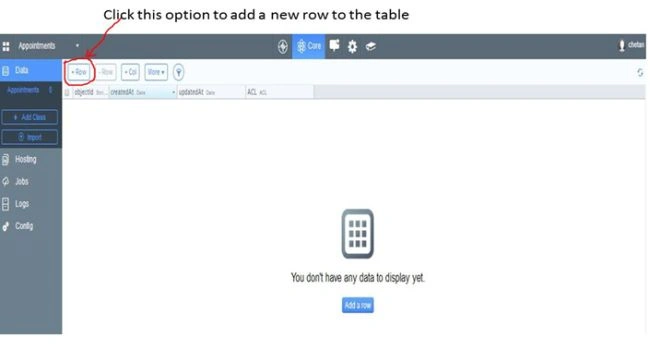
Once all columns are added, start adding new rows and fill in all data into cells that are created by intersection of these new rows and columns.
Note: objectId (String), createdAt (Date), updatedAt (Date), and ACL (ACL) are the columns created automatically when a new table/class is created on Parse. Remember that the objectId, createdAt and updatedAt cells are automatically filled in with the automated data accordingly.
- An example Parse table is filled in with relevant data.
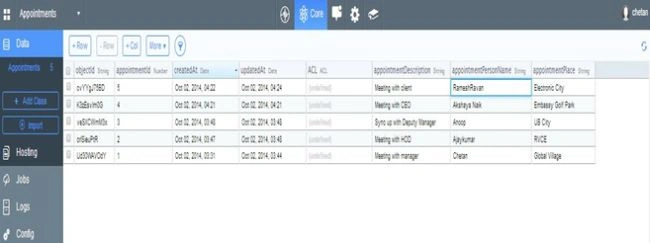
The preceding screen shows the table filled with data that we listed in a table before. Now we can say that we have a database named “Appointments” and a table named “Appointments” under it and hosted in the Parse cloud.
- Add a new table.
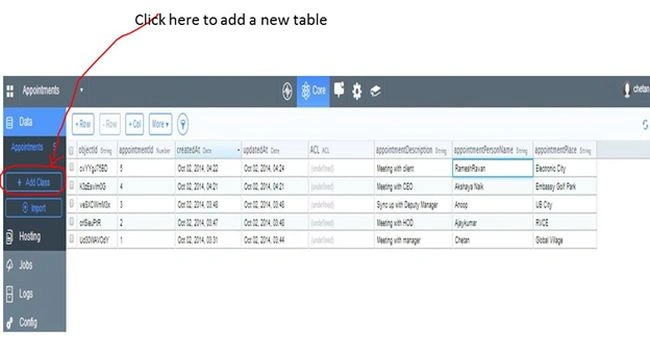
As shown in the preceding screen, adding a new class by clicking on “Add Class” is equivalent to adding a new table.
This section covers pulling or retrieving data from a Parse DB to use it and display it in Windows Store App controls. Here, for displaying the data, I have used ListView UI components. You can make use of FlipView as well.
Step 17: Pulling data from Parse and display it within the UI.
Here, let me show the pulling up of data from the cloud-based Parse DB and storing it in a local list that facilitates binding of this list to a UI component such as a ListView.
- Drag and drop the ListView control from the toolbox to the designer view of the app's main page, in other words MainPage.xaml page.
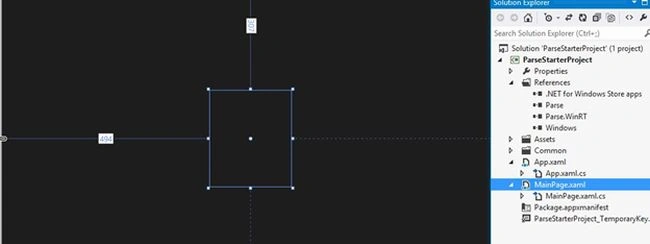
The preceding screen shows a ListView control along with the Solution Explorer.
In the code above, the ParseObject class is the local representation of the data. The Parse cloud gives everything in the form of a ParseObject and gives back this data in the form of a ParseObject. In simple words, saving to the Parse cloud and retrieving data from the Parse cloud happens using ParseObject data representation. In turn, each ParseObject contains JSON compatible data.
- Two ListViews are used to display “Appointment Person Name” and “Appointment Place” that belong to appointmentPersonName and appointmentPlace columns respectively.
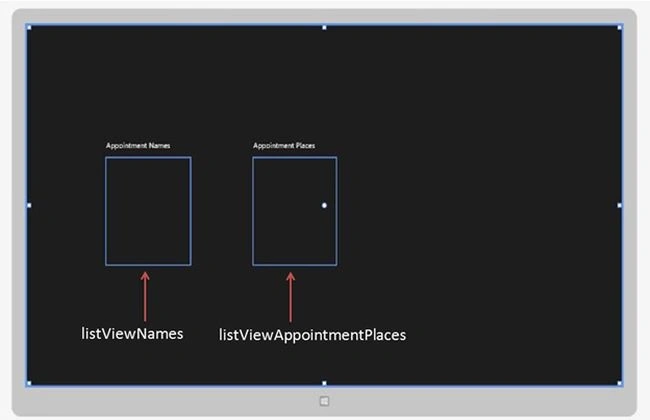
The preceding screen shows two ListViews being drag and dropped onto the design view of the toolbox. They are being named “listViewNames” and “listViewAppointmentPlaces” since one displays all the appointment names and the other displays the appointment locations respectively. The data from the parse database are bound to these list views.
- Adding a suitable namespace.
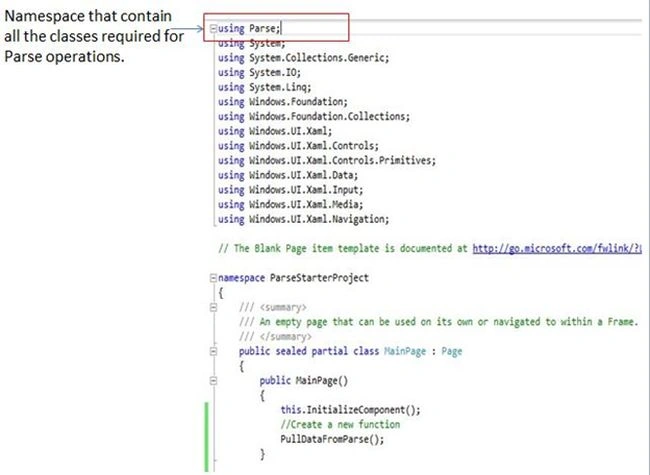
As shown in the preceding code, you can see a “using Parse” statement is added at the beginning that indicates that “Parse” is the namespace with all the classes required to work with Parse using C# code in code behind files. This statement is being added and provided to you automatically when preparing the solution by Parse.
- Write a separate function to retrieve the data from the Parse DB and display the results in ListViews.
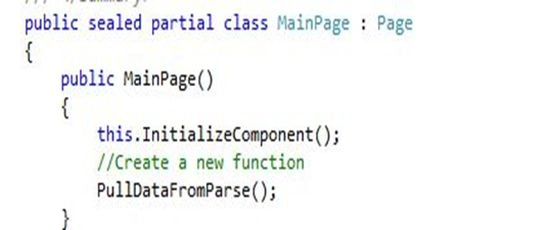
The code above shows the function call to “PullDataFromParse”, that is a separate user defined function written to retrieve data from Parse DB and to bind the data to ListViews.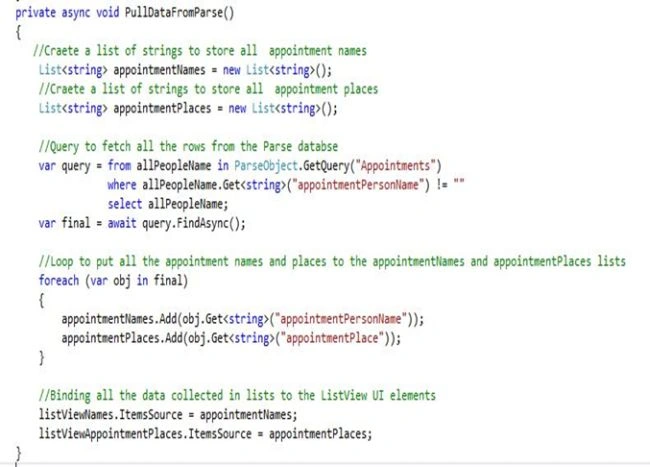
The preceding piece of code implements the functionalities required to retrieve data from the Parse database and display the results in ListViews. Comments describe the functionalities of each and every line of code.
- The following is the final output to display data stored in the Parse DB in ListViews.
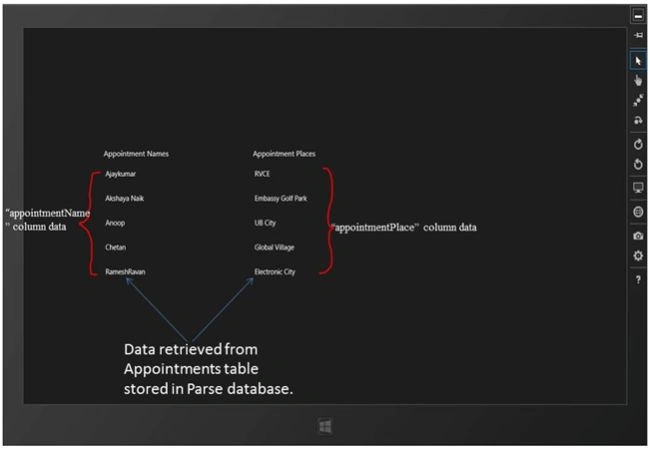
The preceding screen shows the output obtained after running the application within the emulator. Data displayed in the output are queried and retrieved from Parse DB. This data will be bound to UI elements (ListViews).
This section covers processes that involve taking necessary data using user input and saving it to the Parse DB table. Inputs are taken using UI controls (Textboxes). Therefore, this section also covers creating a new form that takes user inputs present within Windows Store Apps.
- Add a new blank page to the existing Windows Store App project.
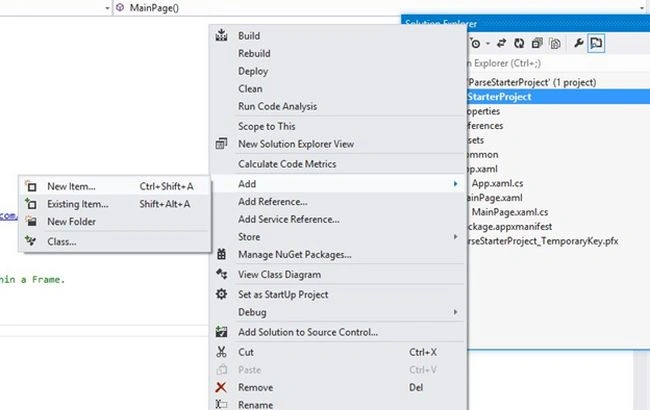
The preceding screen shows the process involved in adding a new item to the project. This item is required since we need to add a new Blank Page to the project to start with the new user input form design.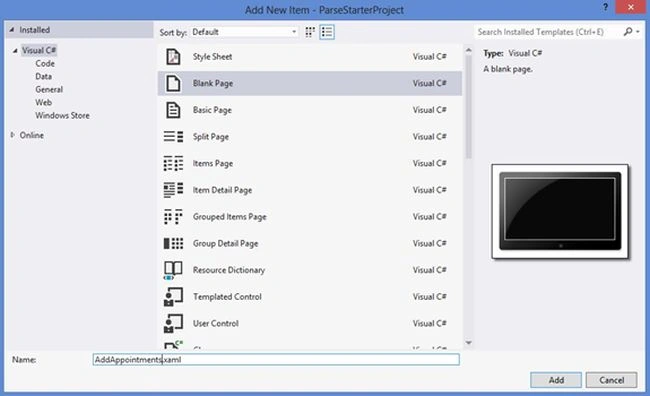
The preceding screen shows selecting the Blank Page option from the list and naming it AddApointments.xaml. This results in the generation and addition of a designer file, in other words AddApointments.xaml and a code behind file AddApointments.xaml.cs. In the code behind file, we will be writing the C# code necessary to save the user input data to the Appointments table present in Parse cloud database.
- Create a form by adding textboxes, text blocks and a button.
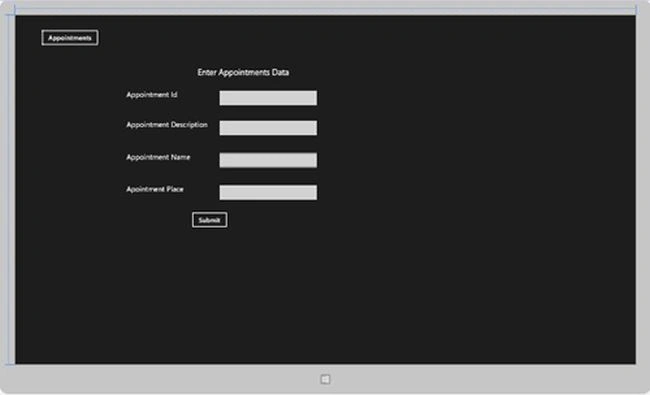
In the preceding screen shot, four textboxes are added to take four inputs (Appointment Id, Appointment Description, Appointment Name and Appointment Place) from the user and save them in the Parse DB by inserting a new row to the Appointments table present in the Parse database. The saving action must be done once the user clicks on the Submit button. The Button click event handler associated with the Submit button will handle the click event and this event will execute the code responsible for storing data in the Parse cloud. The button present at the top-left corner is labeled “Appointments” and this will redirect the user to the Main Page. This page lists all the names of all people having appointments booked and the location at which they are expected to meet.
- Add code to save the text given as input using the TextBox controls upon clicking the Submit button.
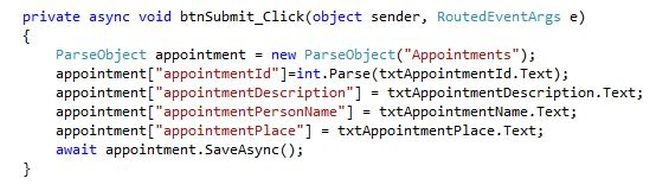
As shown in the preceding code, upon clicking the Submit button the btnSubmit_Click event handler is called and the code written to save the data to the Parse DB is executed. Here data are saved to the Parse DB as a parse object.
- Run the application and submit new information.
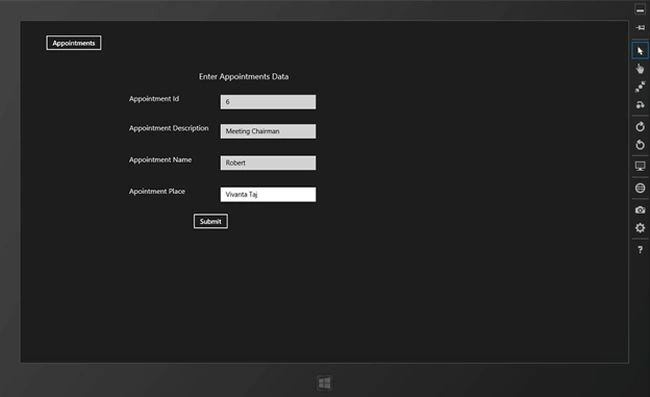
- The preceding screen shows new information entered using the form to store the information in the Parse DB. Upon clicking the Submit button a suitable event handler will be called to store the data in the Parse cloud.
- Check for the newly entered data on Parse DB and check for the reflected changes.
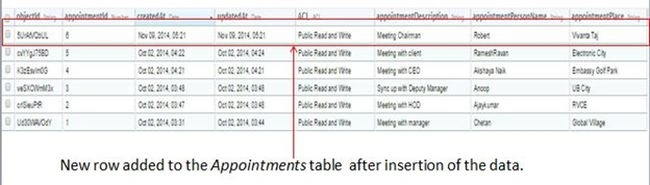
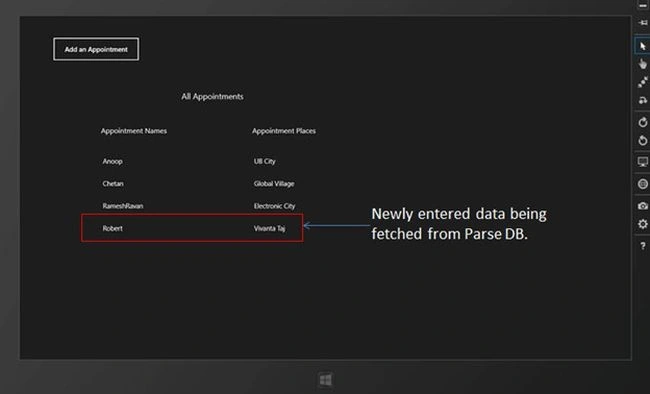
The preceding screen shows the new row added to the Appointments table of Parse DB present on the cloud.
*
In a similar way, I have demonstrated usage of Parse in Windows Store Apps. You can also make use of it in your Android, iOS and Windows Phone apps. The UI and coding syntaxes may differ from platform to platform but the procedure to use Parse will remain the same.
Manoj Prabhu TPosted Dec 21, 2015, 1:03 AM
how to get device token in this method
Chetankumar G ShettyPosted Dec 17, 2014, 10:19 AM
Thank you Naveen
Naveenkumar NaveenPosted Nov 23, 2014, 6:36 AM
good
Chetankumar G ShettyPosted Nov 11, 2014, 5:35 AM
Thank you Vithal
Vithal WadjePosted Nov 10, 2014, 10:26 AM
good one keep it up