
1. Development Tools Used
- Microsoft Visual Studio 2005
- Microsoft Word 2003
- Programming Language: C#
2. Word Automation using C#
Word Automation through C# is all about programmatically generating the Word Document using C# code. Working on Word is considered to be straightforward, but doing the same programmatically gets a little intricate. Word automation almost completely involves working with objects and reference types. Almost all of the tasks which we perform on word 2003 can be done programmatically using C# or VB. Tasks like Inserting Table of Contents, Linking documents, Mail Merge, Inserting Documents, Embedding documents, inserting pictures, watermark... etc can all be done programmatically.
3. Setting Up Work Environment
Starting off, the first step is to include the Word DLL's to the Solution. This can be done by right clicking the Reference Folder in the Solution explorer of the project and select Add Reference.
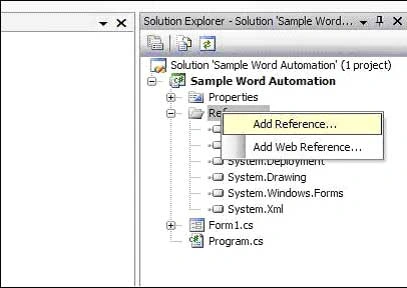
Figure 1.
Browse Through the available COM objects and Select Microsoft Office 11.0 Object Library & Microsoft Word 11.0 Object Library. This DLL has all the methods which we do to perform the automation.
Note: This DLL would be present only if Microsoft Office is installed on the Machine.
Also include "using Microsoft.Office;" in the Namespaces used.
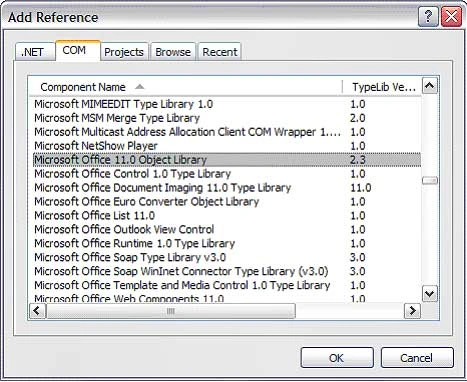
Figure 2.
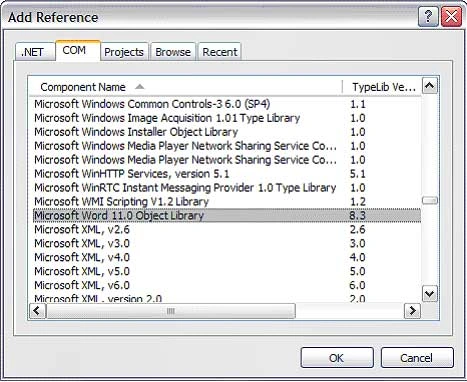
Figure 3.
4. Objects Used in Automation
All the methods used Word automation is derived either from Word.Application or Word.Document class.
Let's consider that we want to create a document using the Word Application, we might end up doing the following steps,
- Open Word Application. (Opening Word Application creates a new document by default, but in Automation, wee need to manually add a document)
- Add a New document.
- Edit the document.
- Save it.
The same steps needs to be done programmatically. The Word.Application and Word.Document are used to Open Word and add a new Document to it.
4.1 Word.Application
This represents in Word Application without any new document loaded in it. This is like the base class which is needed to create a new document. Creating a new instance of Word.Application can be visualized as below.
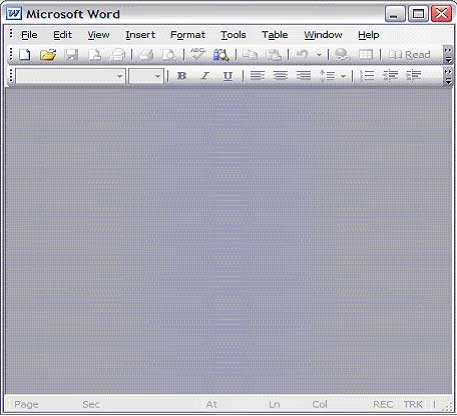
Figure 4.
4.2 Word.Document
If we need to add a new document file, first we have to create an instance of the Word.Document object and then add it to the Word.Application.
//OBJECT OF MISSING "NULL VALUE"
Object oMissing = System.Reflection.Missing.Value();
//OBJECTS OF FALSE AND TRUE
Object oTrue = true;
Object oFalse = false;
//CREATING OBJECTS OF WORD AND DOCUMENT
Word.Application oWord = new Word.Application();
Word.Document oWordDoc = new Word.Document();
//MAKING THE APPLICATION VISIBLE
oWord.Visible = true;
//ADDING A NEW DOCUMENT TO THE APPLICATION
oWordDoc = oWord.Documents.Add(ref oMissing, ref oMissing, ref oMissing, ref oMissing);
This triggers the following operation in the Word Application
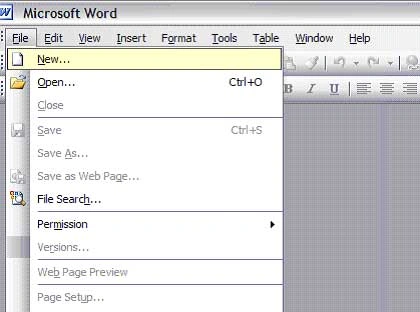
Figure 5.
Approaches to Perform Automation
- We can either have a base template (.dot) file and open the base template file and work on it.
- We can otherwise build a word document from scratch.
4.3 Standard Input Parameters
Most of the methods have input parameters which are of reference type, and the values are mostly true, false or missing (null). In automation it makes sense as to why most of the input parameters are of reference types; it might be because of the fact that most of the methods a multitude of input parameters (many have more than 10 input parameters) and their value is going to be either true, false or missing in most of the cases. So instead of supplying the same input parameter ten times, we can make all the input parameters point to the location same single variable in them memory.
4.3.1 Range Object
While we work on Word Application, if we want to type some text in the 11th line, then we manually take the cursor and click it on the required line and then start typing. In order to do the same task, we use the Range variable in C#. The range variable of the Word.Document object represents the location of the cursor on the current document.
There are many possible ways to point to a specific location on a document. I had extensively used the Bookmarks locators as I work on Automation using a base template. In this approach, we insert Bookmarks on the base template and we programmatically locate those Bookmarks, set the range on them and insert text or documents at that specific location. There are also many other possible ways to set the range.
//SETTING THE RANGE ON THE BOOKMARK
Object oBookMarkName = "My_Inserted_Bookmark_On_Template";
Word.Range wrdRange = oWordDoc.Bookmarks.get_Item(ref oBookMarkName).Range.Select();
4.3.2 Selection Object
While working on word, we select a range of text by clicking and dragging the mouse pointer across contents in the document to select it. The contents can be text, formatted text, tables or any other item in the document. We programmatically represent the same by using the Selection Object derived from Word.Selection. In the previous range example, we locate a bookmark and set the range on that specific bookmark and we select it. Now the selection object represents that specific location. It's like placing the cursor on that specific bookmark location on the document. The selection across text can be done by selecting a range of text in between two ranges. Then the selected range can be copied, deleted or formatted.
4.3.3 Selecting Between Bookmarks
//BOOK MARK FOR START OF SELECTION
Object oBookmarkStart = "BookMark__Start";
Object oRngoBookMarkStart = oWordDoc.Bookmarks.get_Item(ref oBookmarkDesignInfoStart).Range.Start;
//BOOK MARK FOR END OF SELECTION
Object oBookmarkEnd = "BookMark__End";
Object oRngoBookMarkEnd = oWordDoc.Bookmarks.get_Item(ref oBookmarkDesignInfoEnd).Range.Start;
//SETTING THE RANGE ON THE BOOKMARK BETWEEN TWO BOOKMARKS
Word.Range rngBKMarkSelection = oWordDoc.Range(ref oRngoBookMarkStart, ref oRngoBookMarkEnd);
//SELECTING THE TEXT
rngBKMarkSelection.Select();
rngBKMarkSelection.Delete(ref oMissing, ref oMissing);
5. Automation using a Base Template
The base template file method is preferable as it gives us much more flexibility in performing the automation and it comes very handy for performing Mail Merge.
In the base template method, when we call the Documents.Add method of the Application object, we give the path of the .dot file.
//THE LOCATION OF THE TEMPLATE FILE ON THE MACHINE
Object oTemplatePath = "C:\\Program Files\\MyTemplate.dot";
//ADDING A NEW DOCUMENT FROM A TEMPLATE
oWordDoc = oWord.Documents.Add(ref oTemplatePath, ref oMissing, ref oMissing, ref oMissing);
Now .dot file is opened and when we save the generated document, we save it as a new file.
6. Mail Merge
Mail merge is a useful tool in scenarios where we want to randomly generate alike documents where just a few fields change. For instance in a pay slip which has a base template and just the employee name, number and pay details needs to change for each employee. Now we can have a base template which is a word file saved as Document Template file.
In the .dot file, insert a Mail Merge Field manually by placing the cursor in the required position and Insert -> Field, and in Field Names, select "MergeField", now the Mail merged field would be represented by <<FieldName>>. The template can be like
Contact Information
For further information and discussions, please contact:
Name: <<CIFLName>>
Address: <<CIAddress>>
Phone: <<CIPhW>> (Work)
<<CIPhM>>(Cell)
Fax: <<CIFax>>
Email <<CIMail>>
Now for programmatically replacing the Mail Merge fields using the code, the document by default has many fields in it. But the user entered fields comes with a prefix and suffix which can be can be used as an identifier to replace the fields.
//OBJECT OF MISSING "NULL VALUE"
Object oMissing = System.Reflection.Missing.Value();
//OBJECTS OF FALSE AND TRUE
Object oTrue = true;
Object oFalse = false;
//CREATING OBJECTS OF WORD AND DOCUMENT
Word.Application oWord = new Word.Application();
Word.Document oWordDoc = new Word.Document();
//SETTING THE VISIBILITY TO TRUE
oWord.Visible = true;
//THE LOCATION OF THE TEMPLATE FILE ON THE MACHINE
Object oTemplatePath = "C:\\Program Files\\MyTemplate.dot";
//ADDING A NEW DOCUMENT FROM A TEMPLATE
oWordDoc = oWord.Documents.Add(ref oTemplatePath, ref oMissing, ref oMissing, ref oMissing);
foreach (Word.Field myMergeField in oWordDoc.Fields)
{
    iTotalFields++;
    Word.Range rngFieldCode = myMergeField.Code;
    String fieldText = rngFieldCode.Text;
    // ONLY GETTING THE MAILMERGE FIELDS
    if (fieldText.StartsWith(" MERGEFIELD"))
    {
        // THE TEXT COMES IN THE FORMAT OF
        // MERGEFIELD  MyFieldName  \\* MERGEFORMAT
        // THIS HAS TO BE EDITED TO GET ONLY THE FIELDNAME "MyFieldName"
        Int32 endMerge = fieldText.IndexOf("\\");
        Int32 fieldNameLength = fieldText.Length - endMerge;
        String fieldName = fieldText.Substring(11, endMerge - 11);
        // GIVES THE FIELDNAMES AS THE USER HAD ENTERED IN .dot FILE
        fieldName = fieldName.Trim();
        // **** FIELD REPLACEMENT IMPLEMENTATION GOES HERE ****//
        // THE PROGRAMMER CAN HAVE HIS OWN IMPLEMENTATIONS HERE
        if (fieldName == "MyField")
        {
            myMergeField.Select();
            oWord.Selection.TypeText("This Text Replaces the Field in the Template");
        }
    }
}
There is one other method for replacing the Merge Fields which is mentioned in msdn, which uses a rather memory hungry approach. In that method a separate document is opened and it is inserted with a table which has first row as the Mail Merge Field Name and the second row as the replacement value, then the value from the table is matched with that of the original document and replacement occurs and the second document is purged.
7. Embedding a Document
Embedding a document is done through the application by
Insert-> Object-> Create from file-> Select the File-> Display as Icon. This embeds the file in the selected location as an icon and the user can double click on the icon to open the file. The same can be done through automation.
The range supposed to set at the required place and the same has to be selected (range can be set by any of the means mentioned above). Now with the selection, the file can be embedded.
//ICON LABEL CAN BE THE NAME OF THE FILE,
//ITS THE NAME DISPLAYED BESIDES THE EMBEDDED DOCUMENT
Object oIconLabel = "File Name";
//INCASE WE NEED THE EMBEDDED DOCUMENT TO BE DISPLAYED AS A SPECIFIC ICON,
//WE NEED TO SPECIFY THE LOCATION OF THE ICON FILE
//ELSE SET IT TO oMissing VALUE
Object oIconFileName = "C:\\Document and Settings\\IconFile.ico";
//THE BOOKMARK WHERE THE FILE NEEDS TO BE EMBEDDED
Object oBookMark = "My_Custom_BookMark";
//THE LOCATION OF THE FILE
Object oFileDesignInfo = "C:\\Document and Settings\\somefile.doc";
//OTHER VARIABLES
Object oClassType = "Word.Document.8";
Object oTrue = true;
Object oFalse = false;
Object oMissing = System.Reflection.Missing.Value;
//METHOD TO EMBED THE DOCUMENT
oWordDoc.Bookmarks.get_Item(ref oBookMark).Range.InlineShapes.AddOLEObject(
    ref oClassType,ref oFileDesignInfo,ref oFalse, ref oTrue, ref oIconFileName,
    ref oMissing,ref oIconLabel, ref oMissing);
8. Inserting a Document File
Contents of a Word documents can also be inserted into the current document from the application by doing the following.
Insert -> File -> Select the File. This extracts the contents from the selected file and inserts it into the current document.
In automation, we need to follow a similar approach by placing the range at the required point and selecting it and then inserting the file.
//THE LOCATION OF THE FILE
String oFilePath = "C:\\Document and Settings\\somefile.doc";
oWordDoc.Bookmarks.get_Item(ref oBookMark).Range.InsertFile(oFilePath,ref oMissing, ref oFalse, ref oFalse, ref oFalse);
9. Including Water Marks/Pictures in the Document Background
Including watermarks is one other important feature for any official documents as the watermark may have the company's logo, draft logo or any other picture/text. This is useful when we want a picture or some text to be present throughout the document in the background.
We insert a watermark in the application by performing the following tasks.
Format -> Background -> Printed Watermarks
The same can also be done programmatically; moreover as we manually define the values like the angle of tilt and actual location of the watermark, we have more flexibility in defining the exact location of the watermark.
9.1 Embedding Pictures in Document Header
//EMBEDDING LOGOS IN THE DOCUMENT
//SETTING FOCUES ON THE PAGE HEADER TO EMBED THE WATERMARK
oWord.ActiveWindow.ActivePane.View.SeekView = Word.WdSeekView.wdSeekCurrentPageHeader;
//THE LOGO IS ASSIGNED TO A SHAPE OBJECT SO THAT WE CAN USE ALL THE
//SHAPE FORMATTING OPTIONS PRESENT FOR THE SHAPE OBJECT
Word.Shape logoCustom = null;
//THE PATH OF THE LOGO FILE TO BE EMBEDDED IN THE HEADER
String logoPath = "C:\\Document and Settings\\MyLogo.jpg";
logoCustom = oWord.Selection.HeaderFooter.Shapes.AddPicture(logoPath,
    ref oFalse, ref oTrue, ref oMissing, ref oMissing, ref oMissing, ref oMissing, ref oMissing);
logoCustom.Select(ref oMissing);
logoCustom.Name = "CustomLogo";
logoCustom.Left = (float)Word.WdShapePosition.wdShapeLeft;
//SETTING FOCUES BACK TO DOCUMENT
oWord.ActiveWindow.ActivePane.View.SeekView = Word.WdSeekView.wdSeekMainDocument;
9.2 Inserting Text in the Centre of the Document as Water Mark
//THE LOGO IS ASSIGNED TO A SHAPE OBJECT SO THAT WE CAN USE ALL THE
//SHAPE FORMATTING OPTIONS PRESENT FOR THE SHAPE OBJECT
Word.Shape logoWatermark = null;
//INCLUDING THE TEXT WATER MARK TO THE DOCUMENT
logoWatermark = oWord.Selection.HeaderFooter.Shapes.AddTextEffect(
    Microsoft.Office.Core.MsoPresetTextEffect.msoTextEffect1,
    "Enter The Text Here", "Arial", (float)60,
    Microsoft.Office.Core.MsoTriState.msoTrue,
    Microsoft.Office.Core.MsoTriState.msoFalse,
    0, 0, ref oMissing);
logoWatermark.Select(ref oMissing);
logoWatermark.Fill.Visible = Microsoft.Office.Core.MsoTriState.msoTrue;
logoWatermark.Line.Visible = Microsoft.Office.Core.MsoTriState.msoFalse;
logoWatermark.Fill.Solid();
logoWatermark.Fill.ForeColor.RGB = (Int32)Word.WdColor.wdColorGray30;
logoWatermark.RelativeHorizontalPosition = Word.WdRelativeHorizontalPosition.wdRelativeHorizontalPositionMargin;
logoWatermark.RelativeVerticalPosition = Word.WdRelativeVerticalPosition.wdRelativeVerticalPositionMargin;
logoWatermark.Left = (float)Word.WdShapePosition.wdShapeCenter;
logoWatermark.Top = (float)Word.WdShapePosition.wdShapeCenter;
logoWatermark.Height = oWord.InchesToPoints(2.4f);
logoWatermark.Width = oWord.InchesToPoints(6f);
//SETTING FOCUES BACK TO DOCUMENT
oWord.ActiveWindow.ActivePane.View.SeekView = Word.WdSeekView.wdSeekMainDocument;
9.3 Inserting Text in the Centre of Page, and rotating it by 90 Degrees
//INSERTING TEXT IN THE CENTRE RIGHT, TILTED AT 90 DEGREES
Word.Shape midRightText;
midRightText = oWord.Selection.HeaderFooter.Shapes.AddTextEffect(
    Microsoft.Office.Core.MsoPresetTextEffect.msoTextEffect1,
    "Text Goes Here", "Arial", (float)10,
    Microsoft.Office.Core.MsoTriState.msoTrue,
    Microsoft.Office.Core.MsoTriState.msoFalse,
    0, 0, ref oMissing);
//FORMATTING THE SECURITY CLASSIFICATION TEXT
midRightText.Select(ref oMissing);
midRightText.Name = "PowerPlusWaterMarkObject2";
midRightText.Fill.Visible = Microsoft.Office.Core.MsoTriState.msoTrue;
midRightText.Line.Visible = Microsoft.Office.Core.MsoTriState.msoFalse;
midRightText.Fill.Solid();
midRightText.Fill.ForeColor.RGB = (int)Word.WdColor.wdColorGray375;
//MAKING THE TEXT VERTICAL & ALIGNING
midRightText.Rotation = (float)90;
midRightText.RelativeHorizontalPosition =
    Word.WdRelativeHorizontalPosition.wdRelativeHorizontalPositionMargin;
midRightText.RelativeVerticalPosition =
    Word.WdRelativeVerticalPosition.wdRelativeVerticalPositionMargin;
midRightText.Top = (float)Word.WdShapePosition.wdShapeCenter;
midRightText.Left = (float)480;
10. Including Page Numbers in Page Footer
Including auto-generated page numbers in the Footer is yet another useful feature which can be simulated in the code.
//SETTING THE FOCUES ON THE PAGE FOOTER
oWord.ActiveWindow.ActivePane.View.SeekView = Word.WdSeekView.wdSeekCurrentPageFooter;
//ENTERING A PARAGRAPH BREAK "ENTER"
oWord.Selection.TypeParagraph();
String docNumber = "1";
String revisionNumber = "0";
//INSERTING THE PAGE NUMBERS CENTRALLY ALIGNED IN THE PAGE FOOTER
oWord.Selection.Paragraphs.Alignment = Word.WdParagraphAlignment.wdAlignParagraphLeft;
oWord.ActiveWindow.Selection.Font.Name = "Arial";
oWord.ActiveWindow.Selection.Font.Size = 8;
oWord.ActiveWindow.Selection.TypeText("Document #: " + docNumber + " - Revision #: " + revisionNumber);
//INSERTING TAB CHARACTERS
oWord.ActiveWindow.Selection.TypeText("\t");
oWord.ActiveWindow.Selection.TypeText("\t");
oWord.ActiveWindow.Selection.TypeText("Page ");
Object CurrentPage = Word.WdFieldType.wdFieldPage;
oWord.ActiveWindow.Selection.Fields.Add(oWord.Selection.Range, ref CurrentPage, ref oMissing, ref oMissing);
oWord.ActiveWindow.Selection.TypeText(" of ");
Object TotalPages = Word.WdFieldType.wdFieldNumPages;
oWord.ActiveWindow.Selection.Fields.Add(oWord.Selection.Range, ref TotalPages, ref oMissing, ref oMissing);
//SETTING FOCUES BACK TO DOCUMENT
oWord.ActiveWindow.ActivePane.View.SeekView = Word.WdSeekView.wdSeekMainDocument;
11. Basic Text Formatting Options
11.1 Paragraph Break
This is equivalent to hitting the enter button in the document.
//ENTERING A PARAGRAPH BREAK "ENTER"
oWord.Selection.TypeParagraph();
11.2 Text Formatting Option
All the text formatting options available in the Word Application can also be replicated through automation.
//OTHER COMMONLY USED FORMATTING OPTIONS
oWord.Selection.Font.Bold = 1;
oWord.Selection.Font.Color = Word.WdColor.wdColorAqua;
oWord.Selection.Font.Italic = 1;
oWord.Selection.Font.Underline = Word.WdUnderline.wdUnderlineDashHeavy;
11.3 Clear Formatting
When the Formatting is applied to a selection, then the same formatting gets carried on to the next lines, in order to clear the formatting, the next line needs to be selected and ClearFormatting() method needs to be called.
//CLEARING THE FORMATTING
oWord.Selection.ClearFormatting();
12. Table of Contents
Table of Contents is very handy when it comes to official documents or some technical papers which span across many pages. Table of contents can be inserted and updated on the fly as the document gets built.
For the Table of Contents to get auto generated without any hassles, it is vital that the Headings, Sub-Headings and the Body text have their respective attributes set. When we work on the application, the values get set by themselves, we only need to edit if required. But while programming its mandatory that we set the values in the code in order to prevent any anomalies when the Table of Contents gets updated.
Below is an example of a document which was programmatically generated.
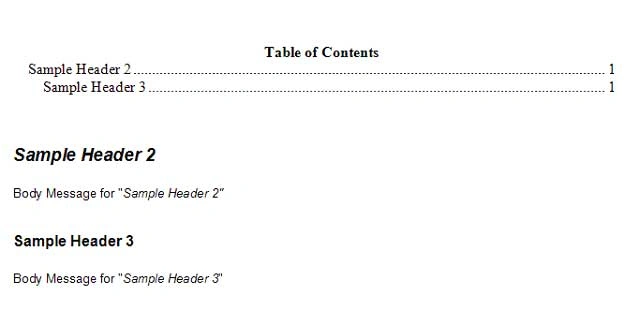
Figure 6.
It is apparent that the Header 2 and Header 3 and Body are formatted differently and even in the Table of Contents the Header 2 is slightly offset from the Header 1.
Open the above document and Outlining Tool bar, View -> Toolbars -> Outlining. And on moving the cursor on the Sample Header 2, we can see that the Format is Heading 2 and Outlining level is Level 2.
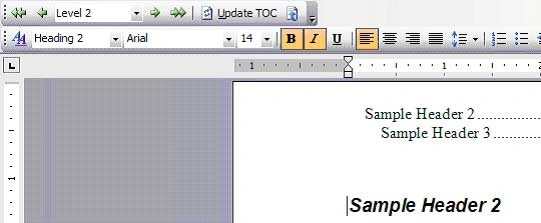
Figure 7.
And for Body, the Format is Normal + Arial, 10 pt and Outlining Level is Body text.
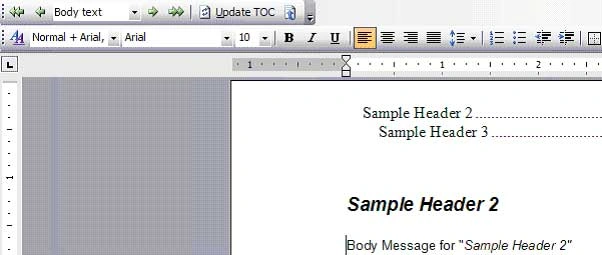
Figure 8.
The same values needs to be set programmatically for the Table of Contents to get generated.
12.1 Section Format
For setting the Format of the Selection, select the entire text (select between bookmarks like mentioned before in Selection section) and set the value
//SETTING THE FORMAT TYPE
//SELECT THE CONTENST TO BE FORMATTED AND SET THE VALUE
Object styleHeading2 = "Heading 2";
Object styleHeading3 = "Heading 3";
oWord.Selection.Range.set_Style(ref styleHeading2);
oWord.Selection.Range.set_Style(ref styleHeading3);
12.2 Outline Level
For setting the outline level, select the contents and set it to one of the values mentioned below
//SETTING THE OUTLINE LEVEL
//SELECT THE CONTENTS WHOSE OUTLINE LEVEL NEEDS TO BE CHANGED AND
//SET THE VALUE
oWord.Selection.Paragraphs.OutlineLevel =Word.WdOutlineLevel.wdOutlineLevel2;
oWord.Selection.Paragraphs.OutlineLevel = Word.WdOutlineLevel.wdOutlineLevel3;
oWord.Selection.Paragraphs.OutlineLevel = Word.WdOutlineLevel.wdOutlineLevelBodyText;
12.3: Inserting Table of Contents
Once the Outline Levels & Section Style are set, the Table of Contents can be inserted programmatically and the page numbers gets populated automatically based on the Outline Levels & Section Style set by the user. (Also refer this MSDN Link)
// NAME OF THE BOOKMARK IN THE DOCUMENT (.dot Template) WHERE TABLE OF
// CONTENTS NEEDS TO BE ADDED
Object oBookmarkTOC = "Bookmark_TOC";
// SETTING THE RANGE AT THE BOOKMARK
Word.Range rngTOC = oWordDoc.Bookmarks.get_Item(ref oBookmarkTOC).Range;
// SELECTING THE SET RANGE
rngTOC.Select();
// INCLUDING THE TABLE OF CONTENTS
Object oUpperHeadingLevel = "1";
Object oLowerHeadingLevel = "3";
Object oTOCTableID = "TableOfContents";
oWordDoc.TablesOfContents.Add(rngTOC, ref oTrue, ref oUpperHeadingLevel,
    ref oLowerHeadingLevel,ref oMissing, ref oTOCTableID, ref oTrue,
    ref oTrue, ref oMissing, ref oTrue, ref oTrue, ref oTrue);
12.4 Updating Table of Contents
Usually the Table of Contents is inserted in the beginning of the document generation and once all the contents are populated, the locations of the Headings and Sub Headings tend to change. If the Table of Contents is not updated, then its contents points to different pages. To overcome this hassle, the Table of Contents needs to be updated at the end of the Automation.
//UPDATING THE TABLE OF CONTENTS
oWordDoc.TablesOfContents[1].Update();
//UPDATING THE TABLE OF CONTENTS
oWordDoc.TablesOfContents[1].UpdatePageNumbers();
13. Saving/Closing & Re-Opening the File
13.1 Saving the File
//THE LOCATION WHERE THE FILE NEEDS TO BE SAVED
Object oSaveAsFile = (Object)"C:\\SampleDoc.doc";
oWordDoc.SaveAs(ref oSaveAsFile, ref oMissing, ref oMissing, ref oMissing,
    ref oMissing, ref oMissing,ref oMissing, ref oMissing, ref oMissing,
    ref oMissing, ref oMissing, ref oMissing, ref oMissing, ref oMissing,
    ref oMissing, ref oMissing);
13.2 Closing the File
//CLOSING THE FILE
oWordDoc.Close(ref oFalse, ref oMissing, ref oMissing);
//QUITTING THE APPLICATION
oWord.Quit(ref oMissing, ref oMissing, ref oMissing);
13.3 Re-Opening the File
The Open () method which we use in Word2003 dll might throw an exception if the client have another version of word installed in their machine. If the client has Word 2002, then he has to open a word file only by Open2002 () method. Open () method which comes for Word 2003 might through an exception in Word 2002 environment. And for Word 2000, there is a method called Open2000 () and Open2002 () for Office 2002 and so on. So it is wise to put the Open () in a try-catch block as mentioned below.
Figure 10.
14. Tips for Word Automation to Create New Document (Non-Base Template Approach)
When we proceed to create a New Document without using the Base Template, the most useful entity is the inbuilt Bookmark endofdoc. It would be a build-from-scratch approach where the programmer starts of the automation by inserting his first section of contents, then setting the range to point to the endofdoc Bookmark and selecting it and inserting his contents and again selecting the endofdoc which would be pointing to the end of the document which would now be after the two sections.
ayman sharkawyPosted Jan 27, 2021, 10:11 AM
Can I add also watermark into excel files ?
Shan RPosted Jan 19, 2021, 7:48 AM
Thank you very much for show the examples, which has been very helpful. I would like to (1) start the page numbering from page 4 (2) to have different folder for different page. Please help to provide some guide. Thank you.
Shashi TantarpalePosted Oct 12, 2020, 2:24 PM
Hi, I want to change the Track Revision property in Review tab to All mark up from drop box.. Using c# code.. Can someone help?
deep pandeyPosted Jun 17, 2019, 12:29 AM
Hi the code for enter text and rotating by 90 degree(section 9.2) gives object reference error. Is there any solution to this.
Thomas GordonPosted Sep 26, 2017, 11:37 AM
Your Object for missing, the Missing.Value() cannot be used like a method. This needs to be updated.
Ramesh PalaniappanPosted Aug 22, 2016, 11:25 AM
Nice
Parvez AhadPosted Jul 14, 2016, 5:12 AM
Very good article....
kalu singh raoPosted Jul 7, 2016, 8:41 AM
Nice...
Iris PanabakerPosted Jan 22, 2016, 9:41 AM
http://codebeautify.org/csharpviewer will help to format c# code.
SharadPosted Jul 17, 2015, 3:40 AM
cool stuff
Sachin KPosted Apr 2, 2015, 12:54 AM
Can the Length of each item in TOC be trimmed to say a specific number of characters,as in my c# application i have marked sections or paragraphs to be included in TOC so m finding the whole paragraph content being set in the TOC item itself.....
Rahul SonawanePosted Jul 16, 2014, 11:02 AM
can i save the web page as it is with its result calculated (it contains a tab panel with some text boxes in it and a image, in the word document ??
Sahar SPosted Jul 1, 2014, 2:13 PM
Hi, Would you please help me how I can edit schema color?
Former memberPosted Oct 3, 2013, 4:48 AM
You can also do word automation using this C# Library for MS Office: http://www.aspose.com/.net/total-component.aspx
Ajinkya PAtilPosted Apr 22, 2013, 8:20 AM
i need to create a word document 1- i save the document with the file name in the textbox 2- suppose i save the document name as ABC.docx 3- now i want the final saved document to be saved as ABC_001_A.docx 4- this all i need to do it in C# I have saved the document like this ABC.docx But i am not understanding how to save it the this formate ABC_001_A.docx
Hoe SPosted Nov 9, 2012, 8:35 AM
:( kanbudong!!
John GlenneditedPosted Feb 15, 2012, 8:32 AMEdited Feb 15, 2012, 8:38 AM
You can also easily automate Word from C# with GemBox.Document library - http://www.gemboxsoftware.com/document/overview. One of the cool things is very fast and easy to use Mail merge functionality - http://www.gemboxsoftware.com/document/articles/c-sharp-vb-net-mail-merge.
piya senPosted Dec 21, 2011, 4:14 AM
Hi! Can you provide some codes to do the same. Code written by me is as: protected void Button1_Click(object sender, EventArgs e) { Microsoft.Office.Interop.Word.ApplicationClass WordApp = new Microsoft.Office.Interop.Word.ApplicationClass(); // give any file name of your choice. object fileName = "D:\\mydoc\\h.docx"; object readOnly = true; object isVisible = true; WordApp.Visible = true; // the way to handle parameters you don't care about in .NET object missing = System.Reflection.Missing.Value; Microsoft.Office.Interop.Word.Document aDoc = WordApp.Documents.Open(ref fileName, ref missing, ref readOnly, ref missing, ref missing, ref missing, ref missing, ref missing, ref missing, ref missing, ref missing, ref isVisible, ref missing, ref missing, ref missing, ref missing); Label1.Text = "Word opened"; try { string strExpirationDate = DateTime.Today.AddDays(2).ToString(); DateTime d = DateTime.Parse(strExpirationDate); aDoc.Permission.Add(@"[email protected]", Microsoft.Office.Core.MsoPermission.msoPermissionRead ,d); aDoc.Close(ref missing, ref missing, ref missing); WordApp.Quit(ref missing, ref missing, ref missing); } catch (Exception ex) { Response.Write(ex.Message); } Word document is opening properly but has no read permission set on it. It shows an error msg:"value not within the expected range". Can you please help.
chanandrew99Posted Dec 20, 2011, 11:45 AM
I cannot think of anyway you can stop people from copying and forwarding as I see it, if they get the document. I suppose you can disable the clipboard on open of the document and re-enable it back when it closes? But I don't know how you can get past the client machine security for that. As for saving the document, you can first, slam a modify password to the document. This will help in case people has opened the document in a different manner other than by code. For saving and printing, there are also the DocumentBeforePrint and DocumentBeforeSave events respectively in Word. Perhaps you want to put your own conditions there to prevent people from saving and printing.
piya senPosted Dec 19, 2011, 10:56 PM
Hi! I really liked your article. I have a specific requirement.I'm opening a word document in a asp.net application. I need to set permission on the word doc like a user can't forward,copy or print.How do I go for this programmatically using c# codes. Thanks & Regards, Piya
P JPosted Nov 22, 2011, 2:18 PM
For document generation you can use Docentric toolkit. It's not free but it takes document genereation to the next level.
Chit Min MaungPosted Aug 31, 2011, 9:08 PM
When I run with debugging mode in my local machine, it's okay but on server I got an error like this. Retrieving the COM class factory for component with CLSID {00020906-0000-0000-C000-000000000046} failed due to the following error: 80080005. My server is Windows 2008 64 bit, Office 2007 and my code is like this private void GenerateWords(string sPO, string sSup) { Object oMissing = System.Reflection.Missing.Value; Object oTrue = true; Object oFalse = false; Object savechanges = true; Word.ApplicationClass oWord = new Word.ApplicationClass(); Word.Document oWordDoc = new Word.Document(); oWord.Visible = true; Object oTemplatePath = Server.MapPath("Reports/Word/PurchaseOrder.docx"); oWordDoc = oWord.Documents.Add(ref oTemplatePath, ref oMissing, ref oMissing, ref oMissing); oWordDoc.Activate(); foreach (Word.Field myMergeField in oWordDoc.Fields) { iTotalFields++; Word.Range rngFieldCode = myMergeField.Code; String fieldText = rngFieldCode.Text; // Start filling information in Word file if (fieldText.StartsWith(" MERGEFIELD")) { Int32 endMerge = fieldText.IndexOf("\\"); Int32 fieldNameLength = fieldText.Length - endMerge; String fieldName = fieldText.Substring(11, endMerge - 11); fieldName = fieldName.Trim(); if (fieldName == "PONo") { myMergeField.Select(); oWord.Selection.Font.Color = Word.WdColor.wdColorBlue; oWord.Selection.TypeText(sPO); } if (fieldName == "SupNo") { myMergeField.Select(); oWord.Selection.Font.Color = Word.WdColor.wdColorBlue; oWord.Selection.TypeText(sSup); } if (fieldName == "VendorID") { myMergeField.Select(); oWord.Selection.Font.Color = Word.WdColor.wdColorBlue; oWord.Selection.TypeText(dtPOSup(sPO, sSup).Rows[0]["VendorID"].ToString().Trim()); } if (fieldName == "VName") { myMergeField.Select(); oWord.Selection.Font.Color = Word.WdColor.wdColorBlue; oWord.Selection.TypeText(dtPOSup(sPO, sSup).Rows[0]["Name"].ToString().Trim()); } if (fieldName == "Contact") { myMergeField.Select(); oWord.Selection.Font.Color = Word.WdColor.wdColorBlue; oWord.Selection.TypeText(dtPOSup(sPO, sSup).Rows[0]["Contact"].ToString().Trim()); } if (fieldName == "Designation") { myMergeField.Select(); oWord.Selection.Font.Color = Word.WdColor.wdColorBlue; oWord.Selection.TypeText(dtPOSup(sPO, sSup).Rows[0]["Designation"].ToString().Trim()); } if (fieldName == "Tel") { myMergeField.Select(); oWord.Selection.Font.Color = Word.WdColor.wdColorBlue; oWord.Selection.TypeText(dtPOSup(sPO, sSup).Rows[0]["Tel"].ToString().Trim()); } if (fieldName == "Fax") { myMergeField.Select(); oWord.Selection.Font.Color = Word.WdColor.wdColorBlue; oWord.Selection.TypeText(dtPOSup(sPO, sSup).Rows[0]["Fax"].ToString().Trim()); } if (fieldName == "PODate") { myMergeField.Select(); oWord.Selection.Font.Color = Word.WdColor.wdColorBlue; oWord.Selection.TypeText(dtPOSup(sPO, sSup).Rows[0]["PODate"].ToString().Trim()); } if (fieldName == "ClientName") { myMergeField.Select(); oWord.Selection.Font.Color = Word.WdColor.wdColorBlue; oWord.Selection.TypeText(dtPOSup(sPO, sSup).Rows[0]["ClientName"].ToString().Trim()); } if (fieldName == "JobDescription") { myMergeField.Select(); oWord.Selection.Font.Color = Word.WdColor.wdColorBlue; oWord.Selection.TypeText(dtPOSup(sPO, sSup).Rows[0]["JobDescription"].ToString().Trim()); } if (fieldName == "JobNo") { myMergeField.Select(); oWord.Selection.Font.Color = Word.WdColor.wdColorBlue; oWord.Selection.TypeText(dtPOSup(sPO, sSup).Rows[0]["JobNo"].ToString().Trim()); } if (fieldName == "CostCode") { myMergeField.Select(); oWord.Selection.Font.Color = Word.WdColor.wdColorBlue; oWord.Selection.TypeText(dtPOSup(sPO, sSup).Rows[0]["CostCode"].ToString().Trim()); } if (fieldName == "SchDlvy") { myMergeField.Select(); oWord.Selection.Font.Color = Word.WdColor.wdColorBlue; oWord.Selection.TypeText(dtPOSup(sPO, sSup).Rows[0]["SchDlvy"].ToString().Trim()); } if (fieldName == "DlvyPoint") { myMergeField.Select(); oWord.Selection.Font.Color = Word.WdColor.wdColorBlue; oWord.Selection.TypeText(dtPOSup(sPO, sSup).Rows[0]["DlvyPoint"].ToString().Trim()); } if (fieldName == "Amount") { myMergeField.Select(); oWord.Selection.Font.Color = Word.WdColor.wdColorBlue; oWord.Selection.TypeText(dtPOSup(sPO, sSup).Rows[0]["Amount"].ToString().Trim()); } if (fieldName == "tbl") { myMergeField.Select(); oWord.Selection.Font.Color = Word.WdColor.wdColorBlue; oWord.Selection.TypeParagraph(); Word.Table tbl = oWordDoc.Tables.Add(rngFieldCode, 1, 5, ref oMissing, ref oMissing); //oWordDoc.Tables.Add(rngFieldCode, dtItems(sPO, sSup).Rows.Count, 5, ref oMissing, ref oMissing); //SET HEADER SetHeadings(tbl.Cell(1, 1), "Item No."); SetHeadings(tbl.Cell(1, 2), "Description"); SetHeadings(tbl.Cell(1, 3), "Unit"); SetHeadings(tbl.Cell(1, 4), "Unit Price"); SetHeadings(tbl.Cell(1, 5), "Amount"); //END SET HEADER //Add Row for (int i = 0; i < dtItems(sPO, sSup).Rows.Count; i++) { Word.Row newRow = tbl.Rows.Add(ref oMissing); newRow.Range.Font.Bold = 0; newRow.Range.Underline = 0; newRow.Range.ParagraphFormat.Alignment = Word.WdParagraphAlignment.wdAlignParagraphCenter; newRow.Cells[1].Range.Text = dtItems(sPO, sSup).Rows[i][3].ToString(); newRow.Cells[2].Range.Text = dtItems(sPO, sSup).Rows[i][4].ToString(); newRow.Cells[3].Range.Text = dtItems(sPO, sSup).Rows[i][8].ToString(); newRow.Cells[4].Range.Text = dtItems(sPO, sSup).Rows[i][10].ToString(); newRow.Cells[5].Range.Text = dtItems(sPO, sSup).Rows[i][11].ToString(); } //END ROW oWord.Selection.TypeParagraph(); } if (fieldName == "TItems") { myMergeField.Select(); oWord.Selection.Font.Color = Word.WdColor.wdColorBlue; oWord.Selection.TypeText(dtTotal(sPO, sSup).Rows[0]["Unit"].ToString().Trim()); } if (fieldName == "Discount") { myMergeField.Select(); oWord.Selection.Font.Color = Word.WdColor.wdColorBlue; oWord.Selection.TypeText(dtTotal(sPO, sSup).Rows[0]["Discount"].ToString().Trim()); } if (fieldName == "TAmount") { myMergeField.Select(); oWord.Selection.Font.Color = Word.WdColor.wdColorBlue; oWord.Selection.TypeText(dtTotal(sPO, sSup).Rows[0]["Amount"].ToString().Trim()); } if (fieldName == "Summary") { myMergeField.Select(); oWord.Selection.Font.Color = Word.WdColor.wdColorBlue; oWord.Selection.TypeText(dtPOSup(sPO, sSup).Rows[0]["Amount"].ToString().Trim()); } if (fieldName == "ReqNo") { myMergeField.Select(); oWord.Selection.Font.Color = Word.WdColor.wdColorBlue; oWord.Selection.TypeText(dtPOSup(sPO, sSup).Rows[0]["ReqNo"].ToString().Trim()); } if (fieldName == "RevNo") { myMergeField.Select(); oWord.Selection.Font.Color = Word.WdColor.wdColorBlue; oWord.Selection.TypeText(dtPOSup(sPO, sSup).Rows[0]["RevNo"].ToString().Trim()); } } } // End filling information in Word file Object oSaveAsFile = (Object)Server.MapPath("Reports/Word/tmp2.docx"); oWordDoc.SaveAs(ref oSaveAsFile, ref oMissing, ref oMissing, ref oMissing, ref oMissing, ref oMissing, ref oMissing, ref oMissing, ref oMissing, ref oMissing, ref oMissing, ref oMissing, ref oMissing, ref oMissing, ref oMissing, ref oMissing); oWordDoc.Close(ref savechanges, ref oMissing, ref oMissing); oWord.Application.Quit(ref savechanges, ref oMissing, ref oMissing); //foreach (Process p in System.Diagnostics.Process.GetProcessesByName("winword")) //{ // try // { // if (p.ProcessName == "WINWORD") // { // if (!p.HasExited) // { // p.Kill(); // p.WaitForExit(); // possibly with a timeout // } // } // else // { // lblMessage.Text = "cannot kill. try again!"; // } // } // catch (Win32Exception winException) // { // //process was terminating or can't be terminated - deal with it // Session["error"] = winException.Message; // Response.Redirect("MessageBoard.aspx"); // } // catch (InvalidOperationException invalidException) // { // //process has already exited - might be able to let this one go // Session["error"] = invalidException.Message; // Response.Redirect("MessageBoard.aspx"); // } //} Response.ClearContent(); Response.ClearHeaders(); Response.ContentType = "application/msword"; Response.WriteFile(Server.MapPath("Reports/Word/tmp2.docx"), false); Response.Flush(); Response.Close(); } And I followed to give the permission from Blog.Crowe.co.nz But still got problem, I can't solve this one since last month. If you're possible, please kindly help to me. Thanks
Dwight FunkeditedPosted Apr 11, 2011, 2:10 PMEdited Apr 11, 2011, 2:22 PM
NOt sure why but my carriage returns are getting dropped. Using Word.WdSeekView.wdSeekCurrentPageHeader doesn't take into account the situation where a docment has multiple sections and up to 3 headers (wdHeaderFooterPrimary, wdHeaderFooterEvenPages and wdHeaderFooterFirstPage). This will guarentee that all the document pages get the watermark. The selection statements are also important including restoring the selection at the end. // Save selection to restore later Word.Range SavedSelection = oWord.Selection.Range; // not 100% sure why the ActiveDocument.Select is // needed but the first watermark will not work right if it isin't there oWord.ActiveDocument.Select(); foreach (Word.Section s in oWord.ActiveDocument.Sections) foreach (Word.HeaderFooter h in s.Headers) if (h.Exists) if (!h.LinkToPrevious) { h.Range.Select(); // This is important //INSERTING TEXT IN THE CENTRE RIGHT, TILTED AT 90 DEGREES Word.Shape midRightText; midRightText = oWord.Selection.HeaderFooter.Shapes.AddTextEffect( Microsoft.Office.Core.MsoPresetTextEffect.msoTextEffect1, "Text Goes Here", "Arial", (float)10, Microsoft.Office.Core.MsoTriState.msoTrue, Microsoft.Office.Core.MsoTriState.msoFalse, 0, 0, ref oMissing); //FORMATTING THE SECURITY CLASSIFICATION TEXT midRightText.Select(ref oMissing); midRightText.Name = "PowerPlusWaterMarkObject2"; midRightText.Fill.Visible = Microsoft.Office.Core.MsoTriState.msoTrue; midRightText.Line.Visible = Microsoft.Office.Core.MsoTriState.msoFalse; midRightText.Fill.Solid(); midRightText.Fill.ForeColor.RGB = (int)Word.WdColor.wdColorGray375; //MAKING THE TEXT VERTICAL & ALIGNING midRightText.Rotation = (float)90; midRightText.RelativeHorizontalPosition = Word.WdRelativeHorizontalPosition.wdRelativeHorizontalPositionMargin; midRightText.RelativeVerticalPosition = Word.WdRelativeVerticalPosition.wdRelativeVerticalPositionMargin; midRightText.Top = (float)Word.WdShapePosition.wdShapeCenter; midRightText.Left = (float)480; } // Restore selection SavedSelection.Select();
Lennie KuahPosted Dec 26, 2010, 1:58 AM
Among the articles suggestions, there were no articles or sample coding for this action: At the insertion of row on the Table within the WHILE ( DATAREAD.READ()) { Create the new Row BorderBottom ???? row gridline linestyle ??? }
Daniel LeonPosted Jul 30, 2010, 7:31 AM
hello everyone!I would like to read a certain page from a doc file,more exactly I need to read page by page.I modified a sample from here,but I can't select the whole page.If anyone,has a example or a source code,I would be grateful!
cheburashkaPosted Jan 10, 2010, 11:16 PM
When adding text to a paragrapgh how can I format individual letters or words differently i.e Total For Invoice: $-12.50
cheburashkaPosted Jan 10, 2010, 11:12 PM
How do I position a table so the whole table is right aligned, there seems to be no Table.Align property.
Tamas RaczPosted Jan 8, 2010, 2:59 PM
I'm using late binding word automation to generate a document. During generate I accidentaly noticed that if i hold the left mouse click on the word document's Head (technically the word window's top blue bar) It speeds up generating like hell! Normally 15 pages generated in 14 sec, BUT if I hold the top bar and move the window a little (I'm still holding the left mouse button) It generates 15 pages under 2-3 sec. Any idea why is that, and how can I do this from code?
minakshieditedPosted Dec 16, 2009, 11:02 PMEdited Dec 16, 2009, 11:09 PM
Hello, Can anyone tell me how to add text in multiple line in table cell. Below is my code word.Application oWord; word.Document oDoc; word.Table oTable; word.Paragraph oPara1; word.Paragraph oPara2; word.Paragraph oPara3; word.Paragraph oPara4; word.Range oRang; word.InlineShape oShape; word.Application create; object missing = System.Type.Missing; Type t = System.Type.GetTypeFromProgID("Word.Application"); object oWord1 = Activator.CreateInstance(t); oWord = (word.Application)oWord1; oWord.Visible = true; oDoc = oWord.Documents.Add(ref missing, ref missing, ref missing, ref missing); //Insert a 3 x 2 table, fill it with data, and make the first row //bold and italic. int r, c,r1,c1; object no = 5; object defaultTableBehaviour = Type.Missing; object autoFitBehaviour = Type.Missing; object start = Type.Missing; object end = Type.Missing; word.Range rng = oDoc.Range(ref start, ref end); oTable = oDoc.Tables.Add(rng, 5, 2, ref defaultTableBehaviour, ref autoFitBehaviour); oTable.Range.Borders.OutsideLineStyle = word.WdLineStyle.wdLineStyleDot; oTable.Columns.Width = 250; oTable.Borders.InsideLineStyle = word.WdLineStyle.wdLineStyleDashDot; oTable.Range.ParagraphFormat.SpaceAfter = 15; string name = ""; string addr = ""; string city = ""; string dist = ""; string state = ""; for (r = 1; r < 4; r++) { for (c = 1; c < 2; c++) { object range = oTable.Cell(r, c); name = dgCustomers.Rows[r].Cells[1].Value.ToString(); addr = dgCustomers.Rows[r].Cells[2].Value.ToString(); city = dgCustomers.Rows[r].Cells[3].Value.ToString(); dist = dgCustomers.Rows[r].Cells[4].Value.ToString(); state = dgCustomers.Rows[r].Cells[5].Value.ToString(); oWord.ActiveWindow.Selection.TypeText("\n"); } } while adding text in newline of table cell the older line text get deleted . Why it happens .I am not getting. Anyone help me. Its urgent. Thanks, Minakshi
John BermanPosted Aug 26, 2009, 9:59 AM
I liked this article. I've done shed loads of word development in vba, quite a bit of excel in vb6 and recently excel using .net c#. So I'm not exactly a beginner, but I still found this article to be very useful.
Pradip AdhikariPosted Aug 23, 2009, 11:45 PM
how can i convert text with html tag to formatted word document??
Amrish Deep RavidaseditedPosted Jul 15, 2009, 11:51 PMEdited Dec 16, 2009, 11:30 PM
All, Thanks for your comments and I am happy that a few found this helpful. I can see many questions but I am unable to help you guys as I have changed my career and taken up my Masters in optimization and I have long forgotten the word automation and other recent trends in it. Cheers, Amrish
Jignesh PatelPosted May 21, 2009, 6:17 AM
Hello I have created word document in C#.Net but how i will add blank page in that word document Please give me reply Thanks & Regards Jignesh Patel
Kiran Chand PalakkattiriPosted Mar 23, 2009, 5:37 AM
Please do let me know how to get the text with formatting and how to insert text with formatting
Kiran Chand PalakkattiriPosted Mar 23, 2009, 5:37 AM
Please do let me know how to get the text with formatting and how to insert text with formatting
sam endeditedPosted Jan 23, 2009, 6:02 PMEdited Jan 23, 2009, 6:41 PM
The explanation is awesome but can u also add the code for word document page indexing?or anyone having idea how to manage indexing in word using C#
Vitalii SymonPosted Dec 23, 2008, 7:18 PM
mostly people need just to generate documents from predifened templates. for this purpose aspose.words (aspose.com) is very good solution. another great (and FREE) solution is invoke docx lib ( http://invoke.co.nz/products/docx.aspx )
Sanjith PillaiPosted Sep 17, 2008, 5:35 PM
This illustrates a very simple and easy to follow procedure for word automation from ASP.net. But is there any way we can deploy such an application (for public use) without having to install ms-word on the server?
Sanjith PillaiPosted Sep 17, 2008, 5:32 PM
The article helps us do word automation from asp.net in a very simple and systematic way. But is there any way we can deploy this application on a server, without having to install ms-office on the server?
Serdar Osman OnurPosted Feb 6, 2008, 5:22 AM
does anybody know how to get the first page of a word document and convert/save it as an image? Thanks a lot
chanandrew99Posted Jan 16, 2008, 3:26 PM
I tried something similar and it works fine for me until I tried to use the app in VISTA. It gives me the following error: QueryInterface for interface Microsoft.Office.Interop.Word._Application failed. Anybody has any idea?
faheem saleemPosted Oct 26, 2007, 7:09 AM
It is a very good article really help me a lot. thanks for writing it and keep writing good articles
faheem saleemPosted Oct 26, 2007, 7:09 AM
It is a very good article really help me a lot. thanks for writing it and keep writing good articles
Shashi SaiPosted Oct 19, 2007, 2:13 AM
How do i change the icon of an embedded object?
BhargavaPosted Jul 15, 2007, 7:45 PM
Is there any way that, clicking on the "Save" button of MS Word, the document is saved in a database? Could you please help me with this issue? Is it possible?
pankaj 0Posted Jul 8, 2007, 5:25 AM
This article is excellent for use by the programmers involved into Word Automation. The clarity and step-by-step approach is remarkable. The comments are well written for an easy and quick understanding. thanks
Jasmine AdamsoneditedPosted Jun 14, 2007, 7:07 PMEdited Jun 14, 2007, 7:08 PM
I do a lot of work with Word Automation and while this is a pretty good article for someone totally unfamiliar with it, you haven't put anything that isn't already available in multiple sources on the web, including the obvious one, MSDN. I was kind of hoping for something new... If you've done any actual work with Word Automation applications, you would know that there are some major unsolved issues with it. Your article would have more value if it had some information about those problems. It is still a good article, but you could have had something about these issues: 1. How to buffer the output so the user doesn't see the flurry of activity on-screen. 2. How to determine the version of Word that is installed on the user's machine and load the correct DLL in your application. This is a big deal for any real-world automation app, and current apps need to be able to deal with 3 versions and they are very different. What you have here will only work for Word 2003. For other versions of Word, the DLL is loaded differently (from the COM server), and the resulting object is a different type, so the code you use to work with it also has to be different. 3. It would be really nice if you explained the whole issue with redistribution of the Office the use of the Primary Interop Assemblies for .NET applications, and how to re-distribute them in your installer. That whole deal is relatively undocumented and it took me a while to figure it out. Also, it seems like the end of this article is cut off. You just sort of stop in mid-thought... why did...