

Abstract
Over the years, we have learned innumerable ways of consuming services across the network such as Remoting, COM, COM+, MSMQ, Web Services using ASP.NET and DCOM. Every technology has its advantages and disadvantages. This article commences by framing the need for WCF and examining the problems it intends to resolve by way of a quick regression of earlier distributing computing technologies. After completion of this article, you will be able to build several WCF services, host each service and consume it in a client application using various WCF development tools. This article intends to provide an understanding of in-house development of WCF services rather than the actual hosting environment such as IIS web server.
Legacy Distributed Technologies
- You have a far greater chance of ensuring that each connected computer is running the same operating system and using the same platform. The Windows operating system has provided us many APIs for building distributed systems. Here the following section depicts a quick recap of some of the major distributed technologies so that we can get the obvious need of WCF.
.NET Remoting
The .NET Remoting API allows distributed objects across multiple computers under .NET platforms. This technology provided some useful features such as performance and managing the manipulation of the service just by editing the configuration files rather than requiring the entire application to be rebuilt. But interoperability among other programming languages such as Java is still not possible in Remoting technology. Object distribution could happen across Windows operating systems only.
COM / DCOM
The Distributed Component Object Model (DCOM) was the Remoting API of choice for Microsoft Centric developers. DCOM extends the features of COM. It is possible to build a distributed system using COM objects. You can program client software in such a way that the physical locations of the remote objects are not hard-coded in the application. During the era of COM , it was not possible to consume objects or a proxy class across a LAN but regardless of whether the remote object was on the same machine or secondary networked machine, the code base could remain neutral because the actual location was recorded externally in the system registry.
XML Web Services
The main idea behind XML services is to achieve a high degree of interoperability across operating systems and platforms. The XML web service faced a major problem early in that it was not 100% compatible with other web service implementations. To overcome such a problem the W3C authored several specifications that laid out how vendors should build web services to ensure interoperability. The Microsoft implementation of most of these standards is encapsulated in the WSE toolkit. But when we build a WCF services application, you do not need to adhere to these semantics defined in the WSE toolkit.
COM+ (MTS)
Microsoft released COM+ to fill in the missing piece of features that were absent in the COM/DCOM technology. COM+ provides a number of features that serviced components leverage, including pooling service, object lifetime, transaction management and role-based security. The COM+ technology is limited to Windows and is best suited for in-house application development.
Anatomy of WCF
We can build web services and client applications that can communicate and interoperate with web services and client applications running on other non-Windows operating systems. So why do we need WCF? If you are building a distributed application for Windows, which technology should we use? The objective behind WCF is to provide a unified programming model for many of these technologies such as Web services, MSMQ, Remoting, COM+ and DCOM, enabling you to build an application that is as independent as possible from the underlying mechanism used to connect services and applications together.
WCF is the acronym for Windows Communication Foundation, introduced with the .NET 3.0 Framework. It integrates many previously independent distributed technologies into a streamlined API represented by the System.ServiceModel namespace. We can expose the service to callers using a wide variety of tactics by employing WCF. Integration and interoperability of diverse APIs are typically two major aspects of WCF. Here, consider the following list of major features of WCF:
- It supports service bindings that allow us to choose the most applicable protocols (such as HTTP, TCP, MSMQ and named pipes).
- It supports both strongly-typed and un-typed messages that allow .NET applications to share custom efficiently on other platforms.
- It supports the latest web service specifications.
- It supports session-like management tactics.
- It also supports both native Windows and .NET security protocols and numerous neutral security techniques built on web services standards.
When you build a WCF distributed system, you will typically need to create three interrelated assemblies as in the following:
- WCF Service Assembly: This DLL contains the classes and interfaces that represent the overall functionality you want to expose to external callers.
- WCF Service Host: This software module is the entity that hosts your WCF service assembly.
- WCF Client: This is the application that accesses the service's functionality using an intervening proxy.

If we develop a WCF service on the local machine, then we do not need to create three files, we can eliminate the host DLL generation part.
Building WCF Service Assembly
The Visual Studio 2010 IDE provides the ideal environment for building and consuming WCF web services and applications. The Visual Studio development tools for the .NET framework 4.0 include a project template that you can use for creating WCF services. 
At this moment, we are creating a WCF service that is hosted locally. Since we are hosting it locally, we do not need to create a separate solution to host this service that typically happens in the case of an HTTP or TCP binding.
To begin, open the Visual Studio 2010 IDE and create a WCF Service Library project named MagicMathWcf, making sure the correct option under the WCF node of the New Project Dialog box is as in the following: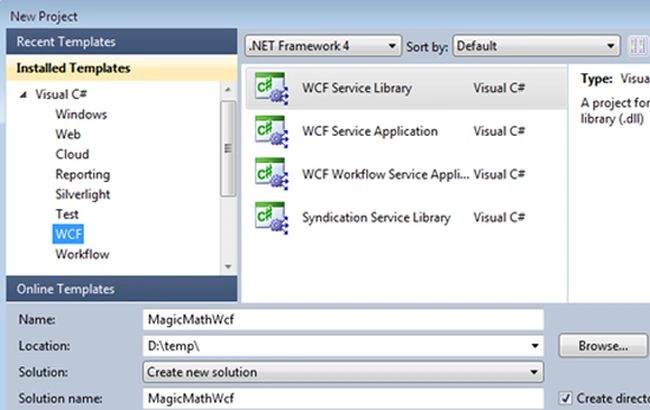
Defining the Contract
The WCF service requires an interface-like structure referred to as Contracts that the service will implement and then build a service that conforms to these contracts. The WCF typically stipulates three types of contracts, Data Contract, Message Contract and Service Contract. The Data contract specifies the details of products that the WCF service can pass to the operation. In simple terms, the Data contract defines the variables. On the other hand, the service contract defines the operations (methods) that the WCF service implements. For a CLR interface to participate in the service provided by WCF, it must be adorned with the [ServiceContract] attribute.
The following code depicts the implementation of the Service contract. Here, change the name of the initial IService.cs file to IMath.cs and Service1.cs to MathLib.cs. Once you do so, delete all the existing example code from both of files and place the following code in the IMath.cs as in the following:
- using System;
- using System.ServiceModel;
- namespace MagicMathWcf
- {
- [ServiceContract]
- public interface IMath
- {
- [OperationContract]
- double calSqrt(double value);
- [OperationContract]
- string WelcomeMsg(string str);
- }
- }
We have now specified the structure of the data passed to the WCF service by using a data contract and defined the shape of the WCF service by using a service contract. The next step is to write the code that actually implements the service code like an interface.
So, open the MathLib.cs file and implement the IMath interface over there. Here, specify the previously defined method body implementation logic as in the following:
- using System;
- using System.ServiceModel;
- namespace MagicMathWcf
- {
- public class MathLib : IMath
- {
- public double calSqrt(double value)
- {
- return Math.Sqrt(value);
- }
- public string WelcomeMsg(string str)
- {
- return "Hello " + str;
- }
- }
- }
Finally, double-check the details in the app.config file to ensure and verify that file renaming operation has been done correctly. Finally, debug the service project. One benefit of a WCF service project is that it provides a service simulator where we can test our service implementation. Just double-click over the method that you wanted to test, supply the necessary argument and click the Invoke button. It will yield the output as in the following:
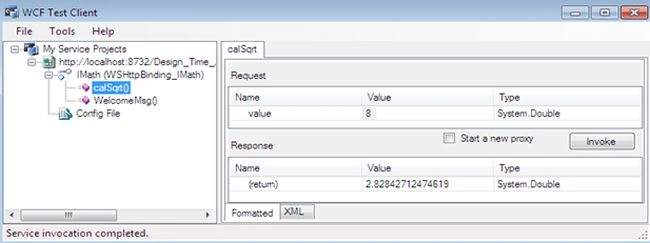
We can also test the WCF service from the command prompt using the wcftestclient.exe utility. Just pass the service metadata URL and testing begin with a similar simulator as earlier.
WCF Service Binding
Once you have defined and implemented the service and the data contract in your service library, the next step is to build the hosting agent for the WCF service. Fortunately, we have a diverse possible range of hosts to choose from, all of which must specify the binding used by the remote caller to gain access to the service. WCF ships with many binding choices, each of which is tailored to a specific need.
HTTP Binding
The BasicHttpBinding class is invented in the HTTP binding mechanism to expose contracts types using XML web service protocols. This binding uses HTTP as the transport and Text/XML as the default encoding message. The main reason of using this binding is to maintain backward compatibility with applications that were previously built to communicate with ASP.NET web services.
TCP binding
The NetTcpBinding class is behind the TCP binding implementation. This class uses TCP to move binary data between the client and WCF service that results in higher performance than the web service protocol. The TcpNetBinding supports transaction, reliable session and secure communication.
MSMQ binding
The NetMsmgBinding class is of immediate interest if you want to integrate with a Microsoft MSMQ server. This type of binding is used for cross-machine communication among .NET applications. This is the preferred approach among the MSMQ-centric binding.
Since we are hosting the WCF service on the local machine we do not need this section indeed. Basically, this step is required when we create a WCF service that is hosted on an IIS server. During that process, a final endpoint address is generated that is referenced in the configuration file. Just for knowledge purposes, we create a separate console based application that works as a middleware responsible for starting and stopping the service. In order to start the service, first add the reference of WCF service DLL and ServiceModel.dll in that solution and use the following code.
- using System;
- using System.ServiceModel;
- using MagicMathWcf;
- namespace MathMagicHOST
- {
- class Program
- {
- static void Main(string[] args)
- {
- using (ServiceHost sHost=new ServiceHost(typeof(MathLib)))
- {
- sHost.Open();
- Console.WriteLine("The Service Started.......");
- Console.ReadLine();
- }
- }
- }
- }
- <?xml version="1.0" encoding="utf-8" ?>
- <configuration>
- <system.serviceModel>
- <services>
- <service name ="MagicMathWcf.MathLib">
- <endpoint address =""
- binding="basicHttpBinding"
- contract="MagicMathWcf.IMath" />
- <host>
- <baseAddresses>
- <add baseAddress =""/>
- </baseAddresses>
- </host>
- </service>
- </services>
- </system.serviceModel>
- </configuration>
Consuming WCF Service
Now, the final task is to build a piece of software to communicate with this WCF service type. Consumtion of a WCF service is basically generating a proxy class of that service that is later referenced in the client application. There are many ways to generate a proxy class. In this section, we shall create a proxy class using the Visual Studio IDE. So, first of all create a Console based application (called MagicMathClient) and right-click over the project in the Solution Explorer. Here, choose the Add Service Reference vommand, then the following dialog box will ask you to enter the address of the WCF service. Just enter the address and hit the Go button. It will expose the metadata that resides in the WCF reference as in the following:
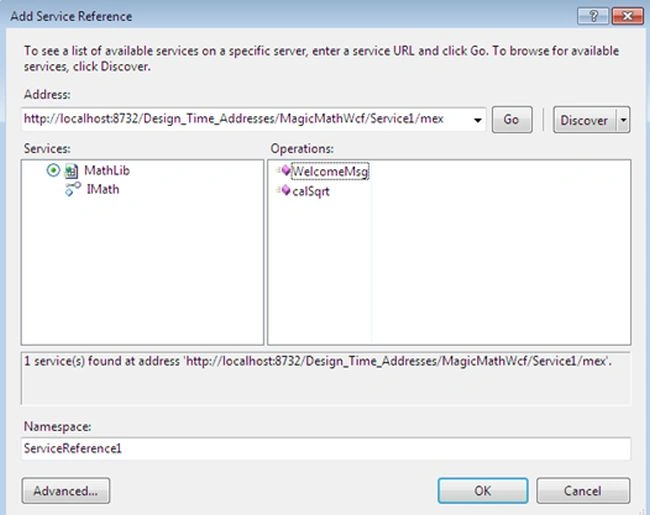
In the bottom of that dialog box, you can set the name of this proxy class, for instance ServiceReference1. Finally, click the OK button and once that is done, you will see that a service reference is added under the Solution Explorer as in the following:
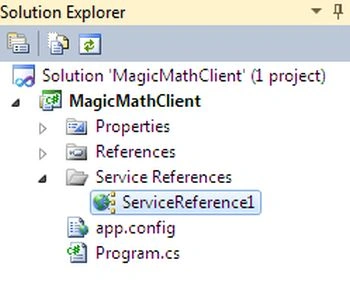
Now, import the WCF ServiceReference1 namespace and place the following code in the program class as in the following:
- using System;
- using MagicMathClient.ServiceReference1;
- namespace MagicMathClient
- {
- class Program
- {
- static void Main(string[] args)
- {
- using (MathClient obj=new MathClient())
- {
- Console.Write("Enter the Value:");
- double x = double.Parse(Console.ReadLine());
- Console.WriteLine("Sqrt={0}",obj.calSqrt(x));
- Console.ReadLine();
- }
- }
- }
- }

One thing to always remember, before running this application, first start the hosted service application, otherwise this application throws an exception.
Summary
As we have stated, WCF is platform-independent like ASP.NET web services but offers features similar to Remoting, XML Web services and MSMQ. In this article, we learned how to use WCF between a client and server application and explored the various aspects of a WCF service contract, data contract, its advantage over inherent technology, how to configure the service and finally, how to consume its functionality into a client console-based application. In the next article of this series, we will illustrate the HTTP, TCP and MSMQ binding implementation and other features such as security and session management.
Sam HobbsPosted Nov 1, 2014, 6:35 PM
For the benefit of others, note that there is no DCOM "Remoting API". DCOM uses the RPC protocol (that ususally uses TCP/IP) for communication, as in: https://en.wikipedia.org/wiki/Microsoft_RPC