

In this series you will learn property-wise. The last stop in the journey of this series is Creating Responsive Site. So please go through with all futures CSS articles. Before starting the series first we will look at the answers to some basic questions.
- What is CSS?
- Which IDE(Integrated Development Environment) Required?
- How to create a CSS file & Types of CSS?
- How to link External CSS file to HTML?
- What is Property?
- Basic Rules of Writing CSS & CSS Selector
- Online formatter.
- CSS properties Explanation and Practical
- Background
- Border
- Float
What is CSS?
CSS stand for Cascading Style Sheets. This very simple language is used to decorate and make beautification and make stylish web page. Without CSS web page will not look good.
If a Web Page isa human body then HTML is like a skeleton and CSS is like the actual body.
Simple Web Page Web Page with CSS
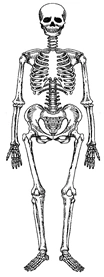

CSS makes web pages look stylish. Mostly visitors look at your website design, way of presentation and colors, dimension of object etc….
This can all be achieved by CSS.
Which IDE(Integrated Development Environment) Is Required?
You can use any normal notepad application to write HTML and CSS. Because CSS is not required to compile, it's just a text file.
To the best of my knowledge you can use the following IDE:
- Visual Studio Community Edition
- Visual Studio Code
- NetBeans
- Brackets
- SubLimeText
For more detail you can Google the following keywords ”free html css ide”
Or
https://www.google.co.in/search?source=hp&ei=Yq8mWsizLYSSvQSyh5DwCA&q=ree+html+css+ide&oq=ree+html+css+ide&gs_l=psy-ab.3..0i13k1j0i22i30k1l3.7651.7651.0.8026.1.1.0.0.0.0.140.140.0j1.1.0....0...1c.1.64.psy-ab..0.1.139....0.CG91BYfxBgU
How to create a CSS file & Types of CSS?
CSS file is a plain text file you can even create it in a simple notepad program.
There are three ways to use css in html documents.
- In Document Style / Internal Style Sheet
- Inline (With Html Tag)
- External Style Sheet
These three ways can be used in one document. Its depends upon developer to developer and project / situation.
In Document Style
Under head tag section mostly we write a style tag that is In Document Style.
- <head>
- <style>
- IN DOCUMENT STYLE
- </style>
- </head>
Example
- <head>
- <style>
- p {
- background: green
- }
- ;
- </style>
- </head>
Inline Style
With html tag we write Inline style.
- <p style=”Inline Style”>This paragraph tag and text</p>
Example
- <p style=”background:red”>This paragraph tag and text</p>
Performance
External CSS file is the best option to use in html documents because it reduces the loading time of the page.
Inline CSS makes it slightly slower to load html documents.
Online Test CSS performance link
https://jsperf.com/inline-style-vs-css-class/2
How to link External CSS file to HTML?
You can bind CSS files in header <head> section of HTML document.
Example
<link href="css/style.css" type="text/css" rel="stylesheet" />
In the above example you can see STYLE.CSS file which located inside CSS folder and linked with html document.
What is Property?
CSS is all about properties. Property is one type of predefined option which can be set by different values.
In the example you can see background color property option which can be set by different colors as per your web page requirement.
Example
background-color: yellow;
Above property will make a yellow background color where its get declared.
Basic Rules of Writing CSS
; : Semicomma is line terminator.
{ } : Inside curly braces we write the css style for In document (Internal) )style and External Style Sheet.
/* */ : Single line and Multiline can be marked as comments.
CSS Selector
You can write css on a selector basis. Following is a type of selector,
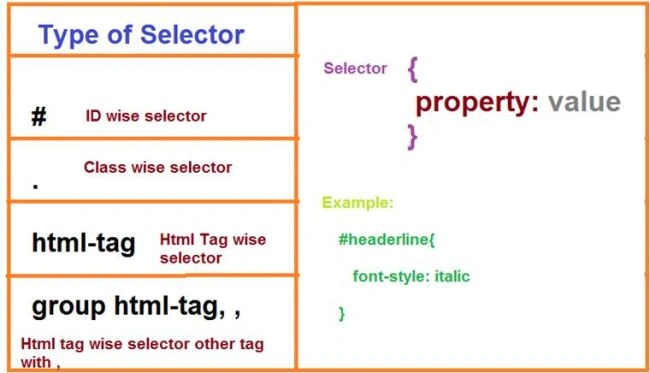
- ID wise
- Tag wise
- Class wise
- Group Tag wise
ID wise
As you know CSS for HTML and CSS bind to html tag. In html tag you mostly define ID attribute.
In following example you can see P tag defined with id named intropara
Example
<p id=”intropara”>Welcome to learn CSS</p>
We write css for defined ID.
Example
- #intropara {
- text - align: justify;
- }
Tag wise
We write HTML with the help of Tags like this:
<p> <h1> etc..
- p {
- background - color: yellow;
- }
- h1 {
- font - style: italic;
- }
As per above, tag wise style means background color will be yellow to all p tags and all H1 tag will be displayed in italic form.
Class wise
Classwise style sheet are mostly used in HTML and CSS because you can give one class name to multiple tags. Class wise css start with . (dot).
Class HTML example,
- <p id=”firstpara” class=”italicletter”>This paragraph number 1</p>
- <p id=”secondpara” class=”italicletter”>This paragraph number 2</p>
CSS example,
- .italicletter {
- font - style: italic;
- }
Group Tag wise
Groupwise tag css style is where we write css rules for multiple html tags.
In the following example you can see style sheet rules written for h1 and p tags.
Example
- h1, p {
- font - style: italic;
- }
Online CSS Formatter
You can format and align your css code online on the following sites,
- https://www.cleancss.com/css-beautify/
- https://www.freeformatter.com/css-beautifier.html
- http://www.codebeautifier.com
CSS properties Explanation and Practical
- Background
- Border
- Content
- Float
Background
CSS background property to set the background things of HTML element.
Background has the following types of properties,
- background-color
- background-image
- background-repeat
- background-attachment
- background-position
- background-color:
To set the background color of a html element.
You can specify the color by following ways,
- Color Name
- Hex Values
- RGB numers.
Syntax
background-color: <color name>;
Example
background-color: red;
- background-image
To set the background image of a html element.
Syntax
background-image: url / path
Example
background-image: “images/pic.jpg”;
- background-repeat
To set background if image will repeat on page or not.
Syntax
background-repeat: repeat/repeat-x/repeat-y/no-repeat/
Example
background-repeat: repeat-x;
- background-attachment
This property is to set background image scrollable with image or without image.
Syntax
background-attachment: scroll / fixed / local / initial / inherit
Example
background-attachment: scroll;
- background-position
To set the position of the image
Syntax
background-position: left / left top / left center / left bottom / right top / right / right center / right bottom /
center / center top / center center / center bottom
Example
background-position: left;
Border
To set the border. Border having following sub categories properties.
- border: All in one property to set the all types border rules.
Syntax
border: <width> <style> <color>
Example
border: 7px dotted blue;
You will learn more about border-width, border-style and border-color in coming paragraphs.
- border-bottom : To set bottom side border.
Syntax
border-bottom: <bottom width> <bottom style> <bottom color>
Example
border-bottom: 7px dotted blue;
Border bottom can be further divided or extended into the following properties
- border-bottom-color
- border-bottom-style
- border-bottom-width
- border-bottom-left-radius
- border-bottom-right-radius
- border-bottom-color : To set the bottom border color.
Syntax
border-bottom-color: <color name>
Example
border-bottom-color: red;
- border-bottom-style : To set the bottom border style.
Syntax
border-bottom-style: <none/dotted/solid/double/groove/ridge/inset/outset>
Example
border-bottom-style: dotted;
- border-bottom-width: To set the bottom border width
Syntax
border-bottom-style: <thin/thick/??px>
Example
border-bottom-style: 10px;
- border-bottom-left-radius: To make left bottom in round corner shape.
Syntax
border-bottom-left-radius: <length/%>
Example
border-bottom-left-radius: 10px;
border-bottom-left-radius: 10%;
- border-bottom-right-radius:To make right bottom in round corner shape.
Syntax
border-bottom-right-radius: <length/%>
Example
border-bottom-right-radius: 10px;;
border-bottom-right-radius: 10%;
- border-top: To set top side border.
Syntax
border-top: <width> <style> <color>
Example
border-top: 7px dotted blue;
Border top can be further divided or extended into the following properties:
- border-top-color
- border-top-style
- border-top-width
- border-top-left-radius
- border-top-right-radius
NOTE
You can set border-top-<properties> in a similar way as border-bottom-<properties>
- border-left: To set left side border.
Syntax
border-left: <width> <style> <color>
Example
border-left: 7px dotted blue;
Border left can be further divided or extended into the following properties:
- border-left-color
- border-left-style
- border-left-width
NOTE
You can set border-left-<properties> as similar way as border-bottom-<properties>
- border-right: To set right side border.
Syntax
border-right: <width> <style> <color>
Example
border-right: 7px dotted blue;
Border right can be further divided or extended into the following properties:
- border-right-color
- border-right-style
- border-right-width
NOTE
You can set border-right-<properties> as similar way as border-bottom-<properties>
- border-color: To set the border color
Syntax
border-color: <color name / hex code / rgb code>
You can give color definition by color name, hex code and rgb code.
Example
border-color: red;
(all four side will be red color)
border-color:red blue green yellow;
(Top border in red, Right border in blue , Bottom border in green , Left border in yellow)
border-color: #F00;
border-color: #ff0000;
- border-collapse: To display cells or contents in collapse separately.
Collapse will reduce space and make it into single border.
Separate will give space and make an individual border to cell or content.
Syntax
border-collapse: <collapse/separate>
Example
border-collapse: red;
- border-image: To set image as a border to an element.
You can give the path or url of the image.
Syntax
border-image: <collapse/separate>
Example
border-image: collapse;
- border-radius: To add rounded corner.
Syntax
border-radius: <width px/width px>
Example
border-radius: 25px;
border-radius: 50px 25px;
- border-width: To specify the border type.
Syntax
border-width: <medium/thin/thick/??px>
Example
border-width: 10px;
border-width: medium thick 20px 30px
(above property value will build top border medium, right border thick and bottom border 20px, Left border 30px)
- border-style: To set the pattern of border.
Syntax
border-style: <none/dotted/solid/double/groove/ridge/inset/outset>
Example
border-style: dotted;
border-style: dotted double groove solid
(above property value will build border style top border dotted, right border double and bottom border groove, left border solid.)
- border-spacing: To set the spacing.
Syntax
border-spacing: <??px> (To set the spacing Top,Right,Bottom,Left side equally.)
border-spacing: <LRpx TBpx >
(LRpx : Left side and Right side spacing // TBpx: Top side and Bottom side spacing)
Example
border-spacing: 10px;
border-spacing: 10px 30px;
Float
To set alignment of element inside container. There are two basic values; left , right.
Syntax
float: <none/left/right/initial/inherit>
Example
float: left; (To move element left side in container.)
float: right; (To move element right side in container.)
Background HTML and CSS Sample Code
- <html>
- <head>
- <style>
- .firstsample {
- background: lightblue url("http://csharpcorner.mindcrackerinc.netdna-cdn.com/App_Themes/CSharp/Images/SiteLogo.png") no-repeat fixed center;
- }
- .secondsample {
- background-color: green;
- }
- </style>
- </head>
- <body class="firstsample">
- <h1>In this page you scroll page but C# (Csharpcorner) logo always in center of the screen.</h1>
- <div> <b>First Div</b> Sample div with class name "firstsample" </div> <br> <br>
- <div class="secondsample">
- <h2>Background color of this div : green</h2> <b>Second Div</b> Sample div with class name "secondsample" </div> <br> <br> <br> <br> <br> <br> <br>
- <div> <br> <br> <br> <br> <br> <br> <b>Third Div</b> Sample div with class name "secondsample" </div> <br> <br>
- <div> <br> <br> <br> <b>Fourth Div</b> Sample div with class name "secondsample" </div> <br> <br>
- <div> <br> <br> <br> <br> <br> <br> <br> <br> <br> <br> <b>Fifth Div</b> Sample div with class name "secondsample" </div> <br> <br> </body>
- </html>
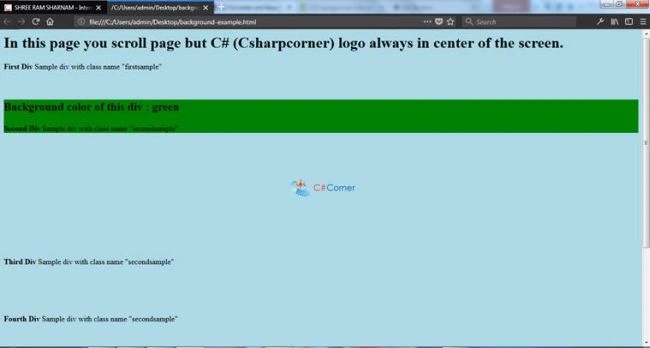
OUTPUT
Border HTML and CSS Sample Code
- <html>
- <head>
- <style>
- .firstsample {
- border: 5px solid blue;
- }
- .secondsample {
- padding-top: 20px;
- padding-left: 20px;
- height: 70px;
- border-width: 20px;
- border-color: #009;
- border-style: outset;
- border-radius: 5px;
- }
- .thirdsample {
- padding-top: 20px;
- padding-left: 20px;
- height: 200px;
- border-width: 10px;
- border-color: grey;
- border-style: dotted double solid groove;
- border-radius: 5px;
- }
- table,
- td,
- th {
- border: 3px solid green;
- }
- .firsttable {
- border-collapse: collapse;
- }
- .secondtable {
- border-collapse: separate;
- border-color: blue;
- }
- </style>
- </head>
- <body>
- <div class="firstsample"> <b>First Div</b> Sample div with class name "firstsample" </div> <br> <br>
- <div class="secondsample"> <b>Second Div</b> Sample div with class name "secondsample" </div> <br> <br>
- <div class="thirdsample"> <u>border-style </u> <br> Top side : dotted <br> Right side : double <br> Bottom side : solid <br> Left side : groove;s <br> <br> <b>Third Div</b> Sample div with class name "secondsample" </div> <br> <br>
- <div>
- <table class="firsttable">
- <tr>
- <td> Name </td>
- <td> Phone </td>
- </tr>
- <tr>
- <td> Ashish Kalla </td>
- <td> 9022592774xxxx </td>
- </tr>
- <tr>
- <td> Suhana Kalla </td>
- <td> 9022592774xxxx </td>
- </tr>
- </table>
- </div>
- </body> <br> <br>
- <div>
- <table class="secondtable">
- <tr>
- <td> Name </td>
- <td> Phone </td>
- </tr>
- <tr>
- <td> Ashish Kalla </td>
- <td> 9022592774xxxx </td>
- </tr>
- <tr>
- <td> Suhana Kalla </td>
- <td> 9022592774xxxx </td>
- </tr>
- </table>
- </div>
- </body>
- </html>
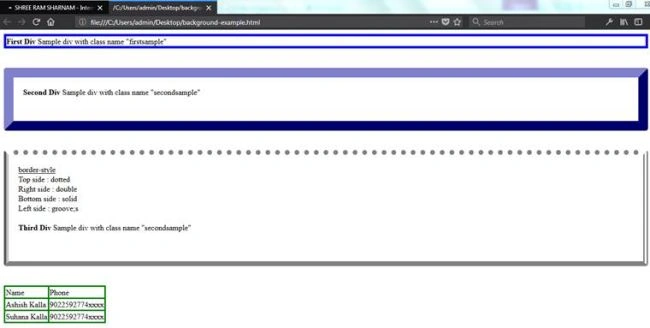
OUTPUT
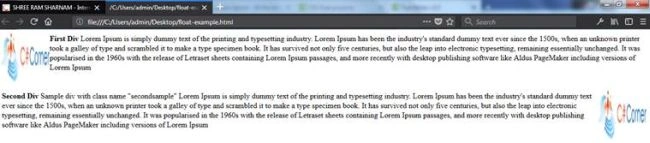
Float HTML and CSS Sample Code
- <html>
- <head>
- <style>
- .firstsample {
- float: left
- }
- .secondsample {
- float: right
- }
- </style>
- </head>
- <body>
- <div> <b>First Div</b> <img src="http://csharpcorner.mindcrackerinc.netdna-cdn.com/App_Themes/CSharp/Images/SiteLogo.png" class="firstsample" width="100px" height="100px" /> Lorem Ipsum is simply dummy text of the printing and typesetting industry. Lorem Ipsum has been the industry's standard dummy text ever since the 1500s, when an unknown printer took a galley of type and scrambled it to make a type specimen book. It has survived not only five centuries, but also the leap into electronic typesetting, remaining essentially unchanged. It was popularised in the 1960s with the release of Letraset sheets containing Lorem Ipsum passages, and more recently with desktop publishing software like Aldus PageMaker including versions of Lorem Ipsum </div> <br> <br>
- <div class="secondsample"> <b>Second Div</b> Sample div with class name "secondsample" <img src="http://csharpcorner.mindcrackerinc.netdna-cdn.com/App_Themes/CSharp/Images/SiteLogo.png" class="secondsample" width="100px" height="100px" /> Lorem Ipsum is simply dummy text of the printing and typesetting industry. Lorem Ipsum has been the industry's standard dummy text ever since the 1500s, when an unknown printer took a galley of type and scrambled it to make a type specimen book. It has survived not only five centuries, but also the leap into electronic typesetting, remaining essentially unchanged. It was popularised in the 1960s with the release of Letraset sheets containing Lorem Ipsum passages, and more recently with desktop publishing software like Aldus PageMaker including versions of Lorem Ipsum </div>
- </body>
- </html>
OUTPUT
Happy Coding…
Arvind SinghPosted Jan 3, 2018, 11:32 PM
Nice article........