

Validations are very important to limit user input. So, we need to validate our form client side and server side as well. Developers write the validations through if/else statements again and again to check the data and then they go through the exceptions, this is the way developers normally apply the validations on the forms.
But Data Annotation attributes are a C# built-in feature. Data Annotation Attributes is not a web concept, but we can also use them in our desktop and mobile applications as well. But today, web development is a huge trend so students or beginners should know about it. Don’t limit your mind to use Data Annotations for the web only.
You just need to include the reference to System.ComponentModel.DataAnnotations into your project and you can use Data Annotation Attribute in your business (model) classes. Let’s discuss the classical validation and how the developers were applying the validations before this feature.
- public class Student {
- private string _StudentName;
- public string StudentName {
- get {
- return _StudentName;
- }
- set {
- if (value == null) {
- throw new
- NullReferenceException("The value should not Null");
- }
- _StudentName = value;
- }
- }
- }
Yes, this was the way, whenever they needed to apply the validations on the form they would come into the set block and apply if else statements here.
But with the help of Data Annotations, the code has become so much cleaner and easy to use.
Implementation of Data Annotations
Let’s add some different kinds of fields in our class to apply a different kind of validation attribute on it and to learn the most about Data Annotations.
- namespace ValidationDemo.Models {
- public class Student {
- public string Name {
- get;
- set;
- }
- public string Email {
- get;
- set;
- }
- public string RetypeEmail {
- get;
- set;
- }
- public string Cnic {
- get;
- set;
- }
- public int Age {
- get;
- set;
- }
- public string City {
- get;
- set;
- }
- public DateTime ? DateOfBirth {
- get;
- set;
- }
- }
- }
I’ve decorated the model class with these fields.
Required
Required attribute is used to make the fields required.
- [Required]
- public string Name {
- get;
- set;
- }
As you can see in the Visual Studio, [Required] and our Customer class names have the same color, this means that ‘Required’ is also a class. You can see the under-the-hood coding by right-clicking on the ‘Required’ attribute and going to Definition. If you’ve installed Resharper, then you can easily see the coding behind it.
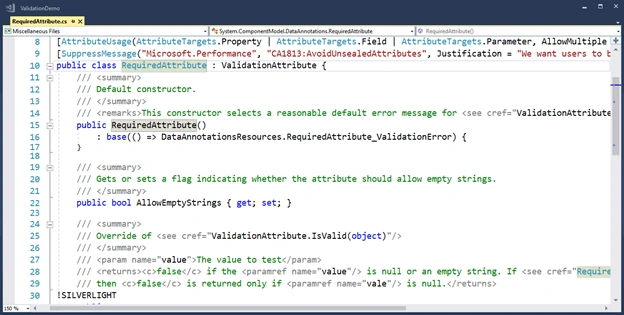
The code looks like that. We’re using [Required] and here the class name is RequiredAttribute. Don’t get confused among these things, actually, Microsoft makes the word Attribute optional here. Now you just write it as [Required].
Now if we want to define our custom error message and if any user validates the Name field, then we can initialize the ‘ErrorMessage’ Property of any validation attribute class.
- [Required] public string Name {
- get;
- set;
- }[Required(ErrorMessage = "Please Enter Valid Email Address")]
- public string Email
- {
- get;
- set;
- }
EmailAddress
As we already know, email address has its own way, it is necessary that email address should have a domain name with @ sign. So, instead of writing the code for email address field validation, we decorate our email field as:
- [EmailAddress]
- public string Email { get; set; }
- [DataType(DataType.EmailAddress)]
- public string Email { get; set; }
- [Required(ErrorMessage = "Please Enter Valid Email Address")]
- public string Email { get; set; }
- [Compare("Email")]
- public string RetypeEmail { get; set; }
- [Required]
- [Compare("Email")]
- public string RetypeEmail { get; set; }
- [Compare("Email"), Required]
- public string RetypeEmail { get; set; }
- [RegularExpression("^[0-9+]{5}-[0-9+]{7}-[0-9]{1}$")]
- public string Cnic { get; set; }
- [Range(18, 25)]
- public string Age { get; set; }
- [StringLength(30)]
- public string Name { get; set; }
- [StringLength(30, MinimumLength = 3)]
- public string Name { get; set; }
- [DataType(DataType.Date)]
- public DateTime? DateOfBirth { get; set; }
- public class Student {
- [Required(ErrorMessage = "Please Enter Name e.g. John Doe")]
- [StringLength(30, MinimumLength = 3)]
- public string Name {
- get;
- set;
- }
- [Required]
- [EmailAddress]
- public string Email {
- get;
- set;
- }
- [Required]
- [Compare("Email")]
- public string RetypeEmail {
- get;
- set;
- }
- [DisplayName("Phone Number")]
- public string Phone {
- get;
- set;
- }
- [RegularExpression("^[0-9+]{5}-[0-9+]{7}-[0-9]{1}$")]
- [Required]
- public string Cnic {
- get;
- set;
- }
- [Range(18, 25)]
- public string Age {
- get;
- set;
- }
- [StringLength(35)]
- public string City {
- get;
- set;
- }
- public string Address {
- get;
- set;
- }
- [Required]
- [DataType(DataType.Date)]
- public DateTime ? DateOfBirth {
- get;
- set;
- }
- }
Join the conversation! Your thoughts help the community grow.