

Introduction
In this article we will use backbone.js with raphael.js. Here we create a simple application using both scripts. We already know about backbone.js. This article is a simple introduction to backbone.js. Here is the main purpose, to introduce raphael.js.
Backbonejs
We know that backbone is a JavaScript library for client-side applications. It helps for managing the code for the developers that use this code to create a single page application. Backbone.js has four classes that are Models, Views, Controllers and Collections. The Models and Collections work together when combined , those two classes make up the Model of MVC.
Raphael.js
Raphael.js is also a JavaScript framework that provides some functionality for drawing vector graphics in the browser. It is the SVG W3C recommendation and VML as a base for creating graphics. For drawing the image we need the raphael object that is called the raphael paper.
Here we need to add these JavaScripts files:
<script type="text/javascript" src="js/raphael.js"></script>
<script type="text/javascript" src="js/underscore.js"></script>
<script type="text/javascript" src="js/jquery-2.0.1.js"></script>
<script type="text/javascript" src="js/backbone.js"></script>
<script type="text/javascript" src="backbone.raphael.js"></script>
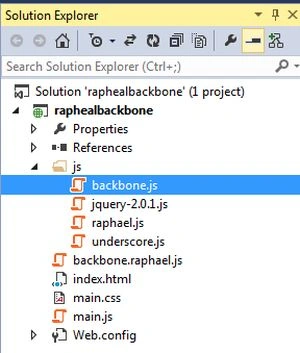
Now we create the application.
Step 1
First create a web application:
- Start Visual Studio 2013.
- From the Start window select "New Project".
- Select "Installed" -> "Template" -> "Visual C#" -> "Web" -> "Visual Studio 2012" and select "Empty web application".
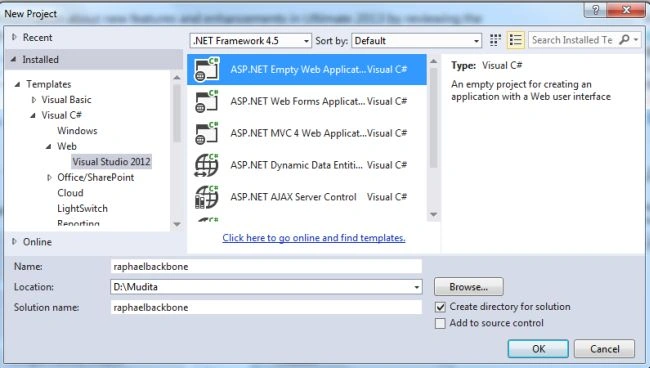
- Click on the "OK" button.
Step 2
Now add the HTML Page to the project:
- In the Solution Explorer.
- Right-click on the project and select "Add" -> "HTML Page".
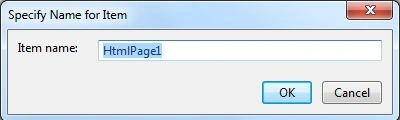
- Change the name.
- Then click on the "OK" button.
Add the following code:
<!DOCTYPE html>
<html>
<head>
<title>Raphael Boilerplate</title>
<link rel="stylesheet" href="main.css" type="text/css" />
<!-- global use -->
<script type="text/javascript" src="js/raphael.js"></script>
<script type="text/javascript" src="js/underscore.js"></script>
<script type="text/javascript" src="js/jquery-2.0.1.js"></script>
<script type="text/javascript" src="js/backbone.js"></script>
<script type="text/javascript" src="backbone.raphael.js"></script>
<script type="text/javascript" src="main.js"></script>
</head>
<body>
<div id="wrap">
<div id="left">
<div id="container"></div>
</div>
<div id="right">
</div>
</div>
<script type="text/template" id="circleHtmlView">
<label for="x"> x Co-ordinate: <input id="x" class="rInput" value="<%- x %>" type="number"></label><br />
<label for="y"> y Co-ordinate:: <input id="y" class="rInput" value="<%- y %>" type="number"></label><br />
<label for="radius"> radius: <input id="radius" class="rInput" value="<%- radius %>" type="number"></label><br />
<label for="name"> Circle Name: <input id="name" class="rInput" value="<%- name %>" type="text"></label><br />
<label for="color"> Circle_Color: <input id="color" class="rInput" value="<%- color %>" type="color"></label>
</script>
</body>
</html>
Step 3
Now we add a JavaScript file:
- In the Solution Explorer.
- Right-click on the project then select "Add" -> "New Item" -> "JavaScript".
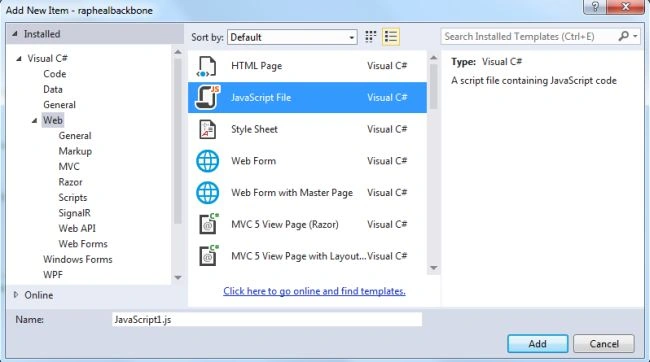
- Click on the "Add" button.
Add the following code:
$(document).ready(function () {
'use strict';
var paper = Raphael("container", 300, 500);
var CircleModel = Backbone.Model.extend({
defaults: {
x: 0,
y: 0,
radius: 5,
name: "Default",
color: "RED"
}
});
var ImageView = Backbone.RaphaelView.extend({
initialize: function () {
this.el = paper.circle(model.get("x"), model.get("y"), model.get("radius")).attr({ fill: model.get("color") });
},
events: {
"click": "sayCircle"
},
sayCircle: function (evt) {
console.log("circle");
},
render: function (model) {
var figure = this.el;
figure.attr({
cx: model.get("x"),
cy: model.get("y"),
r: model.get("radius"),
fill: model.get("color")
});
return this;
}
});
var NameView = Backbone.RaphaelView.extend({
initialize: function (options) {
this.circleFigure = options.circleFigure;
var figureBbox = this.circleFigure.getBBox();
this.el = paper.text(model.get("x"), model.get("y") + figureBbox.height / 1.5, model.get("name"));
},
events: {
"click": "sayName"
},
sayName: function (evt) {
console.log("name");
},
render: function (model) {
var name = this.el;
var figureBbox = this.circleFigure.getBBox();
name.attr({
x: model.get("x"),
y: parseInt(model.get("y")) + figureBbox.height / 1.5,
text: model.get("name")
});
return this;
}
});
var CircleView = Backbone.RaphaelView.extend({
initialize: function () {
var model = this.model;
this.listenTo(model, "change", this.render);
this.imageView = new ImageView();
this.nameView = new NameView({ circleFigure: this.imageView.el });
var element = paper.set();
element.push(this.imageView.el);
element.push(this.nameView.el);
this.el = element;
}, render: function () {
this.imageView.render(this.model);
this.nameView.render(this.model);
return this;
},
events: {
mouseout: "sayCompound"
},
sayCompound: function (evt) {
console.log("Compound");
}
});
var CircleHtmlView = Backbone.View.extend({
template: _.template($('#circleHtmlView').html()),
el: $('#right'),
initialize: function () {
this.listenTo(model, "change", this.render);
this.render();
},
events: {
"change .rInput": "update"
}, render: function () {
this.$el.html(this.template(this.model.attributes));
return this;
},
update: function (evt) {
var source = $(evt.target),
newValue = source.val(),
id = source.attr("id");
this.model.set(id, newValue);
}
});
var model = new CircleModel({
x: 200,
y: 250,
radius: 50,
name: "MyName",
color: "yellow"
});
var view = new CircleView({
model: model
});
var htmlView = new CircleHtmlView({
model: model
});
});
In the code above we use this code:
var paper = Raphael("container", 300, 500);
Here we use the "container" that is the object of raphael js, this is called raphael paper used for drawing. It is created by the raphael() function. There are various sets of arguments taken by this function.
Step 4
Now we add a stylesheet as in the following:
- In the Solution Explorer.
- Right-click on the project then select "Add" -> "New Item" -> "StyleSheet".
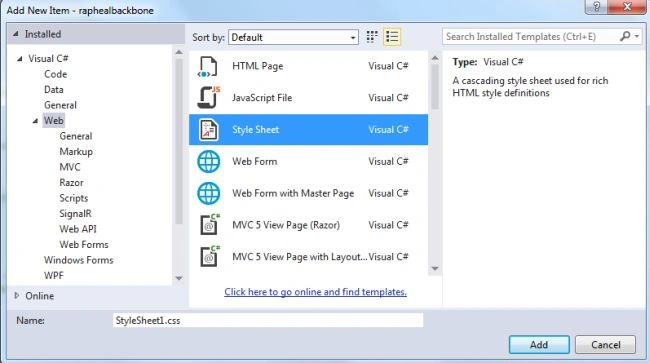
- Click on the "Add" button.
Add the following code:
body{
background-color: #e4dddd;
}
#wrap {
width:1000px;
margin:0 auto;
}
#left {
float: left;
width: 500px;
}
#right {
float:right;
width:500px;
}
label{
display: block;
}
Step 5
Now execute the application, the output window looks like this:
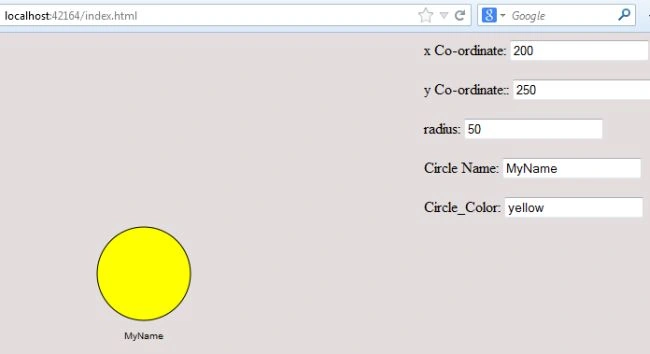
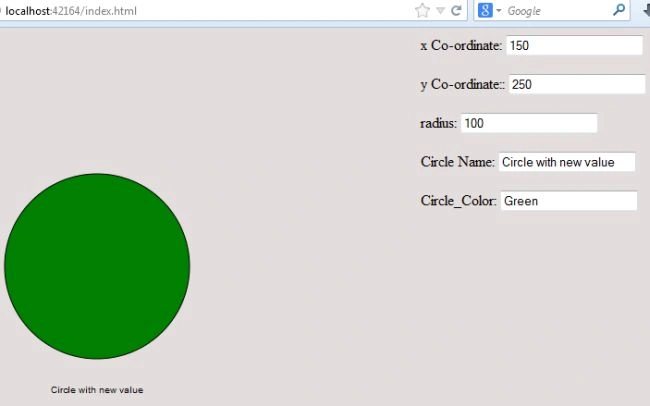
Now we can change the radius, color , axis and name of all the properties of the circle dynamically.
Mahesh ChandPosted Feb 2, 2014, 9:17 PM
Thanks Mudita. Nice to know new libraries.