

Introduction
In this article we will see how to use Angular.js in a LightSwitch application. Please check the previous articles on LightSwitch by visiting the following links.
Why AngularJS?
- It decreases emphasis on directly handling DOM manipulation from the application logic
- It employs efficient two-way data binding and sensible MVC implementation
- We can create our own HTML custom tags and attributes
- Step 1: Let's start with a new LightSwitch application
Create a new project by opening Visual Studio 2013 then selecting "File" -> "New" -> "Project..." then create a new "LightSwitch HTML Application" and name it "LightSwitchAngularJs".
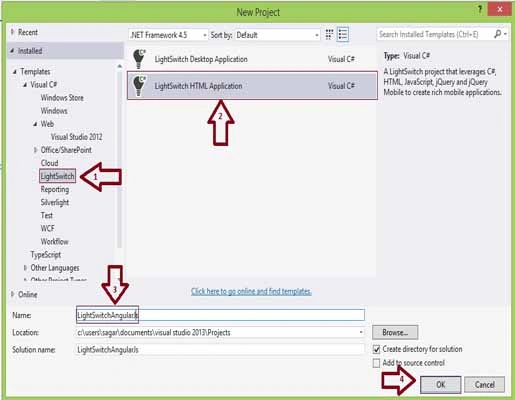
- Step 2: Right-click on the Data Sources folder and select Add Table.

Create a table called Products and save it. The table will be pluralized to Store.
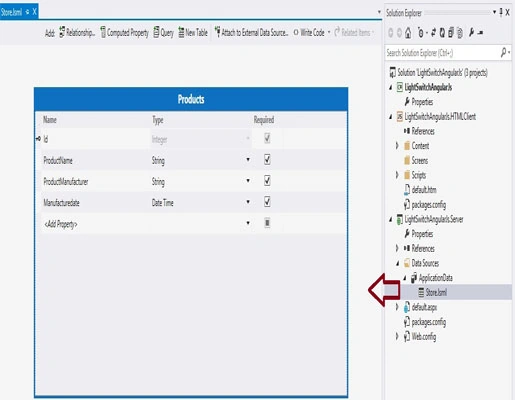
- Step 3: Now let's add Nuget components.
Go to "Tools" and select "Library Package Manager" and then select "Package Manager Console".
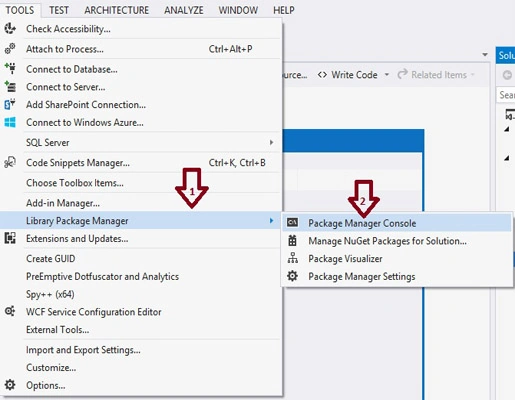
And then type one by one and install.
- PM> Install-Package angularjs
- Install-Package Microsoft.AspNet.Mvc -Version 5.0.0
- PM> Install-Package AspNetWebApi
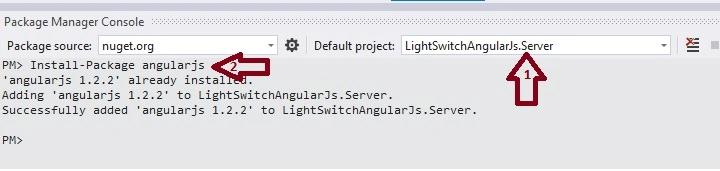
- Step 4 Create a folder named "App_Start" in the server application and add the following class files.
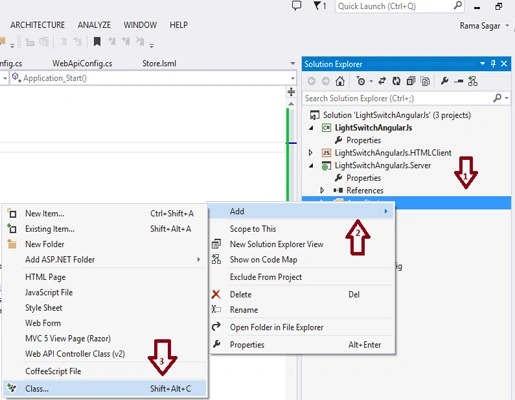
Right-click on the "App_Start" folder and select "Add" then select "Add" -> "New Item". Create a file called "WebApiConfig.cs" and add the following implementation:
- using System;
- using System.Collections.Generic;
- using System.Linq;
- using System.Web;
- using System.Web.Http;
- namespace LightSwitchApplication
- {
- public static class WebApiConfig
- {
- public static void Register(HttpConfiguration config)
- {
- config.Routes.MapHttpRoute(
- name: "DefaultApi",
- routeTemplate: "api/{controller}/{id}",
- defaults: new { id = RouteParameter.Optional }
- );
- }
- }
- }
- using System;
- using System.Collections.Generic;
- using System.Linq;
- using System.Web;
- using System.Web.Mvc;
- using System.Web.Routing;
- namespace LightSwitchApplication
- {
- public class RouteConfig
- {
- public static void RegisterRoutes(RouteCollection routes)
- {
- // This rule is required to allow the LightSwitch OData service to
- // be accessed when WebAPI is also enabled
- routes.IgnoreRoute("{*allsvc}", new { allsvc = @".*\.svc(/.*)?" });
- routes.IgnoreRoute("{resource}.axd/{*pathInfo}");
- routes.MapRoute(
- name: "Default",
- url: "{controller}/{action}/{id}",
- defaults: new { controller = "Home", action = "Index", id = UrlParameter.Optional }
- );
- }
- }
- }
- using System;
- using System.Collections.Generic;
- using System.Linq;
- using System.Web;
- using System.Web.Mvc;
- namespace LightSwitchApplication
- {
- public class FilterConfig
- {
- public static void RegisterGlobalFilters(GlobalFilterCollection filters)
- {
- filters.Add(new HandleErrorAttribute());
- }
- }
- }
- using System.Web;
- using System.Web.Optimization;
- namespace LightSwitchApplication
- {
- public class BundleConfig
- {
- // For more information on Bundling, visit http://go.microsoft.com/fwlink/?LinkId=254725
- public static void RegisterBundles(BundleCollection bundles)
- {
- }
- }
- }
Join the conversation! Your thoughts help the community grow.