

Overview
I hope, you got a chance to read some useful articles to start programming in Android Applications. The useful links are given below:
- Android Programming - Day One
- Android Programming - Day Two
- How To Display A Dialog Windows In Android
- How To Display A Progress Dialog Window In Android
- Intent In Android
- Return Data Using Intent Object In Android Applications
- Passing Data Using An Intent Object In Android Applications
- Fragments In Android Applications
- Adding Fragments Dynamically In Android Application
- Fragment Life Cycle In Android Application
- Interaction Between Two Fragments
- Calling In-Built Functions in Android Application
- Intent Object and Intent Filters in Android Application
- Displaying Notifications in Android Applications
Introduction
You know about an Activity and how its life cycle and activity is a means by which users interact with the Application. However, an activity by itself does not have a presence on the screen. An activity displays the user interface of your application, which may contain some widgets such as buttons, labels, text boxes, etc. Basically, it is defined in the XML file, generally called the main.xml file, located in the res/layout folder of your project.
- <LinearLayout
- xmlns:android="http://schemas.android.com/apk/res/android"
- xmlns:tools="http://schemas.android.com/tools"
- android:orientation="vertical"
- android:layout_width="fill_parent"
- android:layout_height="fill_parent" tools:context=".MainActivity">
- <Button android:id="@+id/buttondisplaynotification"
- android:layout_width="fill_parent"
- android:layout_height="fill_parent"
- android:text="Show Notification"
- android:onClick="onClickShowNotification"
- />
- </LinearLayout>
During the runtime, it is loaded in the onCreate() method handler in the Activity class, using the setContentView() method.
- @Override
- protected void onCreate(Bundle savedInstanceState) {
- super.onCreate(savedInstanceState);
- setContentView(R.layout.activity_main);
- }
In this article, you will learn about some widgets like Views, ViewGroups, LinearLayout, AbsoluteLayout, TableLayout, RelativeLayout, FrameLayout, ScrollView, etc.
An activity contains Views and View groups. A View is a widget, which has an appearance on the screen. E.g buttons, labels, textboxes, etc. It is derived from the base class android.view.View.
In ViewGroup, one or more Views can be grouped together. A ViewGroup provides the layout, in which you can set the order of the appearance and sequence of the Views. Some examples of ViewGroups are LinearLayout and FrameLayout. It is derived from the base class android.view.ViewGroup.
Android supports the following ViewGroups.
- LinearLayout
- AbsoluteLayout
- TableLayout
- RelativeLayout
- FrameLayout
- ScrollView
Let us see all these one by one.
- <LinearLayout xmlns:android="http://schemas.android.com/apk/res/android"
- xmlns:tools="http://schemas.android.com/tools"
- android:orientation="vertical"
- android:layout_width="fill_parent"
- android:layout_height="fill_parent" tools:context=".MainActivity">
- <Button android:id="@+id/buttondisplaynotification"
- android:layout_width="fill_parent"
- android:layout_height="fill_parent"
- android:text="Show Notification"
- android:onClick="onClickShowNotification"
- />
- </LinearLayout>
windowtext .5pt;solid wi
| ATTRIBUTE | DESCRIPTION |
| Lauout_width | It specifies the width of the View and ViewGroup. |
| Layout_height | It specifies the height of the View and ViewGroup. |
| Layout_marginTop | It specifies the extra space on the top side of the View or Viewgroup |
| Layout_marginBotton | It specifies the extra space on the bottom side of the View or Viewgroup |
| Layout_marginLeft | It specifies the extra space on the left side of the View or Viewgroup. |
| Layout_marginRight | It specifies the extra space on the right side of the View or Viewgroup |
| Layout_gravity | It specifies, how child Views are positioned. |
| Layout_weight | It specifies, how much extra space in the layout should be allocated to the View. |
| Layout_x | It is x-coordinate of the view or Viewgroup. |
| Layout_y | It is y-coordinate of the view or Viewgroup. |
- <TextView
- android:layout_width="wrap_content"
- android:layout_height="wrap_content"
- android:text="Check it for layout!!"
- />
Suppose, in the above <TextView> element, the width fills the entire width of its parent, using the fill_parent constant. Its height is indicated by the wrap_content constant, which means that its height is the height of its content. If you don’t want the <TextView> View to occupy the entire row, you can set its layout width attribute to wrap_content.
Now, make some changes in the properties of the element in the same file as:
- <LinearLayout xmlns:android="http://schemas.android.com/apk/res/android"
- xmlns:tools="http://schemas.android.com/tools"
- android:orientation="vertical"
- android:layout_width="fill_parent"
- android:layout_height="fill_parent" tools:context=".MainActivity">
- <TextView
- android:layout_width="100dp"
- android:layout_height="wrap_content"
- android:text="See User Interface Effect by changing dp to px"/>
- <Button android:id="@+id/buttondisplaynotification"
- android:layout_width="120dp"
- android:layout_height="fill_parent"
- android:text="Show Notification"
- android:onClick="onClickShowNotification"
- />
- </LinearLayout>
In the code, given above, set the width of both the TextView and Button Views to an absolute value. The width is 100dp (dp is referred as
density-independent pixels) and Button is 120dp.
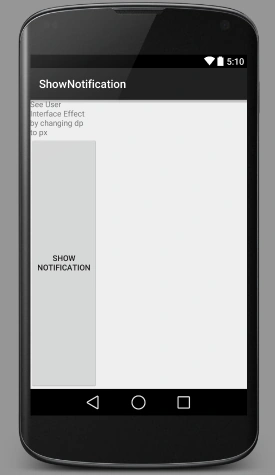
The screenshot, mentioned above is the screen of Nexus 4. It has 4.7 inches screen (diagonally), with a screen width of 2.08 inches.
We can see in the screenshot, given above, what Views looks like on the different screens with different pixel density. Thus, it is important to understand, how Android recognizes the screens of varying sizes and density.
Android defines and recognizes four types of screen densities.
- Low Density(lDPI)
- Medium Density(MDPI)
- High Density(HDPI)
- Extra-High Density(XHDPI)
The above image comes into one of the densities, defined in the preceding list. E.g. Nexus 4 is regarded as an XHDPI device, as its pixel density is closest to 240 dpi. Unit dp ensures that the Views are displayed in the right proportion, regardless of the screen density. Basically, Android automatically scales the size of the view, depending on the density of the screen. E.g. A Button is displayed on 120 dpi screen, its width would be 90 pixels because a 120 dpi screen is treated, just like a 100 dpi screen. If it is displayed on a 165 dpi screen, its width would be 124 pixels.
Below is the formula to convert dp to px.
- Px = dp * (dpi/160), where dpi is either 120, 160, 240 or 320.
- Px = 120 * (120/160) = 90
- Px = 165 * (120/160) = 124 approx.
We see that one dp is equivalent to one px.
Now, we will see about the changes, when the size is defined in pixels(px) instead of dp.
- <TextView
- android:layout_width="100px"
- android:layout_height="wrap_content"
- android:text="See User Interface Effect by changing dp to px"/>
- <Button android:id="@+id/buttondisplaynotification"
- android:layout_width="120px"
- android:layout_height="fill_parent"
- android:text="Show Notification"
- android:onClick="onClickShowNotification"
- />
Run the app and the result is displayed below,
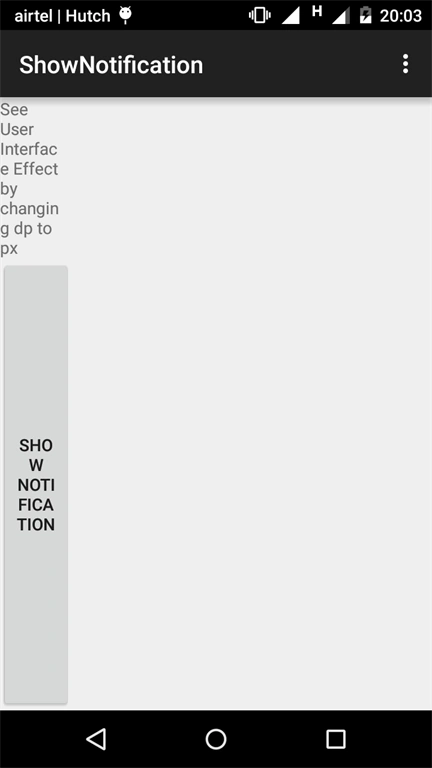
It shows, that if you use pixels for the View sizes, the Views will appear smaller on a device with a high dpi screen, compared to one with a lower dpi.
In the example, mentioned above, the orientation of the layout is set as vertical.
- <LinearLayout xmlns:android="http://schemas.android.com/apk/res/android"
- xmlns:tools="http://schemas.android.com/tools"
- android:orientation="vertical"
- android:layout_width="fill_parent"
- android:layout_height="fill_parent" tools:context=".MainActivity">
The default orientation layout is horizontal. If you remove this attribute, the Views will look like as given below,
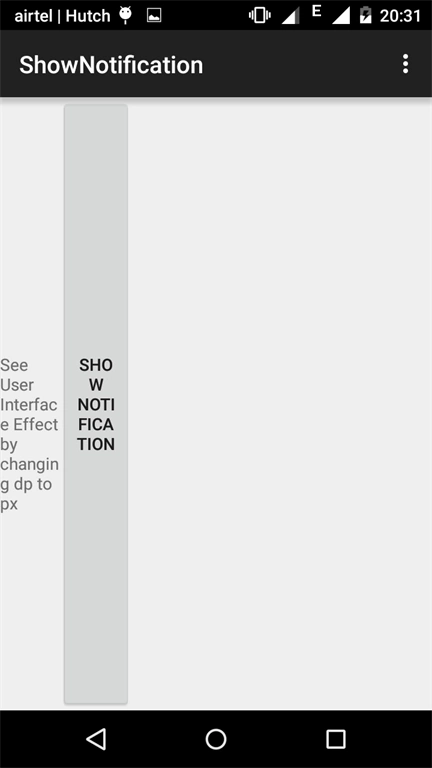
In LinearLayout, we can use layout_weight and layout_gravity attributes to the View, contained within it. We do some changes in the main.xml file.
- <LinearLayout xmlns:android="http://schemas.android.com/apk/res/android"
- xmlns:tools="http://schemas.android.com/tools"
- android:layout_width="fill_parent"
- android:layout_height="fill_parent"
- android:orientation="vertical"
- tools:context=".MainActivity">
- <TextView
- android:layout_width="100px"
- android:layout_height="wrap_content"
- android:text="See User Interface Effect by changing dp to px"/>
- <Button android:id="@+id/buttondisplaynotification"
- android:layout_width="120px"
- android:layout_height="fill_parent"
- android:text="Show Notification"
- android:onClick="onClickShowNotification"
- android:layout_weight="1"
- android:layout_gravity="center"
- />
- </LinearLayout>
Run the app and see the difference, given below,
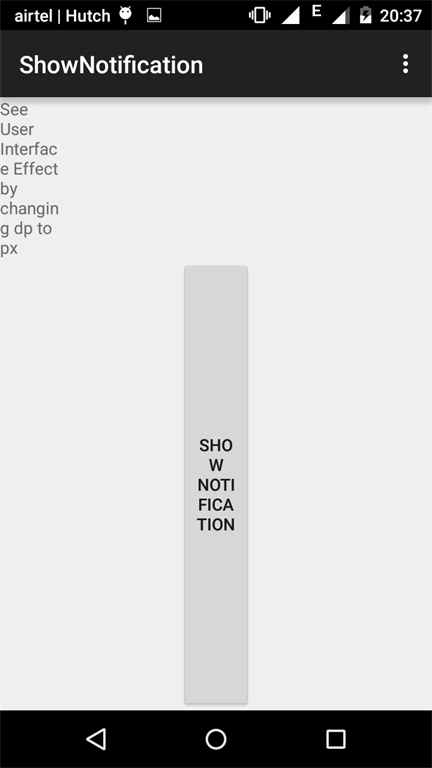
Now, we change the orientation of LinearLayout to horizontal from vertical, given below:
- <LinearLayout xmlns:android="http://schemas.android.com/apk/res/android"
- xmlns:tools="http://schemas.android.com/tools"
- android:layout_width="fill_parent"
- android:layout_height="fill_parent"
- android:orientation="horizontal"
- tools:context=".MainActivity">
- <TextView
- android:layout_width="0dp"
- android:layout_height="wrap_content"
- android:text="See User Interface Effect by changing dp to px"
- android:layout_gravity="left"
- android:layout_weight="1"
- />
- <Button android:id="@+id/buttondisplaynotification"
- android:layout_width="0dp"
- android:layout_height="fill_parent"
- android:text="Show Notification"
- android:onClick="onClickShowNotification"
- android:layout_weight="2"
- android:layout_gravity="center"
- />
- </LinearLayout>
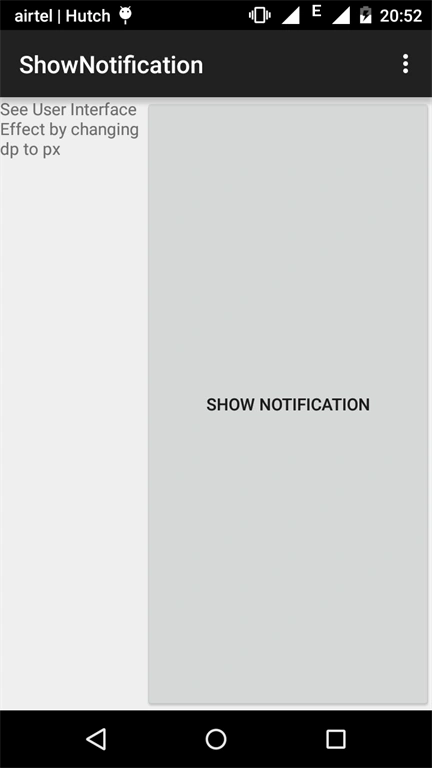
Afterwards, we need to change the width of each view to 0 dp and it displays the screenshot, given below,
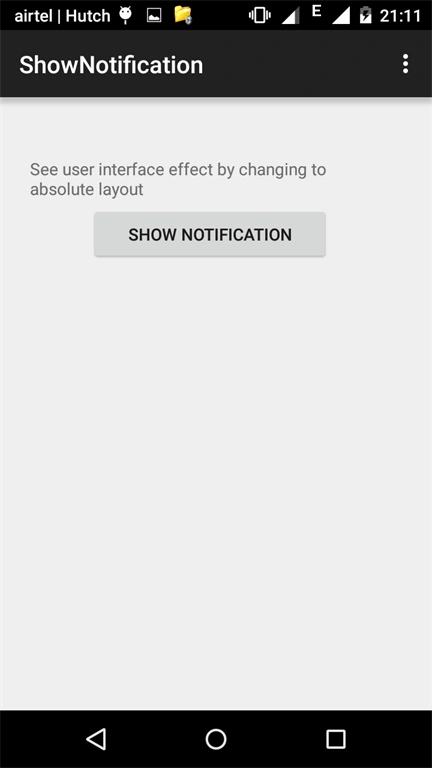
It enables us to specify the exact location of its children. Make some changes in the main.xml file.
- <AbsoluteLayout xmlns:android="http://schemas.android.com/apk/res/android"
- xmlns:tools="http://schemas.android.com/tools"
- android:layout_width="fill_parent"
- android:layout_height="fill_parent"
- tools:context=".MainActivity">
- <TextView
- android:layout_width="300dp"
- android:layout_height="wrap_content"
- android:text="See user interface effect by changing to absolute layout"
- android:layout_x="50px"
- android:layout_y="100px"
- />
- <Button android:id="@+id/buttondisplaynotification"
- android:layout_width="200dp"
- android:layout_height="wrap_content"
- android:text="Show Notification"
- android:onClick="onClickShowNotification"
- android:layout_x="150px"
- android:layout_y="180px"
- />
- </AbsoluteLayout>
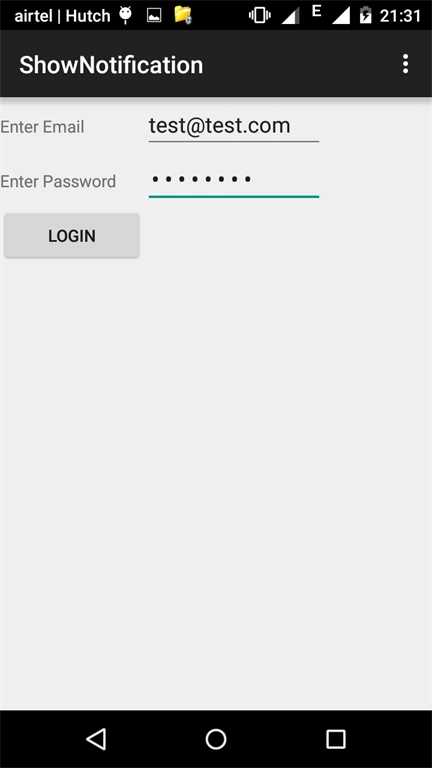
- <TableLayout xmlns:android="http://schemas.android.com/apk/res/android"
- xmlns:tools="http://schemas.android.com/tools"
- android:layout_width="fill_parent"
- android:layout_height="fill_parent"
- tools:context=".MainActivity">
- <TableRow>
- <TextView
- android:text="Enter Email"
- android:width="120dp"
- />
- <EditText
- android:id="@+id/txtemail"
- android:width="150dp"
- />
- </TableRow>
- <TableRow>
- <TextView
- android:text="Enter Password"
- android:width="120dp"
- />
- <EditText
- android:id="@+id/txtpassword"
- android:width="150dp"
- android:password="true"
- />
- </TableRow>
- <TableRow>
- <Button
- android:text="Login"
- android:id="@+id/buttonLogin"
- />
- </TableRow>
- </TableLayout>
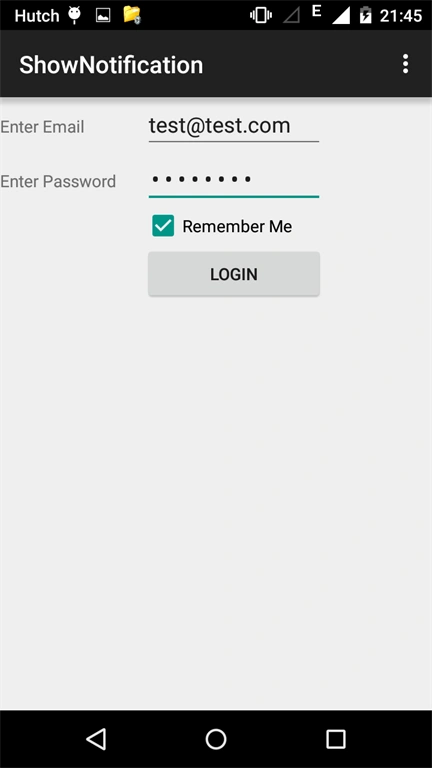
- <TableRow>
- <TextView />
- <CheckBox
- android:text="Remember Me"
- android:id="@+id/chkboxrememberme"
- android:layout_width="fill_parent"
- android:layout_height="wrap_content"
- />
- </TableRow>
- <TableRow>
- <TextView />
- <Button
- android:text="Login"
- android:id="@+id/buttonLogin"
- />
- </TableRow>
- <RelativeLayout xmlns:android="http://schemas.android.com/apk/res/android"
- xmlns:tools="http://schemas.android.com/tools"
- android:layout_width="fill_parent"
- android:layout_height="fill_parent"
- tools:context=".MainActivity">
- <TextView
- android:layout_width="wrap_content"
- android:layout_height="wrap_content"
- android:text="Message"
- android:layout_alignParentTop="true"
- android:layout_alignParentLeft="true"
- android:id="@+id/txtnotifications"
- />
- <EditText
- android:layout_width="fill_parent"
- android:layout_height="150px"
- android:layout_alignLeft="@+id/txtnotifications"
- android:layout_below="@+id/txtnotifications"
- android:layout_centerHorizontal="true"
- android:id="@+id/editnotifications"
- />
- <Button
- android:layout_width="180px"
- android:layout_height="wrap_content"
- android:text="Save"
- android:layout_below="@id/editnotifications"
- android:layout_alignLeft="@id/editnotifications"
- android:id="@+id/buttonsave"
- />
- <Button
- android:layout_width="160px"
- android:layout_height="wrap_content"
- android:text="Cancel"
- android:layout_below="@id/editnotifications"
- android:layout_alignRight="@id/editnotifications"
- android:id="@+id/buttoncancel"
- />
- </RelativeLayout>
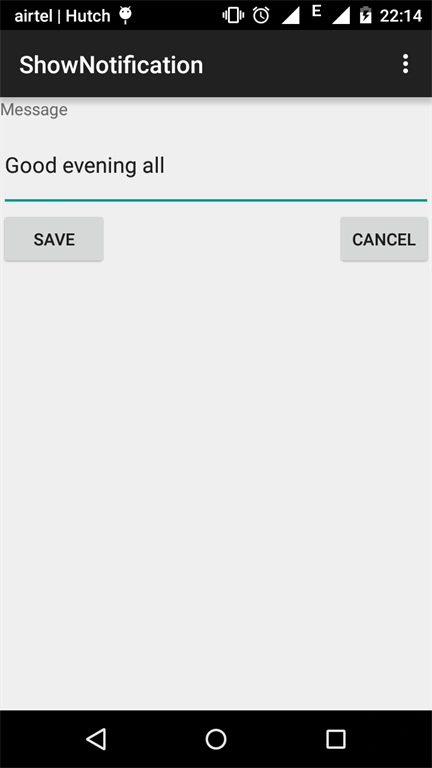
- layout_alignParentTop
- layout_alignParentLeft
- layout_alignLeft
- layout_below
- layout_centerHorizontal
- <RelativeLayout xmlns:android="http://schemas.android.com/apk/res/android"
- xmlns:tools="http://schemas.android.com/tools"
- android:layout_width="fill_parent"
- android:layout_height="fill_parent"
- tools:context=".MainActivity">
- <TextView
- android:layout_width="wrap_content"
- android:layout_height="wrap_content"
- android:text="Welcome you at Frame Layout"
- android:layout_alignParentTop="true"
- android:layout_alignParentLeft="true"
- android:id="@+id/txtnotifications"
- />
- <FrameLayout
- android:layout_width="wrap_content"
- android:layout_height="wrap_content"
- android:layout_alignLeft="@+id/txtnotifications"
- android:layout_below="@+id/txtnotifications"
- android:layout_centerHorizontal="true"
- >
- <ImageView
- android:layout_width="wrap_content"
- android:layout_height="wrap_content"
- android:layout_marginLeft="100px"
- android:layout_marginTop="20px"
- android:src="@drawable/ic_launcher"
- />
- </FrameLayout>
- </RelativeLayout>
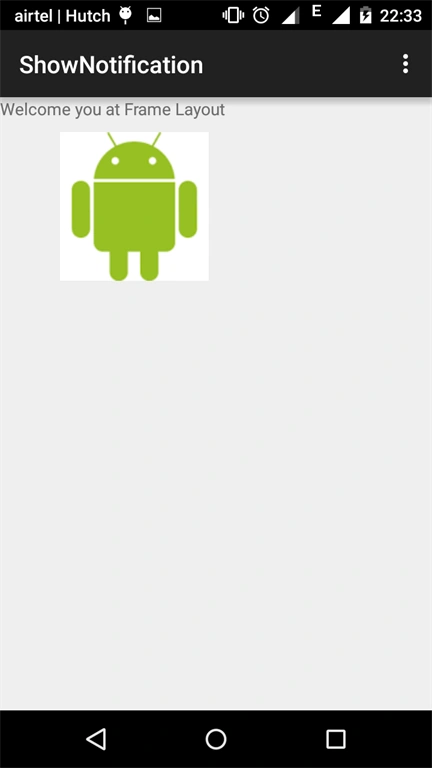
- <FrameLayout
- android:layout_width="wrap_content"
- android:layout_height="wrap_content"
- android:layout_alignLeft="@+id/txtnotifications"
- android:layout_below="@+id/txtnotifications"
- android:layout_centerHorizontal="true"
- >
- <ImageView
- android:layout_width="wrap_content"
- android:layout_height="wrap_content"
- android:layout_marginLeft="100px"
- android:layout_marginTop="20px"
- android:src="@drawable/ic_launcher"
- />
- <Button
- android:layout_width="wrap_content"
- android:layout_height="wrap_content"
- android:text="Show Image"
- />
- </FrameLayout>
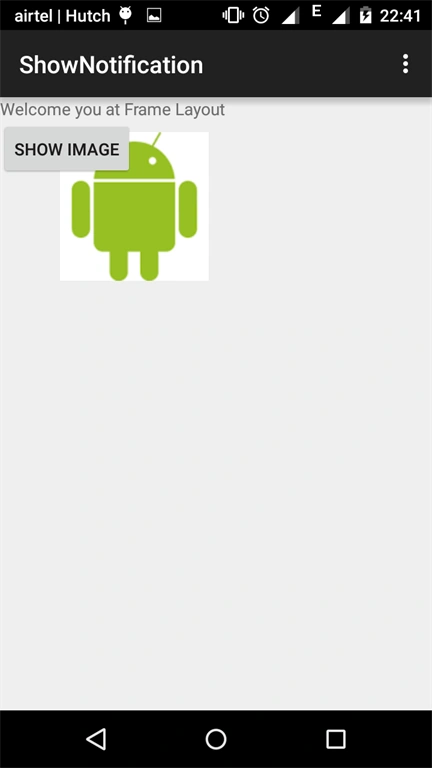
- <ScrollView xmlns:android="http://schemas.android.com/apk/res/android"
- xmlns:tools="http://schemas.android.com/tools"
- android:layout_width="fill_parent"
- android:layout_height="fill_parent"
- tools:context=".MainActivity">
- <LinearLayout
- android:layout_width="fill_parent"
- android:layout_height="wrap_content"
- android:orientation="vertical"
- android:focusable="true"
- android:focusableInTouchMode="true"
- >
- <Button
- android:layout_width="fill_parent"
- android:layout_height="wrap_content"
- android:text="Display 1"
- android:id="@+id/buttondisplay1"
- />
- <Button
- android:layout_width="fill_parent"
- android:layout_height="wrap_content"
- android:text="Display 2"
- android:id="@+id/buttondisplay2"
- />
- <Button
- android:layout_width="fill_parent"
- android:layout_height="wrap_content"
- android:text="Display 3"
- android:id="@+id/buttondisplay3"
- />
- <EditText
- android:layout_width="fill_parent"
- android:layout_height="400dp"
- android:id="@+id/textbox1"
- />
- <Button
- android:layout_width="fill_parent"
- android:layout_height="wrap_content"
- android:text="Display 4"
- android:id="@+id/buttondisplay4"
- />
- <Button
- android:layout_width="fill_parent"
- android:layout_height="wrap_content"
- android:text="Display 5"
- android:id="@+id/buttondisplay5"
- />
- <Button
- android:layout_width="fill_parent"
- android:layout_height="wrap_content"
- android:text="Display 6"
- android:id="@+id/buttondisplay6"
- />
- </LinearLayout>
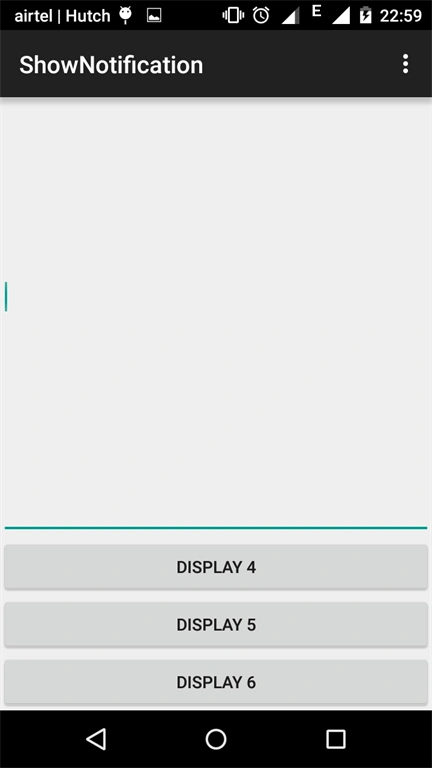
- </ScrollView>
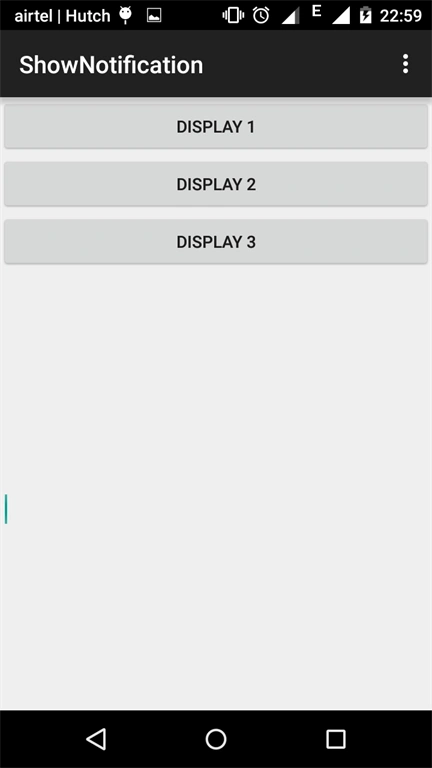
- android:focusable="true"
- android:focusableInTouchMode="true"
Atul RawatPosted Aug 24, 2016, 7:37 AM
Nice article sir?
Ramesh PalaniappanPosted Aug 24, 2016, 12:56 AM
Good one
Ish BandhuPosted Aug 24, 2016, 12:55 AM
Good description
Vignesh ManiPosted Aug 23, 2016, 9:08 AM
Nice one
kalu singh raoPosted Aug 23, 2016, 1:37 AM
Nice Share
SubashPosted Aug 23, 2016, 12:27 AM
Thank you we except many more good articles from like this
SubashPosted Aug 22, 2016, 10:29 PM
Nice share sir