

Introduction

Figure: Illustration of how ViewGroup objects form branches in the layout and contain other View objects.
Create a Linear Layout
- In Android Studio the activity_main.xml file can be found in the res/layout directory. However when the project is created you might have chosen blank activity now it contains RelativeLayout root view.
- Delete the <TextView> element
- Change the <RelativeLayout> element to <LinearLayout> because we are creating a linear layout.
- Add the android:orientation attribute and set it to "horizontal" and remove all the other attributes such as android: padding.
The resulting code after applying the preceding procedure will look as in the following:
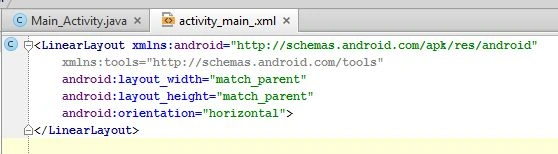
Adding a Text Field
- In the activity_main.xml file within the <LinearLayout> element, define the new element <EditText> with the additional attribute "id".
- Define the layout_width and layout_height attributes as wrap_content.
- Define a "hint" attribute as a string object named edit_message.
The code will look like this after the addition of an <EditText> element as shown below.
- <LinearLayout xmlns:android="http://schemas.android.com/apk/res/android"
- xmlns:tools="http://schemas.android.com/tools"
- android:layout_width="match_parent"
- android:layout_height="match_parent"
- android:orientation="horizontal">
- <EditText
- android:id="@+id/edit_message"
- android:layout_width="wrap_content"
- android:layout_height="wrap_content"
- android:hint="@string/edit_message" />
- </LinearLayout>
Adding String Resources
- Add a line for a string named "edit message" with the value "Please enter a text"
- Add a line for a string named "button_send" with the value "Send"
Now remove the default string "hello world". Now the following is the code after the modification of the strings in the string resources file:
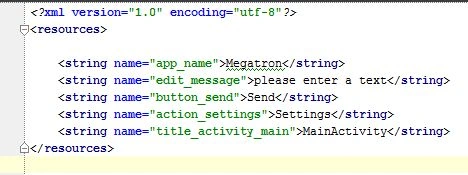 Here, it means that in Android each string is considered a resource. String resources allow the user to manage all the user interface text in a single location that is quite reliable in finding and updating the resources of the entire application in one place. String resources allow the developer to manage various language version releases of a single application.
In Android Studio, from the res/layout directory, edit the activity_main.xml file. In the <LinearLayout> element define or introduce a new element called <Button> just immediately below the <EditText> element.
Set the width and height of the button to "wrap_content" so the button can only be fitted into its text label. Define the button's text label with android: text attribute and set its value to the button Send string resource as we defined earlier. After adding the button code it will look as shown below.
Here, it means that in Android each string is considered a resource. String resources allow the user to manage all the user interface text in a single location that is quite reliable in finding and updating the resources of the entire application in one place. String resources allow the developer to manage various language version releases of a single application.
In Android Studio, from the res/layout directory, edit the activity_main.xml file. In the <LinearLayout> element define or introduce a new element called <Button> just immediately below the <EditText> element.
Set the width and height of the button to "wrap_content" so the button can only be fitted into its text label. Define the button's text label with android: text attribute and set its value to the button Send string resource as we defined earlier. After adding the button code it will look as shown below.
Adding a Button
- <LinearLayout xmlns:android="http://schemas.android.com/apk/res/android"
- xmlns:tools="http://schemas.android.com/tools"
- android:layout_width="match_parent"
- android:layout_height="match_parent"
- android:orientation="horizontal">
- <EditText
- android:id="@+id/edit_message"
- android:layout_width="odp"
- android:weight="1"
- android:layout_height="wrap_content"
- android:hint="@string/edit_message" />
- <Button
- android:layout_width="wrap_content"
- android:layout_height="wrap_content"
- android:text="@string/button_send" />
- </LinearLayout>
Note: we have not added any listener to the button so it will not work or we have not referenced anything from Main_Activity.java.
Join the conversation! Your thoughts help the community grow.