

Introduction
In today’s world, cloud infrastructure is essential for deploying applications and managing resources efficiently. Because manually setting up and maintaining infrastructure can be time-consuming, error-prone, and difficult to reproduce. This is where Terraform comes into the picture.
Terraform, developed by HashiCorp, is a powerful Infrastructure as Code (IaC) tool that allows you to define, provision, and manage your infrastructure using simple, readable configuration files. It supports multiple cloud providers like Azure, AWS, Google Cloud, and more, making it a versatile choice for multi-cloud environments.
This guide will take you through the basics of Terraform, its key components, and how to use it to create and manage cloud resources effortlessly. We will also build a practical example by creating a Virtual Network in Azure using Terraform.
Prerequisites
Before you start working with Terraform, make sure you have the knowledge of the following.
- Basic Knowledge of Cloud Platforms: Understanding cloud concepts and familiarity with Azure or any other cloud provider is helpful.
- Command Line Experience: You should be comfortable using the terminal or command prompt.
- Azure Account: If you are following the example, you’ll need an active Azure account. You can create a free account at Azure Portal.
- Text Editor or IDE: Use any code editor like Visual Studio Code, Sublime Text, or Notepad++.
What is Terraform?
Terraform is a free tool made by HashiCorp that helps you create and manage your computer systems and cloud resources using code. Instead of clicking around in cloud platforms like AWS, Azure, or Google Cloud, you write instructions in a file, and Terraform builds everything for you.
Why Should You Use Terraform?
- Infrastructure as Code: You can write your infrastructure (like servers and databases) as code, just like writing a program. This makes it easy to repeat the setup anytime.
- Works with Many Cloud Providers: Terraform supports almost all cloud providers, so you can use it for AWS, Azure, Google Cloud, and more.
- Easy to Understand: You write what you want, and Terraform figures out how to create it.
- Version Control: Since it's code, you can track changes using tools like Git.
- Consistent Setups: You can ensure the same setup from testing to production.
How Does Terraform Work?
Terraform has a simple process.
- Write: Write what you want in configuration files using a language called HCL (HashiCorp Configuration Language).
- Plan: Check what changes Terraform will make without actually changing anything yet.
- Apply: Make the changes and create the infrastructure.
- Destroy: Delete the infrastructure when you don’t need it anymore.
Important Parts of Terraform
- Providers: These are like plugins that help Terraform talk to cloud services like Azure or AWS.
- Resources: These are the things you create, like virtual machines or databases.
- Modules: These are reusable pieces of code to keep your setup organized and easy to manage.
- State: Terraform keeps track of your infrastructure using a state file, so it knows what has been created.
- Variables: These are placeholders for values, making your code flexible and reusable.
- Output Values: These show you useful information after creating resources, like the name of a server.
How to Install Terraform?
- Go to the Terraform website and download the version for your computer.
- Extract the file and add it to your system’s PATH so you can use it in the terminal.
- Check if it’s installed by running: terraform -version
Setting Up Terraform for Azure
In this article, we are going to create Azure resources with the help of Terraform.
Example: Creating a Resource Group in Azure Using Terraform.
Let's create a Resource Group in Azure using Terraform with very simple steps. We will use the Azure Dashboard for authentication, not the Azure CLI.
Step 1. Set Up Azure Service Principal.
Since we're using the Azure Dashboard, we need to create a Service Principal for Terraform to authenticate.
- Go to the Azure Portal.
- Navigate to Azure Active Directory → App registrations → New registration.
- Enter a name (e.g., TerraformApp) and select Accounts in this organizational directory only.
- Click Register.
- Go to Certificates & Secrets → New client secret. Copy the secret value somewhere safe (you won't see it again).
- Go to Overview and copy the Application (client) ID, Directory (tenant) ID, and Assign the required roles.
- Go to Subscriptions → Select your Subscription → Access control (IAM) → Add role assignment.
- Choose the Contributor role and select your registered application.
Step 2. Create a Terraform Configuration File.
Create a folder for your project and open your preferred text editor.
main.tf
provider "azurerm" {
  features {}

  client_id       = var.client_id
  client_secret   = var.client_secret
  subscription_id = var.subscription_id
  tenant_id       = var.tenant_id
}

resource "azurerm_resource_group" "example" {
  name     = var.resource_group_name
  location = var.location
}

output "resource_group_name" {
  value = azurerm_resource_group.example.name
}
variable.tf
variable "client_id" {
  description = "Azure Client ID"
}

variable "client_secret" {
  description = "Azure Client Secret"
  sensitive   = true
}

variable "tenant_id" {
  description = "Azure Tenant ID"
}

variable "subscription_id" {
  description = "Azure Subscription ID"
}

variable "resource_group_name" {
  description = "Name of the Resource Group"
  default     = "terraform-demo-rg"
}

variable "location" {
  description = "Azure Region"
  default     = "East US"
}
terraform.tfvars
client_id           = "YOUR_CLIENT_ID"
client_secret       = "YOUR_CLIENT_SECRET"
tenant_id           = "YOUR_TENANT_ID"
subscription_id     = "YOUR_SUBSCRIPTION_ID"
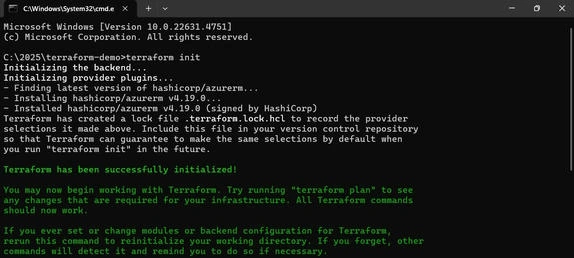
Step 3. Initialize Terraform.
Open a terminal, go to the project folder, and run.
terraform init
This downloads the Azure provider plugin.
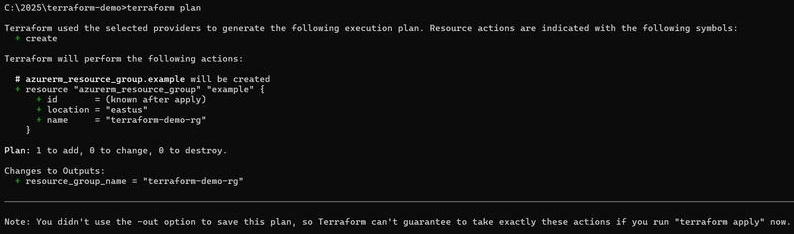
Step 4. Preview Changes.
Check what Terraform will do before actually creating the resource.
terraform plan
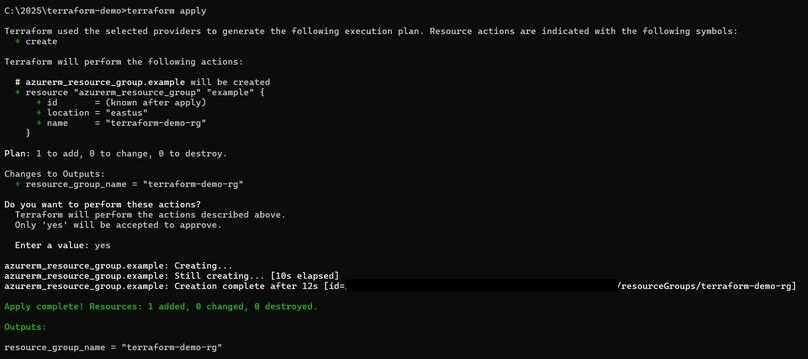
Step 5. Apply Changes.
Create the Resource Group in Azure.
terraform apply
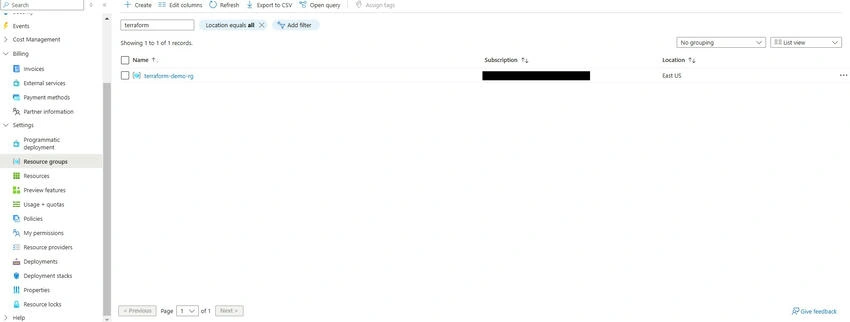
Step 6. Verify in Azure Dashboard.
Go to the Azure Portal → Resource Groups and check if the Resource Group is created.
Step 7. Clean Up (Optional)
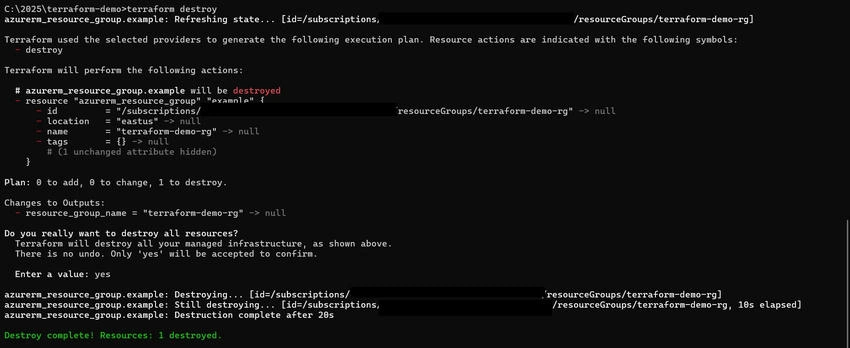
Delete the Resource Group and all associated resources.
terraform destroy
Conclusion
In this article, we went through the basics of terraform and its installation. Later on, we looked into the step-by-step creation of azure resource group with the help of Terraform.
Join the conversation! Your thoughts help the community grow.