

TensorFlow is a modern machine learning framework, which allows us to solve many different prediction and classification tasks. This technology improves every year and Google provides a very useful API, performance optimization, and great examples and tutorials for the TensorFlow community. It will be very interesting to integrate TensorFlow as a machine learning framework and ASP.NET Core 5 client application with React/Redux/TypeScript front end. For this purpose, I created a simple CNN (Convolutional Neural Network) for number prediction, based on the MNIST example, implemented a web application for number drawing, and integrated them all into a solid solution for real-time number prediction.
Prehistory
Three years ago I already tried to create this solution with TensorFlow 1.0 and C# web client. I have provided my first example on a Github. There were a few nuances, that were resolved in the next version of TensorFlow,
- TensorFlow serving allowed integration only by gRPC protocol, but now it is possible to use gRPC and Rest also
- TensorFlow API was a little bit complex: Model saving and creation tasks took more time. Now TensorFlow 2.0 with Keras has an awesome API, which allows us to implement good things much more simply than before.
- TensorFlow Serving can be deployed only on Docker or on Linux. So, before I used Ubuntu as a model prediction service host. Now, I use docker with a TensorFlowServing image, which is a pretty fast and useful solution.
Also, I would like to emphasize that the purpose of this article is a description of integration between .NET the client web application, and Tensorthe FlowServing prediction service. Machine Learning is out of scope. But if you want to learn more about this technology, I recommend referring to official TensorFlow tutorials and examples.
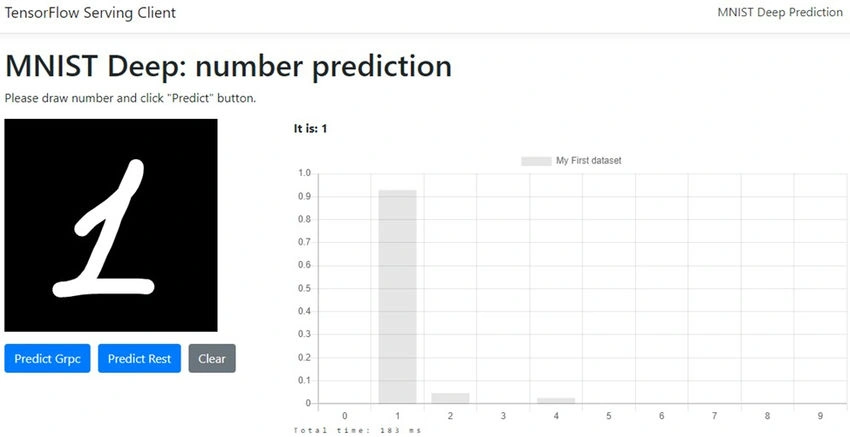
The screen above shows the UI of the web application with prediction results. The Repository of the web application is located on Git Hub.
The example web application has the following features.
- Canvas region for manually drawing numbers
- Control buttons for prediction
- “Predict GRPC”: Executes prediction with gRPC protocol
- “Predict Rest”: Executes prediction by Rest
- BarChart and prediction result text region for results visualization
How to start an example
Environment requirements
- Windows 10
- .NET Core 5 for BackEnd
- Latest docker version for TensorFlow
- Latest NodeJs for FrontEnd
Please follow the steps below to run the solution
gh repo clone iminakov/TensorFlow2ServingDotNet5Client
Clone git repository from GitHub
cd src
Navigate to the root directory.
Init TensorFlowServing docker image with code (Required only first time).
start init_tensorflow_serving_in_docker.bat
Run trained model in TensorFlowServing docker container
start run_serving_in_docker.bat
Build and Run .Net Client Application
start run_client.bat
Navigate to http://localhost:5000/ and test the prediction app.
Technical details
Image processing workflow
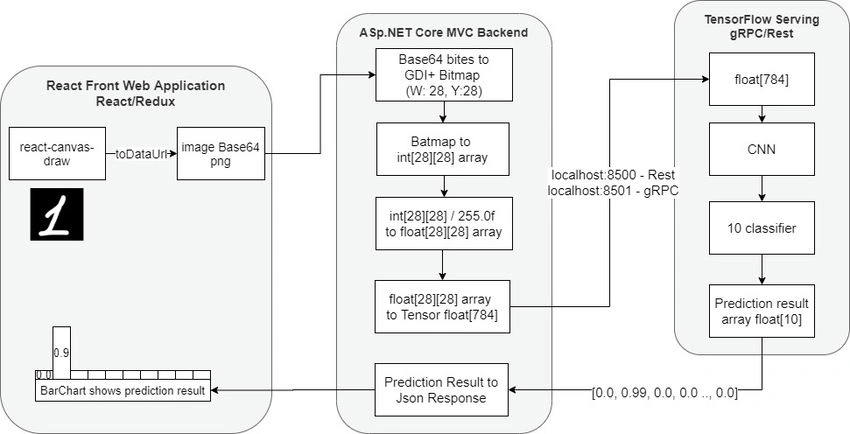
The screen above shows an image processing workflow, services integration, and main parts.
Front end part
FrontEnd based on MSVS 2019 React/Redux/Typescript setup, which delivers with ASP.NET Core 5 web application project template. I used the ‘react-canvas-draw’ library for the manual drawing component. See the code listing below for this part.
<div className="paint_region_container">
  <CanvasDraw
     ref="paint_region"
     brushColor='#ffffff'
     backgroundColor="#000000"
     hideGrid={true}
     brushRadius={10}
     lazyRadius={2}
     canvasWidth={280}
     canvasHeight={280} />
</div>
For prediction results visualization I used the ‘react-chart-js2‘library. See the code listing forlow of this part.
<BarChart.Bar
    data={{
        labels: [0, 1, 2, 3, 4, 5, 6, 7, 8, 9],
        datasets: [
            {
                data: this.props.results,
                label: "My First dataset"
            }
        ]
    }}
/>
All component behavior is implemented by React/Redux. The main part of the integration with the server is located in the source code file NumberPredict.ts in the function on ‘tryPredictNumber’.
tryPredictNumber: (imageData: any, isGrpc: any): AppThunkAction<KnownAction> => (dispatch, getState) => {
    const predictClientType = isGrpc ? 'PredictNumberByGrpc' : 'PredictNumberByRest';
    fetch('api/MnistDeep/' + predictClientType, {
        method: 'POST',
        headers: {
            'Accept': 'application/json',
            'Content-Type': 'application/json'
        },
        body: JSON.stringify({ "imageData": imageData })
    })
    .then(response => response.json() as Promise<PredictionResult>)
    .then(data => {
        dispatch({ type: 'PREDICT_IMAGE_LOADED', results: data.results, numberPredicted: data.predictedNumber, predictResult: data.success, errorMessage: data.errorMessage, debugText: data.debugText });
    });
    dispatch({ type: 'PREDICT_IMAGE_LOADING' });
}
Backend ASP.NET Core part
The main responsibility of the backend web application is an image processing workflow and sending requests to est the TensorFlow Serving for prediction. Firstly, the image is created from a Base64 data string, and then it should be transformed ed to a 28x28 size. After that, It will be saved as an array of integers int[28][28]. The code listing below shows this logic.
private int[][] CreateImageDataFromModel(string modelImageData)
{
    // Load Bitmap from input base64
    Bitmap convertedImage = null;
    using (var str = new MemoryStream(Convert.FromBase64String(modelImageData))))
    {
        str.Position = 0;
        using (var bmp = Image.FromStream(str))
        {
            // Resize image and convert to RGB24
            convertedImage = ImageUtils.ResizeImage(bmp, 28, 28, 280, 280);
        }
    }
    // Convert image to 28x28 8bit per pixel image data array
    var imageData = ImageUtils.ConvertImageStreamToDimArrays(convertedImage);
    return imageData;
}
Important note
I used the GDI+ library for Image processing because this is a test example. In a real production scenario, it is recommended to use other .NET image frameworks like SkiaScharp, and ImageSharp. See more details here.
Prediction request by gRPC
The code listing below shows the logic of creating a gRPC request for prediction.
// Create predict request object
var request = new PredictRequest()
{
    ModelSpec = new ModelSpec() { Name = "mnist_v1", SignatureName = "serving_default" }
};
request.Inputs.Add("flatten_input", TensorBuilder.CreateTensorFromImage(imageData, 255.0f));
It is required to create a PredictionRequest object and set up its properties: ModelName and SignatureName. Then, populate an input tensor: to add a new element to the request and san et up the input array with the following values: TensorName, which is equal to the prediction model layer name (flatten_input), and TensorValue, which is image data as an array of float with size equals 784 (28 x 28). I used my lily “TensorFlowServingClient” for Tensor preparation, which is available in solution sources.
// Send grpc request
var channel = new Channel(_configuration.GetSection("TfServer")["GrpcServerUrl"], ChannelCredentials.Insecure);
var client = new PredictionService.PredictionServiceClient(channel);
var predictResponse = client.Predict(request);
Next, it is required to create a GRPC channel: set up Grpc Server Url (localhost:8500), create PredictionServiceClient, and in the end ena d , request to the TensorFlowServing in Docker.
The response contains information about prediction results. It is an array of float size osizes, where every element means the probability of an appropriate number from 0 to 9.
// Process response
var maxValue = predictResponse.Outputs["dense_1"].FloatVal.Max();
var predictedValue = predictResponse.Outputs["dense_1"].FloatVal.IndexOf(maxValue);
Prediction request by Rest
TensorFlowServing allows sending requests by Rest API. For this case is required to use the following URL: http://localhost:8501/v1/models/mnist_v1:predict.
There are the following parts.
- http://localhost:8501 - base service URL
- v1: model version
- mnist_v1: model name
- predict: request action: classification or prediction
JSON request data looks like the following.
{
   "signature_name": "serving_default", // Signature name
   "instances": [1.0, 0.1, ..., 0.0] // Image data as float array size of 784
}
JSON response data contains prediction results in an array of float size of 10 with probabilities according to numbers.
{
   "predictions": [[[0.0, 0.9, 0.0, 0.0, 0.0, 0.0, 0.0, 0.0, 0.0, 0.1]]]
}
TensorFlow model creation and service setup
The repository contains a directory “TrainingModel” with the following content.
- createModel.py: python script for creation of CNN model for number prediction. The screen with the summary of the model is below.
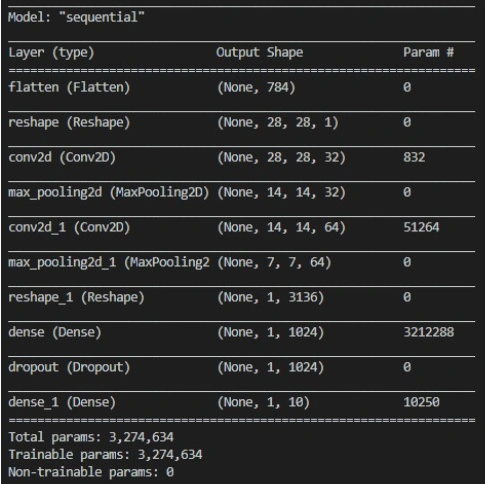
- trainModel.py: contains scripts for the training model and exports it to the local directory. It has 99.67% accuracy for training data and 99.19% for test data

After the training model has been successfully trained and exported, it is required to run TensorFlowServing in docker. For this purpose use the following scripts:
Download and set up a Docker image for TensorFlowServing.
docker pull tensorflow/serving
Put the trained model in serving, and run grpc and rest services.
docker run -t --rm -p 8500:8500 -p 8501:8501 -v "%cd%/TrainingModel/ExportedModel:/models/mnist_v1" -e MODEL_NAME=mnist_v1 tensorflow/serving &
Conclusion
This article describes a simple example of full integration between TensorFlowServing and the .NET Core web application client. Of course, this is only a simple prototype solution. There are a lot of things that should be implemented and set up in a real production environment. Such as model retraining and versioning, logging and monitoring, CI/CD, load balancing, and so on.
Join the conversation! Your thoughts help the community grow.