
In my previous article on Using AutoMapper In MVC Project, I described the following things.
- What is Automapper.
- How to use Automapper in MVC project.
- Some Basic Advantages of Automapper.
"AutoMapper is an object-object mapper which allows you to solve the problem of manually mapping each property of a class with the same properties of another class.".
Before AutoMapper was introduced if we wanted to assign one object property to another object property then we were following a long procedure. We had to map each property of these two different objects. Suppose in one class we have 30 properties and we want to map this with another class having 30 properties, then we would have to map this property one-by-one 30 times. Thus for this problem, a new concept, AutoMapper, was introduced.
The main demerit of using automapper mapping is that it needs the two different class property name to be the same, otherwise it fails to map automatically, and again we have to map them manually.
Here I am giving one example.
Consider we have 2 classes, User.cs and Patient.cs, and we need user property to be mapped with Patient property as shown below.
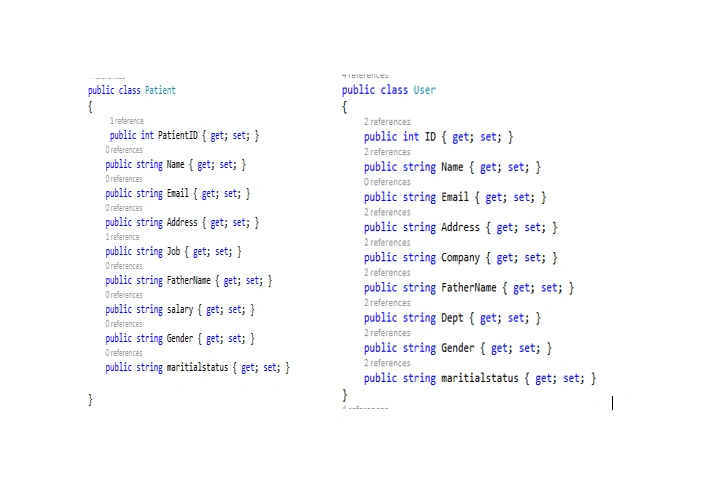
As per the automapper rule it will map to those properties whose names are the same. So I am marking here which of them are mapped by automapper.
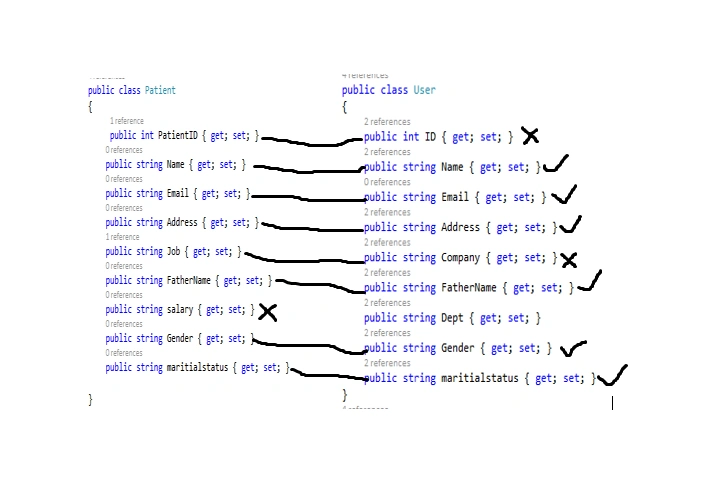
Those properties which are not mapped automatically due to violatio of the automapper rule we can map them manually. So our first goal is to see how we can map these properties manually.
Here I am creating a console application with same 2 classes in a console project.
To use automapper goto the Nuget Package Manager and install Automapper.

So to map them manually we need to specify the member like this. Let's check the problem first.
- using System;
- using System.Collections.Generic;
- using System.Linq;
- using System.Text;
- using System.Threading.Tasks;
- using AutoMapper;
- namespace Mapper
- {
- public class User
- {
- public int ID { get; set; }
- public string Name { get; set; }
- public string Email { get; set; }
- public string Address { get; set; }
- public string Company { get; set; }
- public string FatherName { get; set; }
- public string Dept { get; set; }
- public string Gender { get; set; }
- public string maritialstatus { get; set; }
- }
- public class Patient
- {
- public int PatientID { get; set; }
- public string Name { get; set; }
- public string Email { get; set; }
- public string Address { get; set; }
- public string Job { get; set; }
- public string FatherName { get; set; }
- public string salary { get; set; }
- public string Gender { get; set; }
- public string maritialstatus { get; set; }
- }
- public class Demo
- {
- static void Main(string[] args)
- {
- User uobj = new User();
- uobj.ID = 100;
- uobj.Name = "Susant";
- uobj.Address = "Bangalore";
- uobj.Company = "Accenture";
- uobj.Dept = "IT";
- uobj.Dept = "[email protected]";
- uobj.FatherName = "Mohan";
- uobj.Gender = "Male";
- uobj.maritialstatus = "Unmarried";
- AutoMapper.Mapper.CreateMap<User, Patient>();
- var mappeddata = AutoMapper.Mapper.Map<User,Patient>(uobj);
- Console.WriteLine(mappeddata.PatientID + Environment.NewLine +
- mappeddata.Name + Environment.NewLine +
- mappeddata.Address + Environment.NewLine+
- mappeddata.Job + Environment.NewLine+
- mappeddata.FatherName + Environment.NewLine +
- mappeddata.Gender + Environment.NewLine +
- mappeddata.maritialstatus+Environment.NewLine
- );
- Console.ReadLine();
- }
- }
- }
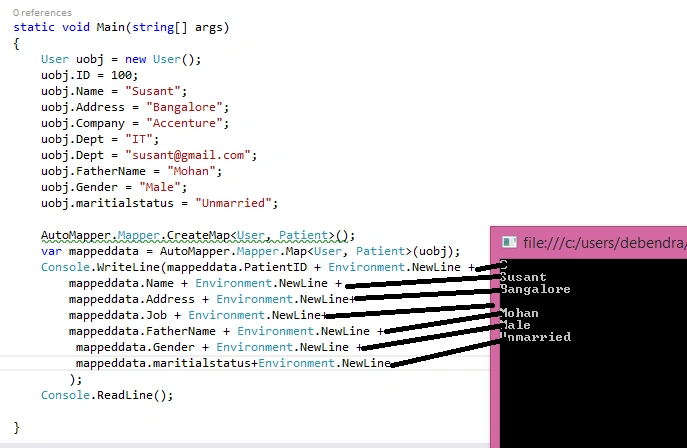
Now let's try to map these members manually.
We can map manually using the keyword "ForMember" like this.
- AutoMapper.Mapper.CreateMap<User, Patient>().ForMember(dest => dest.PatientID, opt => opt.MapFrom(src => src.ID))
- .ForMember(dest => dest.Job, opt => opt.MapFrom(src => src.Company)
- );
- var mappeddata = AutoMapper.Mapper.Map<User,Patient>(uobj);
After that just print the data as follow and check the Output.
- Console.WriteLine(mappeddata.PatientID + Environment.NewLine +
- mappeddata.Name + Environment.NewLine +
- mappeddata.Address + Environment.NewLine+
- mappeddata.Job + Environment.NewLine+
- mappeddata.FatherName + Environment.NewLine +
- mappeddata.Gender + Environment.NewLine +
- mappeddata.maritialstatus+Environment.NewLine
- );
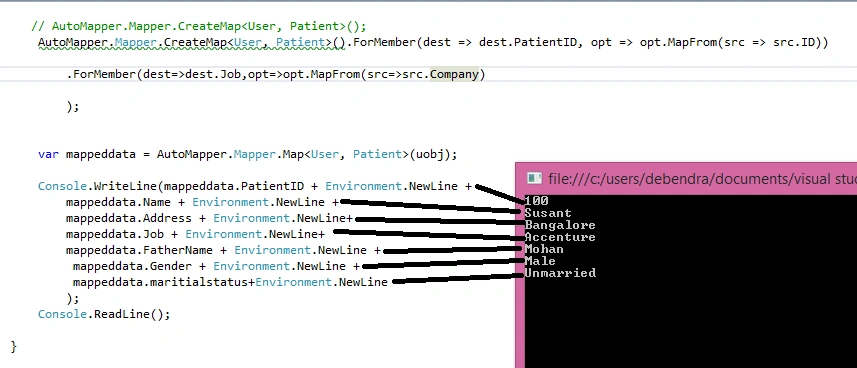
So in this way we can map each property with another if the name mismatch.
Mapping Based On Condition:
In automapper we can map 2 properties based on condition also. As we look in my above example i have assigned Id property to 100. Now i am putting a condition here i will map the name if id==100 other wise i will not map.So for this let check the code.
- AutoMapper.Mapper.CreateMap<User, Patient>()
- .ForMember(dest => dest.Name,opt => opt.Condition(src=>((User)src.Parent.SourceValue).ID ==100));

Now let me change the condition which is False,it will not print anything as shown below.
- AutoMapper.Mapper.CreateMap<User, Patient>()
- .ForMember(dest => dest.Name,opt => opt.Condition(src=>((User)src.Parent.SourceValue).ID ==10));

So in this way we can see how we can map with condition.
Read more articles on C#:
Rajeev RanjanPosted Sep 21, 2018, 1:51 AM
Super article
Bhanu KorremulaPosted Feb 27, 2018, 3:04 PM
CreateMap is deprecated
Kuppurasu NagarajPosted Apr 30, 2016, 2:42 PM
Nice Sharing..
Muhammad Aqib ShehzadPosted Apr 29, 2016, 12:25 AM
good article
Pankaj Kumar ChoudharyPosted Apr 28, 2016, 8:30 PM
Thanks for share this, really it is new concept for me............
Upendra Pratap ShahiPosted Apr 28, 2016, 12:31 PM
nice..