

Introduction
Here, I am going to discuss how we can create a sliding layout in Android. All the Android Applications are using sliding tabs.
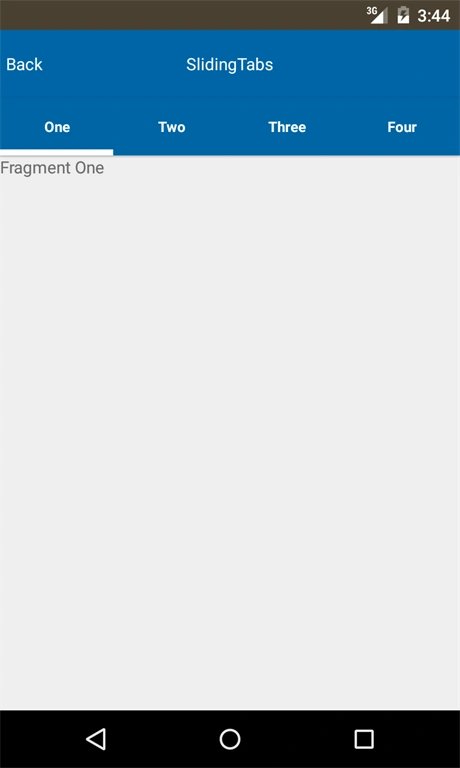
Here, I have an action bar with the left side. There is a back button and in the center, it's showing the application title. Below that, it's showing the tabs. Each tab has a scrolling facility, in order to change the content. We can do click operations to the tabs.
First, create your mail layout, as shown below:
- <LinearLayout
- xmlns:android="http://schemas.android.com/apk/res/android"
- xmlns:tools="http://schemas.android.com/tools" android:layout_width="match_parent"
- android:layout_height="match_parent" android:paddingLeft="@dimen/activity_horizontal_margin"
- android:paddingRight="@dimen/activity_horizontal_margin"
- android:paddingTop="@dimen/activity_vertical_margin"
- android:orientation="vertical"
- android:paddingBottom="@dimen/activity_vertical_margin" tools:context=".MainActivity">
- <include
- android:id="@+id/tool_bar"
- layout="@layout/tool_bar"
- android:layout_height="wrap_content"
- android:layout_width="match_parent"
- />
- <techniche.com.slidingtabs.helper.SlidingTabLayout
- android:id="@+id/tabs"
- android:layout_width="match_parent"
- android:layout_height="wrap_content"
- android:elevation="2dp"
- android:background="@color/sub_title_bg"/>
- <android.support.v4.view.ViewPager
- android:id="@+id/pager"
- android:layout_height="match_parent"
- android:layout_width="match_parent"
- android:layout_weight="1"
- ></android.support.v4.view.ViewPager>
- </LinearLayout>
- <?xml version="1.0" encoding="utf-8"?>
- <android.support.v7.widget.Toolbar
- xmlns:app="http://schemas.android.com/apk/res-auto"
- android:layout_height="wrap_content"
- android:layout_width="match_parent"
- android:elevation="0dp"
- android:contentInsetLeft="5dp"
- android:contentInsetStart="5dp"
- app:contentInsetLeft="5dp"
- app:contentInsetStart="5dp"
- android:contentInsetRight="5dp"
- android:contentInsetEnd="5dp"
- app:contentInsetRight="5dp"
- app:contentInsetEnd="5dp"
- xmlns:android="http://schemas.android.com/apk/res/android" >
- <RelativeLayout
- android:layout_width="match_parent"
- android:layout_height="wrap_content" >
- <TextView
- android:id="@+id/menuLeft"
- android:layout_width="wrap_content"
- android:layout_height="wrap_content"
- android:layout_alignParentLeft="true"
- android:layout_centerHorizontal="true"
- android:layout_centerVertical="true"
- android:layout_alignParentStart="true"
- android:textColor="@color/white"
- android:clickable="true" />
- <TextView
- android:id="@+id/toolbar_title"
- android:layout_width="wrap_content"
- android:layout_height="wrap_content"
- android:layout_centerHorizontal="true"
- android:layout_centerVertical="true"
- android:text="@string/app_name"
- android:textColor="@color/white"/>
- </RelativeLayout>
- </android.support.v7.widget.Toolbar>
compile 'com.android.support:appcompat-v7:23.0.1'
Now, we need to create a style for the Application bar, as shown below:
Now, bind the controls in the Java file, as given below:
Now, we need to create the adapter for all the contents, as given below:
Now, create four fragments to show on selecting each tab, as shown below:
- <style name="HomeTheme" parent="Theme.AppCompat.Light.DarkActionBar">
- <!-- Customize your theme here. -->
- <item name="colorPrimary">@color/colorPrimary</item>
- <item name="colorPrimaryDark">@color/colorPrimaryDark</item>
- <item name="colorAccent">@color/colorAccent</item>
- <item name="windowActionBar">false</item>
- <item name="windowNoTitle">true</item>
- </style>
- TextView backButton = (TextView) findViewById(R.id.menuLeft);
- TextView titleText = (TextView) findViewById(R.id.toolbar_title);
- backButton.setOnClickListener(new View.OnClickListener()
- {
- @Override
- public void onClick(View view)
- {
- final FragmentManager fragmentManager = getFragmentManager();
- if (fragmentManager.getBackStackEntryCount() != 0)
- {
- fragmentManager.popBackStackImmediate();
- } else
- finish();
- }
- });
- // Creating The Toolbar and setting it as the Toolbar for the activity
- toolbar = (Toolbar) findViewById(R.id.tool_bar);
- setSupportActionBar(toolbar);
- adapter = new HomeViewPagerAdapter(getSupportFragmentManager(), Titles, Numboftabs);
- pager = (ViewPager) findViewById(R.id.pager);
- pager.setAdapter(adapter);
- // Assiging the Sliding Tab Layout View
- tabs = (SlidingTabLayout) findViewById(R.id.tabs);
- tabs.setDistributeEvenly(true); // To make the Tabs Fixed set this true, This makes the tabs Space Evenly in Available width
- public class HomeViewPagerAdapter extends FragmentStatePagerAdapter
- {
- CharSequence Titles[]; // This will Store the Titles of the Tabs which are Going to be passed when ViewPagerAdapter is created
- int NumbOfTabs; // Store the number of tabs, this will also be passed when the ViewPagerAdapter is created
- // Build a Constructor and assign the passed Values to appropriate values in the class
- public HomeViewPagerAdapter(FragmentManager fm, CharSequence mTitles[], int mNumbOfTabsumb)
- {
- super(fm);
- this.Titles = mTitles;
- this.NumbOfTabs = mNumbOfTabsumb;
- }
- //This method returns the fragment for the every position in the View Pager
- @Override
- public Fragment getItem(int position)
- {
- if (position == 0) // if the position is 0 we are returning the First tab
- {
- FragmentOne healthFragment = new FragmentOne();
- return healthFragment;
- } else if (position == 1) // if the position is 0 we are returning the First tab
- {
- FragmentTwo appointmentFragment = new FragmentTwo();
- return appointmentFragment;
- } else if (position == 2) // if the position is 0 we are returning the First tab
- {
- FragmentThree favourateFragment = new FragmentThree();
- return favourateFragment;
- } else // As we are having 2 tabs if the position is now 0 it must be 1 so we are returning second tab
- {
- FragmentFour messagesFragment = new FragmentFour();
- return messagesFragment;
- }
- }
- // This method return the titles for the Tabs in the Tab Strip
- @Override
- public CharSequence getPageTitle(int position)
- {
- return Titles[position];
- }
- // This method return the Number of tabs for the tabs Strip
- @Override
- public int getCount()
- {
- return NumbOfTabs;
- }
- <?xml version="1.0" encoding="utf-8"?>
- <LinearLayout
- xmlns:android="http://schemas.android.com/apk/res/android"
- android:orientation="vertical" android:layout_width="match_parent"
- android:layout_height="match_parent">
- <TextView
- android:layout_width="wrap_content"
- android:text="Fragment Two"
- android:layout_height="wrap_content" />
- </LinearLayout>
See the screenshots also,

Santhakumar MunuswamyPosted Jun 25, 2016, 12:44 AM
Thank you for nice article
Prasanna MuraliPosted Jun 23, 2016, 10:21 AM
Nice one...
GokulPosted Jun 23, 2016, 3:11 AM
Thanks for sharing
Pranav J.DevPosted Jun 22, 2016, 5:49 AM
Thank you all for your support
RajaPosted Jun 22, 2016, 3:10 AM
Good One....
kalu singh raoPosted Jun 22, 2016, 1:45 AM
Nice...
Vignesh ManiPosted Jun 21, 2016, 5:01 PM
nice
Kuppurasu NagarajPosted Jun 21, 2016, 12:38 PM
Nice Sharing..