

Introduction
Single-Page Applications (SPAs) are the Web apps that load a single HTML page and dynamically update that page as the user interacts with the app. Why do we want to write single page apps? The main reason is that they allow us to offer a more-native-app-like experiences to the user. If you want to know more about it, why do we need a single page Application? I have found a very good answer in stackoverflow. Click here to read it.
Overview
In this article, we will use Visual Studio 2013, ASP.NET Web API 2 and AngularJS 1.x. For the back end, we will use SQL Server 2008 and to connect it to the database, we will use entity framework code first approach.
Getting Started
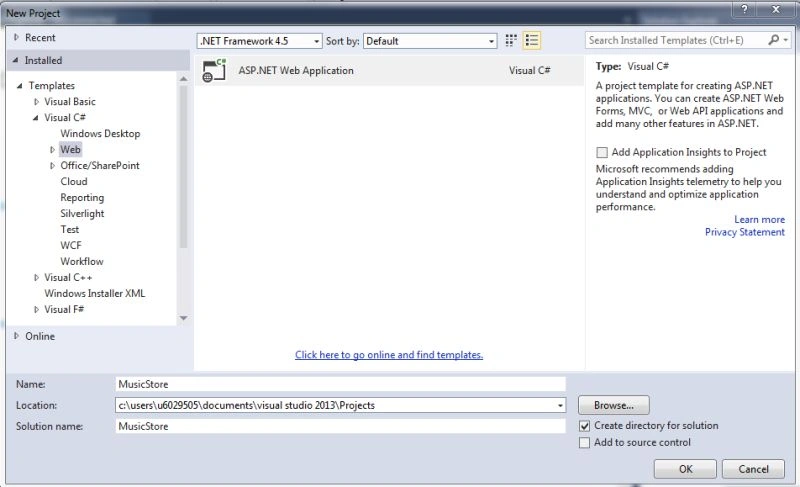
First, we need to create a new ASP.NET application, named MusicStore in Visual Studio 2013, as shown in following image:
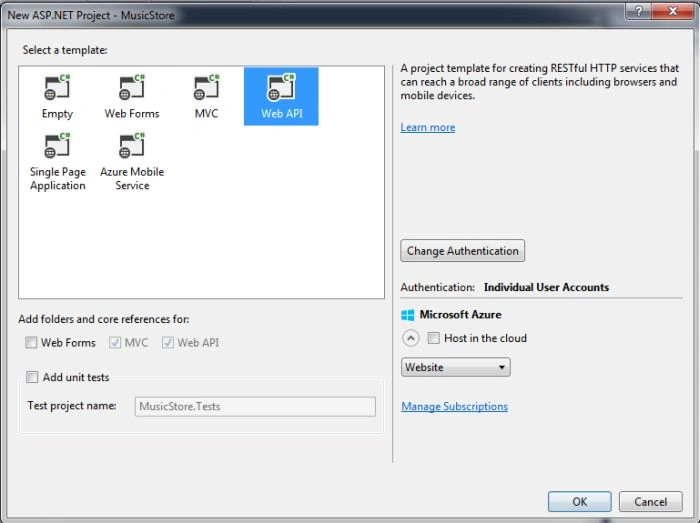
Click OK and select Web API from the template and click OK.
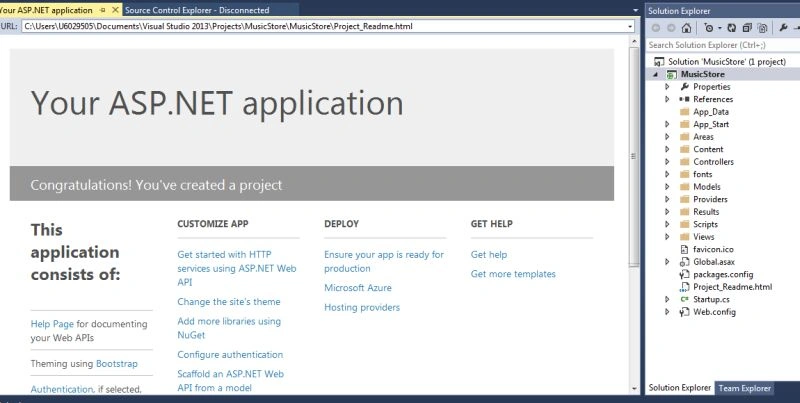
After creating a project, you will find the solution of MusicStore Application with some default file and folder, as shown below:
Now add AngularJS to the Application. To add AngularJS to our project, we have different approaches. If you are particular about Angular versions and features you need, you might go to the Angular website and download it.
The easiest approach is to use NuGet and Package Manager console and execute the following command:
PM> Install-Package AngularJS.core
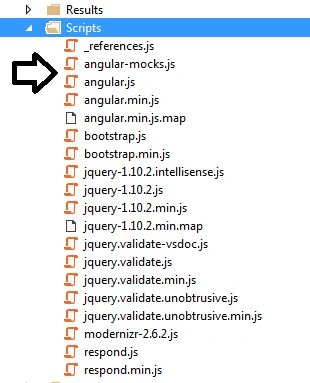
Once this command is executed, we can find the Angular file, as listed in the image below, in Scripts folder.
Setting Up the Database
We are going to use entity framework, so first we need to install the entity framework in our Application. To install the entity framework, we need to execute the following command in Package Manager console:
PM> Install-Package EntityFramework
After successful installation, we first need to create a model class. To add a model class, right click on the Model folder, add a class and name it Music.
- public class Music
- {
- public int Id { get; set; }
- public string Title { get; set; }
- public string Singers { get; set; }
- public int RunTime { get; set; }
- public DateTime ReleaseDate { get; set; }
- }
- public class MusicDb:DbContext
- {
- public DbSet<Music> Musics { get; set; }
- }
PM> Enable-Migrations -ContextTypeName MusicStore.Models.MusicDb
Migration helps to create Migration folder in the project with Configuration.cs file. Inside configuration.cs, we have a seed method. We will add some default seed data for Music in that method, shown below:
- internal sealed class Configuration : DbMigrationsConfiguration<MusicDb>
- public Configuration()
- {
- AutomaticMigrationsEnabled = true;
- }
- protected override void Seed(MusicDb context)
- {
- // This method will be called after migrating to the latest version.
- // You can use the DbSet<T>.AddOrUpdate() helper extension method
- // to avoid creating duplicate seed data. E.g.
- //
- context.Musics.AddOrUpdate(
- m => m.Title,
- new Music
- {
- Title = "Man Ki Mat Pe Mat Chaliyo",
- Singers = "Rahat Fateh Ali Khan",
- RunTime = 5,
- ReleaseDate = new DateTime(2016, 01, 02)
- },
- new Music
- {
- Title = "Tere Mast Mast Do Nain",
- Singers = "Shreya Ghoshal, Rahat Fateh Ali Khan",
- RunTime = 5,
- ReleaseDate = new DateTime(2016, 01, 02)
- },
- new Music
- {
- Title = "Dil Ho Gaya Shanty Flat",
- Singers = "Kishore Kumar",
- RunTime = 5,
- ReleaseDate = new DateTime(2016, 01, 02)
- },
- new Music
- {
- Title = "Humka Peeni Hai Peeni",
- Singers = "Wajid, Master Salim, Shabab Sabri",
- RunTime = 5,
- ReleaseDate = new DateTime(2016, 01, 02)
- },
- new Music
- {
- Title = "Pee Loon Hoto Ki Sargam",
- Singers = "Mohit Chauhan",
- RunTime = 5,
- ReleaseDate = new DateTime(2016, 01, 02)
- }
- );
- }
- AutomaticMigrationsEnabled = true;
PM> Update-Database
The database is ready for us and now we can build a Web API to manipulate the data.
Building The Web API
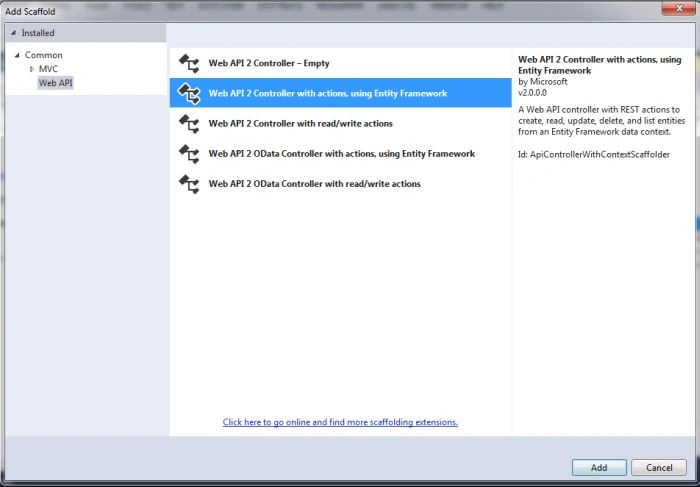
To create a Web API controller, just go to Controller folder and right click it. Click on add new scaffolding, as described in the following image. In this article, we are taking basic CRUD operations only.
After clicking, the following dialog box appears. Select Music as Model class and MusicDb is the data context and click add.
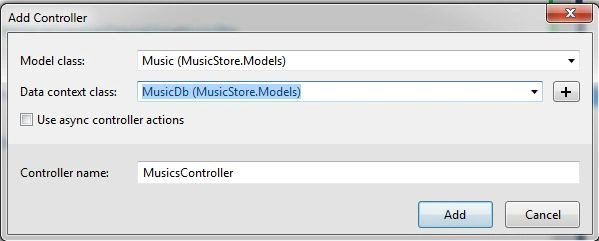
After clicking Add automatically, the CRUD operation code is generated for us.
- public class MusicsController : ApiController
- {
- private readonly MusicDb _db = new MusicDb();
- // GET: api/Musics
- public IQueryable<Music> GetMusics()
- {
- return _db.Musics;
- }
- // GET: api/Musics/5
- [ResponseType(typeof(Music))]
- public IHttpActionResult GetMusic(int id)
- {
- var music = _db.Musics.Find(id);
- if (music == null)
- {
- return NotFound();
- }
- return Ok(music);
- }
- // PUT: api/Musics/5
- [ResponseType(typeof(void))]
- public IHttpActionResult PutMusic(int id, Music music)
- {
- if (!ModelState.IsValid)
- {
- return BadRequest(ModelState);
- }
- if (id != music.Id)
- {
- return BadRequest();
- }
- _db.Entry(music).State = EntityState.Modified;
- try
- {
- _db.SaveChanges();
- }
- catch (DbUpdateConcurrencyException)
- {
- if (!MusicExists(id))
- {
- return NotFound();
- }
- throw;
- }
- return StatusCode(HttpStatusCode.NoContent);
- }
- // POST: api/Musics
- [ResponseType(typeof(Music))]
- public IHttpActionResult PostMusic(Music music)
- {
- if (!ModelState.IsValid)
- {
- return BadRequest(ModelState);
- }
- _db.Musics.Add(music);
- _db.SaveChanges();
- return CreatedAtRoute("DefaultApi", new { id = music.Id }, music);
- }
- // DELETE: api/Musics/5
- [ResponseType(typeof(Music))]
- public IHttpActionResult DeleteMusic(int id)
- {
- var music = _db.Musics.Find(id);
- if (music == null)
- {
- return NotFound();
- }
- _db.Musics.Remove(music);
- _db.SaveChanges();
- return Ok(music);
- }
- protected override void Dispose(bool disposing)
- {
- if (disposing)
- {
- _db.Dispose();
- }
- base.Dispose(disposing);
- }
- private bool MusicExists(int id)
- {
- return _db.Musics.Count(e => e.Id == id) > 0;
- }
- }
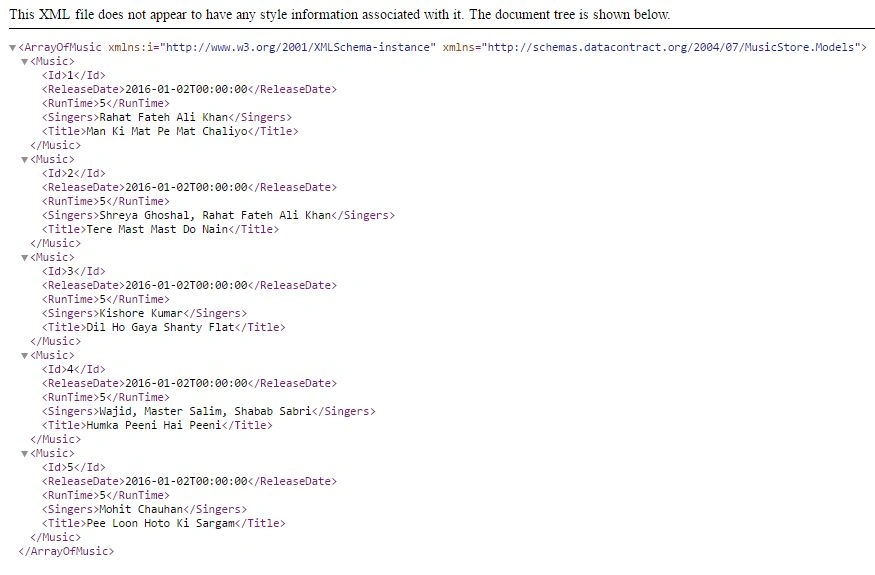
Now, our Web API is ready with all the functionality in place. The only task left is, we need to write some Angular and HTML code to manipulate the data in Single page Application.
Building Application and Module
A module in Angular is an abstraction that allows us to group various components to keep them isolated from the other components and the code in an Application. One of the benefits of isolation is to make Angular code easier to unit test. Various features of Angular framework are organized into different modules that we need for the Application.
To set up our Angular and HTML code, follow the following steps:
Step 1
Create a new folder in a project named MusicApp. Inside this folder, we organized the scripts and HTML. Inside the MusicApp folder, we added two more folders named Scripts and Views. Scripts will store the Angular code and the Views will store the HTML code.
Step 2
Inside the Scripts folder, we will add the Js file with the name theMusic.js with following code:
- (function() {
- var app = Angular.module("theMusic", []);
- }());
Step 3
Add an Index.html view and write the following code in it.
- <head>
- <title></title>
- <script src="../../Scripts/angular.js"></script>
- <script src="../Scripts/theMusic.js"></script>
- </head>
- <body>
- <div ng-app="theMusic">
- </div>
- </body>
- /html>
Creating Controllers, Models, and views
Angular controllers are the objects which you use to govern the section of DOM and set up a model. Angular controllers are helpful and live as long as they are associated with DOM on display. This behavior makes controllers in Angular a little different from their counterparts in ASP.NET MVC, where the controllers process a single HTTP request and then go away.
To create a controller to show the Music list, first create a new JS file in MusicApp/Scripts file and name it as a MusicListController.js. Write the following code in it, shown below:.
- (function(app) {
- }
- (Angular.module("theMusic")));
- (function(app) {
- var MusicListController = function($scope) {
- $scope.message = "Manish Kumar";
- };
- app.controller("MusicListController", MusicListController);
- }(Angular.module("theMusic")));
- <html xmlns="http://www.w3.org/1999/xhtml">
- <head>
- <title></title>
- <script src="../../Scripts/angular.js"></script>
- <script src="../Scripts/theMusic.js"></script>
- <script src="../Scripts/MusicListController.js"></script>
- </head>
- <body>
- <div ng-app="theMusic">
- <div ng-controller="MusicListController">
- {{message}}
- </div>
- </div>
- </body>
- </html>

So far, we did not implement any of the functionality in our Application. The key abstractions our code has demonstrated so far are:
- The controllers are responsible for putting together a model by augmenting the $scope variable. The controllers generally avoid any DOM manipulation directly. The controller only changes UI properties by updating the data.
- The model object is aware of the view and the controller. The model is only responsible for holding state as well as exposing some behavior to manipulate the state.
- The View uses the template and directives to gain an access to the model information.
Some additional abstraction is still available with Angular, including the concept of the Services. The MesucListController must use a Service to retrieve the Music information data from the Server.
Services
Services in Angular are the objects that perform specific tasks, such as communication over HTTP, managing the Browser history, performing the localization, implementing DOM compilation and many more. Services like controllers are registered in a module and managed by Angular. When a controller or other component needs to make use of Services, it asks Angular for a reference to the services by including the service as a parameter to its registered function.
Now go the MusicListController and $http service and use the Get method to get the list of the music like this:
- (function(app) {
- var MusicListController = function($scope, $http) {
- $http.get("/api/Musics").success(function (data) {
- $scope.musics = data;
- });
- };
- app.controller("MusicListController", MusicListController);
- }(angular.module("theMusic")));
Now, our controller is ready with the list of music and we need to display the list of the music in the View to index.html and add the following code:
- <html xmlns="http://www.w3.org/1999/xhtml">
- <head>
- <title></title>
- <script src="../../Scripts/angular.js"></script>
- <link href="../../Content/Site.css" rel="stylesheet" />
- <link href="../../Content/bootstrap.css" rel="stylesheet" />
- <script src="../../Scripts/bootstrap.js"></script>
- <script src="../Scripts/theMusic.js"></script>
- <script src="../Scripts/MusicListController.js"></script>
- </head>
- <body>
- <div ng-app="theMusic">
- <div ng-controller="MusicListController">
- <table class="table table-bordered">
- <thead>
- <tr>
- <th>Title</th>
- <th>Singers</th>
- </tr>
- </thead>
- <tbody>
- <tr ng-repeat="music in musics">
- <td>{{music.Title}}</td>
- <td>{{music.Singers}}</td>
- </tr>
- </tbody>
- </table>
- </div>
- </div>
- </body>
- </html>
Routing
Routing in Angular is similar to routing in ASP.NET. Angular can take care of the preceding requirement. We just need to download some additional module and write some configuration for the Application. Execute the following command in Package Manager console to install the Angular Route.
PM> Install-Package -IncludePrerelease AngularJS.Route
Once the above command is executed properly, we can check the Scripts folder that will have Angular-route.js file. Include it to Index page and list the routing module, as dependency of the Application module (theMusic):
- (function() {
- var app = Angular.module("theMusic", ["ngRoute"]);
- }());
- (function () {
- var app = angular.module("theMusic", ["ngRoute"]);
- var config = function ($routeProvider) {
- $routeProvider
- .when("/list",
- { templateUrl: "/MusicApp/Views/list.html", controller: "MusicListController" })
- .when("/details/:id",
- { templateUrl: "/MusicApp/Views/details.html", controller: "DetailsController" })
- .otherwise(
- { redirectTo: "/list", controller: "MusicListController" });
- };
- app.config(config);
- }());
- <!DOCTYPE html>
- <html xmlns="http://www.w3.org/1999/xhtml">
- <head>
- <title></title>
- <script src="../../Scripts/angular.js"></script>
- <script src="https://ajax.googleapis.com/ajax/libs/angularjs/1.2.0rc1/angular-route.min.js"></script>
- <link href="../../Content/Site.css" rel="stylesheet" />
- <link href="../../Content/bootstrap.css" rel="stylesheet" />
- <script src="../../Scripts/bootstrap.js"></script>
- <script src="../Scripts/theMusic.js"></script>
- <script src="../Scripts/MusicListController.js"></script>
- <script src="../Scripts/DetailsController.js"></script>
- </head>
- <body ng-app="theMusic">
- <h2>Music store</h2>
- <div ng-view></div>
- </body>
- </html>
List view
- <div ng-controller="MusicListController">
- <table class="table table-bordered">
- <thead>
- <tr>
- <th>Title</th>
- <th>Singers</th>
- <th>Action</th>
- </tr>
- </thead>
- <tbody>
- <tr ng-repeat="music in musics">
- <td>{{music.Title}}</td>
- <td>{{music.Singers}}</td>
- <td>
- <a href="#/details/{{music.Id}}" class="btn btn-default btn-sm">Details</a>
- <a href="#/delete/{{music.Id}}" class="btn btn-danger btn-sm">delete</a>
- </td>
- </tr>
- </tbody>
- </table>
- </div>
- (function (app) {
- var DetailsController = function ($scope, $http,$routeParams) {
- var id = $routeParams.id;
- $http.get("/api/Musics/" + id)
- .success(function (data) {
- $scope.music = data;
- });
- };
- app.controller("DetailsController", DetailsController);
- }(angular.module("theMusic")));
- <div ng-controller="DetailsController">
- <h3>{{music.Title}}</h3>
- <div>Sing By {{music.Singers}}</div>
- <div>Released in {{music.ReleaseDate}}</div>
- <div>{{music.RunTime}} minutes long.</div>
- <br/><br/>
- <a href="#/list/" class="btn btn-info btn-default">Back to List</a>
- </div>
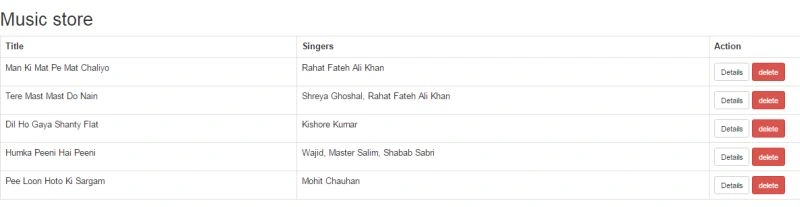
When we click the details button, it will redirect to the details view and show the relative details of the music, as follows:
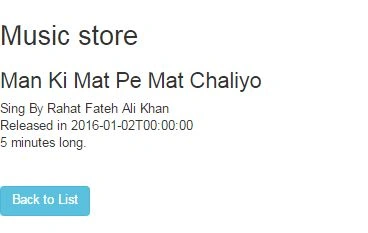
One thing you must have noticed here is when we click on the details button, it redirects to the details view, but the page did not refresh. We can also create a custom Music Service and use that Service in our Application. Let’s discuss how to create a Custom Service
Custom MusicService
In Angular, we can define custom controllers and modules. We can also create custom directives, services, modules and many more. For this Application, we will create a custom Service, that will be capable for MusicController Web API communication. We create a Service and our controller does not need to use $http Service directly. Go to add the MusicService.js file in Scripts folder and write the following code in it:
- (function(app) {
- var musicService = function($http, musicApiUrl) {
- var getAll = function() {
- return $http.get(musicApiUrl);
- };
- var getById = function(id) {
- return $http.get(musicApiUrl + id);
- };
- var update = function(music) {
- return $http.put(musicApiUrl + music.id, music);
- };
- var create = function(music) {
- return $http.post(musicApiUrl, music);
- };
- var destroy = function(id) {
- return $http.delete(musicApiUrl + id);
- };
- return {
- getAll: getAll,
- getById: getById,
- update: update,
- create: create,
- delete: destroy
- };
- };
- app.factory("musicService", musicService);
- }(angular.module("theMusic")));
theMusic.Js
- (function () {
- var app = angular.module("theMusic", ["ngRoute"]);
- var config = function ($routeProvider) {
- $routeProvider
- .when("/list",
- { templateUrl: "/MusicApp/Views/list.html", controller: "MusicListController" })
- .when("/details/:id",
- { templateUrl: "/MusicApp/Views/details.html", controller: "DetailsController" })
- .otherwise(
- { redirectTo: "/list", controller: "MusicListController" });
- };
- app.config(config);
- app.constant("musicApiUrl", "/api/musics/");
- }());
- (function (app) {
- var MusicListController = function ($scope, musicService) {
- musicService
- .getAll()
- .success(function (data) {
- $scope.musics = data;
- });
- };
- app.controller("MusicListController", MusicListController);
- }(angular.module("theMusic")));
- (function (app) {
- var DetailsController = function ($scope, $routeParams, musicService) {
- var id = $routeParams.id;
- musicService
- .getById(id)
- .success(function (data) {
- $scope.music = data;
- });
- };
- app.controller("DetailsController", DetailsController);
- }(angular.module("theMusic")));
Now, we are going to create more controllers to delete the Music data, to Edit the music data and to add the current music data. So far, if you have read this article carefully, you have a very clear idea of how to create those views. So, I am not going to explain more in detail and am only writing the required controller and the view code.
DeleteMusic
As I have already added delete button in the list view, we will just modify the MusicListController, List view and add the functionality in it.
MusicListController.js
- (function (app) {
- var MusicListController = function ($scope, musicService) {
- musicService
- .getAll()
- .success(function (data) {
- $scope.musics = data;
- });
- $scope.delete = function (music) {
- musicService.delete(music.Id)
- .success(function () {
- removeMusicById(music.Id);
- });
- };
- var removeMusicById = function (id) {
- for (var i = 0; i < $scope.musics.length; i++) {
- if ($scope.musics[i].Id == id) {
- $scope.musics.splice(i, 1);
- break;
- }
- }
- };
- };
- app.controller("MusicListController", MusicListController);
- }(angular.module("theMusic")));
- <div ng-controller="MusicListController">
- <table class="table table-bordered">
- <thead>
- <tr>
- <th>Title</th>
- <th>Singers</th>
- <th>Action</th>
- </tr>
- </thead>
- <tbody>
- <tr ng-repeat="music in musics">
- <td>{{music.Title}}</td>
- <td>{{music.Singers}}</td>
- <td>
- <a href="#/details/{{music.Id}}" class="btn btn-default btn-sm">Details</a>
- <button class="btn btn-danger btn-sm" ng-click="delete(music)">Delete</button>
- </td>
- </tr>
- </tbody>
- </table>
- </div>
Agenda for Edit and Insert
To edit the music details, a user needs to go to details of the music and click edit to edit the music details. In a similar way, where we are showing the list of music, we will add the add button to add new music details.
First, we will create an edit view that we will use in edit and insert; both based on the editable property true and false.
Edit.html
- <div class="row" ng-controller="EditController">
- <div class="col-md-5">
- <form ng-show="isEditable()">
- <div class="form-group">
- <label for="Title">Title</label>
- <input name="Title" type="text" class="form-control" placeholder="Enter title" ng-model="edit.music.Title">
- </div>
- <div class="form-group">
- <label for="Singers">Singers</label>
- <input name="Singers" type="text" class="form-control" placeholder="Enter Singers" ng-model="edit.music.Singers">
- </div>
- <div class="form-group">
- <label for="ReleaseDate">Release Date</label>
- <input name="ReleaseDate" type="text" class="form-control" placeholder="Enter Release Date" ng-model="edit.music.ReleaseDate">
- </div>
- <div class="form-group">
- <label for="RunTime">RunTime</label>
- <input name="RunTime" type="text" class="form-control" placeholder="Enter RunTime" ng-model="edit.music.RunTime">
- </div>
- <button class="btn btn-primary" ng-click="save()">Save</button>
- <button class="btn btn-primary" ng-click="cancel()">Cancel</button>
- </form>
- </div>
- </div>
Edit Controller
- (function(app) {
- var EditController = function ($scope, musicService) {
- $scope.isEditable = function () {
- return $scope.edit && $scope.edit.music;
- };
- $scope.cancel = function() {
- $scope.edit.music = null;
- };
- $scope.save = function () {
- if ($scope.edit.music.Id) {
- updateMusic();
- } else {
- createMusic();
- }
- };
- $scope.musics = [];
- var updateMusic = function() {
- musicService.update($scope.edit.music)
- .then(function () {
- angular.extend($scope.music, $scope.edit.music);
- $scope.edit.music = null;
- });
- };
- var createMusic = function () {
- musicService.create($scope.edit.music)
- .then(function () {
- $scope.musics.push($scope.edit.music);
- $scope.edit.music = null;
- });
- };
- };
- app.controller("EditController", EditController);
- }(angular.module("theMusic")));
- $scope.edit = function () {
- $scope.edit.music = Angular.copy($scope.music);
- };
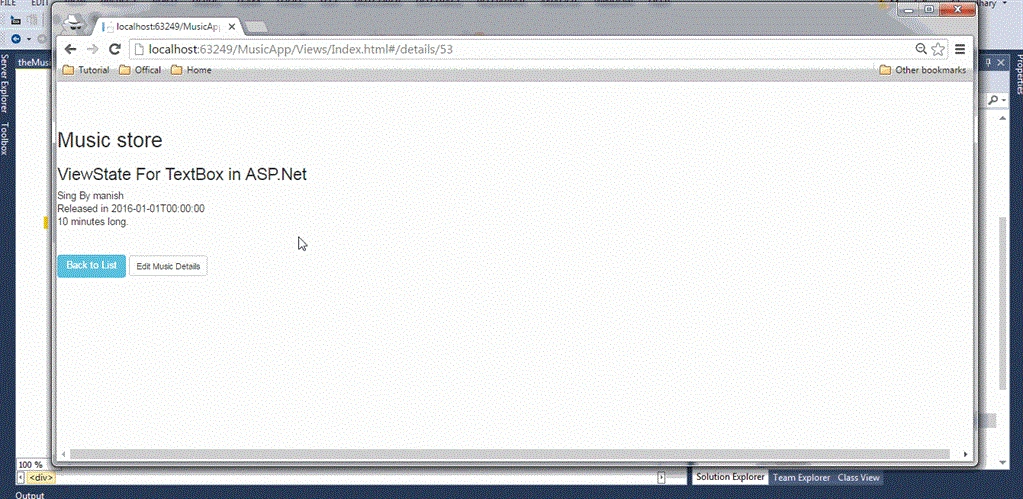
- <button class="btn btn-default btn-sm" ng-click="edit()">Edit Music Details</button>
- <div ng-include="'/MusicApp/Views/edit.html'"></div>
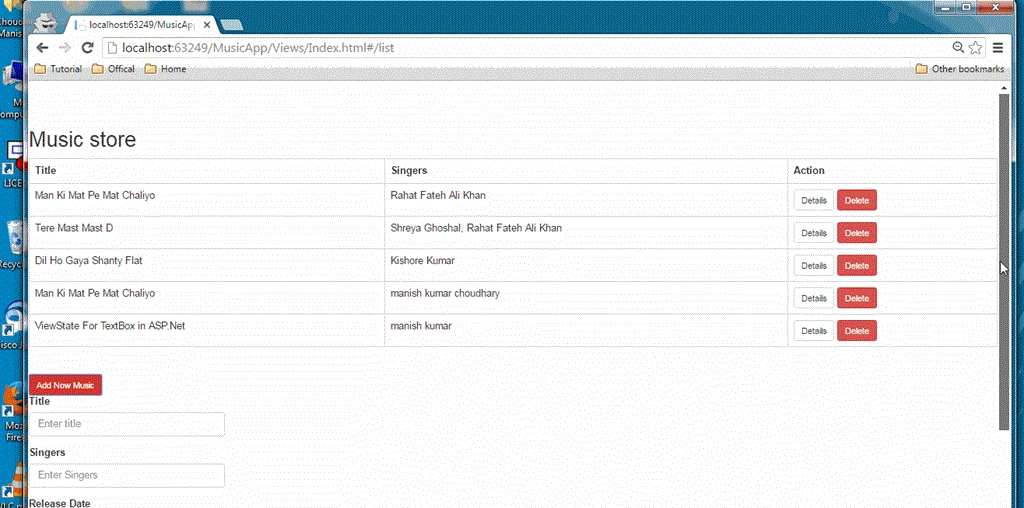
To add the new record in the music section, we need to modify the list controller and list view like:
ListController will add
- $scope.create = function () {
- $scope.edit = {
- music: {
- Title: "",
- Singers: "",
- ReleaseDate: new Date,
- RunTime: 0
- }
- };
- };
List.html
- <button class="btn btn-danger btn-sm" ng-click="create()">Add Now Music</button>
- <div ng-include="'/MusicApp/Views/edit.html'"></div>
Conclusion
In this article, we learned about the SPA (Single Page Application), using AngularJS and ASP.NET Web API. If you have any questions or comments regarding this article, please post it in the comment section of this article. I hope you like it.
varsha mudigondaPosted Apr 30, 2021, 1:05 PM
I am not able to get details while i did exactly same as your application
Martin PanPosted Dec 26, 2018, 9:56 PM
Good implement of Web API with AngularJS, It works.
UtkPosted Jul 29, 2018, 3:16 AM
Please Help : List not refreshing after Create
Nithish ReddyPosted Jan 8, 2018, 6:34 AM
The context type 'MusicStore.Models.MusicDb' was not found in the assembly 'MusicStore'.Getting this error in Package Manager Console , how to troubleshoot it ?
Shridhar SharmaPosted Jul 14, 2016, 2:44 PM
Nice share :)
Santhakumar MunuswamyPosted Jun 25, 2016, 12:54 AM
Thank you for well written