

Introduction
It is well known among the SharePoint community that SharePoint Framework (SPFx) has emerged as the most popular development method in recent times. One of the requirements from the SharePoint Developers community was to enable SharePoint developers with the easy creation of SPAs. The SPFx method provided that hope as there was a plan by Microsoft to approach the SPFx in a phased manner and include the SPA module after the Client-side web part module is stabilized.
In the latest version of SPFx, there is an option to convert the existing web parts to single part app pages (SPAP). Now, I am not sure if this is Microsoft’s version of SPAs in SharePoint or if there is any plan to include SPA module in SPFx in the future.
SPAPs are the extensions of Client-side Web Parts. These types of pages basically allow just one web part on a page and restrict the developers or power users from adding multiple web parts to the page.
The overall development experience is exactly similar to the client-side web parts development method using SPFx. Developers should first create the client-side web part using the SPFx method and then follow a few additional steps to convert the existing page to single part app page (SPAP) using either PowerShell script or by running a JS script as explained in the official documentation here.
If you look from the developer’s perspective, below mentioned are the high-level steps to create SPAPs.
- Create a new client-side web part using SPFx development method. Click Here for detailed steps from Microsoft's official documentation.
- After deploying this web part, you need to add it to the SharePoint page. Click Here for the steps to add web parts to modern SharePoint pages.
- Now, you can convert this page as a single page app part (SPAP). Click Here to refer to the steps to convert the page to single part app page(SPAP).
In my opinion, the single page app page (SPAP) is definitely not a Single Page App (SPA) and hence I am writing this article which will help you to create an SPA from within SharePoint using NodeJS based development.
Motivation for this Article Series
Many people may not be aware that SPFx is derived from the same principle of NodeJS based open source development. In fact, much before the SPFx was officially announced, there were a few demos and documentation conducted and written by Microsoft about how NodeJS development method can be leveraged. This was a preparatory measure in order to prepare the developers for the SPFx.
In this article series, I will provide the steps to develop a Single Page Application using the node.js based development method which communicates with SharePoint resources using REST APIs and perform desired activities.
Prerequisites
- Reader has knowledge of SPFx (Not mandatory though)
- Reader has some knowledge of Open source development using Node.js and has already installed all the relevant packages such as (NodeJS, npm, webpack etc.)
- Reader has some understanding of advanced JS, TypeScript, and ReactJS
- Reader is aware of the existence of JS bundler libraries such as webpack, gulp etc
- SharePoint Online development environment setup is already available
This Article series is divided into three major parts as mentioned below.
- Part 1: Introduction & Motivation (This article)
- Part 2: Getting Started
- Basic setup
- How to open a SharePoint page and connect to Node.JS development environment
- Part 3: Simple Sharepoint SPA with an example
- SPA Layout using CSS grid
- Display of SP lists in Side Nav and content in the Main section
Note: Please be informed that this method is not an officially recommended method by Microsoft, please proceed to use this as per your judgment and business use case.
The previous part of this article is all about the introduction and the motivation for starting this article series, in this article onwards we will start with the actual steps to develop a Single Page App in SharePoint using ReactJS wired up with TypeScript.
Preparation using Node JS command line utility
Step 1
Step 2
Please note above that “--scripts-version=react-scripts-ts” is included to add the typescript flavor to the react JS.
The reason for including typescript mix is to ensure that we are in alignment with Microsoft’s SPFx development setup requirements so that it is easy for developers to move whole solution or modules to the SPFx and convert as a Client Side Web Part.
Step 3
- cd sp-app
- npm start
Step 4
Preparation on SharePoint Designer
Assuming that you already have a SharePoint site for development and testing purposes, open the site using the SharePoint designer and then follow the steps below to create an initial page.
Once you open any site in the SharePoint Designer, you will notice all the resources listed under side navigation.
- Here, you can click on Site Pages library.
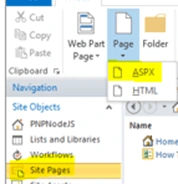
- Once you click on the Site Pages library, you will notice a “Page” button on the top ribbon bar as shown in the picture below.
- Now, you can click on the Page > ASPX, and then rename the file thus created to your convenient name. In this example below, I have created it as index.aspx.
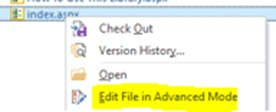
- Now, you can open this page by right-clicking on the file and then “Edit File in Advanced Mode".
Now, you can copy and paste the below snippet to the index.aspx page in the SP Designer
- <!DOCTYPE html PUBLIC "-//W3C//DTD XHTML 1.0 Strict//EN" "http://www.w3.org/TR/xhtml1/DTD/xhtml1-strict.dtd"><%@ Page Language="C#" %><%@ Register tagprefix="SharePoint" namespace="Microsoft.SharePoint.WebControls" assembly="Microsoft.SharePoint, Version=15.0.0.0, Culture=neutral, PublicKeyToken=71e9bce111e9429c" %>
- <html dir="ltr"
- xmlns="http://www.w3.org/1999/xhtml"
- xmlns:mso="urn:schemas-microsoft-com:office:office"
- xmlns:msdt="uuid:C2F41010-65B3-11d1-A29F-00AA00C14882">
- <head runat="server">
- <meta name="WebPartPageExpansion" content="full" />
- <meta http-equiv="X-UA-Compatible" content="IE=10" />
- <SharePoint:CssRegistration Name="default" runat="server"/>
- <title>SharePoint SPA</title>
- </head>
- <body>
- <div class="ms-Grid-row" id="root"></div>
- </body>
- <!-- Dependencies -->
- <script type="text/javascript" src="http://localhost:3000/static/js/bundle.js"></script>
- </html>
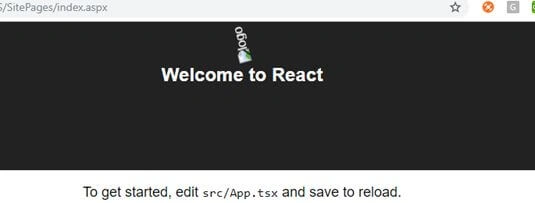
When you open this SharePoint page from the browser, you should be able to see the page similar to below.
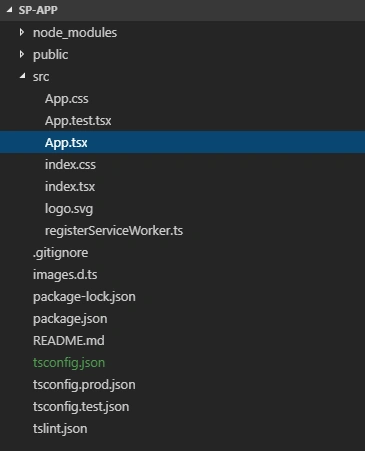
Now, you can open this project on any IDE of your choice, I am using the Visual Studio Code for the demo purpose. Your folder structure should look like the below image.
- import * as React from 'react';
- import {
- Web
- } from '@pnp/sp';
- class App extends React.Component < any, any > {
- constructor(props: any) {
- super(props);
- this.state = {
- lists: []
- };
- }
- componentWillMount() {
- const web = new Web(“Enter your Web URL as a string”)
- const lists: any = [];
- web.lists.get().then(Alllists => {
- Alllists.forEach(function(list, index) {
- lists.push({
- key: index,
- title: list.Title
- });
- })
- this.setState({
- lists: lists
- })
- })
- }
- public render() {
- return ( < div > {
- this.state.lists.map(list => < div > {
- list.title
- } < /div>)} < /div>);
- }
- }
- exportdefault App;
Now, let us understand what we have written in the code snippet above.
This is a React JS component in which
- We are importing the @pnp/sp library into our application and then we are accessing the “Web” object.
- We are then creating an instance of the “Web” object
- Then using the lists method of the Web method, we are fetching all the lists within the site in the context
- Then we are displaying all the lists through the render method of the ReactJS
Now, save the file “App.tsx” file and the application will compile again. If the execution was stopped then you can run “npm start” command again to run the application.
Now, when you open the index.aspx file that you have created earlier in the “Site Pages” library within your SharePoint site, you should be able to see all the lists of the SharePoint site as shown in the image below.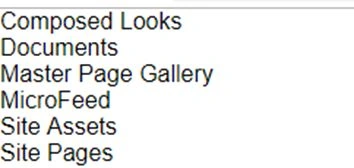
In the next section, we will discuss about various options available to create a SPA layout.
In this section, we will go through the steps below.
- Create SPA layout using CSS Grid
- Create a simple React component which fetches all the lists from the SharePoint site within the selected context and will arrange them in the Left Navigation section.
- Clicking on the list name will display the records with title and IDs in the main section.
Create SPA layout using CSS Grid
In the IDE open the file App.css file and then replace the existing content with the css mark up as mentioned in the snippet below.
- .header { grid-area: header; }
- .leftnav { grid-area: menu; }
- .main { grid-area: main; }
- .rightnav { grid-area: right; }
- .footer { grid-area: footer; }
- .grid-container {
- display: grid;
- grid-template-areas:
- 'header header header header header header'
- 'menu main main main main right'
- 'menu footer footer footer footer footer';
- grid-template-columns: 200px 1fr 1fr 1fr 200px;
- grid-template-rows: 50px 1fr auto;
- grid-gap: 10px;
- background-color: #2196F3;
- padding: 10px;
- min-height: 100vh;
- }
- .grid-container > div {
- background-color: rgba(255, 255, 255, 0.8);
- text-align: center;
- padding: 20px 0;
- font-size: 20px;
- }
Explanation about how this works is out of scope of this article, Please refer to some of the CSS grid training materials
Now, the next step is to make the adjustment in the App component. In order to do this open the App.tsx file and then replace the existing content with the below code snippet.
- import * as React from 'react';
- import './App.css';
- import {
- Web
- } from '@pnp/sp';
- const web = new Web("https://yourtenant.sharepoint.com/sites/dev/");
- class App extends React.Component < any, any > {
- constructor(props: any) {
- super(props);
- this.state = {
- lists: [],
- listItems: []
- };
- this._onClickHandler = this._onClickHandler.bind(this);
- }
- async _onClickHandler(e: React.MouseEvent < HTMLElement > ) {
- var listName = e.currentTarget.innerText;
- var lstResults = [{}];
- const result = await web.lists.getByTitle(listName).items.get();
- for (var i = 0; i < result.length; i++) {
- lstResults.push({
- key: i,
- ID: result[i].Id,
- Title: result[i].Title
- })
- }
- this.setState({
- listItems: lstResults
- });
- }
- componentWillMount() {
- const lists: any = [];
- web.lists.get().then(Alllists => {
- Alllists.forEach(function(list, index) {
- lists.push({
- key: index,
- title: list.Title
- });
- })
- this.setState({
- lists: lists
- })
- })
- }
- public render() {
- return (
- <div className="grid-container">
- <div className="header">Header</div>
- <div className="leftnav" style={{ textAlign: "left", paddingLeft: "10px" }} >
- {this.state.lists.map(list =>
- <div >
- <a href="#" onClick={this._onClickHandler}>{list.title}</a>
- </div>)}
- </div>
- <div className="main">
- {(this.state.listItems.length === 0) ? 'No Data' :
- <table>
- <tbody>
- <tr>
- <th>Title</th>
- <th>ID</th>
- </tr> {this.state.listItems.map(lstitems =>
- <tr>
- <td> {lstitems.ID} </td>
- <td> {lstitems.Title} </td>
- </tr>)}
- </tbody>
- </table>}
- </div>
- <div className="rightnav">Right</div>
- <div className="footer">Footer</div>
- </div>
- );
- }
- }
- export default App;
Since this is not an article about the React JS or CSS Grid, I am not explaining the details about how the code works here. I will be looking forward to comments, If you need any explanation I will be happy to add that here. Please note that this example has a very basic setup in terms of css and the coding.
Now, after saving both the files you can now run a command "npm start" again and then open the index.aspx file from SharePoint. Now, you should be able to see the page as shown in the image below.
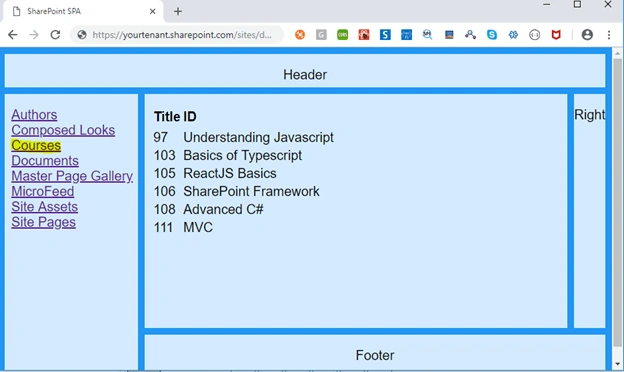
This is a simple example which sets up the initial template. As you can notice, you can click on the name of any list in the left navigation section and the page will immediately fetch all the records of the selected list and then displays the title and ID in the main section in a tabular format without refreshing the page.
Mentioned below are a few of the noticeable references while preparing this article.
- Big Thanks to Patrick Rodgers for creating a pnpjs library.
- w3schools.com from where the CSS grid-based layout is snippet is used.
- Typescript-react-starter GitHub using which initial development setup was created
Issues
You may encounter a few issues when you follow the steps above. Please perform the below-mentioned adjustment to a couple of files before hitting npm start command.
open the tslint.js file from the root folder and then make adjustment as shown below
- {
- "extends": [],
- "defaultSeverity": "warning",
- "linterOptions": {
- "exclude": [
- "config/**/*.js",
- "node_modules/**/*.ts",
- "coverage/lcov-report/*.js"
- ]
- }
- }
Open the tsconfig.json file under root folder and then add below line under the compiler option
- "skipLibCheck": true
Matt MyersPosted Mar 30, 2020, 2:17 AM
Do you host the app in Sharepoint as well? Would that help with security?
Matt MyersPosted Mar 26, 2020, 3:38 AM
Hey this is amazing! And exactly what I was looking for. Which Sharepoint are you using? I want to get this working in Modern Sharepoint online... but so far Site Pages isn't letting me upload the custom index.aspx..
riccardo amadiPosted Jun 18, 2019, 4:56 AM
I can't get this to work, I might have messed app the libraries requirements because now The react-scripts-ts package is deprecated and typescript 3.x doesn't go well with some older packages.http://localhost:3000/ displays a failed to compile error: sp-app-2/node_modules/@pnp/sp/src/searchsuggest.d.ts (14,5): Property 'count' of type 'number | undefined' is not assignable to string index type 'string | number | boolean'. Index.aspx is blank and shows: odata.es5.js:126 Uncaught (in promise) SyntaxError: Unexpected token < in JSON at position 2 at Object.parse (<anonymous>) at odata.es5.js:126 (anonymous) @ odata.es5.js:126 Promise.then (async) ./src/App.tsx.App.componentWillMount @ App.tsx:16 callComponentWillMount @ react-dom.development.js:11421 mountClassInstance @ react-dom.development.js:11514 updateClassComponent @ react-dom.development.js:14688 beginWork @ react-dom.development.js:15644 performUnitOfWork @ react-dom.development.js:19312 workLoop @ react-dom.development.js:19352 renderRoot @ react-dom.development.js:19435 performWorkOnRoot @ react-dom.development.js:20342 performWork @ react-dom.development.js:20254 performSyncWork @ react-dom.development.js:20228 requestWork @ react-dom.development.js:20097 scheduleWork @ react-dom.development.js:19911 scheduleRootUpdate @ react-dom.development.js:20572 updateContainerAtExpirationTime @ react-dom.development.js:20600 updateContainer @ react-dom.development.js:20657 ./node_modules/react-dom/cjs/react-dom.development.js.ReactRoot.render @ react-dom.development.js:20953 (anonymous) @ react-dom.development.js:21090 unbatchedUpdates @ react-dom.development.js:20459 legacyRenderSubtreeIntoContainer @ react-dom.development.js:21086 render @ react-dom.development.js:21155 ./src/index.tsx @ index.tsx:7 __webpack_require__ @ bootstrap 821dd8d4a7cc8c56969e:678 fn @ bootstrap 821dd8d4a7cc8c56969e:88 0 @ registerServiceWorker.ts:123 __webpack_require__ @ bootstrap 821dd8d4a7cc8c56969e:678 (anonymous) @ bootstrap 821dd8d4a7cc8c56969e:724 (anonymous) @ bootstrap 821dd8d4a7cc8c56969e:724 abstract-xhr.js:132 GET https://mcquayit.sharepoint.com/sockjs-node/info?t=1560851016130 404 (NOT FOUND) ./node_modules/sockjs-client/lib/transport/browser/abstract-xhr.js.AbstractXHRObject._start @ abstract-xhr.js:132 (anonymous) @ abstract-xhr.js:21 setTimeout (async) AbstractXHRObject @ abstract-xhr.js:20 XHRLocalObject @ xhr-local.js:8 InfoAjax @ info-ajax.js:19 ./node_modules/sockjs-client/lib/info-receiver.js.InfoReceiver._getReceiver @ info-receiver.js:36 ./node_modules/sockjs-client/lib/info-receiver.js.InfoReceiver.doXhr @ info-receiver.js:56 (anonymous) @ info-receiver.js:25 setTimeout (async) InfoReceiver @ info-receiver.js:24 SockJS @ main.js:121 ./node_modules/react-dev-utils/webpackHotDevClient.js @ webpackHotDevClient.js:61 __webpack_require__ @ bootstrap 821dd8d4a7cc8c56969e:678 fn @ bootstrap 821dd8d4a7cc8c56969e:88 0 @ registerServiceWorker.ts:123 __webpack_require__ @ bootstrap 821dd8d4a7cc8c56969e:678 (anonymous) @ bootstrap 821dd8d4a7cc8c56969e:724 (anonymous) @ bootstrap 821dd8d4a7cc8c56969e:724 webpackHotDevClient.js:76 The development server has disconnected. Refresh the page if necessary.
suresh vegapattaPosted Mar 30, 2019, 6:32 AM
Hi, Can you please explain how to bring the logo image or any other image in to the page. for example suppose I have a class like .svg-image{ background-image: url('./assets/instagram.svg')}.After deploying in SharePoint, I am getting an 404 error; image not found on the url https://developertrail.sharepoint.com/static/media/instagram.b1c58ee1.svg. But the actual image path is https://developertrail.sharepoint.com/sites/BridgeWaterPortal/SiteAssets/portal/static/media/instagram.b1c58ee1.svg . where 'BridgeWaterPortal' is the publishing site, 'portal' is a folder under 'SiteAssets'. I kept all my 'dist' folder items inside this one only.