

In this article I explain how to insert an image into our project folder and insert an image of a path in the database and show images in a GridView.
First I created a database EmpDetail. Now I will create a table in this database.
Query Code
- CREATE TABLE [dbo].[Image_Details](
- [ImageId] [int] IDENTITY(1,1) NOT NULL,
- [ImageName] [varchar](50) NULL,
- [Image] [nvarchar](max) NULL
- ) ON [PRIMARY]
Now insert some data into the LoginDetail table.
Now the following procedure is used.
Step 1
Open Visual Studio 2012 and click "File" -> "New" -> "Web site...". A window is opened. In this window, select "Empty Web Site Application" under Visual C#.

Give the name of your application as "Display_Image_in_Gridview" and then click "Ok".
Step 2
Now we will need to add a folder to our website, check the following procedure.
Go to Solution Explorer then right-click on the solution then select "Add" then select "New Folder". Then provide the name of this folder.
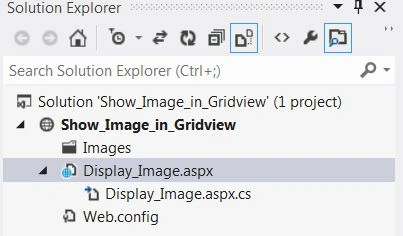
Complete Program
Display_Image.aspx
- <%@ Page Language="C#" AutoEventWireup="true" CodeFile="Display_Image.aspx.cs" Inherits="Display_Image" %>
- <!DOCTYPE html>
- <html xmlns="http://www.w3.org/1999/xhtml">
- <head runat="server">
- <title></title>
- </head>
- <body>
- <form id="form1" runat="server">
- <h3 style="color: #0000FF; font-style: italic">Display Image in GridView Using ASP.NET</h3>
- <div>
- <asp:FileUpload ID="fileupload" runat="server" />
- <br />
- <asp:Button ID="upload" runat="server" Font-Bold="true" Text="Upload" OnClick="upload_Click" />
- <br />
- <br />
- </div>
- <div>
- <asp:GridView runat="server" ID="gdImage" HeaderStyle-BackColor="Tomato" AutoGenerateColumns="false">
- <Columns>
- <asp:BoundField DataField="ImageId" HeaderText="ImageId" />
- <asp:BoundField DataField="ImageName" HeaderText="ImageName" />
- <asp:ImageField DataImageUrlField="Image" HeaderText="Image"></asp:ImageField>
- </Columns>
- </asp:GridView>
- </div>
- </form>
- </body>
- </html>
Display_Image.aspx.cs
- using System;
- using System.Collections.Generic;
- using System.Linq;
- using System.Web;
- using System.Web.UI;
- using System.Web.UI.WebControls;
- using System.Data;
- using System.Data.SqlClient;
- using System.IO;
- using System.Configuration;
- public partial class Display_Image : System.Web.UI.Page
- {
- SqlConnection con;
- SqlDataAdapter da;
- DataSet ds;
- SqlCommand cmd;
- protected void Page_Load(object sender, EventArgs e)
- {
- }
- protected void upload_Click(object sender, EventArgs e)
- {
- try
- {
- string filename = Path.GetFileName(fileupload.PostedFile.FileName);
- fileupload.SaveAs(Server.MapPath("~/Images/" + filename));
- con = new SqlConnection(ConfigurationManager.ConnectionStrings["ImageSql"].ConnectionString);
- con.Open();
- cmd = new SqlCommand("insert into Image_Details (ImageName,Image) values(@ImageName,@Image)", con);
- cmd.Parameters.AddWithValue("@ImageName", filename);
- cmd.Parameters.AddWithValue("@Image", "Images/" + filename);
- cmd.ExecuteNonQuery();
- da = new SqlDataAdapter("select * from Image_Details",con);
- ds = new DataSet();
- da.Fill(ds);
- gdImage.DataSource = ds;
- gdImage.DataBind();
- }
- catch (Exception ex)
- {
- upload.Text = ex.Message;
- }
- }
- }
Output

For more information, download the attached sample application.
First LastPosted Dec 25, 2017, 10:44 AM
I want to load an image from a folder and store the entire image in the database. I don't want to reference the file folder path there after as I delete the folder and hence the image. I only want to get it from the database and not reference a file folder path. So how do I do that?
Jeevan JoshiPosted Sep 8, 2017, 7:03 AM
Hi not able to display image, decription is comin in grid view
barathi rajaPosted May 12, 2016, 2:59 AM
good work bro....And Nice step by step
Abhishek KumarPosted Apr 9, 2016, 7:41 AM
Nice article..
burugupalli kasiravitejaPosted Apr 23, 2014, 5:32 AM
it's working good, but some error in connection, just place sql connection code fully with in upload or button click code,,,,,,,,,,,
Dangar BharatPosted Mar 15, 2014, 12:12 AM
it's working good work bro
Hussain AhmedPosted Mar 13, 2014, 8:10 AM
good