

To know about basics and how to getting started with Angular 2, Please read this article first and add mandatory files and npm_modules.
Getting Started
· Start Visual Studio
· Create a new website
· Provide the name and the location of website
· Click "Next".
Once all files are added and npm_modules installed, now let’s work on how to show data.
First of all, add a new component and make some properties with data type.
- export class Article {
- constructor(
- public Id: Number,
- public Title: string,
- public Summary: string
- ) { }
- }
Add a new component and give references for CSS and HTML like this.
First add some data in article array.
- import { Component } from '@angular/core';
- import { Article } from '../shared/article';
- const ARTICLES: Article[] = [
- { Id: 1, Title: 'Angular 2 - Getting Started', Summary: 'In this article, you will learn how to start working with Angular 2.' },
- { Id: 2, Title: 'How to detect image Faces and make Blur using Cognitive Face API with .NET Core', Summary: 'In this article, you will learn how to detect total faces and image and make them Blur using Cognitive Face API with .NET Core.' },
- { Id: 3, Title: 'Getting Started With Microsoft Project 2016', Summary: 'In this article, you will learn how to getting started with Microsoft Project 2016 from scratch.' },
- { Id: 4, Title: 'Get Image Attributes using Cognitive Services face API in WPF', Summary: 'In this article you will learn how to get the image attributes like Age, Gender using Cognitive Services face API in WPF.' },
- { Id: 5, Title: 'Cognitive Services face API in WPF', Summary: 'In this article, I will explain how to use Cognitive Services face API in WPF.' }
- ];
- @Component({
- selector: 'article-app',
- templateUrl: './app/article/article.component.html',
- styleUrls: ['./app/styles/styles.css']
- })
- export class ArticleComponent {
- debugger;
- title = 'Top 5 Articles';
- articles = ARTICLES;
- selectedArticle: Article;
- onSelect(article: Article): void {
- this.selectedArticle = article;
- }
- }
Now add a new HTML page and CSS.
HTML:
- <div>
- <h3>{{title}}</h3>
- <ul class="articles">
- <li *ngFor="let article of articles"
- [class.selected]="article === selectedArticle"
- (click)="onSelect(article)">
- <span class="badge">{{article.Id}}</span> {{article.Title}}
- </li>
- </ul>
- </div>
CSS:
- .articles {
- margin: 0 0 2em 0;
- list-style-type: none;
- padding: 0;
- width: 50em;
- }
- .articles li {
- cursor: pointer;
- position: relative;
- left: 0;
- background-color: #EEE;
- margin: .5em;
- padding: .3em 0;
- height: 2em;
- border-radius: 4px;
- }
- .articles li.selected:hover {
- background-color: #BBD8DC !important;
- color: white;
- }
- .articles li:hover {
- color: #607D8B;
- background-color: #DDD;
- left: .1em;
- }
- .articles .text {
- position: relative;
- top: -3px;
- }
- .articles .badge {
- display: inline-block;
- font-size: small;
- color: white;
- padding: 0.8em 0.7em 0 0.7em;
- background-color: #607D8B;
- line-height: 1em;
- position: relative;
- left: -1px;
- top: -4px;
- height: 1.8em;
- margin-right: .8em;
- border-radius: 4px 0 0 4px;
- }
Now add references of components on Module:
- import { NgModule } from '@angular/core';
- import { BrowserModule } from '@angular/platform-browser';
- import { FormsModule } from '@angular/forms';
- import { HttpModule } from '@angular/http';
- import { ArticleComponent } from './article/article.component';
- import { ArticleDetailComponent } from './article/article-detail.component';
- @NgModule({
- imports: [BrowserModule, FormsModule, HttpModule],
- declarations: [ArticleComponent, ArticleDetailComponent],
- providers: [],
- bootstrap: [ ArticleComponent, ArticleDetailComponent]
- })
- export class AppModule { };
- <!DOCTYPE html>
- <html>
- <head>
- <title></title>
- <meta charset="utf-8" />
- <meta name="viewport" content="width=device-width, initial-scale=1">
- <link href="//maxcdn.bootstrapcdn.com/bootstrap/3.3.7/css/bootstrap.min.css" rel="stylesheet" />
- <link href="app/styles/styles.css" rel="stylesheet" />
- <!-- Polyfill(s) for older browsers -->
- <script src="node_modules/core-js/client/shim.min.js"></script>
- <script src="node_modules/zone.js/dist/zone.js"></script>
- <script src="node_modules/reflect-metadata/Reflect.js"></script>
- <script src="node_modules/systemjs/dist/system.src.js"></script>
- <!-- Configure SystemJS -->
- <script src="systemjs.config.js"></script>
- <script>
- System.import('app').catch(
- function (err)
- { console.error(err); });
- </script>
- </head>
- <body>
- <header class="navbar navbar-inner navbar-fixed-top">
- <nav class="container">
- <div class="navbar-header">
- <span class="app-title">My Latest Articles</span>
- </div>
- </nav>
- </header>
- <main class="container">
- <article-app>Loading...</article-app>
- </main>
- </body>
- </html>
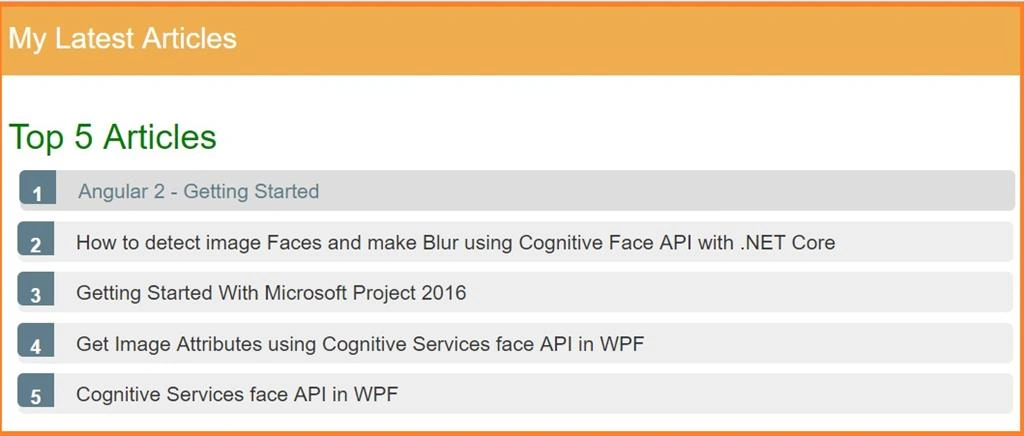
Now run the application:
Conclusion
In this article, we have learnt how to display data in Angular 2. In next article, I will show how to display article summary when click on article title. If you have any question or comments, then drop me a line in C# Corner comments section.
Madhanmohan DevarajanPosted Jan 16, 2017, 11:09 AM
Very useful angular 2 article for the beginners, Thanks for sharing it.
Anu VPosted Jan 3, 2017, 1:05 AM
Nice article thanks for sharing...