

Overview
In the article Develop First Client-Side Web Part, we developed a basic SharePoint client web part which can run independently without any interaction with SharePoint.
In this article, we will explore how to interact with the SharePoint list for CRUD (Create, Read, Update, and Delete) operations using React JS. React JS is natively supported by SharePoint Framework.
Brief info about React JS
React is a JavaScript library developed and licensed by Facebook. It represents V (View) in MVC (Model View Controller). React JS can react to changes in application state. SharePoint Framework itself is built using React JS. Read more about React JS at here.
Create SPFx Solution
Open a command prompt. Create a directory for SPFx solution
In this article, we will explore how to interact with the SharePoint list for CRUD (Create, Read, Update, and Delete) operations using React JS. React JS is natively supported by SharePoint Framework.
Brief info about React JS
React is a JavaScript library developed and licensed by Facebook. It represents V (View) in MVC (Model View Controller). React JS can react to changes in application state. SharePoint Framework itself is built using React JS. Read more about React JS at here.
Create SPFx Solution
Open a command prompt. Create a directory for SPFx solution
- md spfx-crud-reactjs
Navigate to the above-created directory
- cd spfx-crud-reactjs
Run Yeoman SharePoint Generator to create the solution
- yo @microsoft/sharepoint
Yeoman generator will present you with the wizard by asking questions about the solution to be created.
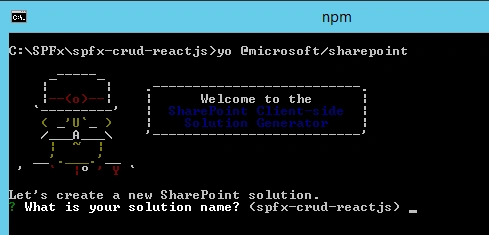
Solution Name
Hit enter to have a default name (spfx-crud-reactjs in this case) or type in any other name for your solution.
Selected choice - Hit enter
Hit enter to have a default name (spfx-crud-reactjs in this case) or type in any other name for your solution.
Selected choice - Hit enter
Target for component
Here, we can select the target environment where we are planning to deploy the client web part; i.e., SharePoint Online or SharePoint OnPremise (SharePoint 2016 onwards).
Selected choice - SharePoint Online only (latest)
Here, we can select the target environment where we are planning to deploy the client web part; i.e., SharePoint Online or SharePoint OnPremise (SharePoint 2016 onwards).
Selected choice - SharePoint Online only (latest)
Place of files
We may choose to use the same folder or create a subfolder for our solution.
Selected choice - Same folder
We may choose to use the same folder or create a subfolder for our solution.
Selected choice - Same folder
Deployment option
Selecting Y will allow the app to be deployed instantly to all sites and will be accessible everywhere.
Selected choice - N (install on each site explicitly)
Selecting Y will allow the app to be deployed instantly to all sites and will be accessible everywhere.
Selected choice - N (install on each site explicitly)
Type of client-side component to create
We can choose to create a client-side web part or an extension. Choose web part option.
Selected choice - WebPart
We can choose to create a client-side web part or an extension. Choose web part option.
Selected choice - WebPart
Web part name
Hit enter to select the default name or type in any other name.
Selected choice - ReactCRUD
Hit enter to select the default name or type in any other name.
Selected choice - ReactCRUD
Web part description
Hit enter to select the default description or type in any other value.
Selected choice - CRUD operations with React JS
Hit enter to select the default description or type in any other value.
Selected choice - CRUD operations with React JS
Framework to use
Select any JavaScript framework to develop the component. Available choices are (No JavaScript Framework, React, and Knockout)
Selected choice - React
Select any JavaScript framework to develop the component. Available choices are (No JavaScript Framework, React, and Knockout)
Selected choice - React
Yeoman generator will perform a scaffolding process to generate the solution. The scaffolding process will take a significant amount of time.
Once the scaffolding process is completed, lock down the version of project dependencies by running the below command
- npm shrinkwrap
In the command prompt type the below command to open the solution in the code editor of your choice.
- code .
Configure Property for List Name
SPFx solution by default has description property created. Let us change the property to list name. We will use this property to configure the list name on which the CRUD operation is to perform.
SPFx solution by default has description property created. Let us change the property to list name. We will use this property to configure the list name on which the CRUD operation is to perform.
Step 1
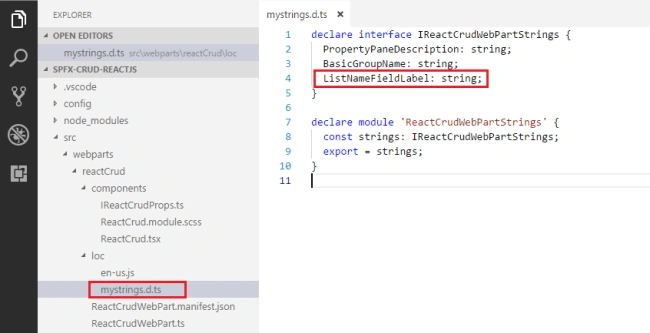
Open mystrings.d.ts under "\src\webparts\reactCrud\loc\" folder
Step 2
Rename DescriptionFieldLabel to ListNameFieldLabel
Open mystrings.d.ts under "\src\webparts\reactCrud\loc\" folder
Step 2
Rename DescriptionFieldLabel to ListNameFieldLabel
- declare interface IReactCrudWebPartStrings {
- PropertyPaneDescription: string;
- BasicGroupName: string;
- ListNameFieldLabel: string;
- }
- declare module 'ReactCrudWebPartStrings' {
- const strings: IReactCrudWebPartStrings;
- export = strings;
- }
Step 3
In en-us.js file under "\src\webparts\reactCrud \loc\" folder set the display name for listName property
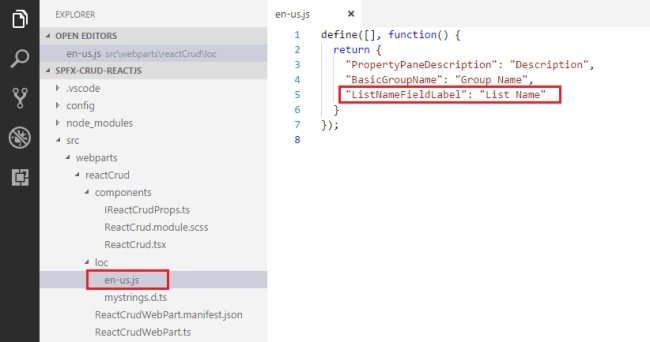
In en-us.js file under "\src\webparts\reactCrud \loc\" folder set the display name for listName property
- define([], function() {
- return {
- "PropertyPaneDescription": "Description",
- "BasicGroupName": "Group Name",
- "ListNameFieldLabel": "List Name"
- }
- });
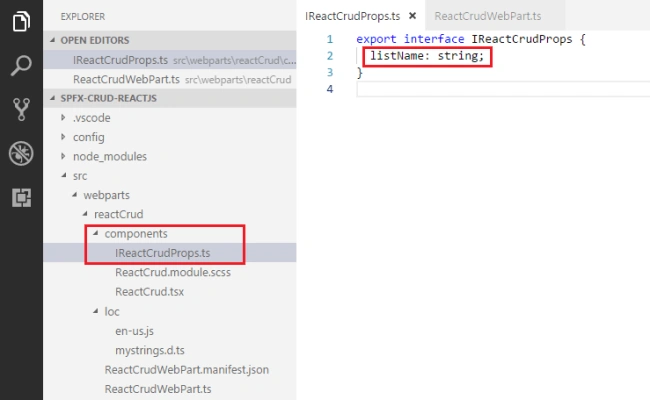
In the interface IReactCrudProps.ts under "\src\webparts\reactCrud\components\", set the member name to listName
- export interface IReactCrudProps {
- listName: string;
- }
Step 5
Open the main webpart file (ReactCrudWebPart.ts) under "\src\webparts\reactCrud" folder.
Step 6
Rename description property pane field to listName
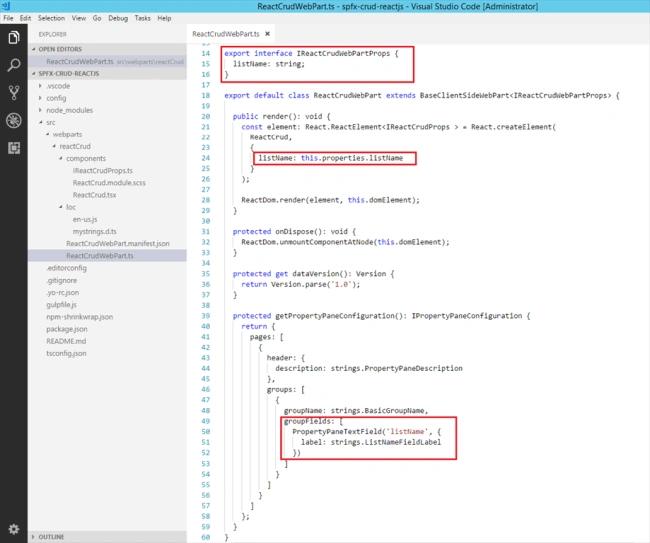
Open the main webpart file (ReactCrudWebPart.ts) under "\src\webparts\reactCrud" folder.
Step 6
Rename description property pane field to listName
- export interface IReactCrudWebPartProps {
- listName: string;
- }
- export default class ReactCrudWebPart extends BaseClientSideWebPart<IReactCrudWebPartProps> {
- public render(): void {
- const element: React.ReactElement<IReactCrudProps > = React.createElement(
- ReactCrud,
- {
- listName: this.properties.listName,
- spHttpClient: this.context.spHttpClient,
- siteUrl: this.context.pageContext.web.absoluteUrl
- }
- );
- ReactDom.render(element, this.domElement);
- }
- protected onDispose(): void {
- ReactDom.unmountComponentAtNode(this.domElement);
- }
- protected get dataVersion(): Version {
- return Version.parse('1.0');
- }
- protected getPropertyPaneConfiguration(): IPropertyPaneConfiguration {
- return {
- pages: [
- {
- header: {
- description: strings.PropertyPaneDescription
- },
- groups: [
- {
- groupName: strings.BasicGroupName,
- groupFields: [
- PropertyPaneTextField('listName', {
- label: strings.ListNameFieldLabel
- })
- ]
- }
- ]
- }
- ]
- };
- }
- }
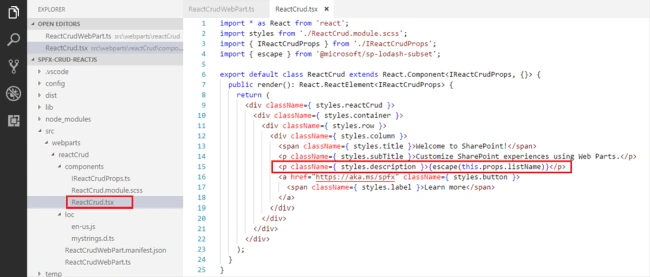
The UI in React gets served from component ReactCrud.tsx under "\src\webparts\reactCrud\components\ReactCrud.tsx". Make the changes for listName property in the component.
- import * as React from 'react';
- import styles from './ReactCrud.module.scss';
- import { IReactCrudProps } from './IReactCrudProps';
- import { escape } from '@microsoft/sp-lodash-subset';
- export default class ReactCrud extends React.Component<IReactCrudProps, {}> {
- public render(): React.ReactElement<IReactCrudProps> {
- return (
- <div className={ styles.reactCrud }>
- <div className={ styles.container }>
- <div className={ styles.row }>
- <div className={ styles.column }>
- <span className={ styles.title }>Welcome to SharePoint!</span>
- <p className={ styles.subTitle }>Customize SharePoint experiences using Web Parts.</p>
- <p className={ styles.description }>{escape(this.props.listName)}</p>
- <a href="https://aka.ms/spfx" class="${ styles.button }">
- <span class="${ styles.label }">Learn more</span>
- </a>
- </div>
- </div>
- </div>
- </div>
- );
- }
- }
Step 8
In the command prompt, type “gulp serve”
Step 9
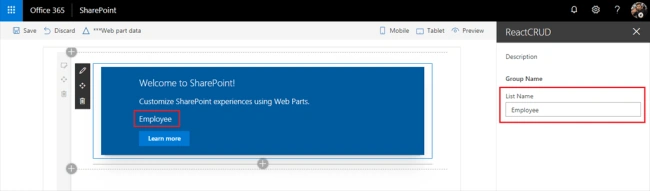
In the SharePoint local workbench page, add the web part.
Step 10
Edit the web part to ensure the listName property pane field is getting reflected.
Model for List Item
Step 1
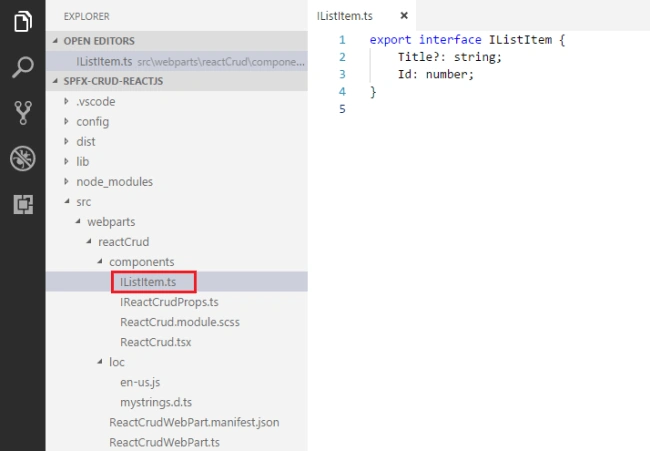
Add a class (IListItem.ts) representing the list item.
In the command prompt, type “gulp serve”
Step 9
In the SharePoint local workbench page, add the web part.
Step 10
Edit the web part to ensure the listName property pane field is getting reflected.
Model for List Item
Step 1
Add a class (IListItem.ts) representing the list item.
- export interface IListItem {
- Title?: string;
- Id: number;
- }
React JS acts on the state change. Let us add a state to our solution.
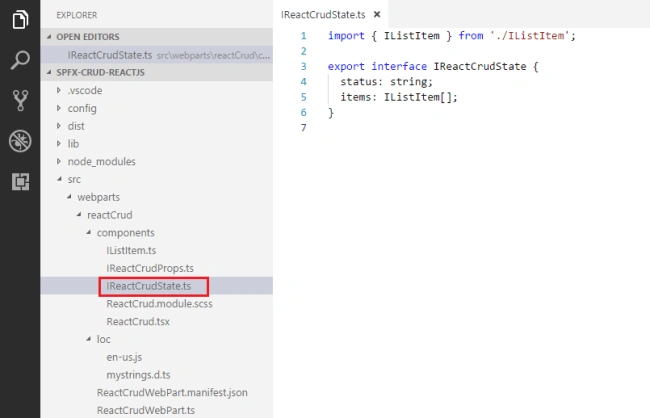
- import { IListItem } from './IListItem';
- export interface IReactCrudState {
- status: string;
- items: IListItem[];
- }
Configure ReactCrud.tsx for this state
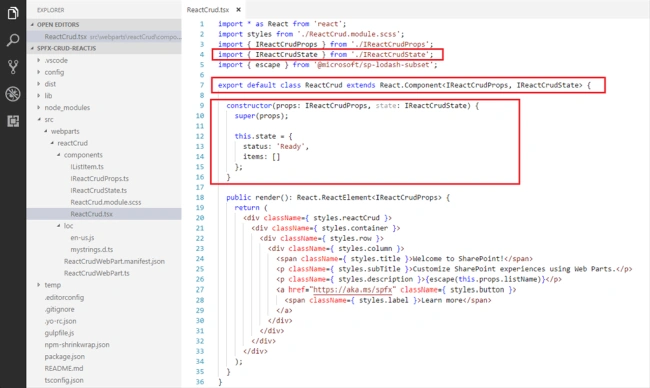
- import * as React from 'react';
- import styles from './ReactCrud.module.scss';
- import { IReactCrudProps } from './IReactCrudProps';
- import { IReactCrudState } from './IReactCrudState';
- import { escape } from '@microsoft/sp-lodash-subset';
- export default class ReactCrud extends React.Component<IReactCrudProps, IReactCrudState> {
- constructor(props: IReactCrudProps, state: IReactCrudState) {
- super(props);
- this.state = {
- status: 'Ready',
- items: []
- };
- }
- public render(): React.ReactElement<IReactCrudProps> {
- return (
- <div className={ styles.reactCrud }>
- <div className={ styles.container }>
- <div className={ styles.row }>
- <div className={ styles.column }>
- <span className={ styles.title }>Welcome to SharePoint!</span>
- <p className={ styles.subTitle }>Customize SharePoint experiences using Web Parts.</p>
- <p className={ styles.description }>{escape(this.props.listName)}</p>
- <a href="https://aka.ms/spfx" class="${ styles.button }">
- <span class="${ styles.label }">Learn more</span>
- </a>
- </div>
- </div>
- </div>
- </div>
- );
- }
- }
Step 1
Open ReactCrud.tsx under \src\webparts\reactCrud\components\ReactCrud.tsxfolder.
Step 2
Modify Render method to include buttons for CRUD operations and add event handlers to each of the buttons
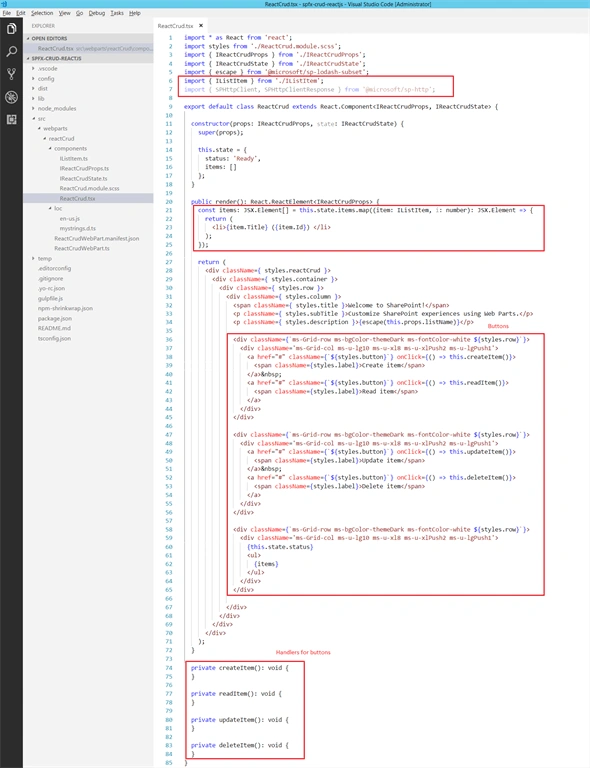
- import * as React from 'react';
- import styles from './ReactCrud.module.scss';
- import { IReactCrudProps } from './IReactCrudProps';
- import { IReactCrudState } from './IReactCrudState';
- import { escape } from '@microsoft/sp-lodash-subset';
- import { IListItem } from './IListItem';
- import { SPHttpClient, SPHttpClientResponse } from '@microsoft/sp-http';
- export default class ReactCrud extends React.Component<IReactCrudProps, IReactCrudState> {
- constructor(props: IReactCrudProps, state: IReactCrudState) {
- super(props);
- this.state = {
- status: 'Ready',
- items: []
- };
- }
- public render(): React.ReactElement<IReactCrudProps> {
- const items: JSX.Element[] = this.state.items.map((item: IListItem, i: number): JSX.Element => {
- return (
- <li>{item.Title} ({item.Id}) </li>
- );
- });
- return (
- <div className={ styles.reactCrud }>
- <div className={ styles.container }>
- <div className={ styles.row }>
- <div className={ styles.column }>
- <span className={ styles.title }>Welcome to SharePoint!</span>
- <p className={ styles.subTitle }>Customize SharePoint experiences using Web Parts.</p>
- <p className={ styles.description }>{escape(this.props.listName)}</p>
- <div className={`ms-Grid-row ms-bgColor-themeDark ms-fontColor-white ${styles.row}`}>
- <div className='ms-Grid-col ms-u-lg10 ms-u-xl8 ms-u-xlPush2 ms-u-lgPush1'>
- <a href="#" className={`${styles.button}`} onClick={() => this.createItem()}>
- <span className={styles.label}>Create item</span>
- </a>
- <a href="#" className={`${styles.button}`} onClick={() => this.readItem()}>
- <span className={styles.label}>Read item</span>
- </a>
- </div>
- </div>
- <div className={`ms-Grid-row ms-bgColor-themeDark ms-fontColor-white ${styles.row}`}>
- <div className='ms-Grid-col ms-u-lg10 ms-u-xl8 ms-u-xlPush2 ms-u-lgPush1'>
- <a href="#" className={`${styles.button}`} onClick={() => this.updateItem()}>
- <span className={styles.label}>Update item</span>
- </a>
- <a href="#" className={`${styles.button}`} onClick={() => this.deleteItem()}>
- <span className={styles.label}>Delete item</span>
- </a>
- </div>
- </div>
- <div className={`ms-Grid-row ms-bgColor-themeDark ms-fontColor-white ${styles.row}`}>
- <div className='ms-Grid-col ms-u-lg10 ms-u-xl8 ms-u-xlPush2 ms-u-lgPush1'>
- {this.state.status}
- <ul>
- {items}
- </ul>
- </div>
- </div>
- </div>
- </div>
- </div>
- </div>
- );
- }
- private createItem(): void {
- }
- private readItem(): void {
- }
- private updateItem(): void {
- }
- private deleteItem(): void {
- }
- }
Step 3
In the command prompt type “gulp serve” to see the buttons on web part.
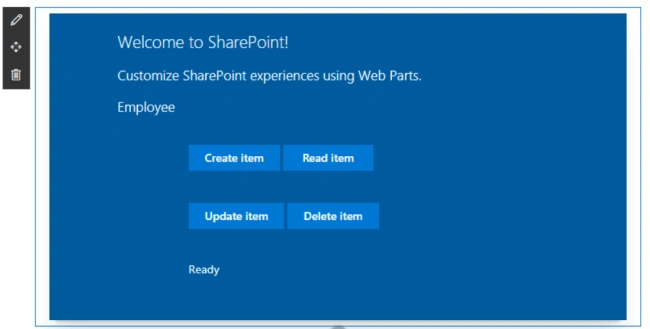
In the command prompt type “gulp serve” to see the buttons on web part.
Step 4
The read, update and delete operations will be performed on the latest item. Update interface IReactCrudProps.ts at "\src\webparts\reactCrud\components\ " to include site URL and spHttpClient
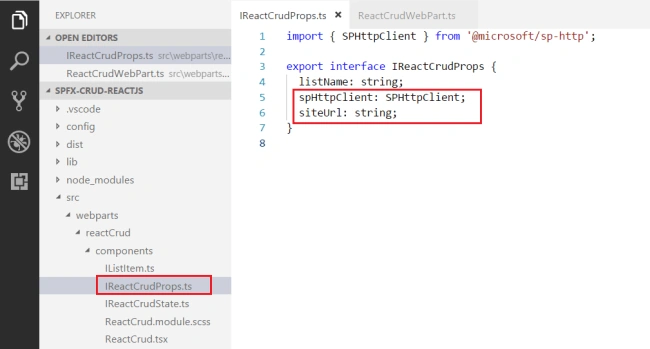
The read, update and delete operations will be performed on the latest item. Update interface IReactCrudProps.ts at "\src\webparts\reactCrud\components\ " to include site URL and spHttpClient
- import { SPHttpClient } from '@microsoft/sp-http';
- export interface IReactCrudProps {
- listName: string;
- spHttpClient: SPHttpClient;
- siteUrl: string;
- }
Step 5
Update "\src\webparts\reactCrud\ReactCrudWebPart.ts" to initiate site url and spHttpClient
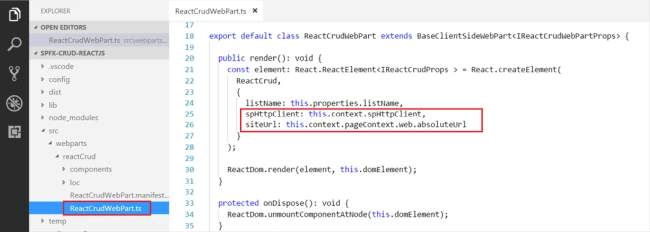
Update "\src\webparts\reactCrud\ReactCrudWebPart.ts" to initiate site url and spHttpClient
- export default class ReactCrudWebPart extends BaseClientSideWebPart<IReactCrudWebPartProps> {
- public render(): void {
- const element: React.ReactElement<IReactCrudProps > = React.createElement(
- ReactCrud,
- {
- listName: this.properties.listName,
- spHttpClient: this.context.spHttpClient,
- siteUrl: this.context.pageContext.web.absoluteUrl
- }
- );
- ReactDom.render(element, this.domElement);
- }
- protected onDispose(): void {
- ReactDom.unmountComponentAtNode(this.domElement);
- }
- }
Step 6
In ReactCrud.tsx implement generic method which will return the id of the latest item from the given list.
In ReactCrud.tsx implement generic method which will return the id of the latest item from the given list.
- private getLatestItemId(): Promise<number> {
- return new Promise<number>((resolve: (itemId: number) => void, reject: (error: any) => void): void => {
- this.props.spHttpClient.get(`${this.props.siteUrl}/_api/web/lists/getbytitle('${this.props.listName}')/items?$orderby=Id desc&$top=1&$select=id`,
- SPHttpClient.configurations.v1,
- {
- headers: {
- 'Accept': 'application/json;odata=nometadata',
- 'odata-version': ''
- }
- })
- .then((response: SPHttpClientResponse): Promise<{ value: { Id: number }[] }> => {
- return response.json();
- }, (error: any): void => {
- reject(error);
- })
- .then((response: { value: { Id: number }[] }): void => {
- if (response.value.length === 0) {
- resolve(-1);
- }
- else {
- resolve(response.value[0].Id);
- }
- });
- });
- }
Implement Create Operation
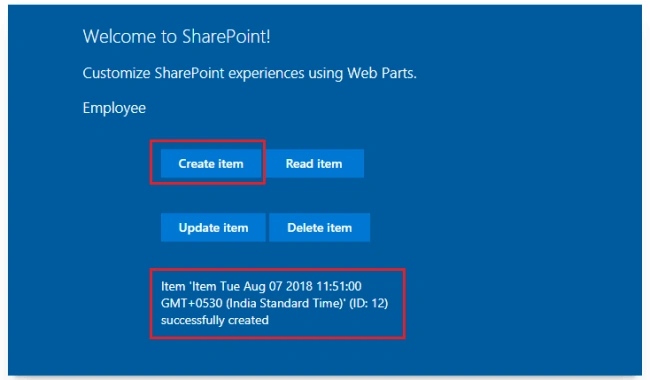
We will use the REST API to add the item to list.
We will use the REST API to add the item to list.
- private createItem(): void {
- this.setState({
- status: 'Creating item...',
- items: []
- });
- const body: string = JSON.stringify({
- 'Title': `Item ${new Date()}`
- });
- this.props.spHttpClient.post(`${this.props.siteUrl}/_api/web/lists/getbytitle('${this.props.listName}')/items`,
- SPHttpClient.configurations.v1,
- {
- headers: {
- 'Accept': 'application/json;odata=nometadata',
- 'Content-type': 'application/json;odata=nometadata',
- 'odata-version': ''
- },
- body: body
- })
- .then((response: SPHttpClientResponse): Promise<IListItem> => {
- return response.json();
- })
- .then((item: IListItem): void => {
- this.setState({
- status: `Item '${item.Title}' (ID: ${item.Id}) successfully created`,
- items: []
- });
- }, (error: any): void => {
- this.setState({
- status: 'Error while creating the item: ' + error,
- items: []
- });
- });
- }
Implement Read Operation
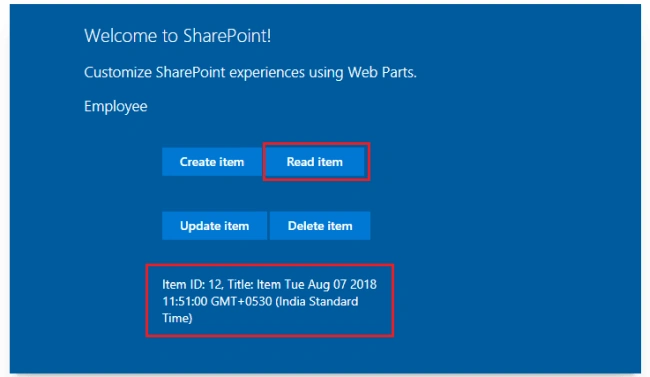
We will use the REST API to read the latest item.
We will use the REST API to read the latest item.
- private readItem(): void {
- this.setState({
- status: 'Loading latest items...',
- items: []
- });
- this.getLatestItemId()
- .then((itemId: number): Promise<SPHttpClientResponse> => {
- if (itemId === -1) {
- throw new Error('No items found in the list');
- }
- this.setState({
- status: `Loading information about item ID: ${itemId}...`,
- items: []
- });
- return this.props.spHttpClient.get(`${this.props.siteUrl}/_api/web/lists/getbytitle('${this.props.listName}')/items(${itemId})?$select=Title,Id`,
- SPHttpClient.configurations.v1,
- {
- headers: {
- 'Accept': 'application/json;odata=nometadata',
- 'odata-version': ''
- }
- });
- })
- .then((response: SPHttpClientResponse): Promise<IListItem> => {
- return response.json();
- })
- .then((item: IListItem): void => {
- this.setState({
- status: `Item ID: ${item.Id}, Title: ${item.Title}`,
- items: []
- });
- }, (error: any): void => {
- this.setState({
- status: 'Loading latest item failed with error: ' + error,
- items: []
- });
- });
- }
Implement Update Operation
We will use the REST API to update the latest item.
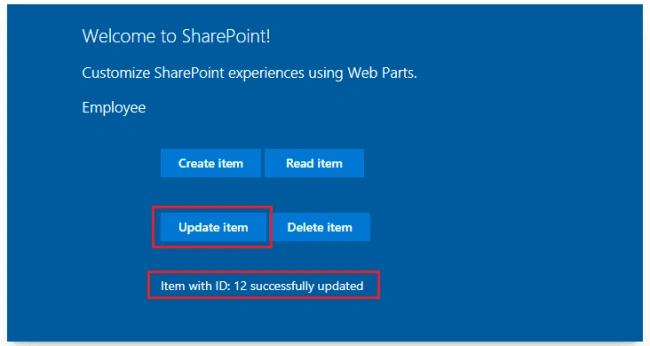
We will use the REST API to update the latest item.
- private updateItem(): void {
- this.setState({
- status: 'Loading latest items...',
- items: []
- });
- let latestItemId: number = undefined;
- this.getLatestItemId()
- .then((itemId: number): Promise<SPHttpClientResponse> => {
- if (itemId === -1) {
- throw new Error('No items found in the list');
- }
- latestItemId = itemId;
- this.setState({
- status: `Loading information about item ID: ${latestItemId}...`,
- items: []
- });
- return this.props.spHttpClient.get(`${this.props.siteUrl}/_api/web/lists/getbytitle('${this.props.listName}')/items(${latestItemId})?$select=Title,Id`,
- SPHttpClient.configurations.v1,
- {
- headers: {
- 'Accept': 'application/json;odata=nometadata',
- 'odata-version': ''
- }
- });
- })
- .then((response: SPHttpClientResponse): Promise<IListItem> => {
- return response.json();
- })
- .then((item: IListItem): void => {
- this.setState({
- status: 'Loading latest items...',
- items: []
- });
- const body: string = JSON.stringify({
- 'Title': `Updated Item ${new Date()}`
- });
- this.props.spHttpClient.post(`${this.props.siteUrl}/_api/web/lists/getbytitle('${this.props.listName}')/items(${item.Id})`,
- SPHttpClient.configurations.v1,
- {
- headers: {
- 'Accept': 'application/json;odata=nometadata',
- 'Content-type': 'application/json;odata=nometadata',
- 'odata-version': '',
- 'IF-MATCH': '*',
- 'X-HTTP-Method': 'MERGE'
- },
- body: body
- })
- .then((response: SPHttpClientResponse): void => {
- this.setState({
- status: `Item with ID: ${latestItemId} successfully updated`,
- items: []
- });
- }, (error: any): void => {
- this.setState({
- status: `Error updating item: ${error}`,
- items: []
- });
- });
- });
- }
Implement Delete Operation
We will use the REST API to delete the latest item.
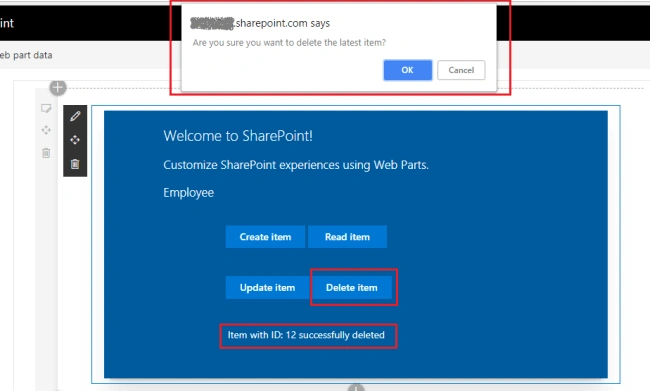
We will use the REST API to delete the latest item.
- private deleteItem(): void {
- if (!window.confirm('Are you sure you want to delete the latest item?')) {
- return;
- }
- this.setState({
- status: 'Loading latest items...',
- items: []
- });
- let latestItemId: number = undefined;
- let etag: string = undefined;
- this.getLatestItemId()
- .then((itemId: number): Promise<SPHttpClientResponse> => {
- if (itemId === -1) {
- throw new Error('No items found in the list');
- }
- latestItemId = itemId;
- this.setState({
- status: `Loading information about item ID: ${latestItemId}...`,
- items: []
- });
- return this.props.spHttpClient.get(`${this.props.siteUrl}/_api/web/lists/getbytitle('${this.props.listName}')/items(${latestItemId})?$select=Id`,
- SPHttpClient.configurations.v1,
- {
- headers: {
- 'Accept': 'application/json;odata=nometadata',
- 'odata-version': ''
- }
- });
- })
- .then((response: SPHttpClientResponse): Promise<IListItem> => {
- etag = response.headers.get('ETag');
- return response.json();
- })
- .then((item: IListItem): Promise<SPHttpClientResponse> => {
- this.setState({
- status: `Deleting item with ID: ${latestItemId}...`,
- items: []
- });
- return this.props.spHttpClient.post(`${this.props.siteUrl}/_api/web/lists/getbytitle('${this.props.listName}')/items(${item.Id})`,
- SPHttpClient.configurations.v1,
- {
- headers: {
- 'Accept': 'application/json;odata=nometadata',
- 'Content-type': 'application/json;odata=verbose',
- 'odata-version': '',
- 'IF-MATCH': etag,
- 'X-HTTP-Method': 'DELETE'
- }
- });
- })
- .then((response: SPHttpClientResponse): void => {
- this.setState({
- status: `Item with ID: ${latestItemId} successfully deleted`,
- items: []
- });
- }, (error: any): void => {
- this.setState({
- status: `Error deleting item: ${error}`,
- items: []
- });
- });
- }
Test the WebPart
- On the command prompt, type “gulp serve”
- Open SharePoint site
- Navigate to /_layouts/15/workbench.aspx
- Add the webpart to page.
- Edit web part, in the properties pane, type the list name
- Click the buttons (Create Item, Read Item, Update Item, and Delete Item) one by one to test the web part
- Verify the operations are taking place in the SharePoint list.
Create Operation
Read Operation
Update Operation
Delete Operation
Troubleshooting
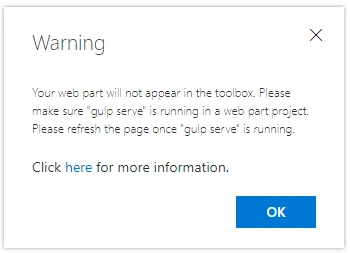
In some cases, SharePoint workbench (https://[tenant].sharepoint.com/_layouts/15/workbench.aspx) shows the below error although “gulp serve” is running.
Troubleshooting
In some cases, SharePoint workbench (https://[tenant].sharepoint.com/_layouts/15/workbench.aspx) shows the below error although “gulp serve” is running.
Open below URL in the next tab of the browser. Accept the warning message.
https://localhost:4321/temp/manifests.js
Summary
React JS is natively supported by SharePoint framework. SPFx generates all needed React components for you to get started with the development. React JS supports the application to be broken down into small React components, which simplifies development and maintenance. React JS focuses more on UI development, in contrast to Angular which is more famous for creating SPA (Single Page Applications).
https://localhost:4321/temp/manifests.js
Summary
React JS is natively supported by SharePoint framework. SPFx generates all needed React components for you to get started with the development. React JS supports the application to be broken down into small React components, which simplifies development and maintenance. React JS focuses more on UI development, in contrast to Angular which is more famous for creating SPA (Single Page Applications).
Allan LeePosted Jul 3, 2020, 11:55 AM
Hi Nandeep, Could you tell us how to update or delete a specific item? Like the one with id=10. Thanks.
manoj raiPosted Jun 22, 2020, 5:33 AM
Hi Nanddeep, Very good article. I was trying to create custom form and saving data in list using react. This article helped me to achieve almost everything. Please can you help me how can i add attachment in list while using the same code of your's. I couldn't find any article with sphttpclient to save any attachment.
sajid kaziPosted Mar 10, 2020, 9:55 AM
Hello Nanddeep. Can you please post the link for inserting data in person, Lookup columns
Krishna AgrawalPosted Jan 19, 2020, 12:18 AM
Hi Nanddeep, I am getting "Unable to determine manifests.js file URL. Using default base URL." error in sharepoint workbench. I have done gulp dev-trust-cert already. Thanks in advance for the help
Yokokito FortunaPosted Dec 12, 2019, 4:35 AM
Hey I am getting this... Item 'undefined' (ID: undefined) successfully created and nothing is being add to the list do i need to creat a list with a name as listName?
Jai ChowdaryPosted Sep 30, 2019, 3:06 AM
What is use of this const items: JSX.Element[] = this.state.items.map((item: IListItem, i: number): JSX.Element => { return ( <li>{item.Title} ({item.Id}) </li> ); may i know briefly ?.
Kranthi kumarPosted Jul 24, 2019, 3:37 AM
Hi NanddeepHi Nanddeep, it's nice article. i have a question - How to update People picker column multi values using spfx ?, it's nice article. i have a question - How to update People picker column multi values using spfx ?
Damian MussiPosted Jul 21, 2019, 1:12 PM
Hello I am getting Error while creating the item: TypeError: Failed to fetch
Vijay ChavanPosted Jul 2, 2019, 3:40 AM
Great article sir!!!
Akash SonarePosted Apr 25, 2019, 1:06 AM
Hi Nanddeep, its nice article for beginners, thanks for sharing, Just want understand how can we get values from other REACT components like textbox, People Picker, Date Picker? Is their any separate article on it?
Durgesh GPosted Feb 1, 2019, 10:09 AM
Thanks Nanddeep for wonderful working article. Can you pls explain me code in 'Implement Create Operation' line #24. I couldn't not understand, how previous response, help you get object of IListItem.
Mohamed YahiaPosted Nov 4, 2018, 5:21 PM
Thanks Nanddeep for this. How do you add more fields other than title and submit them? I tried doing so but can't update the items[] array with values for title and other form fields. Please help!
Nandkishor MotePosted Oct 5, 2018, 1:09 AM
Thanks for creating such a nice article. I followed it and found it very easy to understand as well as to implement.
Rayees KuniyilPosted Sep 2, 2018, 6:04 AM
Good Job!!!!!!!!!!!!!!
jacklin jPosted Aug 9, 2018, 9:47 AM
Thanks for detailed information and programming code for crud operations using ReactJs. This is really helpful for my work. https://colaninfotech.com/react-js-native-development/
Sagar PardeshiPosted Aug 9, 2018, 2:06 AM
Good one explore new ways to implementing the Crud Operation