

Introduction
The SharePoint Framework (SPFx) provides full support for client-side SharePoint development. This provides easy integration with SharePoint data. It is compatible with modern technologies and tools. You can use your own IDE; there's no need to purchase Visual Studio. Moreover, SPFx is responsive in design.
This article talks about using the SharePoint Framework web part with React as Framework. The whole article will walk you through the complete lifecycle from prerequisites to understanding SPFx Web Part, configuring it, building and deploying an application.
Using the code
The code uses React to do the rendering part on the SharePoint Page. REST API fetches the data from the SharePoint list. The data source gets refreshed at a particular interval of time. The page only gets updated if there is a change in the data values as compared to current DOM. No need to refresh the page to see updated data. As soon as the state changes, React does the job of updating DOM.
Prerequisites
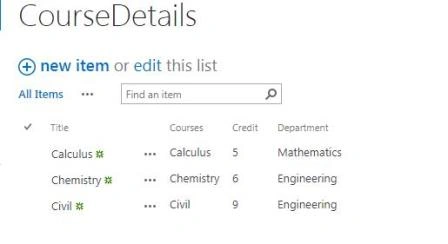
Below are the prerequisites from an installation and learning point of view. References are provided for installation links below. You will also need to create a SharePoint Developer & AppCatalog site, these will come handy while deploying the code. Don't forget to create the SharePoint list with columns as shown below.
Installation
Node.js & npm - https://nodejs.org/en/download
Yeoman & gulp - Open command prompt as administrator. Use below command to install gulp and yeoman.
- npm install -g yo gulp
Visual Studio Code - https://code.visualstudio.com/docs/setup/windows
Create App Catalog & Developer Site
AppCatalog - Go to SharePoint Admin Site. Then go to Apps you will see an option to create an app catalog site.
Developer Site - Go to https://yourtenannt.sharepoint.com/_layouts/15/online/SiteCollections.aspx
Create SharePoint List
Create SharePoint list using below columns of type text.
Create SPFX Web Part
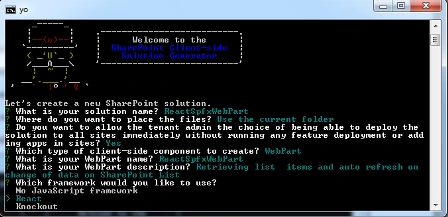
Once the installation of all the required components is completed, it's time to create SPFx webpart. Run the below command and select options as displayed in below screen. This command initiates yeoman to start creating a SharePoint web part.
- yo @microsoft/sharepoint
Install jQuery
- npm install --save jquery
- npm install --save @types/jquery
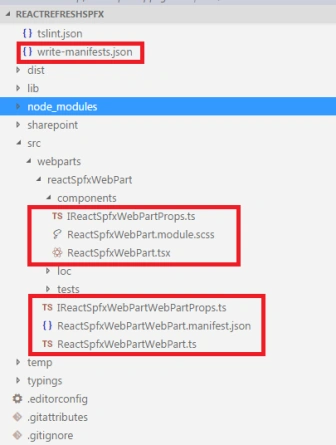
Open the newly created solution in VS Code using code . in the command prompt. There are many files in the whole solution. Below are the important files which we will talk about throughout the article.
Sanity check
Let’s check if the solution builds using gulp. Run the below command in your command prompt window. Make sure you are in the directory where the web part is created.
gulp build
The solution builds, let’s start understanding and updating files in the solution.
ReactGetItems.module.scss
This is like CSS file for SPFx web part. Overwrite your file with the below code.
- .tableStyle{
- display: table ;
- margin-left : 50px ;
- }
- .panelStyle{
- background: white ;
- }
- .divStyle{
- background: #eee ;
- padding: 20px ;
- margin: 20px ;
- }
- .headerCaptionStyle{
- background: white ;
- display: table-row ;
- border: solid ;
- text-align : center ;
- width : 420px ;
- height : 30px ;
- padding-top : 3px ;
- color : white ;
- margin-left : 100px ;
- display : block ;
- }
- .headerStyle{
- background: #4B6978 ;
- display: table-row ;
- border: solid ;
- text-align : center ;
- width : 100px ;
- height : 30px ;
- padding-top : 10px ;
- color : white ;
- }
- .tableCaptionStyle{
- background:#4B6978 ;
- display: block ;
- font-size : 20px ;
- font-weight: bold ;
- border: solid ;
- text-align : center ;
- width : 650px ;
- height : 30px ;
- padding-top : 3px ;
- border-radius: 25px ;
- margin-left : 30px ;
- margin-top : 20px ;
- color:white;
- }
- .rowCaptionStyle{
- width : 600px ;
- display : table-caption ;
- background: #4B6978 ;
- text-align : center ;
- padding: 20px ;
- font-size : 20px ;
- font-weight : bold ;
- color : white ;
- }
- .rowStyle{
- display : table-row ;
- background: #eee ;
- padding: 20px ;
- margin: 20px ;
- font-weight : bold ;
- }
- .CellStyle{
- display: table-cell ;
- border: solid ;
- border-color : white ;
- text-align : center ;
- width : 100px ;
- height : 30px ;
- padding-top : 10px ;
- }
IReactSpfxWebPartProps.ts
Let’s update our IReactSpfxWebPartProps.ts. This is our interface for React.
Siteurl property is used for passing the site in context to webpart. Description is the description of your webpart.
- export interface IReactSpfxWebPartProps {
- description: string;
- siteurl: string;
- }
ReactSpFxWebPart.tsx
This is the most important file which is generated as we chose React Framewrok. Overwrite the files in your solution with the below code,
- IReactSpfxState - Interface for the state
- ReactGetItems - Class File
- constructor - Intitalizes State
- componentDidMount - React Component
- fetchDatafromSharePointList - This method uses REST API to fetch data
- render - Rendering the html
- import * as React from 'react';
- import styles from './ReactSpfxWebPart.module.scss';
- import { IReactSpfxWebPartProps } from './IReactSpfxWebPartProps';
- import * as jquery from 'jquery';
- export interface IReactSpfxState{
- items:[
- {
- "Courses": "",
- "Credit": "",
- "Department":"",
- }]
- }
- export default class ReactGetItems extends React.Component<IReactSpfxWebPartProps, IReactSpfxState> {
- public constructor(props: IReactSpfxWebPartProps, state: IReactSpfxState){
- super(props);
- this.state = {
- items: [
- {
- "Courses": "",
- "Credit": "",
- "Department":"",
- }
- ]
- };
- }
- private componentDidMount() {
- setInterval(
- () => this.fetchDatafromSharePointList(),
- 1000
- );
- }
- private fetchDatafromSharePointList()
- {
- var reactHandler = this;
- jquery.ajax({
- url: `${this.props.siteurl}/_api/web/lists/getbytitle('CourseDetails')/items`,
- type: "GET",
- headers:{'Accept': 'application/json; odata=verbose;'},
- success: function(resultData) {
- /*resultData.d.results;*/
- reactHandler.setState({
- items: resultData.d.results
- });
- },
- error : function(jqXHR, textStatus, errorThrown) {
- }
- });
- }
- public render(): React.ReactElement<IReactSpfxWebPartProps> {
- return (
- <div className={styles.panelStyle} >
- <div className={styles.tableCaptionStyle} >Fetch
- Course Details from SharePointList using SPFx,RESTAPI,React JS
- Data on page changes with change in the SharePointList </div>
- <div className={styles.headerCaptionStyle} >Course Details</div>
- <div className={styles.tableStyle} >
- <div className={styles.headerStyle} >
- <div className={styles.CellStyle}>Courses</div>
- <div className={styles.CellStyle}>Credit </div>
- <div className={styles.CellStyle}>Department</div>
- </div>
- {this.state.items.map(function(item,key){
- return (<div className={styles.rowStyle} key={key}>
- <div className={styles.CellStyle}>{item.Courses}</div>
- <div className={styles.CellStyle}>{item.Credit}</div>
- <div className={styles.CellStyle}>{item.Department}</div>
- </div>);
- })}
- </div>
- </div>
- );
- }
- }
ReactSpfxWebPartWebPart.ts
This is the main file created by SPFx. This interacts with React files under the Component Folder. Eventually, the rendering happens here.
- import * as React from 'react';
- import * as ReactDom from 'react-dom';
- import { Version } from '@microsoft/sp-core-library';
- import {
- BaseClientSideWebPart,
- IPropertyPaneConfiguration,
- PropertyPaneTextField
- } from '@microsoft/sp-webpart-base';
- import * as strings from 'reactSpfxWebPartStrings';
- import ReactSpfxWebPart from './components/ReactSpfxWebPart';
- import { IReactSpfxWebPartProps } from './components/IReactSpfxWebPartProps';
- import { IReactSpfxWebPartWebPartProps } from './IReactSpfxWebPartWebPartProps';
- export default class ReactSpfxWebPartWebPart extends BaseClientSideWebPart<IReactSpfxWebPartWebPartProps> {
- public render(): void {
- const element: React.ReactElement<IReactSpfxWebPartProps > = React.createElement(
- ReactSpfxWebPart,
- {
- description: this.properties.description,
- siteurl: this.context.pageContext.web.absoluteUrl
- }
- );
- ReactDom.render(element, this.domElement);
- }
- protected get dataVersion(): Version {
- return Version.parse('1.0');
- }
- protected getPropertyPaneConfiguration(): IPropertyPaneConfiguration {
- return {
- pages: [
- {
- header: {
- description: strings.PropertyPaneDescription
- },
- groups: [
- {
- groupName: strings.BasicGroupName,
- groupFields: [
- PropertyPaneTextField('description', {
- label: strings.DescriptionFieldLabel
- })
- ]
- }
- ]
- }
- ]
- };
- }
- }
IReactSpfxWebPartWebPartProps.ts
Interface for WebPart Properties.
- export interface IReactSpfxWebPartWebPartProps {
- description: string;
- }
Configurations
copy-assets.json
Folder location to be copied to SharePoint Assets library.
- {
- "deployCdnPath": "temp/deploy"
- }
write-manifests.json
All the files created under temp/deploy should be copied here in order for React webpart to work.
- {
- "cdnBasePath": "https://yourtenant/sites/intranet/Site%20Assets"
- }
Most of the fields are relevant. Most important one is zippedpackage. This is the location where the package is created.
- {
- "solution": {
- "name": "react-spfx-web-part-client-side-solution",
- "id": "7d2fa690-094d-4445-b012-97d462b335ae",
- "version": "1.0.0.0",
- "skipFeatureDeployment": true
- },
- "paths": {
- "zippedPackage": "solution/react-spfx-web-part.sppkg"
- }
- }
- {
- "$schema": "../../../node_modules/@microsoft/sp-module-interfaces/lib/manifestSchemas/jsonSchemas/clientSideComponentManifestSchema.json",
- "id": "3a5f40ec-b0c9-4a4f-acc1-24be14e318f2",
- "alias": "ReactSpfxWebPartWebPart",
- "componentType": "WebPart",
- // The "*" signifies that the version should be taken from the package.json
- "version": "*",
- "manifestVersion": 2,
- // If true, the component can only be installed on sites where Custom Script is allowed.
- // Components that allow authors to embed arbitrary script code should set this to true.
- // https://support.office.com/en-us/article/Turn-scripting-capabilities-on-or-off-1f2c515f-5d7e-448a-9fd7-835da935584f
- "requiresCustomScript": false,
- "preconfiguredEntries": [{
- "groupId": "3a5f40ec-b0c9-4a4f-acc1-24be14e318f2",
- "group": { "default": "Under Development" },
- "title": { "default": "ReactSpfxWebPart" },
- "description": { "default": "Retrieving list
- items and auto refresh on change of data on SharePoint List" },
- "officeFabricIconFontName": "Page",
- "properties": {
- "description": "ReactSpfxWebPart"
- }
- }]
- }
Build your Project
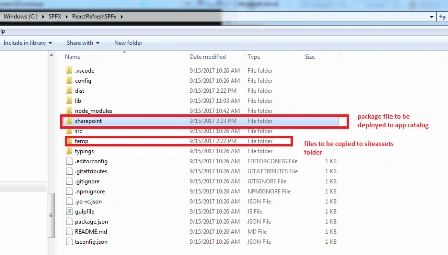
I will use gulp for building the project. Run the below commands to start building the project. Once the project gets built successfully, you will see some files under the temp/deploy folder. These are the files which contain bundled JavaScript and metadata files and are necessary for the webpart to work on SharePoint.
This creates files under temp/deploy – which need to be copied to the Assets folder of your site.
- gulp build
- gulp -ship
- gulp bundle --ship
- gulp package-solution --ship
The below screenshot gives an idea to find the necessary files for deployment to SharePoint.
SharePoint & Local Workbench
Type the below command in command prompt. This command starts gulp and opens up a local workbench in the browser.
- gulp serve
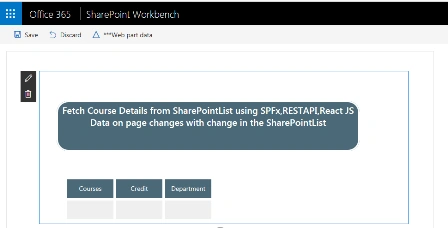
This helps to test the web part before deploying the package to SharePoint. Web part can be tested on local as well as SharePoint workbench.
Local WorkBench
Testing on local workbench will only retrieve data if mock data has been created.
Deploy
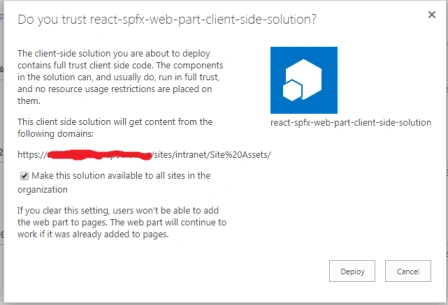
It's time to deploy the package file to SharePoint App Catalog site.
WebPart Deployed on SharePoint
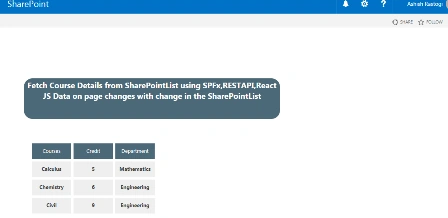
Once the webpart is added to AppCatalog, it should be available to add on SharePoint Developer or any other site collection.
Shashi KPosted Aug 1, 2023, 4:38 AM
Very difficult for a beginner to follow and try.. not sure, bcos this post is 5 years back, and now likely scripts changed
Kd 009Posted Mar 8, 2023, 5:18 PM
Does this code works in 2022, i am getting all kind of build errors. there is no file named IReactSpfxWebPartWebPartProps, where do you get that from?
Neelam MouryaPosted Jan 16, 2020, 2:56 PM
I followed all steps. I uploaded my .sppkg file into app catalog and then uploaded temp/deploy files into asset library of a site which is mentioned in cdn base path. But my newly added app in not showing in any sharepoint site while I am going to add it. Please help me in to this. What is am missing here?
Josué AguadoPosted Dec 14, 2018, 3:07 AM
Good article! Explain the basis deployment of SPFX React WebPart and it's easy to follow the process, but: Can you explain how to deploy a WebPart into a Sharepoint App Catalog Site?! Thanks!!!
Jeevanandham MPosted Nov 28, 2018, 10:15 PM
Nice Article...
Rushi MehtaPosted Nov 28, 2018, 9:07 PM
Nice Article. Thanks for sharing