

Introduction
This is a simple article for beginners for developing with HTML 5 that helps to understand how to set a color picker in a web application using HTML 5 tools. We know that HTML is the client-side scripting language that helps display the data in a browser. We know that HTML is an acronym for "HyperText Markup Language" used to display data in a browser. HTML 5 is the advanced version of HTML. HTML5 will be the new standard for HTML, XHTML, and the HTML DOM. HTML 5 is the advanced version of HTML that is also used to develop a 3D or multimedia application.
Step 1: First open an HTML editor such as Visual Studio.
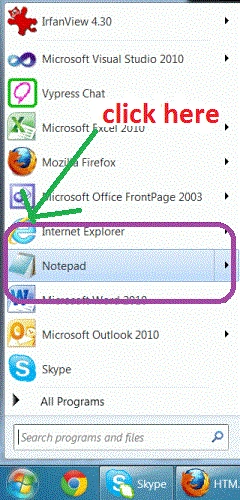
- Open start->Notepad
- The name of the editor is "Tom"
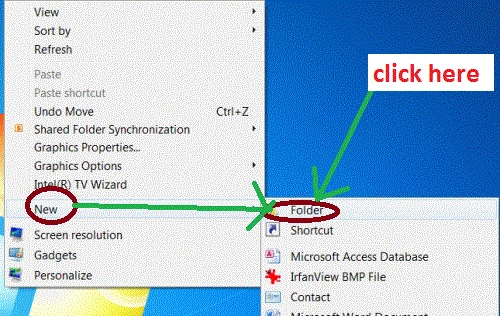
- Right-click on desktop
- new->add folder
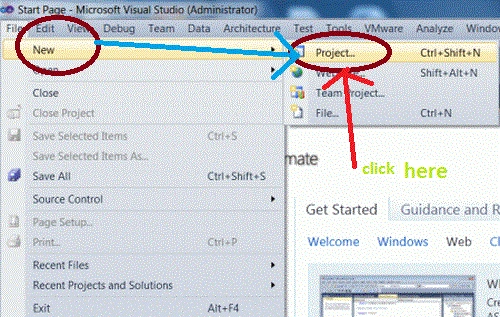
- Go to file -> New->Projects
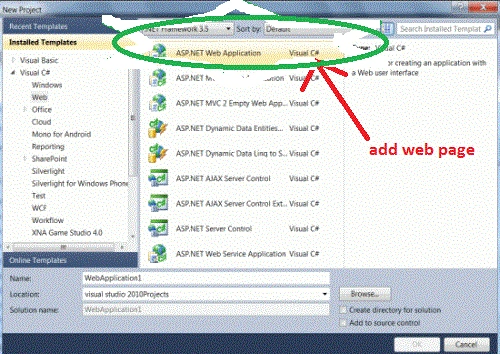
- Create an ASP.NET Web Application
- Name of "Color picker"
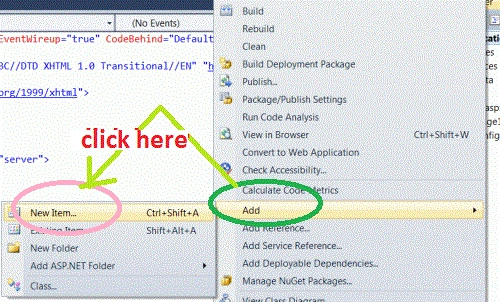
- Right click of Solution Explorer
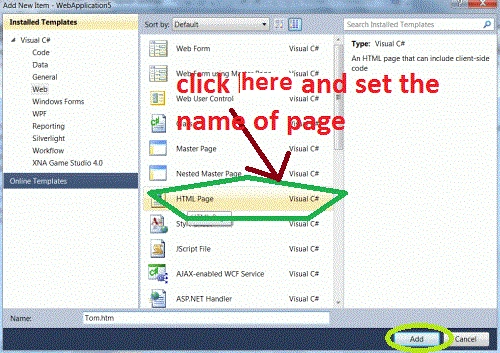
- Add->add new item->HTML form
- Name of HTML form is "color.html"
Code
- <style>
- body, input, textarea {
- font-family: "Algerian", arial, Algerian;
- }
- label {
- display: block;
- float: LEFT;
- clear: LEFT;
- text-align: RIGHT;
- width: 210px;
- margin-RIGHT: 10px;
- }
- input[type=range] {
- margin-RIGHT: 5px;
- }
- div { padding: 10px; }
- fieldset { border: 1px solid #ccc; margin-bottom: 20px; width: 500px; float: LEFT; background-color:#00FF99 ;
- color: white; }
- #preview { display: block; float: LEFT; height: 300px; width: 300px; background: #00FFFF(180, 0%, 0%); margin: 10px; }
- </style>
Step 6: Set the fieldset of a color picker application.
code
- <fieldset>
- <legend>Set a Color Picker</legend>
- <div>
- <label for="SET 0">SET 0</label>
- <input type="range" name="SET 0" value="0" min="0" max="360" id="SET 0" />Deg
- </div>
- <div>
- <label for="SET 1">SET 1</label>
- <input type="range" name="SET 1" value="100" min="0" max="100" id="SET 1" />Per
- </div>
- <div>
- <label for="SET 2">SET 2</label>
- <input type="range" name="SET 2" value="50" min="0" max="100" id="SET 2" />Per
- </div>
- <div>
- <label for="SET 3">SET 3</label>
- <input type="range" name="SET 3" value="100" min="0" max="100" id="SET 3" />0-10
- </div>
- <div>
- <label for="color"Total:</label>
- <output id="HSLA">0</output>
- </div>
- <div>
- <label>Red:</label>
- <output id="BGRA">0</output>
- </div>
- </fieldset>
Step 7 : The complete code of a color picker application is:
Code
Step 8 : Run the application in the browser.
- <html>
- <head>
- <title>Manish application</title>
- <style>
- body, input, textarea {
- font-family: "Algerian", arial, Algerian;
- }
- label {
- display: block;
- float: LEFT;
- clear: LEFT;
- text-align: RIGHT;
- width: 210px;
- margin-RIGHT: 10px;
- }
- input[type=range] {
- margin-RIGHT: 5px;
- }
- div { padding: 10px; }
- fieldset { border: 1px solid #ccc; margin-bottom: 20px; width: 500px; float: LEFT; background-color:#00FF99 ;
- color: white; }
- #preview { display: block; float: LEFT; height: 300px; width: 300px; background: #00FFFF(180, 0%, 0%); margin: 10px; }
- </style>
- </head>
- <body>
- <form>
- <fieldset>
- <legend>Set a Color Picker</legend>
- <div>
- <label for="SET 0">SET 0</label>
- <input type="range" name="SET 0" value="0" min="0" max="360" id="SET 0" />Deg
- </div>
- <div>
- <label for="SET 1">SET 1</label>
- <input type="range" name="SET 1" value="100" min="0" max="100" id="SET 1" />Per
- </div>
- <div>
- <label for="SET 2">SET 2</label>
- <input type="range" name="SET 2" value="50" min="0" max="100" id="SET 2" />Per
- </div>
- <div>
- <label for="SET 3">SET 3</label>
- <input type="range" name="SET 3" value="100" min="0" max="100" id="SET 3" />0-10
- </div>
- <div>
- <label for="color"Total:</label>
- <output id="HSLA">0</output>
- </div>
- <div>
- <label>Red:</label>
- <output id="BGRA">0</output>
- </div>
- </fieldset>
- </form>
- <div id="preview"></div>
- <script>
- var HSLA = document.getElementById('HSLA'),
- preview = document.getElementById('preview'),
- BGRA = document.getElementById('BGRA'),
- form = document.getElementsByTagName('form')[0];
- form.onforminput = function () {
- var man = this.length, values = [], value = 0;
- while (man--, value = this[man].value) {
- if (this[man].type == 'range') {
- switch (this[man].name) {
- case 'SET 3': values.push(value / 100); break;
- case 'SET 0': values.push(value); break;
- default: values.push(value + '%');
- }
- }
- }
- preview.style.backgroundColor = HSLA.value = 'HSLA(' + values.reverse().join(', ') + ')';
- BGRA.value = getComputedStyle(preview, null).backgroundColor;
- };
- form.onforminput();
- </script>
- </body>
- </html>
Output

Join the conversation! Your thoughts help the community grow.