

Introduction
Android is one of the most popular operating systems for mobile. A remote database means that you can access the data from this database in a remote location. A lot of applications are used to send the data to the remote database module. I will show you how to send the data to the remote database in an Android Application, using Android Studio.
Requirements
- Android Studio
- Little bit knowledge of XML and Java.
- Android Emulator or an Android mobile
- Xampp Server
- Download link (Android Studio)
To install and configure XAMPP Server, the reference article is given below.
Steps should be followed
Carefully follow my steps to send the data to the remote database in an Android Application, using Android Studio and I have included the source code too.
Step 1
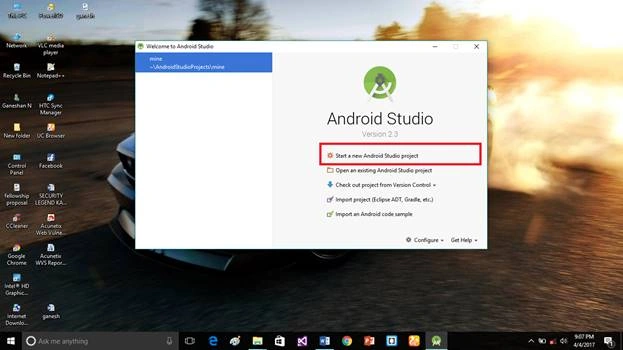
Open Android Studio to start the new project.
Step 2
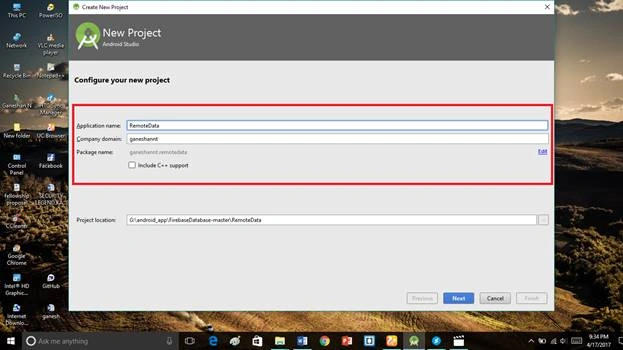
Put the Application name and the company domain. If you wish to use C++ to code the project, include C++ support, followed by clicking Next.
Step 3
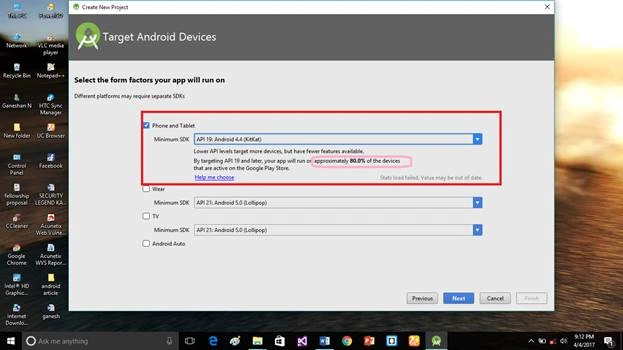
Select Android Minimum SDK. After you chose the minimum SDK, it will show the approximate percentage of people using that SDK. Just click "Next".
Step 4
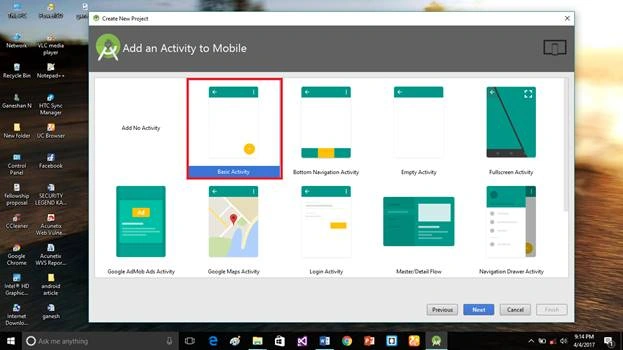
Choose the Empty activity, followed by clicking Next.
Step 5
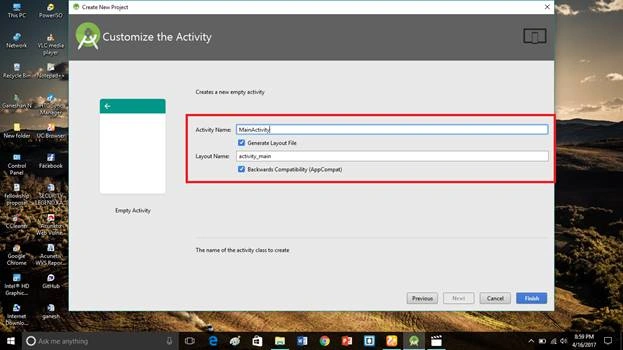
Put the activity name and the layout name. Android Studio basically takes Java class names. Provide the activity name and click Finish.
Step 6
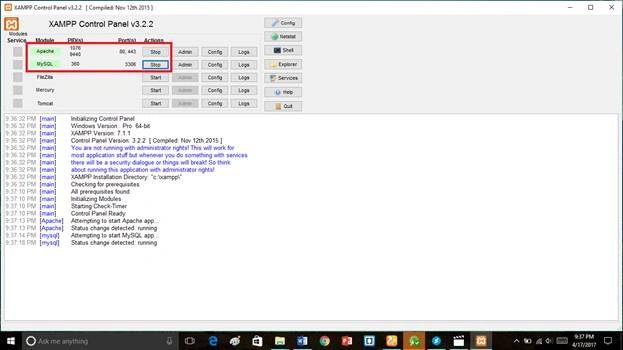
Start Apache and MySQL Server in XAMPP Server.
Step 7
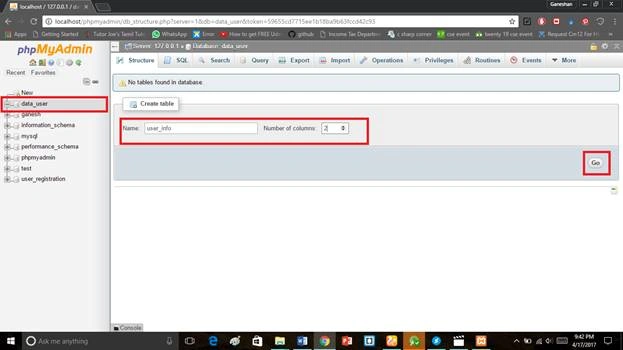
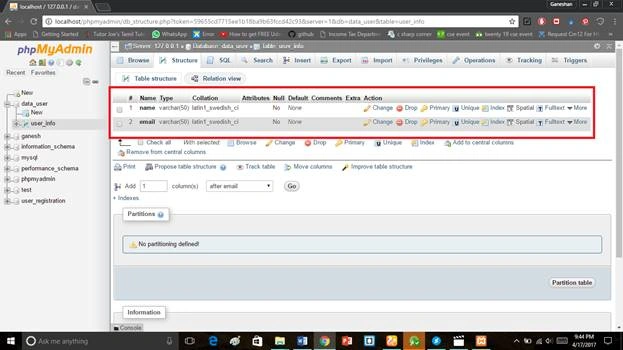
Create the database data_user and then click Create. Afterward, create the table user_info.
data_user MySQL
- CREATE TABLE `user_info` (
- `name` varchar(50) NOT NULL,
- `email` varchar(50) NOT NULL
- ) ENGINE=InnoDB DEFAULT CHARSET=latin1;
- --
- -- Dumping data for table `user_info`
- --
- INSERT INTO `user_info` (`name`, `email`) VALUES
- ('', ''),
- ('', ''),
- ('', ''),
- ('', ''),
- ('', ''),
- ('', ''),
- ('', ''),
- ('', ''),
- ('', ''),
- ('', ''),
- ('', ''),
- ('', ''),
- ('', ''),
- ('', '');
- /*!40101 SET CHARACTER_SET_CLIENT=@OLD_CHARACTER_SET_CLIENT */;
- /*!40101 SET CHARACTER_SET_RESULTS=@OLD_CHARACTER_SET_RESULTS */;
- /*!40101 SET COLLATION_CONNECTION=@OLD_COLLATION_CONNECTION */;
Step 9
Connect to the database using the following PHP script.
Dbconfig.php
- <?php
- $user_name = isset($_POST["name"]);
- $user_pass = isset($_POST["email"]);
- $user = "root";
- $password = "";
- $host ="localhost";
- $db_name ="data_user";
- $con = mysqli_connect($host,$user,$password,$db_name);
- $sql = "insert into user_info values('".$user_name."','".$user_pass."');";
- if(mysqli_query($con,$sql))
- {
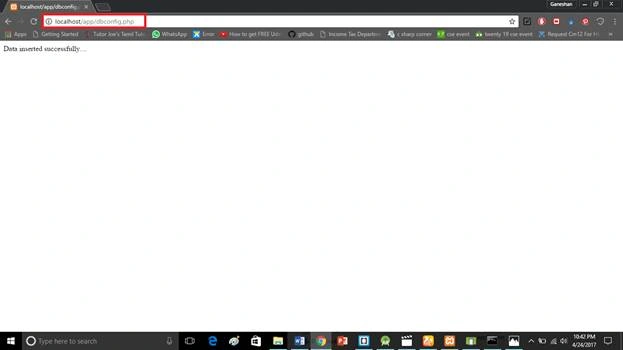
- echo "Data inserted successfully....";
- }
- else
- {
- echo "some error occured";
- }
- mysqli_close($con);
- ?>
Open your browser and run the dbconfig.php page.
Step 11
Go to activity_main.xml, followed by clicking Text bottom. This XML file contains designing the code for an Android app. In activity_main.xml, copy and paste the code given below.
Activity_main.xml code
- <?xml version="1.0" encoding="utf-8"?>
- <RelativeLayout xmlns:android="http://schemas.android.com/apk/res/android"
- xmlns:app="http://schemas.android.com/apk/res-auto"
- xmlns:tools="http://schemas.android.com/tools"
- android:layout_width="match_parent"
- android:layout_height="match_parent"
- tools:context="ganeshannt.remotedata.MainActivity">
- <EditText
- android:id="@+id/name1"
- android:layout_width="378dp"
- android:layout_height="53dp"
- android:layout_marginRight="4dp"
- android:ems="10"
- android:inputType="textPersonName"
- android:text=""
- app:layout_constraintRight_toRightOf="parent"
- tools:layout_editor_absoluteY="119dp"
- tools:layout_editor_absoluteX="2dp"
- android:layout_above="@+id/email"
- android:layout_alignEnd="@+id/name" />
- <EditText
- android:id="@+id/email1"
- android:layout_width="379dp"
- android:layout_height="54dp"
- android:ems="10"
- android:inputType="textPersonName"
- android:text=""
- tools:layout_editor_absoluteX="3dp"
- tools:layout_editor_absoluteY="245dp"
- android:layout_above="@+id/bn"
- android:layout_alignParentEnd="true"
- android:layout_marginBottom="24dp"
- android:layout_below="@+id/email"
- android:layout_alignParentStart="true" />
- <TextView
- android:id="@+id/name"
- android:layout_width="380dp"
- android:layout_height="46dp"
- android:textSize="20dp"
- android:text="Enter Name"
- tools:layout_editor_absoluteX="-2dp"
- tools:layout_editor_absoluteY="61dp"
- android:layout_above="@+id/name1"
- android:layout_alignParentStart="true" />
- <TextView
- android:id="@+id/email"
- android:layout_width="666dp"
- android:layout_height="42dp"
- android:text="Enter the Email"
- android:textSize="20dp"
- tools:layout_editor_absoluteX="0dp"
- tools:layout_editor_absoluteY="205dp"
- android:layout_centerVertical="true"
- android:layout_alignParentEnd="true" />
- <Button
- android:id="@+id/bn"
- android:layout_width="380dp"
- android:layout_height="72dp"
- android:text="SUBMIT"
- tools:layout_editor_absoluteX="2dp"
- tools:layout_editor_absoluteY="351dp"
- android:layout_alignParentBottom="true"
- android:layout_alignEnd="@+id/name1"
- android:layout_marginBottom="81dp" />
- </RelativeLayout>
Step 12
In MainActivity.java, copy and paste the code given below. Java programming is the back-end language for Android. Do not replace your package name otherwise, the app will not run. The code given below contains my package name.
MainActivity.java code
- package ganeshannt.remotedata;
- import android.content.DialogInterface;
- import android.os.Bundle;
- import android.support.v7.app.AlertDialog;
- import android.support.v7.app.AppCompatActivity;
- import android.view.View;
- import android.widget.Button;
- import android.widget.EditText;
- import android.widget.Toast;
- import com.android.volley.AuthFailureError;
- import com.android.volley.Request;
- import com.android.volley.Response;
- import com.android.volley.VolleyError;
- import com.android.volley.toolbox.StringRequest;
- import java.util.HashMap;
- import java.util.Map;
- public class MainActivity extends AppCompatActivity {
- Button button;
- EditText Name , Email;
- String server_url = "http://192.168.43.246/app/dbconfig.php";
- AlertDialog.Builder builder;
- @Override
- protected void onCreate(Bundle savedInstanceState) {
- super.onCreate(savedInstanceState);
- setContentView(R.layout.activity_main);
- button = (Button) findViewById(R.id.bn);
- Name = (EditText) findViewById(R.id.name1);
- Email = (EditText) findViewById(R.id.email1);
- builder = new AlertDialog.Builder(MainActivity.this);
- button.setOnClickListener(new View.OnClickListener() {
- @Override
- public void onClick(View v) {
- final String name , email ;
- name =Name.getText().toString();
- email=Email.getText().toString();
- StringRequest stringRequest = new StringRequest(Request.Method.POST, server_url, new Response.Listener<String>() {
- @Override
- public void onResponse(String response) {
- builder.setTitle("Server Response");
- builder.setMessage("Response :"+response);
- builder.setPositiveButton("OK", new DialogInterface.OnClickListener() {
- @Override
- public void onClick(DialogInterface dialog, int which) {
- Name.setText("");
- Email.setText("");
- }
- });
- AlertDialog alertDialog = builder.create();
- alertDialog.show();
- }
- }
- , new Response.ErrorListener() {
- @Override
- public void onErrorResponse(VolleyError error) {
- Toast.makeText(MainActivity.this,"some error found .....",Toast.LENGTH_SHORT).show();
- error.printStackTrace();
- }
- }){
- @Override
- protected Map<String, String> getParams() throws AuthFailureError {
- Map <String,String> Params = new HashMap<String, String>();
- Params.put("name",name);
- Params.put("email",email);
- return Params;
- }
- };
- Mysingleton.getInstance(MainActivity.this).addTorequestque(stringRequest);
- }
- });
- }
- }
Step 13
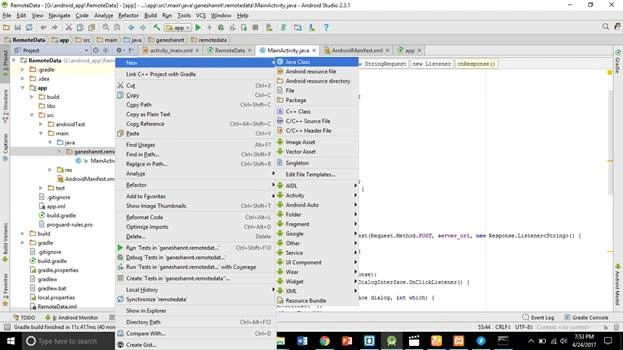
Create a new Java file to request the message queue.
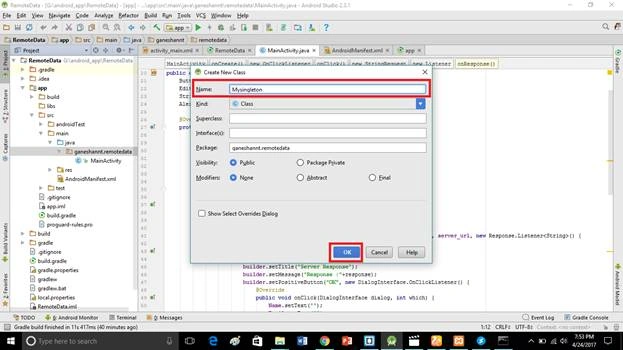
Java class name is Mysingleton.
Step 14
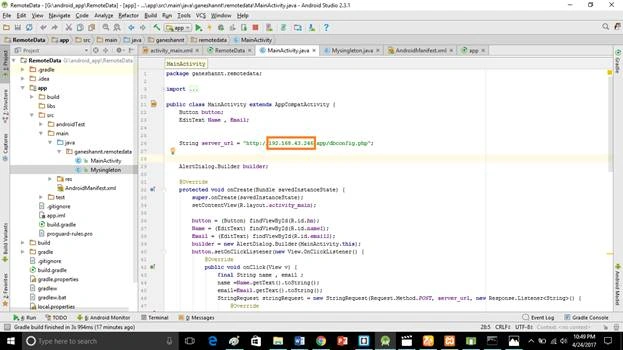
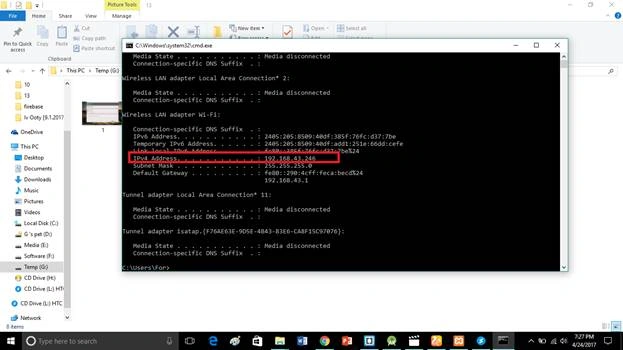
Open your MainActivity.java file. Here, you need to provide your current IP Address to connect to the local server (XAMPP).
Step 15
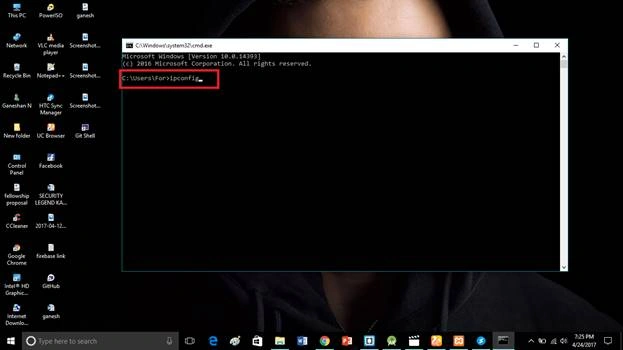
Open your command prompt and type ipconfig. It will show you your current IP address.
Step 16
In Mysingleton.java, copy and paste the code given below. Java is the back-end language for Android. Do not replace your package name here also. The code given below contains my package name.
Mysingleton.java code
- package ganeshannt.remotedata;
- import android.content.Context;
- import com.android.volley.Request;
- import com.android.volley.RequestQueue;
- import com.android.volley.toolbox.Volley;
- /**
- * Created by For on 4/24/2017.
- */
- public class Mysingleton {
- private static Mysingleton mInstance;
- private RequestQueue requestQueue;
- private static Context mCtx;
- private Mysingleton (Context Context)
- {
- mCtx = Context;
- requestQueue = getRequestQueue();
- }
- public static synchronized Mysingleton getInstance (Context context)
- {
- if (mInstance==null)
- {
- mInstance =new Mysingleton(context);
- }
- return mInstance;
- }
- public RequestQueue getRequestQueue() {
- if (requestQueue==null)
- {
- requestQueue = Volley.newRequestQueue(mCtx.getApplicationContext());
- }
- return requestQueue;
- }
- public<T> void addTorequestque(Request<T> request)
- {
- requestQueue.add(request);
- }
- }
Step 17
Add the dependencies given below into the build.gradle file. compile 'com.mcxiaoke.volley:library:1.0.19' compile 'com.android.volley:volley:1.0.0'
Step 18
For allowing the internet connection, you need to add the code given below into AndroidManifest.xml.
- <uses-permission android:name="android.permission.INTERNET"></uses-permission>
Step 21
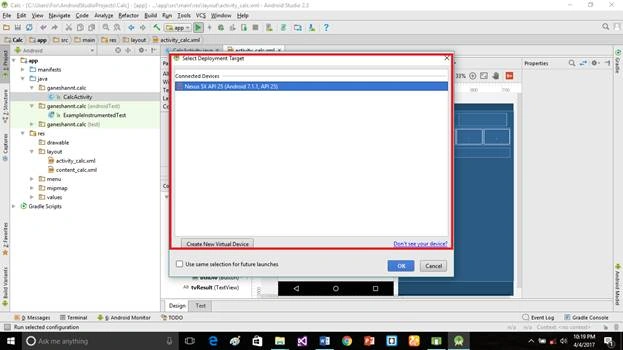
Run the Application, followed by choosing the virtual machine. Now, click "OK".
Deliverables
Here, it has successfully sent the data to the remote database in the recently created Android application.
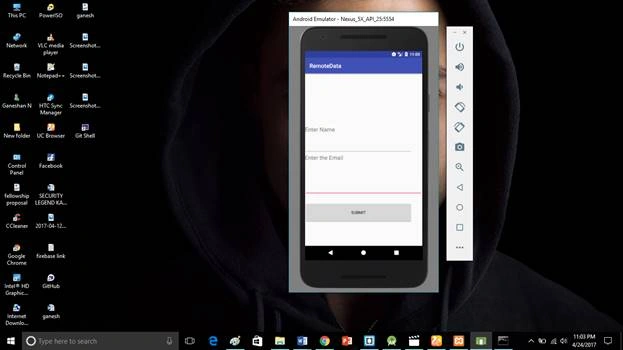
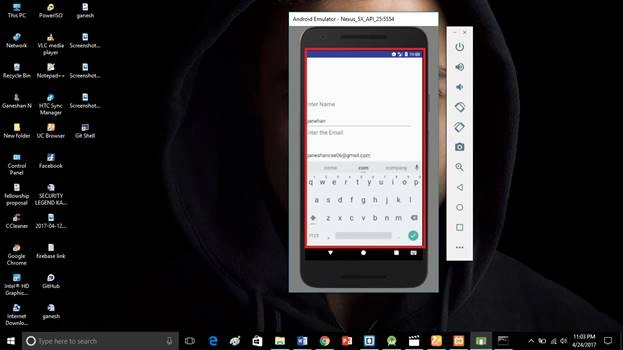
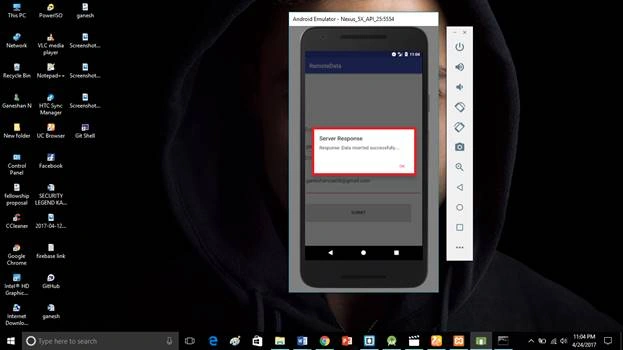
After the data insertion, it will show you the Server response popup message.
Don’t forget to like and follow me. If you have any doubts, just comment below.
Source code
https://github.com/GaneshanNT/RemoteData
manish kumarPosted Feb 2, 2021, 8:07 AM
Pls help me bro ...plss very argent
manish kumarPosted Feb 2, 2021, 8:06 AM
I am using android 4.1.2 using ..this code not work in my system... this error show "some error found" pls help me bro ....
shan rijoPosted May 1, 2020, 7:03 PM
Bro can u please tell, how to connect Android Realtime data with mysql database in websocket, i want to lively update UI with live data
Burhan UddinPosted Apr 12, 2020, 10:23 PM
Hi Ganeshan, Please contact me in this email: [email protected]. I have some good offer for you. Burhan from Australia.
Khou Loud H'aPosted Apr 2, 2020, 6:27 AM
Hello i have successfully inserted in the data base but without getting the same data sended by the form in android app alwayse i saw name: 1 , email : 1 --> in the data base no content
Mindaugas ŠkerbaPosted Aug 12, 2018, 12:57 PM
Hey man great tutorial but a question. I'm able so insert data info my DB, but it is inserted as 1 and not as char. How can I fix this?
Jeph SustituidoPosted Apr 24, 2018, 10:59 PM
Hello man.. uhm a little bit of question. how do you code when you want to connect or rather insert data into database when your likely 2km away using some mobile internet or using intranet method? currently im a student creating somethink like this. but i want to send data even if it is not connected to the same network.
Syahrul RahmatPosted Mar 20, 2018, 9:47 PM
Where directory you put dbconfig.php ?