

Introduction
Today, in this article let's play around with one of the interesting and most useful concepts in SharePoint 2010.
Question: What is setting up role based permissions?
In simple terms "It enables creation of a new role and with a defined permission set using the client object model".
Step 1: Open Visual Studio 2010 and create an "ASP.NET Web Forms Application", as in:
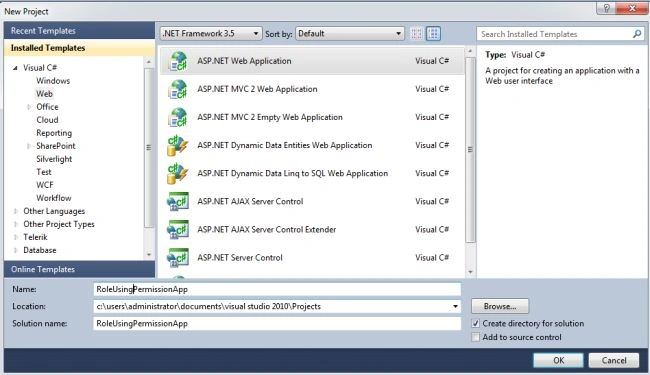
Now two references need to be added to the application; they are:
-
Microsoft.SharePoint.Client
-
Microsoft.SharePoint.Client.Runtime
Step 2: The complete code of webform1.aspx looks like this:
<%@ Page Language="C#" AutoEventWireup="true" CodeBehind="Default.aspx.cs" Inherits="RoleUsingPermissionApp._Default" %>
<!DOCTYPE html PUBLIC "-//W3C//DTD XHTML 1.0 Transitional//EN" "http://www.w3.org/TR/xhtml1/DTD/xhtml1-transitional.dtd">
<html xmlns="http://www.w3.org/1999/xhtml">
<head id="Head1" runat="server">
<title></title>
</head>
<body>
<form id="form1" runat="server">
<center>
<div>
<table>
<tr>
<td colspan="2">
<asp:Label ID="Label1" runat="server" Text="Add Role with Permissions in SharePoint 2010 using VS 2010"
Font-Bold="true" Font-Size="Large" Font-Names="Verdana" ForeColor="Maroon"></asp:Label>
</td>
</tr>
<tr>
<td>
<asp:Label ID="Label2" runat="server" Text="Please Enter Role Name" Font-Size="Large"
Font-Names="Verdana" Font-Italic="true"></asp:Label>
</td>
<td>
<asp:TextBox ID="TextBox1" runat="server"></asp:TextBox>
</td>
</tr>
<tr>
<td colspan="2" align="center">
<asp:Button ID="Button1" runat="server" Text="Add Role With Permissions" Font-Names="Verdana"
Width="213px" BackColor="Orange" Font-Bold="True" OnClick="Button1_Click" />
</td>
</tr>
<tr>
<td colspan="2" align="center">
<asp:Label ID="Label5" runat="server" Font-Bold="true" Font-Names="Verdana" ForeColor="Maroon"></asp:Label>
</td>
</tr>
</table>
</div>
</center>
</form>
</body>
</html>
Step 3: The complete code of webform1.aspx.cs looks like this:
using System;
using System.Collections.Generic;
using System.Linq;
using System.Web;
using System.Web.UI;
using System.Web.UI.WebControls;
using Microsoft.SharePoint.Client;
namespace RoleUsingPermissionApp
{
public partial class _Default : System.Web.UI.Page
{
protected void Page_Load(object sender, EventArgs e)
{
TextBox1.Focus();
}
protected void Button1_Click(object sender, EventArgs e)
{
if (string.IsNullOrEmpty(TextBox1.Text))
{
Label5.Text = "Please Enter Some Values";
Label5.ForeColor = System.Drawing.Color.Red;
}
else
{
ClientContext objContext = new ClientContext("http://win-kv3bo1rqqf7:25339/");
BasePermissions objBasePermission = new BasePermissions();
objBasePermission.Set(PermissionKind.AddListItems);
objBasePermission.Set(PermissionKind.EditListItems);
objBasePermission.Set(PermissionKind.CreateAlerts);
RoleDefinitionCreationInformation objCreateInfo = new RoleDefinitionCreationInformation();
objCreateInfo.BasePermissions = objBasePermission;
objCreateInfo.Name = TextBox1.Text;
objContext.Web.RoleDefinitions.Add(objCreateInfo);
objContext.ExecuteQuery();
Label5.Text = "Role with Permission Created Successfully";
Label5.ForeColor = System.Drawing.Color.Green;
TextBox1.Text = string.Empty;
}
}
}
}
Step 4: The output of the application looks like this:

Step 5: Data entering output of the application looks like this:

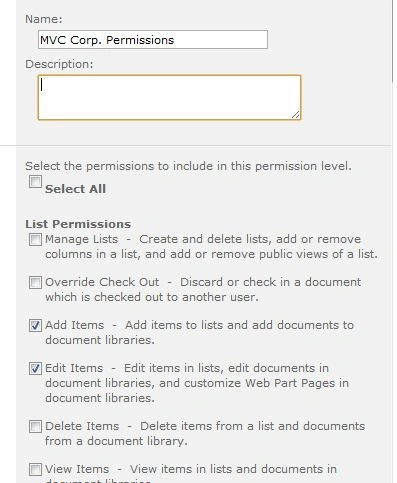
Step 6: Permission level created output of the application looks like this:


Step 7: Base permissions defined output of the application looks like this:
I hope this article is useful for you.
Gowtham RajamanickamPosted Apr 11, 2016, 1:52 AM
expecting more from you vijay
Gowtham RajamanickamPosted Apr 11, 2016, 1:52 AM
good one