

Introduction
Today, we are going to learn something amazing. We are going to understand & implement a full-fledged application with WPF, Rest-API & Entity framework.
To give you an overview, our final solution is going to look as follows.
We are going to have 3 projects.
- The first one is DataAccessLayer which is going to contain an EntityFramework
- Second is a WPF application which is our Presentation layer.
- Then last but not least, a REST API project. API is exposed between the Presentation & DataAccess layer.
Note. It is a good practice to have Rest API's project on a different solution, but this is just for learning purposes so we are keeping it in the same solution for ease of access.
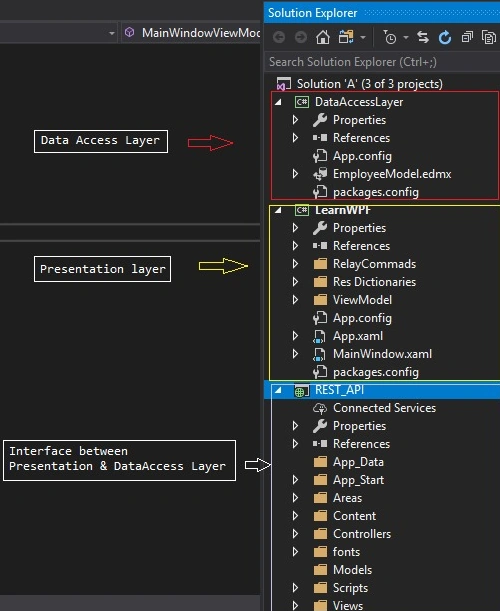
The goal of this article
This article is specific to the REST API. In the next article, we will learn about the Presentation layer. (We will learn each layer individually as keeping everything in one article is fairly complicated.) Out of 3 layers, I have already covered the first layer, the data access layer. You can follow the steps mentioned inDataAccessLayer -Implementation and be ready with DataAccessLayer.
With that we were said, let us move on to our goal, the REST API Implementation.
We need to answer 2 questions.
What is the REST API?
It is called s RESTful API which uses HTTP requests & has methods to
| Method | Description | Example |
| GET | Fetches the records from DB | e.g. select queries |
| PUT | Updates the records into DB | e.g. update queries |
| POST | Creates the records into DB | e.g. insert queries |
| DELETE | Deletes the records from DB | e.g. delete queries |
When to use REST API?
Imagine you have a mobile application plus a website & both of these applications are going to access the same database. In that case, it would be a foolish move for one to design & develop a database for both of these applications.
Rather, one can have a database placed at one point and expose the APIs to the 'n' number of applications based on their requirements.
Advantages of having this architecture
- Loose coupling: With such a design, modules won't be highly integrated.
- Extensible: So if tomorrow the client decides to have a WPF application as well as a website & a mobile app, then we won't have to create a new DB just for WPF. Just expose API to the WPF application & we are good to go.
The architecture
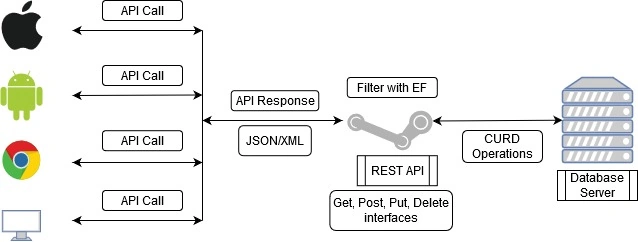
I trust this will have helped you to understand the basics of REST API.
Now it's time for some solid action.
Implementation
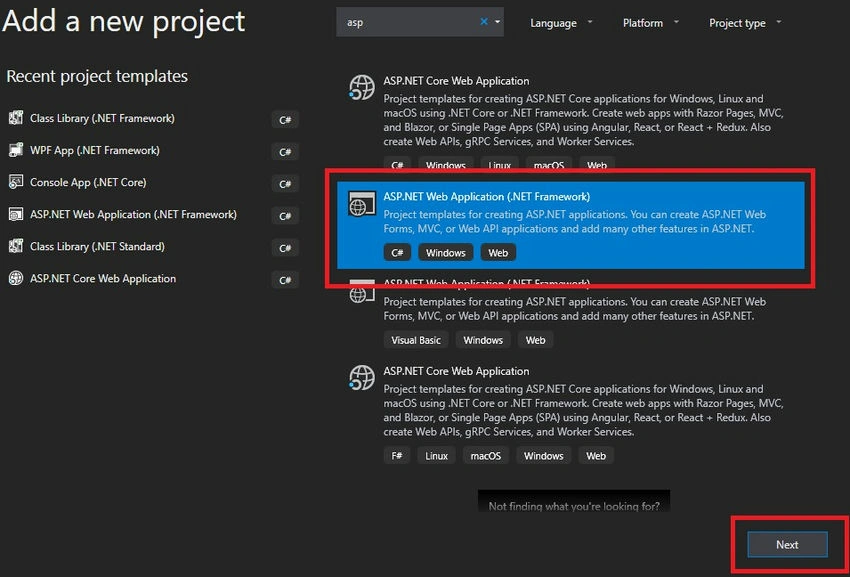
Step 1. Right-click on Solution Explorer => Add new Project => Select Asp.Net web Application
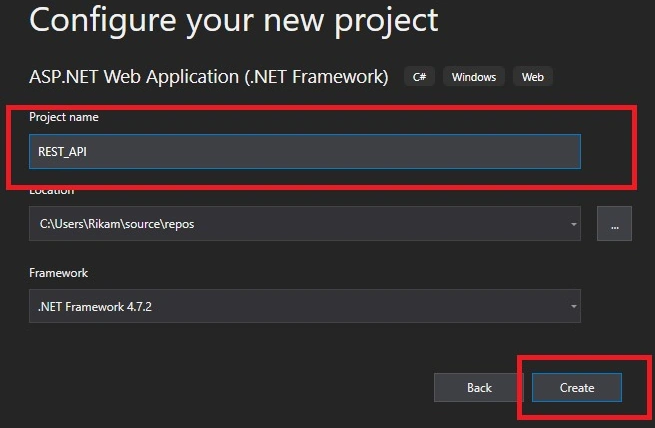
Next, Configure the project. Name as per your desire & click the create button.
Finally, Select Web API & hit the Create button.
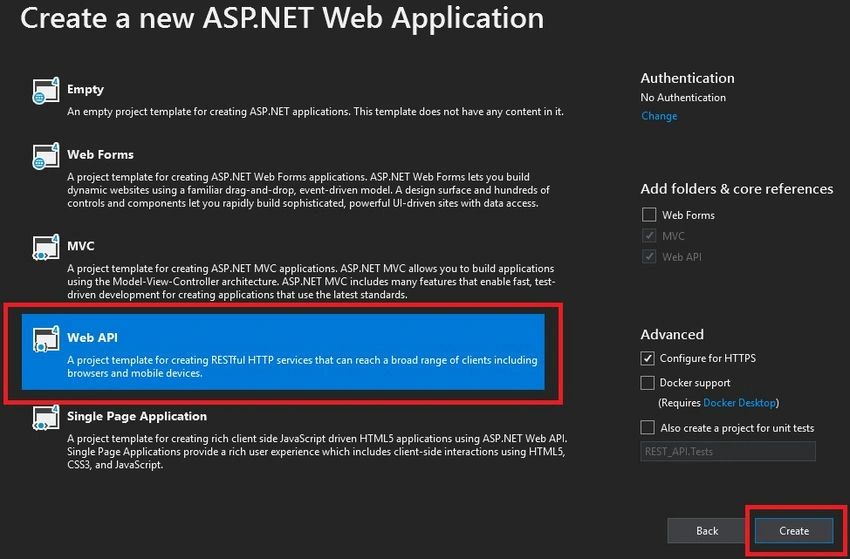
After successful configuration, Web API will add HomeController & ValuesController in your project under the controller folder.
Note. You need to have IIS installed in your system.
Now run the project. It will be published on IIS and will open in a web browser.
Localhost is your system & next to that is the port number(e.g. 44372) on which REST API is running.
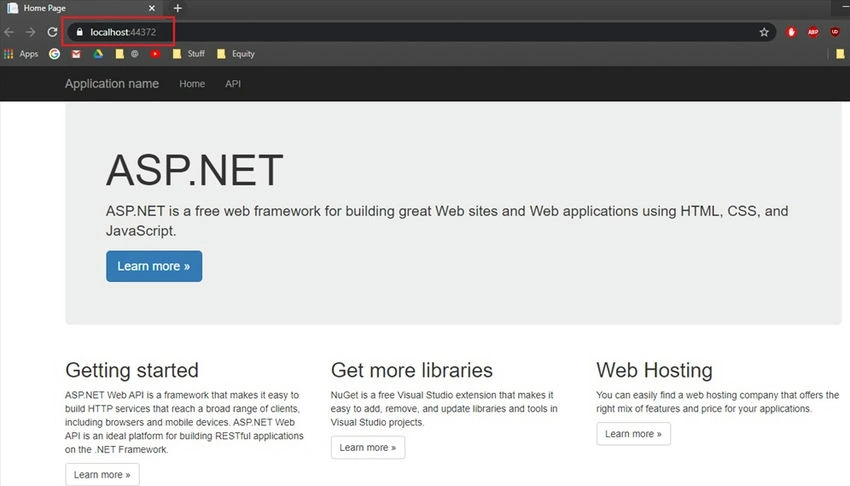
Open ValuesController
It has default Get, Post, Put & Delete interfaces.
public class ValuesController : ApiController
{
    // GET api/values
    public IEnumerable<string> Get()
    {
        return new string[] { "value1", "value2" };
    }

    // GET api/values/5
    public string Get(int id)
    {
        return "value";
    }

    // POST api/values
    public void Post([FromBody]string value)
    {
    }

    // PUT api/values/5
    public void Put(int id, [FromBody]string value)
    {
    }

    // DELETE api/values/5
    public void Delete(int id)
    {
    }
}
Let's call a get method, which returns a string array of values "value1" & "value2" and see if that's working. Paste the following URL in your web browser.
Note. Put your port number.
https://localhost:44372/api/values
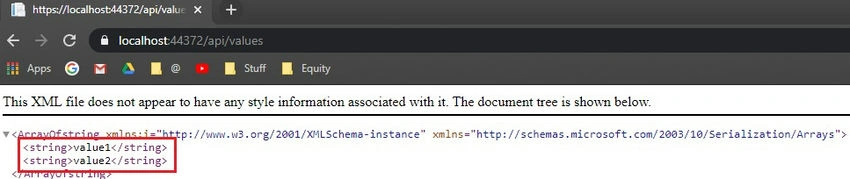
Perfect, that tells us that we have successfully configured the Rest API.
Next, we are going to create a new controller for employees.
Right-click on Controllers folder => Add new controller => Name it EmployeeController.
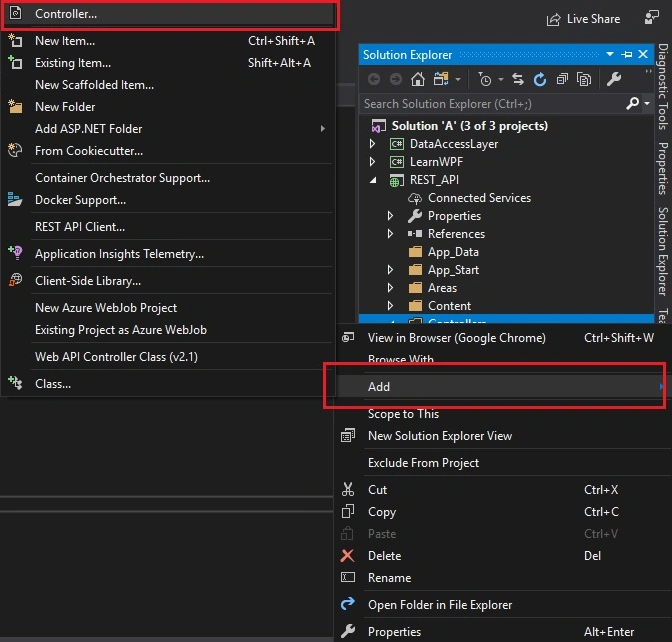
Select Web API 2 Controller - Empty
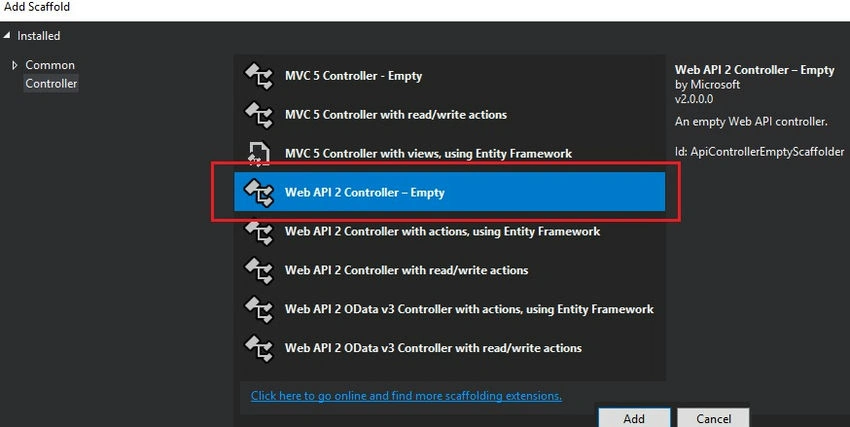
Name it EmployeeController

It will add the following class EmployeeController extending the ApiController class.
public class EmployeeController : ApiController
{
}
Important advice
Kindly Install Postman to take full advantage of REST API.
Now we are going to start creating CRUD operations.
First things first. Add DataAccessLayer's reference to REST_API's project.
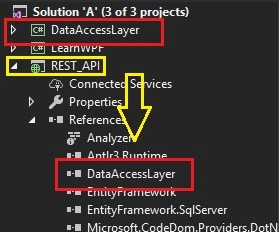
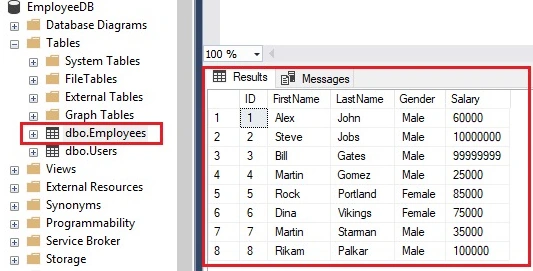
Let's see what we have in the database.
GET Interface
First, let's fetch employee details based on employee id. Remember, to fetch the details we have to use the get method.
- The attribute [HttpGet] specifies it is a get method. By default, it is a get method even if you don't mention it.
- Return type IHttpActionResult: returns status code, error details, response data in content in HTTP format
- EmployeeDBEntities is our DbContext to fetch employee entities with data.
- returns ok if there are any records.
- returns not found error if no records are there.
- returns an exception if the request is not processable.
- If you pass the specific ID of the employee then details of that employee are returned, if you pass nothing then details of all employees are returned.
public class EmployeeController : ApiController
{
    /// <summary>
    /// Filter out employees whose details are asked
    /// </summary>
    /// <param name="id">id of employee</param>
    /// <returns>employee details of id</returns>
    [HttpGet]
    public IHttpActionResult Get(int id)
    {
        try
        {
            using (EmployeeDBEntities entities = new EmployeeDBEntities())
            {
                var emp = entities.Employees.FirstOrDefault(em => em.ID == id);
                if (emp != null)
                {
                    return Ok(emp);
                }
                else
                {
                    return Content(HttpStatusCode.NotFound, "Employee with Id: " + id + " not found");
                }
            }
        }
        catch (Exception ex)
        {
            return Content(HttpStatusCode.BadRequest, ex);
        }
    }
}
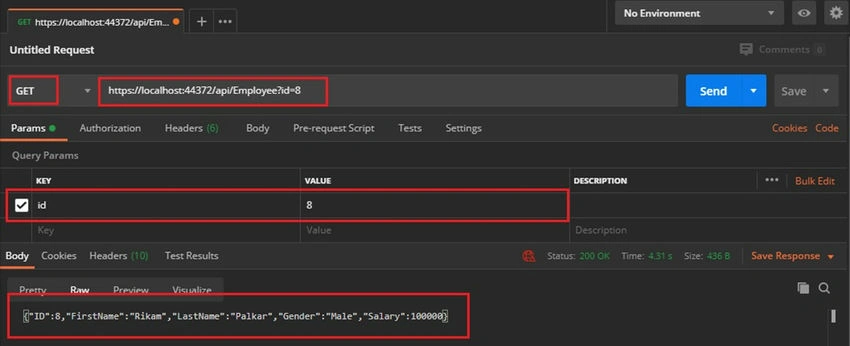
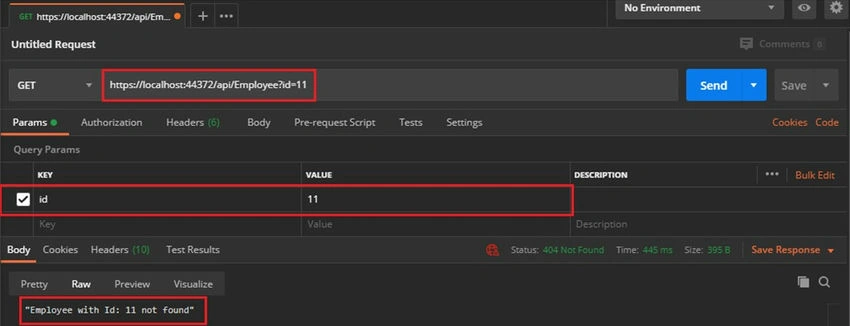
Let's make a Get request from PostMan
- 1st request: fetch details of all the employees
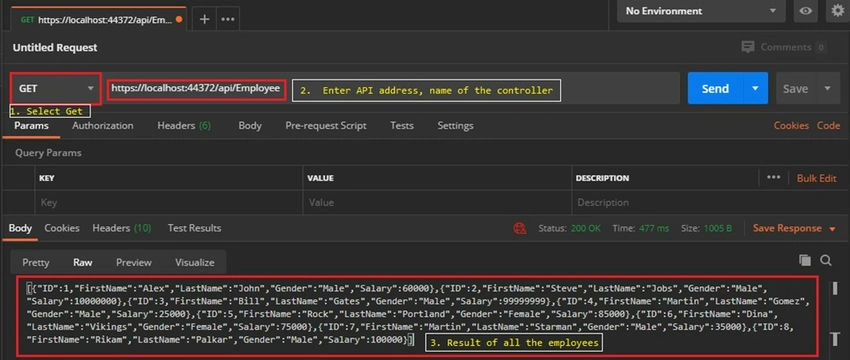
- 2nd request: Fetch details whose employee id = 8.
- 3rd Request: Fetch details of employee who doesn't exist
And my friends, this is how you fetch details using REST API.
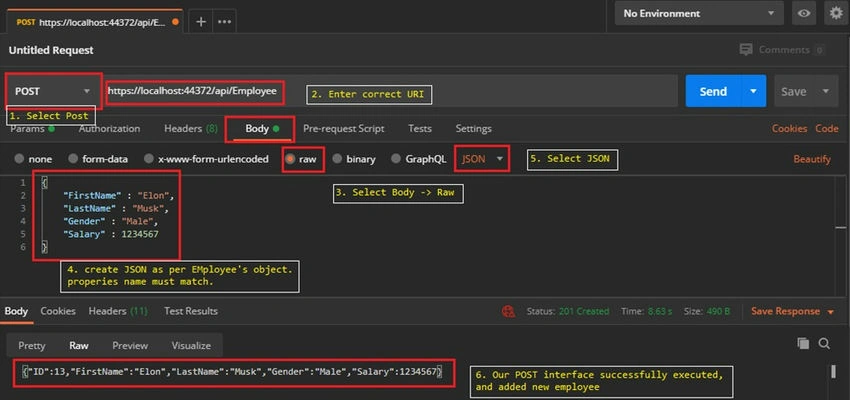
Next in line POST interface
- Add the following method in EmployeeController
- You can either use HttpResponseMessage or IHttpActionResult. I use IHttpActionResult because it is easy to use.
- You must pass request parameters from the body in the form of JSON.
/// <summary>
/// Creates a new employee
/// </summary>
/// <param name="employee"></param>
/// <returns>details of newly created employee</returns>
[HttpPost]
public HttpResponseMessage Post([FromBody] Employee employee)
{
    try
    {
        using (EmployeeDBEntities entities = new EmployeeDBEntities())
        {
            entities.Employees.Add(employee);
            entities.SaveChanges();
            var res = Request.CreateResponse(HttpStatusCode.Created, employee);
            res.Headers.Location = new Uri(Request.RequestUri + employee.ID.ToString());
            return res;
        }
    }
    catch (Exception ex)
    {
        return Request.CreateErrorResponse(HttpStatusCode.BadRequest, ex);
    }
}
Let's cross-check in DB
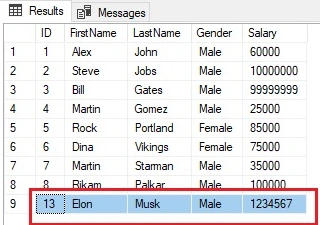
This is how perfectionism works. The record has been successfully inserted into the DB.
Next in line is the put interface
- Add the following method in the EmployeeController class
- The put has 2 parameters
- Id against which we have to update the record. Pass through URL as params
- The new information has to be updated. Pass object as JSON through raw data
- Add an update statement for each property, because you may not know which property the user wants to update. Must check for null conditions.
Let's update Elon's surname to Tusk and his salary to 5555555
/// <summary>
/// Update details of employee based on id
/// </summary>
/// <param name="id"></param>
/// <param name="emp"></param>
/// <returns>updated details of employee</returns>
[HttpPut]
public HttpResponseMessage Put(int id, [FromBody] Employee emp)
{
    try
    {
        using (EmployeeDBEntities entities = new EmployeeDBEntities())
        {
            var employee = entities.Employees.Where(em => em.ID == id).FirstOrDefault();
            if (employee != null)
            {
                if (!string.IsNullOrWhiteSpace(emp.FirstName))
                    employee.FirstName = emp.FirstName;

                if (!string.IsNullOrWhiteSpace(emp.LastName))
                    employee.LastName = emp.LastName;

                if (!string.IsNullOrWhiteSpace(emp.Gender))
                    employee.Gender = emp.Gender;

                if (emp.Salary != 0 || emp.Salary <= 0)
                    employee.Salary = emp.Salary;

                entities.SaveChanges();
                var res = Request.CreateResponse(HttpStatusCode.OK, "Employee with id " + id + " updated");
                res.Headers.Location = new Uri(Request.RequestUri + id.ToString());
                return res;
            }
            else
            {
                return Request.CreateErrorResponse(HttpStatusCode.NotFound, "Employee with id " + id + " is not found!");
            }
        }
    }
    catch (Exception ex)
    {
        return Request.CreateErrorResponse(HttpStatusCode.BadRequest, ex);
    }
}
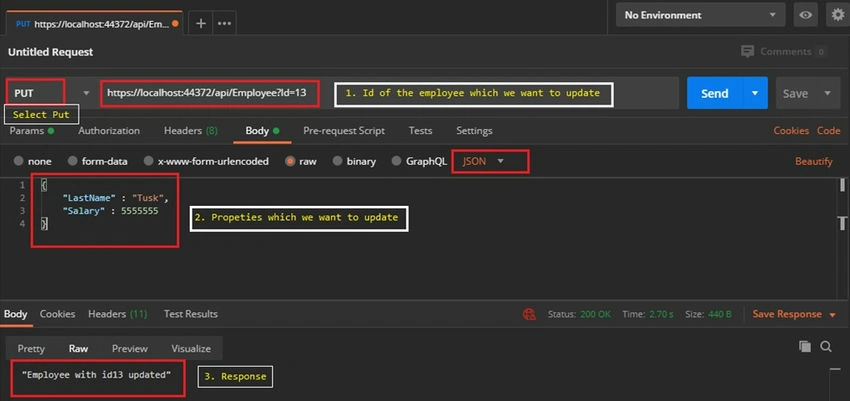
Superb! now let's cross-check that in the DB.
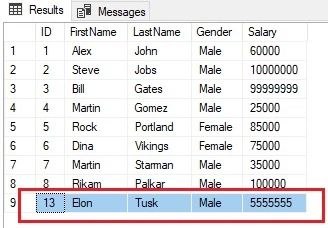
And Elon Musk is now Elon Tusk.
The Last one DELETE Interface
Out of everything, Get & Delete are the simplest ones.
- Add the following function in EmployeeController
- We need to pass the ID of an employee whose record we want to delete.
- Check if a record with the given ID exists or not
- If yes, then delete
- else give a response as a record not found.
/// <summary>
/// Deletes the respected employee based on id passed.
/// </summary>
/// <param name="id"></param>
/// <returns>id of deleted employee</returns>
[HttpDelete]
public HttpResponseMessage Delete(int id)
{
    try
    {
        using (EmployeeDBEntities entities = new EmployeeDBEntities())
        {
            var employee = entities.Employees.Where(emp => emp.ID == id).FirstOrDefault();
            if (employee != null)
            {
                entities.Employees.Remove(employee);
                entities.SaveChanges();
                return Request.CreateResponse(HttpStatusCode.OK, "Employee with id " + id + " Deleted");
            }
            else
            {
                return Request.CreateErrorResponse(HttpStatusCode.NotFound, "Employee with id " + id + " is not found!");
            }
        }
    }
    catch (Exception ex)
    {
        return Request.CreateErrorResponse(HttpStatusCode.BadRequest, ex);
    }
}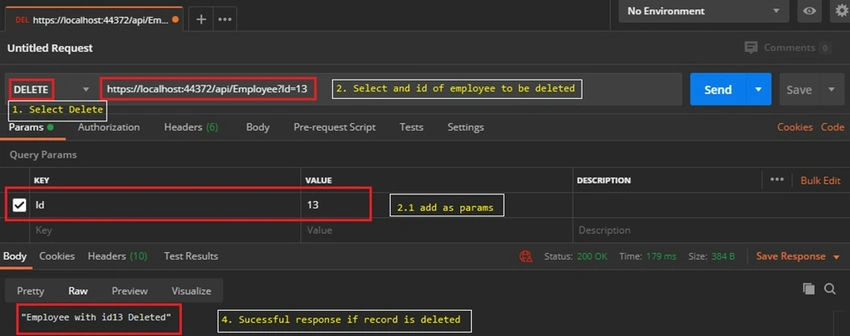
The record of Elon Tusk is deleted.
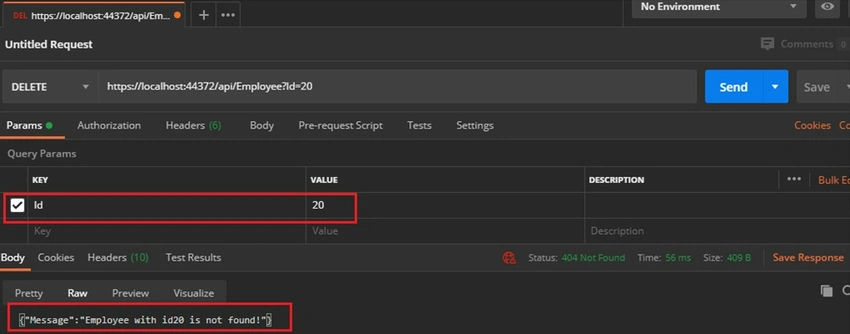
What if we send the wrong ID? As we have already managed that in our code above, it won't be an issue.
Let's cross-check in DB to confirm.
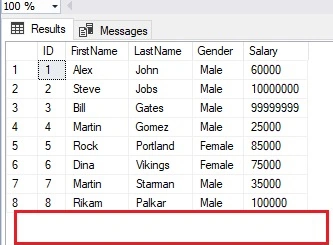
And Elon Tusk has been deleted from DB as well.
Awesome. Everything is in its right place.
Conclusion
This was a long article but there was so much to learn.
I believe now you have all the answers that you were searching for.
Do follow REST APIs are they are easy to implement & don't require much configuration. Plus they are loosely coupled.
In this article, we learned
- What is REST API & when to use it?
- How to configure & implement REST APIs
- What are the advantages of REST APIs
- Different interfaces of REST APIs
- How to handle invalid requests
- HttpResponseMessage & IHttpActionResult
- How to use Postman for REST APIs
We will learn how to bind these data with WPF in the next article.
If you have any queries feel free to comment below.
If you wish to connect, you can find me.
Thank you all and all the best.
Happy Coding!
Join the conversation! Your thoughts help the community grow.