

In Part One, we learned how we can create a simple React element and add it in our page. You may check Part 1 here.
This was the state of our index.html page after the first part.
- <html>
- <head>
- <script crossorigin src="https://unpkg.com/react@16/umd/react.development.js"></script>
- <script crossorigin src="https://unpkg.com/react-dom@16/umd/react-dom.development.js"></script>
- </head>
- <body>
- <div id="app">
- </div>
- <script>
- // if(React){
- // alert('React is available')
- // }
- var el = React.createElement('h3',{id:'myheader',class:'test'},"Bilal Shahzad");
- ReactDOM.render(el,document.getElementById('app'));
- </script>
- </body>
- </html>
Function Component
Now let’s move element creation logic into a function and see another version of React.createElement() function.
- <script>
- function MyName(props){
- return React.createElement('h3',{id:'myheader',class:'test'},props.name);
- }
- var el = React.createElement(MyName, {name:"Bilal Shahzad"});
- ReactDOM.render(el,document.getElementById('app'));
- </script>
Explanation
We’ve moved our h3 element creation logic into a function. This function can be called “Function Component” in React. It is receiving an object which contains properties. Normally this is called “props” in React. (The name of variable can be anything). The function is creating React element and returning it. This function can be used multiple times now (reusability). Then we’ve passed function name to React.createElement() function as first parameter & passed properties (data/props) as second parameter. And then we’ve rendered this in our page DOM. Run page and check if it is still working.
Let’s create another component (function) which will create a profile link using anchor tag. We’ll pass properties (or dynamic content) as props to the function so it can be re-used with different content.
- <script>
- function ProfileLink(props){
- var url = props.url;
- var txt = props.urlText;
- return React.createElement('a',{href:props.url},txt);
- }
- var dataToPass = {url:"https://www.youtube.com/c/LearnInUrdu139",urlText: "Learn in Urdu Tutorials"};
- var el = React.createElement(ProfileLink, dataToPass);
- ReactDOM.render(el,document.getElementById('app'));
- </script>
Explanation
We’ve intentionally removed MyName component for the time being. We’ve created a new function component which is responsible to render a hyperlink. “props” contains URL & Anchor Text as we’ve passed it while using component.
You may have noticed that ReactDOM.render() is taking one element as first parameter. What if we want to render multiple elements instead (i.e. Name & profile link)? Let's say we want to generate the following HTML in our page through code (“app” div is empty by default).
- <div class="mycontainer">
- <h3>Bilal Shahzad</h3>
- <a href="https://www.youtube.com/c/LearnInUrdu139">Learn in Urdu Tutorials</a>
- </div>
This is what we’ll do,
- We’ll create a div element
- We’ll create a Name element as child of div
- We’ll create a Profile element as child of div
Here is the code snippet to do this,
- <body>
- <div id="app">
- </div>
- <script>
- function MyName(props){
- return React.createElement('h3',null,props.name);
- }
- function ProfileLink(props){
- var url = props.url;
- var txt = props.urlText;
- return React.createElement('a',{href:props.url},txt);
- }
- //Create name & profile elements
- var nameComp = React.createElement(MyName, {name:"Bilal Shahzad"});
- var dataToPass = {url:"https://www.youtube.com/c/LearnInUrdu139",urlText: "Learn in Urdu Tutorials"};
- var profileComp = React.createElement(ProfileLink, dataToPass);
- //create div element to hold name & profile elements
- var el = React.createElement(
- 'div'
- ,{class:'mycontainer'}
- ,nameComp
- ,profileComp);
- ReactDOM.render(el,document.getElementById('app'));
- </script>
- </body>
Explanation
We’ve created name & link elements using relevant components by providing required properties to them. Then we’ve created a parent (div) element using the same React.createElement() function. In this case we’ve provided multiple react elements as children, and yes, we may provide more. Then we’ve added it in DOM. If we run the page, the following should be output & html generated by react.
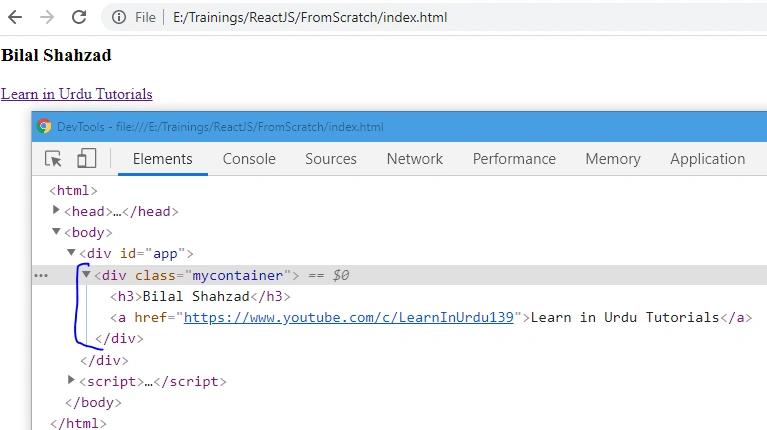
Now shouldn't we have a profile component which shows one person's profile (name & link)? Let’s convert the newly-created div into a separate component so we can reuse it. Don’t get confused, please check comments in the snippet & the explanation below for better understanding.
- <body>
- <div id="app">
- </div>
- <script>
- function MyName(props){
- return React.createElement('h3',null,props.name);
- }
- function ProfileLink(props){
- var url = props.url;
- var txt = props.urlText;
- return React.createElement('a',{href:props.url},txt);
- }
- function Profile(props){
- //Create name & profile elements
- var nameComp = React.createElement(MyName, props);
- var profileComp = React.createElement(ProfileLink, props);
- //create div element to hold name & profile elements
- var el = React.createElement(
- 'div'
- ,{class:'mycontainer'}
- ,nameComp
- ,profileComp);
- return el;
- }
- //create object to pass as props
- var personData = {
- name : "Bilal Shahzad",
- url:"https://www.youtube.com/c/LearnInUrdu139",
- urlText: "Learn in Urdu Tutorials"
- };
- var el = React.createElement(Profile,personData);
- ReactDOM.render(el,document.getElementById('app'));
- </script>
- </body>
Explanation
We’ve moved code to create a “div” element in a separate function (component). We are going to pass dynamic content from outside as props. We may pass specific props to name & link components but we’ve provided the same props object to them for our ease. Then we’ve created a single object which contains name, url & urlText. Then we created profile element. Run page & it should be working fine.
Now what if we want to show another profile on the page? Simple, we just need to:
- Create another data object of that profile
- Create another profile element
- Wrap both profile elements in some container and add that container in DOM.
Here is the code snippet to show how to do this (Note: No change in components)
- //create object to pass as props
- var personData = {
- name : "Bilal Shahzad",
- url:"https://www.youtube.com/c/LearnInUrdu139",
- urlText: "Learn in Urdu Tutorials"
- };
- //create profile element
- var profile1 = React.createElement(Profile,personData);
- //create object to pass as props
- var personData2 = {
- name : "Faisal Shahzad",
- url:"https://www.youtube.com/c/LearnInUrdu139",
- urlText: "Learn in Urdu Tutorials 2"
- };
- //create profile element
- var profile2 = React.createElement(Profile,personData2);
- var el = React.createElement(
- 'div'
- ,{class:'maincontainer'}
- ,profile1
- ,profile2);
- ReactDOM.render(el,document.getElementById('app'));
Explanation
We’ve just used our profile component multiple times. We created 2 profile elements and then added them in a div element as we need a single element to add in DOM. We then added the div element in DOM. If we run the page, the following should be output & html generated by react.
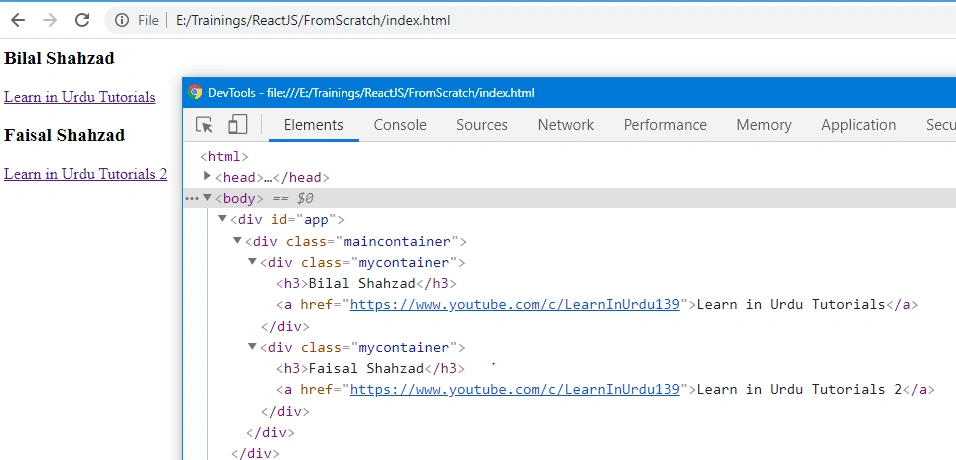
But wait, what? Is this React? Is this creating ease for us or making things difficult? A normal page has many elements, are we going to create components like this? Where are our own tags e.g. <Person>? Yes, you may use this approach (i.e. using React.createElement()) functions or optionally use JSX to ease things.
What is JSX?
- JSX stands for JavaScript XML
- It is an HTML-like syntax
- JavaScript & HTML can be mixed
- It just providesthe sugar coating of syntax we’ve seen above
Let’s check an example of creating React elements using JSX
- function MyName(props){
- //return React.createElement('h3',{id:'myheader',class:'test'},props.name);
- return <h3 id='myheader' class='test'>{props.name}</h3>
- }
Explanation
We can create our elements like we do with HTML. But here we can mix JavaScript by using curly braces (e.g. {props.name}
But before we start using it, we need to do a couple of things.
Import the following script in head, now there should be three references.
- <script crossorigin src="https://unpkg.com/react@16/umd/react.development.js"></script>
- <script crossorigin src="https://unpkg.com/react-dom@16/umd/react-dom.development.js"></script>
- <script src="https://unpkg.com/babel-standalone@6/babel.min.js"></script>
Update script tag with the following:
- <script type='text/babel'>
Here is the full snippet which is creating a Name component by using JSX syntax.
- <html>
- <head>
- <script crossorigin src="https://unpkg.com/react@16/umd/react.development.js"></script>
- <script crossorigin src="https://unpkg.com/react-dom@16/umd/react-dom.development.js"></script>
- <script src="https://unpkg.com/babel-standalone@6/babel.min.js"></script>
- </head>
- <body>
- <div id="app">
- </div>
- <script type='text/babel'>
- //Component is still return react element
- function MyName(props){
- return <h3 id='myheader' class='test'>{props.name}</h3>
- }
- //Created a top level component
- function MyApp(){
- return (
- //Using our custom tag (component), passing data as properties
- <MyName name="Bilal Shahzad"/>
- );
- }
- ReactDOM.render(<MyApp />,document.getElementById('app'));
- </script>
- </body>
- </html>
Explanation
We’ve updated MyName() component and now we are returning React element using JSX syntax. We are using HTML & mixing JavaScript by using curly braces. We’ve also created a top level component which will hold our other components. In MyApp() component, we’ve used MyName component as we use HTML tags. Now we are passing properties to component (e.g. name=”Bilal Shahzad”) as we set in HTML. Then we’ve used <MyApp /> syntax in ReactDOM.render() method.
Let’s try to convert our Persons example using JSX. It should be something like this.
- <html>
- <head>
- <script crossorigin src="https://unpkg.com/react@16/umd/react.development.js"></script>
- <script crossorigin src="https://unpkg.com/react-dom@16/umd/react-dom.development.js"></script>
- <script src="https://unpkg.com/babel-standalone@6/babel.min.js"></script>
- </head>
- <body>
- <div id="app">
- </div>
- <script type='text/babel'>
- function MyName(props){
- return <h3>{props.name}</h3>
- }
- function ProfileLink(props){
- return <a href={props.url}>{props.urlText}</a>;
- }
- function Profile(props){
- return (
- <div class="mycontainer">
- <MyName name={props.name} />
- <ProfileLink url={props.url} urlText={props.urlText} />
- </div>
- );
- }
- //Created a top level component
- function MyApp(){
- return (
- <div class="maincontainer">
- <Profile name="Bilal Shahzad" url="https://www.youtube.com/c/LearnInUrdu139" urlText="Learn in Urdu Tutorials" />
- <Profile name="Faisal Shahzad" url="https://www.youtube.com/c/LearnInUrdu139" urlText="Learn in Urdu Tutorials 2" />
- </div>
- );
- }
- ReactDOM.render(<MyApp />,document.getElementById('app'));
- </script>
- </body>
- </html>
Explanation
We’ve updated MyName, ProfileLink & Profile components with JSX approach. Then we’ve created two profiles in MyApp component. We can see how simplified it has become with JSX. It is more readable now.
So we’ve learnt that we can create a React application using 1) React plain code OR 2) Using JSX
What is Babel?
Babel is a JavaScript compiler (or transpiler) that includes the ability to compile JSX into regular JavaScript. When it is used with React, it converts JSX into React code.
To understand it better
- Go to https://babeljs.io/repl. It will show us what it generates against JSX
- Copy following JSX code and paste in left panel, it will show generated react code in right panel
- var name = "Bilal Shahzad";
- <h3 id="test">{name}</h3>
Practice Tasks
- Create a new array of objects in MyApp and render multiple profiles against it. Hint: You need to use map function to iterate array.
- Check what react code is generated against JSX we’ve after Task 1.
Conclusion
In this part, we’ve extended our learning of React and learned about “Function Components”. A function component takes properties as input and returns a React element. We learned how JSX eases our work by allowing us to use HTML like syntax with a mixture of JavaScript statements.
For more reading on JSX,
https://reactjs.org/docs/jsx-in-depth.html
Join the conversation! Your thoughts help the community grow.