

Introduction
Requirement
Steps to be followed
Step 1 - Create a New Form
In this Qt Designer Environment, we can choose the “Dialog without button” template. It will continue the form without having any widgets or new plain form.
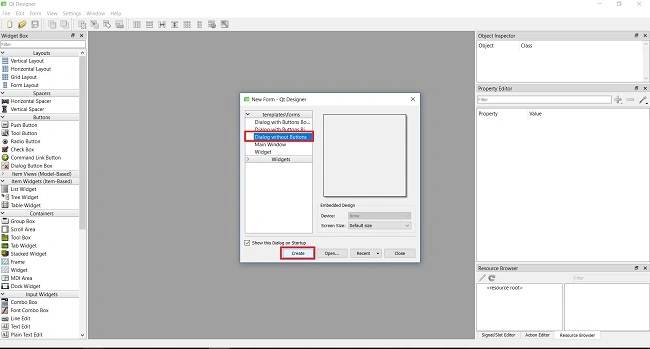
Step 2 - Change Form background
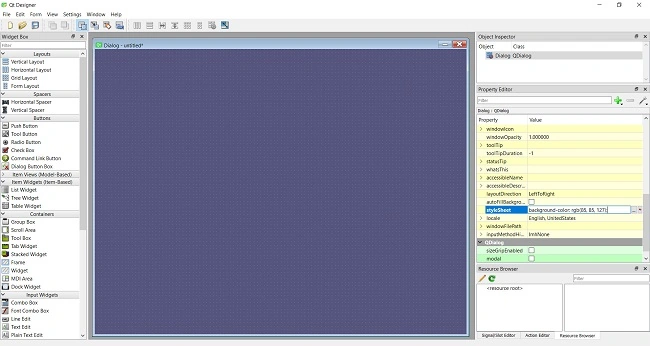
- Go to Properties >> stylesheet
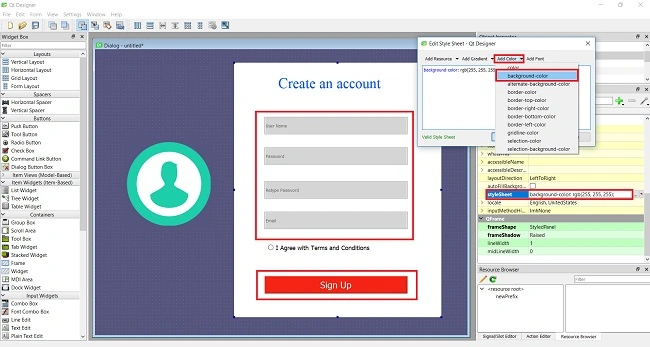
- Edit Style sheet >> Add color >> Background color
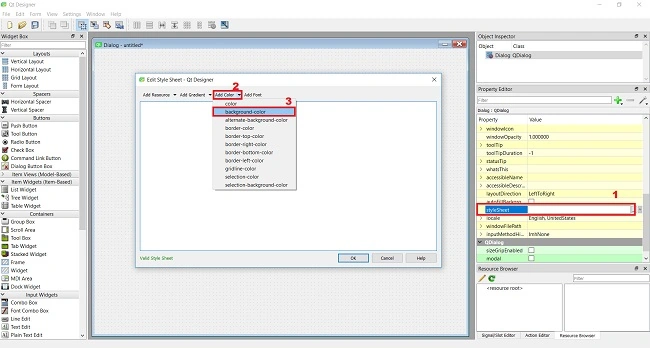
- Select color >> OK.
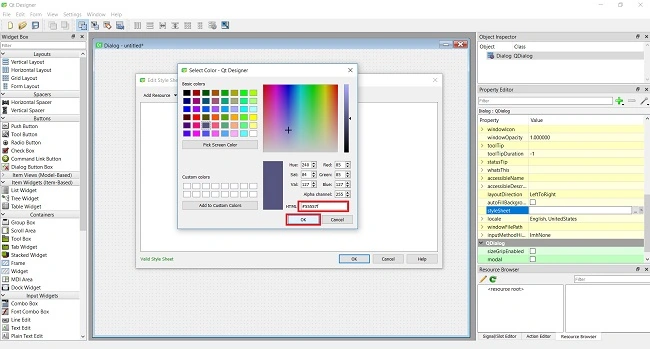
In the Edit Stylesheet editor, our desired color code will be generated. If we want to modify anything on that manually, that’s also available there.
- Verify and click “Ok”.
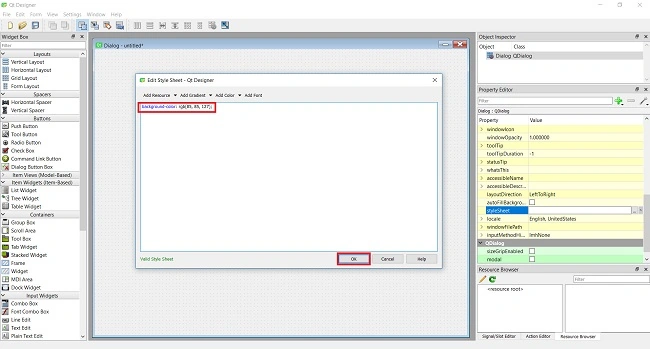
Now, our desired colored form will display like below image.
Step 3 - Setup User image
Creating label (QLabel) for add image
Let’s create a new label for displaying an image on the form. Choose the “label” under Display widgets and drag-drop on the Form (QDialog).
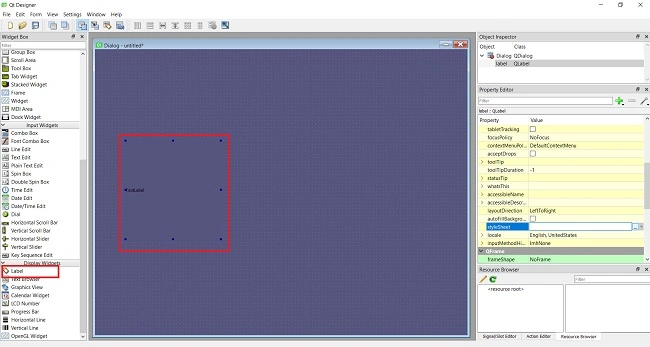
Under “properties”, we need to click on “style sheet”. Then the Edit style sheet window will appear, click on “Add resource” and choose “background-image”.
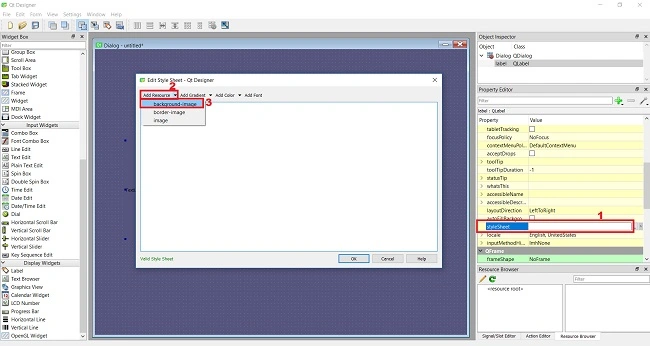
Adding new Resource
- Select Resources >> Edit resources (pencil icon).
- Edit Resources >> New resource file.
- Import Resource File >> resource.qrc >> open.
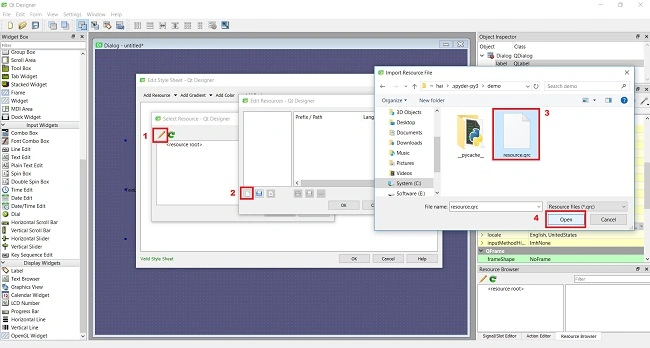
- Edit Resources >> resource.qrc >> add prefix (I will give name as “newPrefix”) >> Add Files>> user.png >> Open
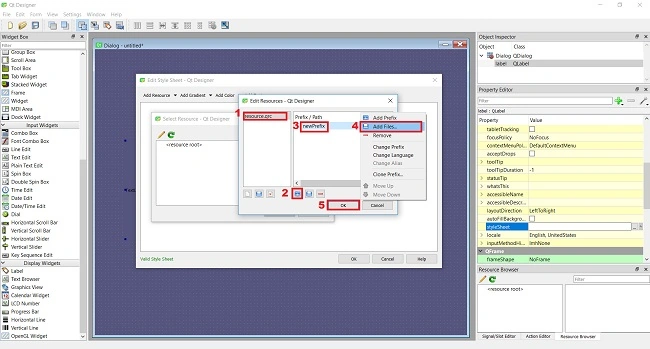
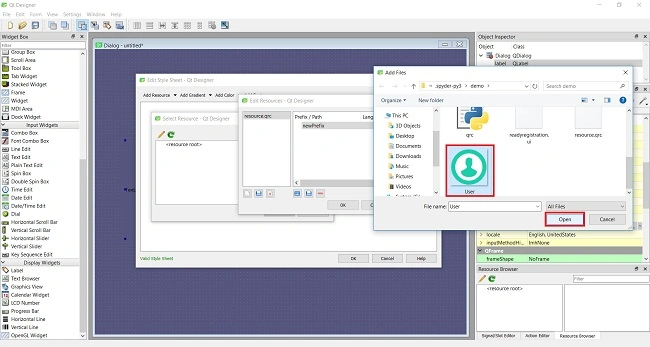
After adding an image with the corresponding resource file, the Edit style sheet editor will show you a few lines of code.
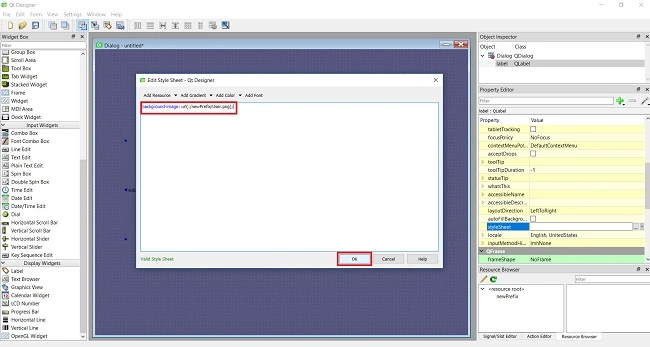
Now, we successfully added an image to the QLabel box. Given below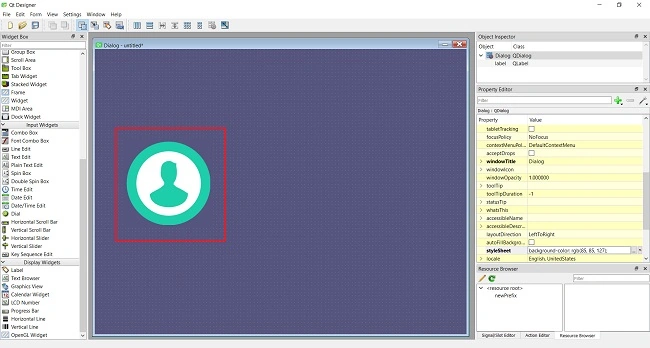
Step 4 - Creating Frame (QFrame)
Under containers, click on the “Frame” widget to drag and drop on the QDialog. Then click on “stylesheet” under properties to choose a color for how your frame looks attractive.
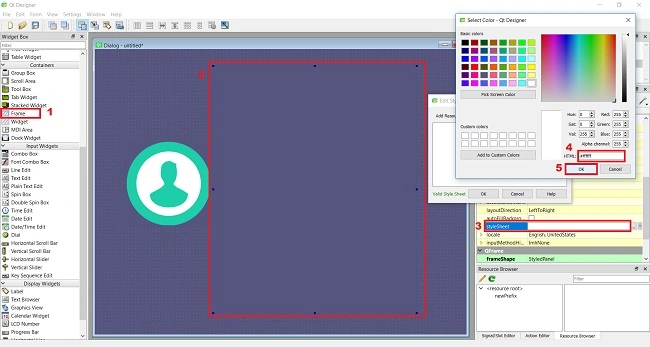
Step 5 - Creating QLabel (Label) for giving form name
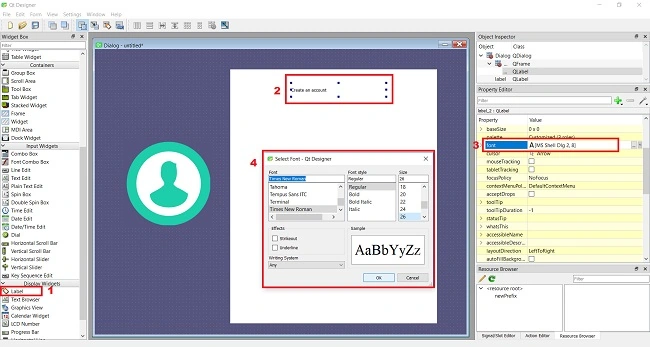
Under Display Widgets, choose “Label” to drag and drop on the Frame then change the name as “Create an account” by Font property.
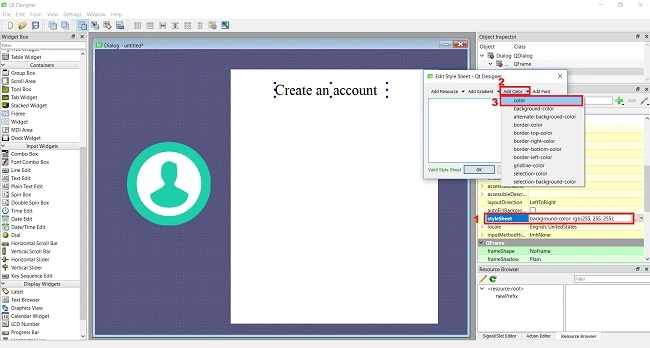
- Edit style Sheet >> Add color >> color >> pic screen color >> Ok
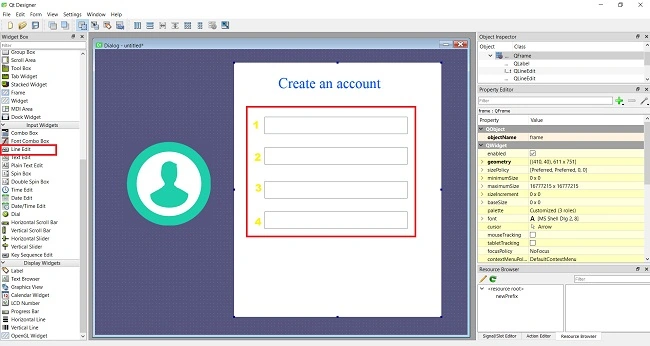
Step 6 - Creating Line Edits
In this Registration form, we will need to create a list of fields for gathering customer information. By the way, I create four Line edits as one by one, under Input Widgets choose “Line Edit” to drag and drop on the frame.
Step 7 - Creating Radio Button
Let’s create a Radio Button for customers who will accept the agreements by doing a single click. Choose “Radio Button” under Buttons Widget to place on the form area.
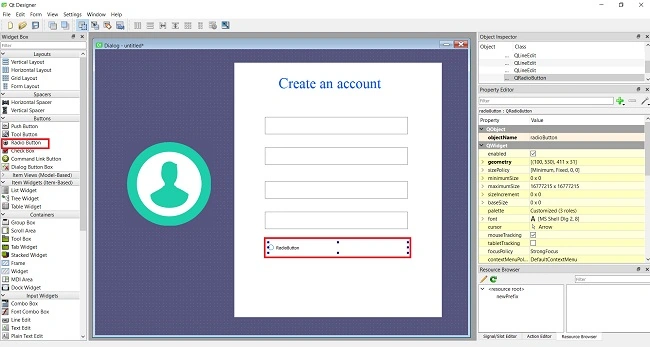
Step 8 - Creating Push Button
Now, we create a “Push Button” for submitting the above-collected information to the server or our local system. Under “Buttons” Widgets, choose “Push Button” to drag and drop on the same Form.
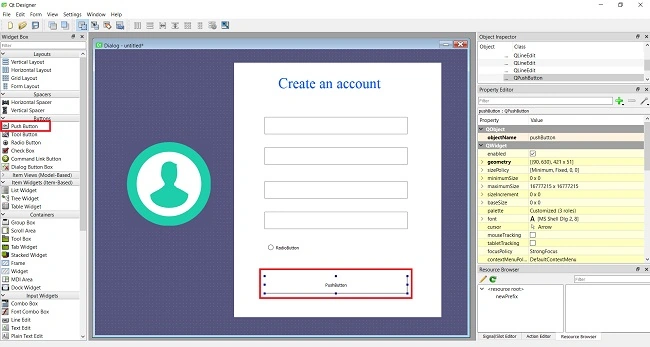
Step 9 - Giving a name for Widgets
As I desired, we created four Line Edits and one Radio Button as well as Push Button; then let’s give a name for them according to their process.
- QLineEdit = User Name
- QLineEdit = Password
- QLineEdit = Retype password
- QLineEdit = Email
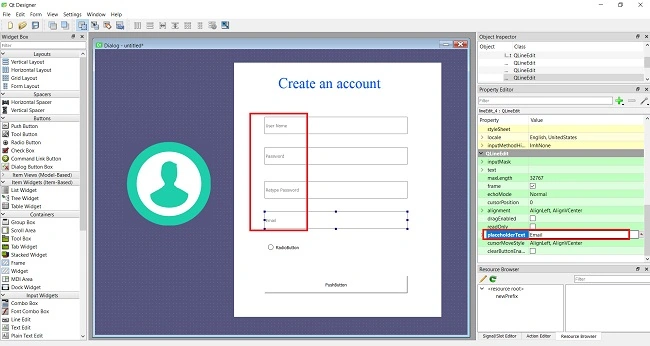
- QRadio Button = Accept the Terms and Conditions
- QPushButton = Sign Up
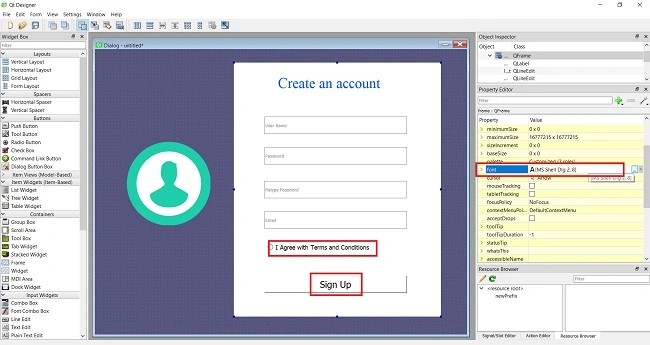
Step 10 - Changing Widgets Background
- Properties >> stylesheet >> Edit Style Sheet >> Add color >> Background-color >> Select screen color>> Ok
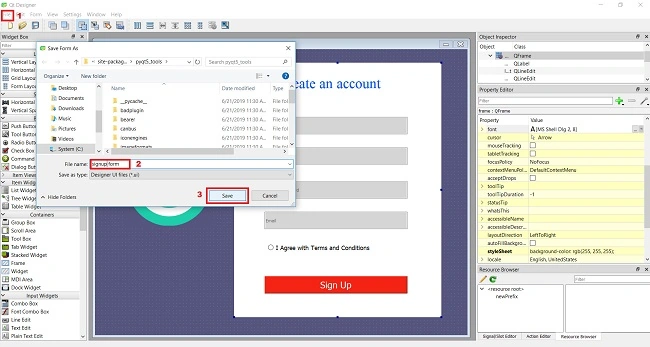
Step 11 - Save and Preview
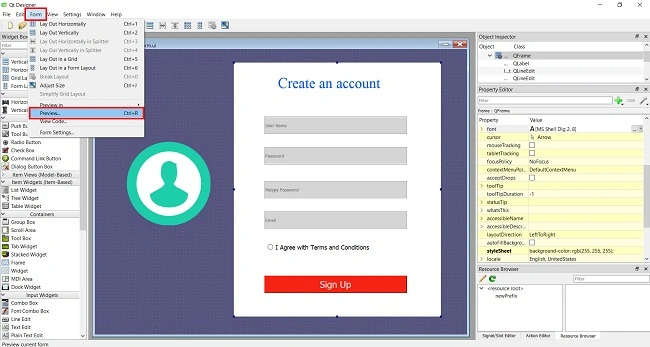
- Form >> Preview
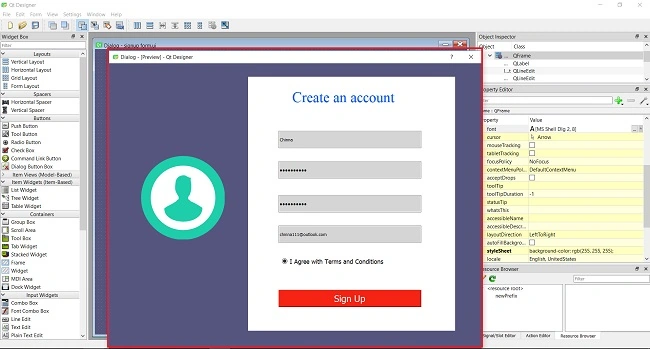
Finally, we test our Registration form. Given below
Summary
In this article, we learned how to create a simple and attractive registration form by using Qt Designer. I hope you understood this very well. If you have any difficulties while doing the above, please leave a comment below.
manikandan PalanisamyPosted Aug 15, 2019, 8:07 PM
very nice and neetly explaination
Guest UserPosted Aug 2, 2019, 12:38 AM
Super explanation Elavarasan , easy understand to me, thank you for sharing. best of luck...
Elavarasan RPosted Aug 1, 2019, 8:33 PM
Thanks for your valuable feedback friends.
Kokila RaniPosted Aug 1, 2019, 11:26 AM
Great sharing, that really helps!
Rajanikant HawaldarPosted Jul 30, 2019, 12:25 PM
nice article