

In this article, we’ll walk through a practical implementation of an Employee Records API that accepts employee data and stores it in Dataverse.
Real-World Use Case
Imagine your organization has:
A website HR form
An internal onboarding portal
Or a third-party recruitment system
Whenever a new employee joins, the system must automatically:
Capture employee details
Store them in Dataverse
Return a proper success or failure response
Instead of building a custom backend API, we can expose a secure HTTP endpoint using Power Automate that behaves like a lightweight REST API.
Step - by Step Implementation:
Step 1 – Dataverse Table Preparation
Before building the flow, create a Dataverse table.
Table Name:
Employee Records
Columns Created:
First Name (Text)
Last Name (Text)
Email (Text)
Company (Text)
Step 2 – Configure HTTP Trigger
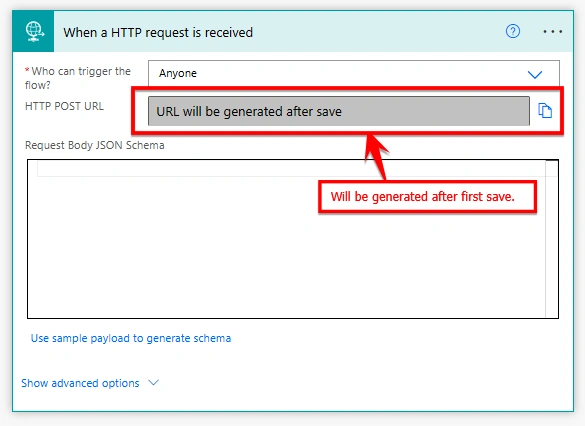
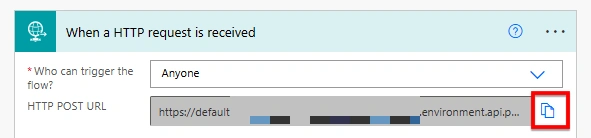
Create a new Instant flow and select trigger as: When an HTTP request is received
This trigger converts your flow into a callable API endpoint.
Trigger Option: Who Can Trigger the Flow?
| Option | Who Can Call the Flow | Authentication Required | Explantion | Risk Level |
|---|---|---|---|---|
| Anyone | Any person/system with the URL | No authentication | The flow becomes publicly callable. If someone has the URL, they can trigger it. Suitable for demos or temporary integrations, but not recommended for production without additional validation (like secret keys). | High (URL exposure risk) |
| Any user in my tenant | Any authenticated user in your Microsoft 365 tenant | Azure AD login required | Only authenticated users within your organization can call the endpoint. | Medium |
| Specific users in my tenant | Only selected users or service principals | Azure AD + restricted access | Access is restricted to defined users or service principals. This is the safest configuration and recommended for enterprise-grade integrations. | Low (recommended) |
Please Note:
1. For testing purpose configuration is set as : Anyone. You can select as per your need.
2. Also, you will notice the "HTTP POST URL" is empty. This URL is generated after you save the flow for the first time.
Defining the JSON Schema
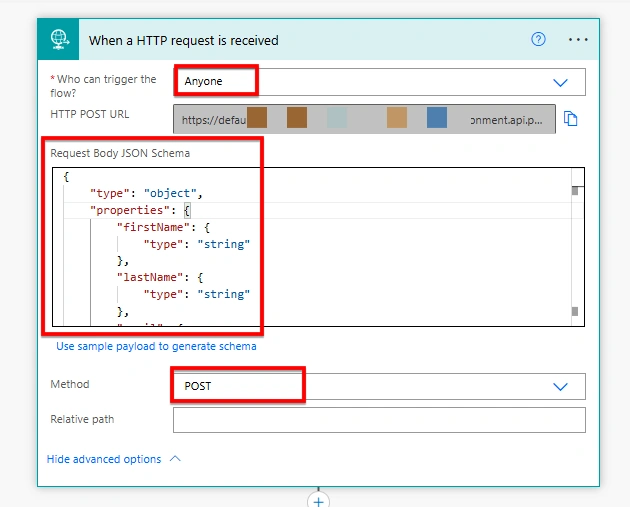
configure the schema as:
{
    "type": "object",
    "properties": {
        "firstName": { "type": "string" },
        "lastName": { "type": "string" },
        "email": { "type": "string" },
        "company": { "type": "string" }
    }
}
This schema does three important things:
It tells Power Automate how to parse incoming JSON.
It enables dynamic content mapping in later steps.
It prevents blank payload issues (
{ }body problems).
Without a schema, the flow may trigger successfully but the body will be unreadable and Dataverse fields will remain empty. Think of this as defining the input model of your API.
Step 3- Understanding and configuring the HTTP Method Correctly
By default, when sending structured JSON data, the request method must be POST.
Why?
GET requests are intended for retrieval.
POST requests are intended for sending structured data.
Only POST reliably carries a body payload.
Since we are sending employee details, POST is the correct method.
Always ensure:
Trigger method matches request method.
If method is changed, copy the regenerated URL.
Method alignment is critical for correct API behavior.
Step 4 – Add Compose (Optional)
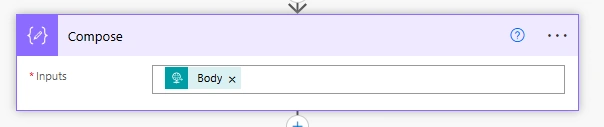
You added a Compose action with:
triggerBody()This is not required for production, but extremely useful for testing.
Why this step is powerful:
Confirms that body is received
Helps identify schema or header issues
Avoids silent Dataverse failures
In integration projects, always validate incoming payload before processing.
Step 5 – Add New Row in Dataverse
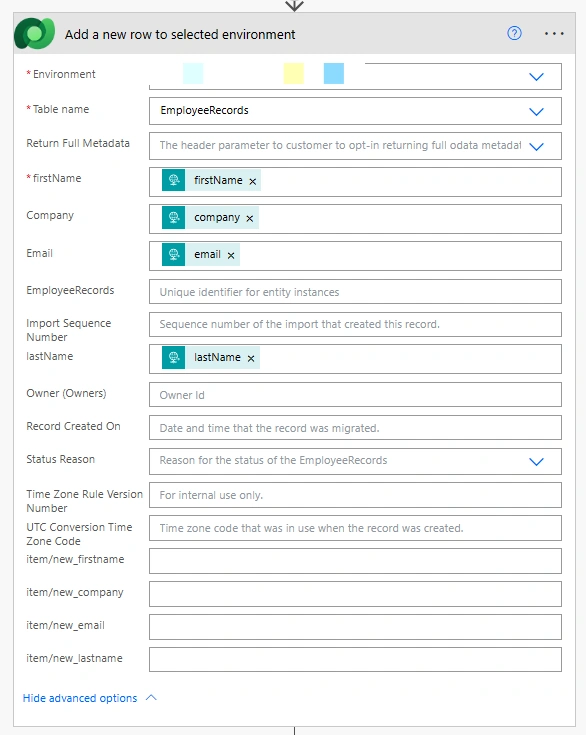
Add action: Add a new row to selected environment
Important Configurations:
Select correct Environment
Select correct Table (Employee Records)
Map fields using Dynamic Content
Step 6 – Structuring API Responses
To make the flow behave like a proper API, structured responses are configured.
Success Response with Status Code: 200
{
  "response": "Flow is successful"
}
This confirms:
Record successfully inserted
Request processed correctly
Failure Response with Status Code: 400
{
  "response": "Flow has failed"
}
This indicates:
Bad request
Validation failed
Required data missing
Returning proper HTTP status codes transforms your flow from simple automation into a standards-compliant API endpoint.
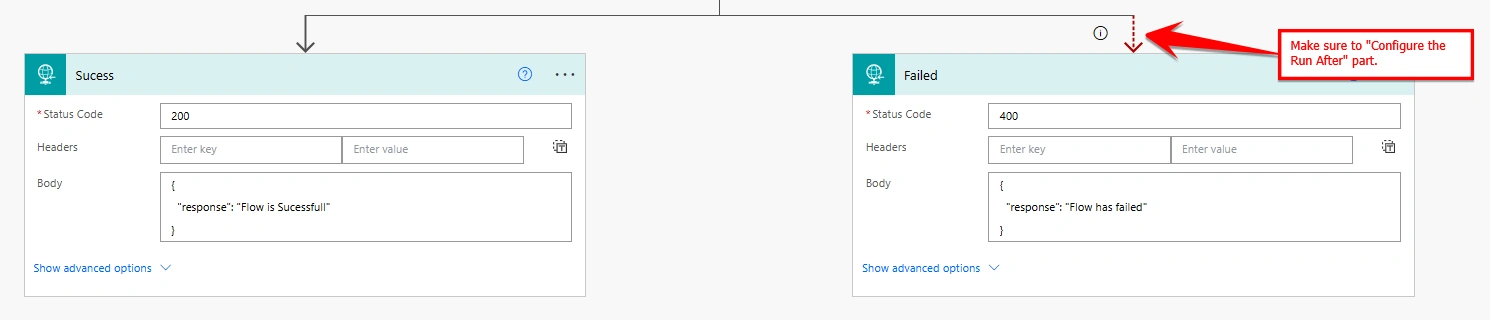
HTTP Status Codes communicate API state clearly as:
| Code | Meaning |
|---|---|
| 200 | Success |
| 400 | Client Error |
| 401 | Unauthorized |
| 500 | Server Error |
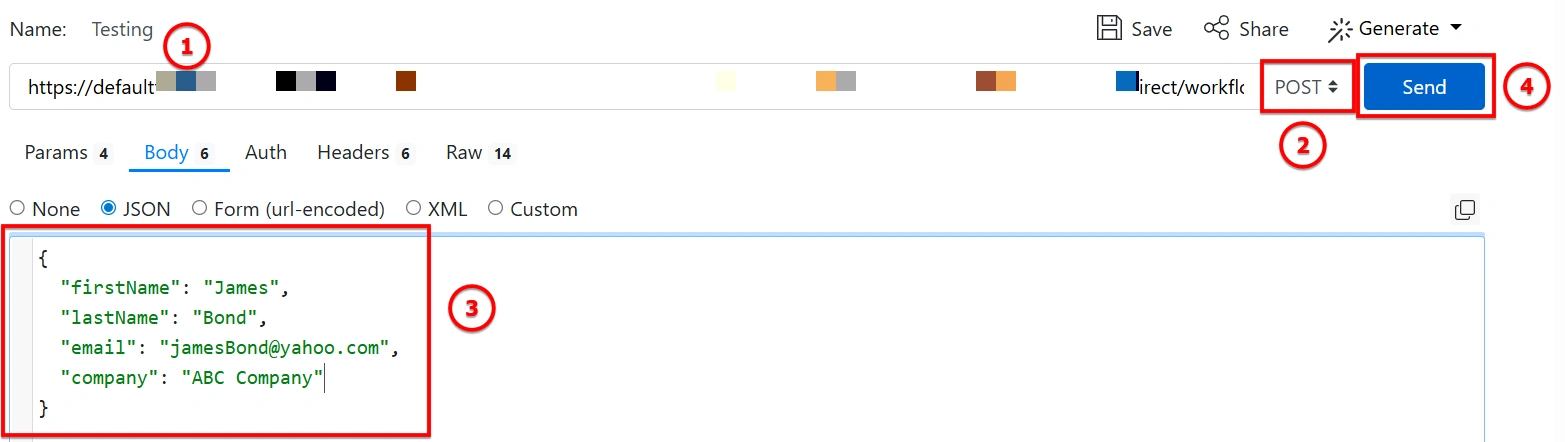
Step 7 – Testing via Postman
Configuration used:
URL : Copy the trigger URL generated and paste it in Postman.
Method: POST
Body (raw JSON):
{
  "firstName": "James",
  "lastName": "Bond",
  "email": "[email protected]",
  "company": "ABC Company"
}
Click "Send".
If everything works correctly:
You’ll receive:
{
  "response": "Flow is successful"
}
Status: 200 OK.

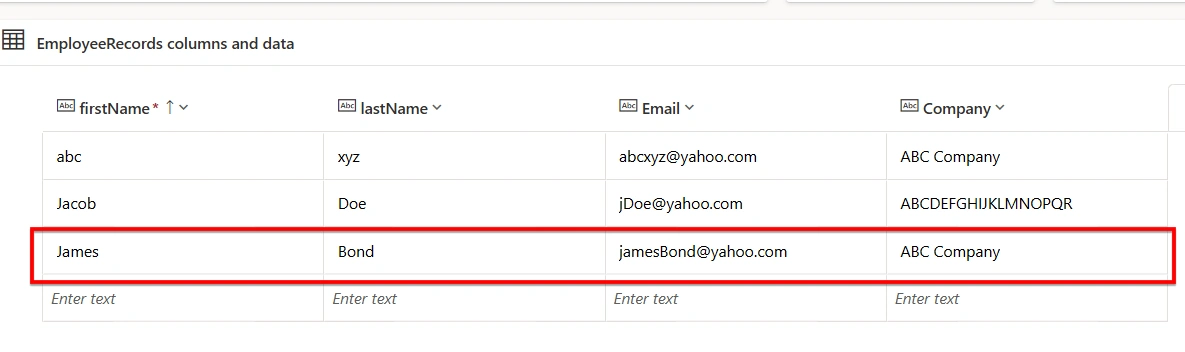
And a new record will be created in Dataverse : Employee Records Table.
Pro Tips for Developers
1. Security is Key
By default, if “Anyone” is allowed to trigger the flow, anyone with the URL can invoke it.
For production scenarios:
Use Trigger Conditions to validate a secret key from request headers.
Require Azure AD authentication.
Place API Management (APIM) in front of the flow.
Never expose anonymous endpoints without validation logic.
Security must be designed — not assumed.
2. Method Matters
POST is the standard method for structured payloads.
If you need to handle GET requests:
Change the method in the trigger’s Advanced Settings.
Remove body-dependent logic.
Pass parameters via query string instead.
Always design method usage intentionally.
3. Use the Async Pattern for Long-Running Flows
If your flow includes:
Complex approvals
External system calls
Long processing steps
Do not keep the client (external server) waiting.
Instead:
Immediately return a 202 or 200 response like:
"Request received"Process the logic asynchronously.
Alternatively:
Enable the Asynchronous Response setting in the trigger.
This prevents timeouts and improves integration reliability.
4. Consider Logging
For production-grade APIs, create a separate logging table:
Store:
Request body
Timestamp
Response code
Error message (if any)
This reduces debugging time when integrations fail.
Conclusion
Power Automate, when used with HTTP triggers and structured responses, becomes:
A lightweight API layer
An integration middleware
A secure entry point into Dataverse
With proper schema definition, method alignment, response handling, and security considerations, you can confidently use Power Automate as a low-code backend service.
Join the conversation! Your thoughts help the community grow.