

In my previous posts, I had given gave an intro to PnP JS Core library and the basic code snippets to access SharePoint objects, using PnP-JS-Core component,the reference to which is given below:
- Introduction to PnP-JS-Core
- Basic SharePoint web operations using PnP-JS-Core
- Filtering SharePoint Object Collections using PnP-JS-Core
The details mentioned at the links given above provide some basic idea about PnP-JS-Core library and how to use the library in accessing SharePoint.
Previously, I used PnP-JS-Core library to integrate with Angular JS to show the available sub sites from the parent site.
In this article, I’m going to simulate the same result by using React JS framework to display the sub sites with the basic details in a table format.
What are the files required?
- React.js A JavaScript library for building user interfaces.
- React-dom.js React package for working with DOM.
- Browser.js Enables you to compile the JavaScript with xml format with in text/babel to JavaScript.
- Pnp.js PnP JavaScript library.
- Fetch.js Used by PnP js file to handle web requests and responses (Required for IE).
- Promise.js Used by PnP js file to handle the Web requests and the responses (Required for IE).
Note: Fetch JS & Promise JS files, required to run PnP methods in some Browsers (IE).
Include Script Files
I have uploaded the required script file under Site Assets library and added the lines, given below, to our sample HTML file.
- <script type="text/javascript" src="/siteassets/scripts/pnp.min.js"></script>
- <script type="text/javascript" src="/siteassets/scripts/fetch.js"></script>
- <script type="text/javascript" src="/siteassets/scripts/promise.min.js"></script>
- <script type="text/javascript" src="/siteassets/scripts/react.js"></script>
- <script type="text/javascript" src="/siteassets/scripts/react-dom.js"></script>
- <script type="text/javascript" src="/siteassets/scripts/browser.min.js"></script>
Add the css styles given below to the sample HTML file. The Id with tableContainer is replaced with the sub sites table.
- <!-- To style table in html -->
- <style type="text/css">
- .web-table th{ background-color:#ddd; border:2px solid #fff;}
- .web-table td{ background-color:#eee; border:2px solid #fff;}
- .web-heading{ padding:2px;}
- </style>
- <div id='tableContainer'></div>
- <script type=’text/babel’>
- <!- - Insert React JSX Code - -></script>
To create a table with sub site details in the rows, we have to create a separate React element for each component:
- Row
- Table
- Container
- Render
Note: Including browser.js file is used to compile react jsx lines to JavaScript
Row component in React JSX
- //Create Row component
- var ResultItem = React.createClass({
- render: function(){
- return (
- <tr>
- <td>{this.props.webTitle} </td>
- <td>{this.props.webId} </td>
- <td>{this.props.webCreated.toLocaleString()}</td>
- <td>{this.props.webTemplate}</td>
- </tr>
- );
- }
- });
Table component in React JSX
- //Create Table component - Within a table component, we have declared the headings for the table
- var Results = React.createClass({
- render: function() {
- var resultItems = this.props.pnpResponse.map(function(result) {
- return <ResultItem webId = {
- result.Id
- }
- webTitle = {
- result.Title
- }
- webTemplate = {
- result.WebTemplate
- }
- webCreated = {
- new Date(result.Created)
- }
- />
- });
- return ( < table width = "100%"
- cellPadding = "10"
- cellSpacing = "2"
- className = "web-table" > < thead > < tr > < th > Title < /th> < th > Id < /th> < th > Created < /th> < th > Web Template < /th> < /tr> < /thead> < tbody > {
- resultItems
- } < /tbody> < /table>);
- }
- });
Container component in React JSX
- //ShowWebsApp is the parent component, which renders the table and each row component.
- var ShowWebsApp = React.createClass({
- getInitialState: function() {
- return {
- pnpResults: []
- }
- },
- componentDidMount: function() {
- this.getWebs();
- },
- showResults: function(response) {
- this.setState({
- pnpResults: response
- })
- },
- getWebs: function() {
- $pnp.sp.web.webs.get().then(function(result) {
- this.showResults(result);
- }.bind(this));
- },
- render: function() {
- return ( < div > < Results pnpResponse = {
- this.state.pnpResults
- }
- /> < /div>);
- }
- });
- getInitialState initializes the array object (pnpResults) to store the Web information.
- componentDidMount method is invoked only once and calls the custom method getWebs(), immediately after the rendering occurs .
- getWebs method is used in PnP JavaScript method to get the subsite values and store the result to pnpResults array object.
- Render method sets the pnpResults (array of subsites) object to the pnpResponse attribute by using setState react function.
Note: In the table component array of pnpResponse, value maps the value to each row by calling the map function.
Render component in ReactJSX
//Render the container component in HTML element with Id “tableContainer”
ReactDOM.render(<ShowWebsApp/>, document.getElementById('tableContainer'));
Full Sample Code
Insert the code, given below, in Script Editor or Content Editor Web-part.
- <script type="text/javascript" src="/siteassets/scripts/pnp.min.js"></script>
- <script type="text/javascript" src="/siteassets/scripts/fetch.js"></script>
- <script type="text/javascript" src="/siteassets/scripts/promise.min.js"></script>
- <script type="text/javascript" src="/siteassets/scripts/react.js"></script>
- <script type="text/javascript" src="/siteassets/scripts/react-dom.js"></script>
- <script type="text/javascript" src="/siteassets/scripts/browser.min.js"></script>
- <!-- To style table in html -->
- <style type="text/css">
- .web-table th {
- background-color: #ddd;
- border: 2px solid #fff;
- }
- .web-table td {
- background-color: #eee;
- border: 2px solid #fff;
- }
- .web-heading {
- padding: 2px;
- }
- </style>
- <div id='tableContainer'></div>
- <!-- browser.min.js file used to compile and transfer the scripts within text/babel script element to javascript readle for React javascript library -->
- <script type="text/babel"> //ShowWebsApp is the parent component, which renders the table and each row component. var ShowWebsApp = React.createClass({ getInitialState: function(){ return{ pnpResults: [] } }, componentDidMount: function() { this.getWebs(); }, showResults: function(response){ this.setState({ pnpResults: response }) }, getWebs: function(){ $pnp.sp.web.webs.get().then(function(result) { this.showResults(result); }.bind(this)); }, render: function(){ return (
- <div>
- <Results pnpResponse={this.state.pnpResults} /> </div> ); } }); //Create Table component - Within a table component, we have declared the headings for the table var Results = React.createClass({ render: function(){ var resultItems = this.props.pnpResponse.map(function(result){ return
- <ResultItem webId={result.Id} webTitle={result.Title} webTemplate={result.WebTemplate} webCreated={new Date(result.Created)} /> }); return(
- <table width="100%" cellPadding="10" cellSpacing="2" className="web-table">
- <thead>
- <tr>
- <th>Title</th>
- <th>Id</th>
- <th>Created</th>
- <th>Web Template</th>
- </tr>
- </thead>
- <tbody> {resultItems} </tbody>
- </table> ); } }); //Create Row component var ResultItem = React.createClass({ render: function(){ return (
- <tr>
- <td>{this.props.webTitle} </td>
- <td>{this.props.webId} </td>
- <td>{this.props.webCreated.toLocaleString()}</td>
- <td>{this.props.webTemplate}</td>
- </tr> ); } }); //Render the container component in html element with id “tableContainer” ReactDOM.render(
- <ShowWebsApp/>, document.getElementById('tableContainer')); </script>
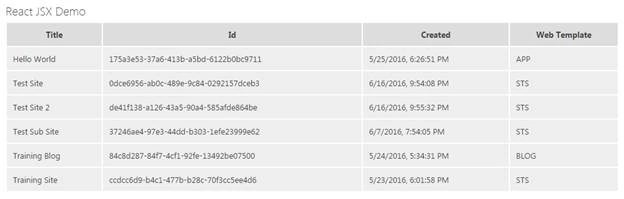
Conclusion
This article provides a simple example to list the sub sites in a table format, using React JS framework.
Click here to read this article from my blog too.
Vignesh ManiPosted Jul 6, 2016, 4:20 PM
Nice
kalu singh raoPosted Jul 6, 2016, 1:34 AM
Nice...