

Introduction
This article demonstrates how to create and use a Panel Control in ASP.NET with C#. This article starts with the introduction of the panel in ASP.NET. After that, it demonstrates how to position the click event handler of a panel.
Creating a Panel
The Panel tag is,
- <asp:Panel ID="Panel1" runat="server"></asp:Panel>
Panel control is derived from the WebControl class. Hence it inherits all the properties, methods and events of the same. It does not have any method or event of its own.
Steps
- In the 1st row, drag a radio button list and go to radio button list task-> edit item add and enable auto postback.
- In the 2nd row, drag a panel control and drag an HTML table and design it.
- Similarly, in 3rd, 4th, and 5th rows, drag a panel control and an HTML table and design it.
- Go to radio button list, double-click it, and write the code
The source code snippet creates a panel control and sets the name and content of a Pannel control.
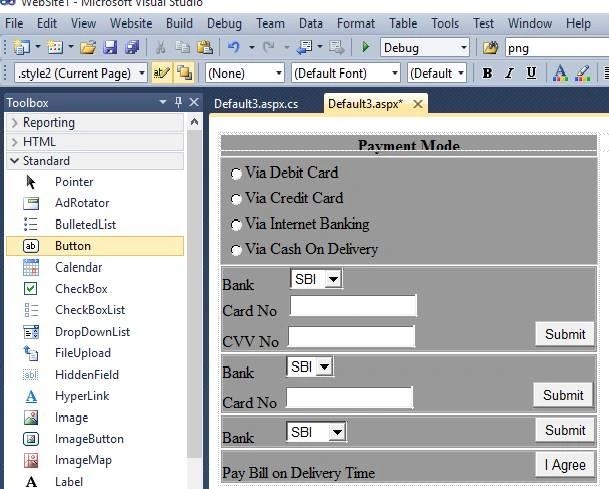
We can take an example of online payment mode for panel control in this. There are 3-4 panels; after selecting any option the respective panel appears on screen.
So if you select the 1st radio button then it will show you panel 1 ,similarly if you select the 2nd radio button then it will show you panel 2 , if you select the 3rd radio button then it will show you panel 3, and if you select the 4th radio button then it will show you panel 4.
Codes
- <%@ Page Language="C#" AutoEventWireup="true" CodeFile="Default3.aspx.cs" Inherits="Default3" %>
- <!DOCTYPE html PUBLIC "-//W3C//DTD XHTML 1.0 Transitional//EN" "http://www.w3.org/TR/xhtml1/DTD/xhtml1-transitional.dtd">
- <html xmlns="http://www.w3.org/1999/xhtml">
- <head runat="server">
- <title>Pannel Control</title>
- <style type="text/css">
- .style1
- {
- text-align: center;
- background-color: #999999;
- }
- .style2
- {
- background-color: #999999;
- }
- </style>
- </head>
- <body>
- <form id="form1" runat="server">
- <div>
- <table class="style3" align="center">
- <tr>
- <td class="style1">
- <strong style="background-color: #999999">Payment Mode</strong></td>
- </tr>
- <tr>
- <td class="style2">
- <asp:RadioButtonList ID="RadioButtonList1" runat="server" AutoPostBack="True"
- onselectedindexchanged="RadioButtonList1_SelectedIndexChanged">
- <asp:ListItem>Via Debit Card</asp:ListItem>
- <asp:ListItem>Via Credit Card</asp:ListItem>
- <asp:ListItem>Via Internet Banking</asp:ListItem>
- <asp:ListItem>Via Cash On Delivery</asp:ListItem>
- </asp:RadioButtonList>
- </td>
- </tr>
- <tr>
- <td class="style2">
- <asp:Panel ID="Panel1" runat="server" CssClass="style2">
- Bank
- <asp:DropDownList ID="DropDownList2" runat="server" AutoPostBack="True">
- <asp:ListItem>SBI</asp:ListItem>
- <asp:ListItem>PNB</asp:ListItem>
- <asp:ListItem>CBI</asp:ListItem>
- <asp:ListItem>BOI</asp:ListItem>
- </asp:DropDownList>
- <br />
- Card No
- <asp:TextBox ID="TextBox3" runat="server"></asp:TextBox>
- <br />
- CVV No
- <asp:TextBox ID="TextBox4" runat="server"></asp:TextBox>
- </asp:Panel>
- </td>
- </tr>
- <tr>
- <td class="style2">
- <asp:Panel ID="Panel2" runat="server" CssClass="style2">
- Bank
- <asp:DropDownList ID="DropDownList3" runat="server">
- <asp:ListItem>SBI</asp:ListItem>
- <asp:ListItem>IOB</asp:ListItem>
- </asp:DropDownList>
- <br />
- Card No
- <asp:TextBox ID="TextBox5" runat="server"></asp:TextBox>
- </asp:Panel>
- </td>
- </tr>
- <tr>
- <td class="style2">
- <asp:Panel ID="Panel3" runat="server" CssClass="style2">
- Bank
- <asp:DropDownList ID="DropDownList4" runat="server">
- <asp:ListItem>SBI</asp:ListItem>
- <asp:ListItem>IOB</asp:ListItem>
- <asp:ListItem>CBI</asp:ListItem>
- <asp:ListItem>PNB</asp:ListItem>
- <asp:ListItem>HDFC</asp:ListItem>
- </asp:DropDownList>
- </asp:Panel>
- </td>
- </tr>
- <tr>
- <td class="style2">
- <asp:Panel ID="Panel4" runat="server" CssClass="style2">
- Pay Bill on Delivery Time
- <asp:Button ID="Button5" runat="server" Text="I Agree" />
- </asp:Panel>
- </td> </tr></table>
- </div>
- </form>
- </body>
- </html>
The design looks like Figure 1.
code
- using System;
- using System.Collections.Generic;
- using System.Linq;
- using System.Web;
- using System.Web.UI;
- using System.Web.UI.WebControls;
- public partial class Default3 : System.Web.UI.Page
- {
- protected void Page_Load(object sender, EventArgs e)
- {
- Panel1.Visible = false;
- Panel2.Visible = false;
- Panel3.Visible = false;
- Panel4.Visible = false;
- }
- protected void RadioButtonList1_SelectedIndexChanged(object sender, EventArgs e)
- {
- if (RadioButtonList1.SelectedIndex == 0)
- {
- Panel1.Visible = true;
- }
- if (RadioButtonList1.SelectedIndex == 1)
- {
- Panel2.Visible = true;
- }
- if (RadioButtonList1.SelectedIndex == 2)
- {
- Panel3.Visible = true;
- }
- if (RadioButtonList1.SelectedIndex == 3)
- {
- Panel4.Visible = true;
- }
- }}
Output
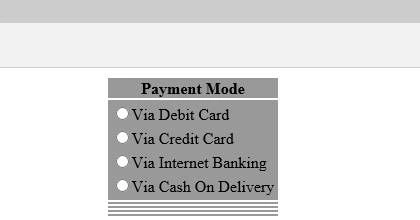
The output of the panel in the browser is like figure 2.
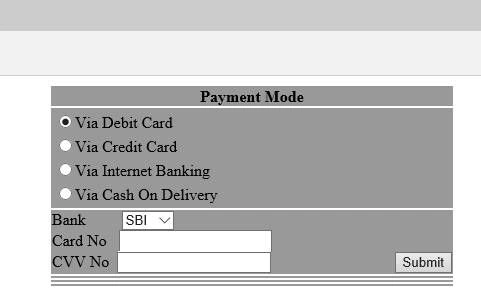
When you click on any option, like Debit Card, the Debit Card Panel appears like Figure 3,
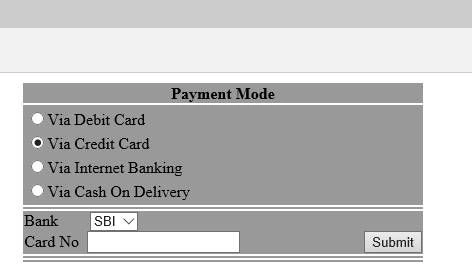
And when you click on another option like figure 4:
Summary
In this article, I discussed how we can create a Panel Control in ASP.NET with C#. We saw how with the help of Radio Button, we can control the panel and we can first set the panel invisible and on every radio button, they are seperately visible.
Sunil JaswaniPosted Dec 6, 2018, 5:26 AM
The article is good but some files are missing in Download SourceCode.rar Like Default.aspx,etc.
Reshma BhalekarPosted Sep 18, 2018, 12:38 AM
Hi Yogesh, I have one question. why you have not created bank drop down list as common for all? If we create common bank list for all the payment mode then code will be less just show hide other details.
DeepanPosted Sep 17, 2018, 11:07 AM
Good article for beginners