

SharePoint Add-ins are self-contained extensions of SharePoint websites that you create, and that run without custom code on the SharePoint server.
In SharePoint hosted apps, you can use almost all the SharePoint components like list, content type, pages etc.…
All business logic in a SharePoint-hosted add-in, use JavaScript, either directly on a custom page or as a JavaScript file that is referenced from a custom page. A JavaScript version of the SharePoint Object Model (JSOM) is available to make it simple for the add-in to perform create, read, update, and delete (CRUD) operations on SharePoint data.
Over View of Example
- Create List in Office 365 Site
- Create Project in Visual Studio (Selecting SharePoint Hosted App)
- Provide User Interface
- Business logic under .js file (Insert Data)
- Deploy the Solution to office 365 Site.
Let’s take an example of SharePoint hosted app.
Step - 1 (Create List in Office 365 Site)
Open your office 365 Share Point site and create one list. Below find the steps and screen shots to create list with columns.
- Click on Site Settings
- Select New Option -> Select App-> Select Custom List.
- Provide List name ‘Employees’.
Now, we need to create some columns for this list.
- On Ribbon, Go to List Settings-> Under Columns Section Create three new columns.
- EmployeeName(Title Field renamed as EmployeeName), Salary, Address.
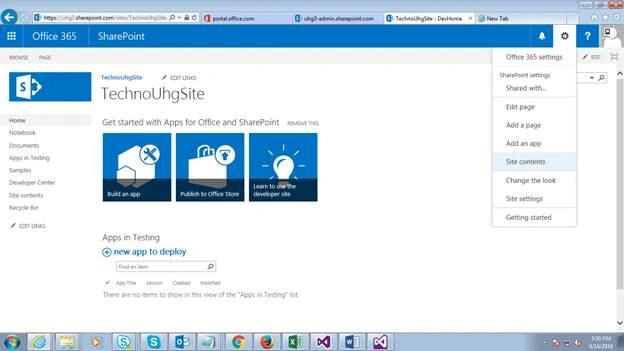
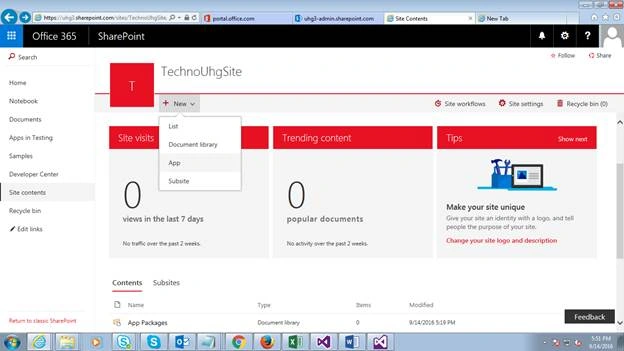
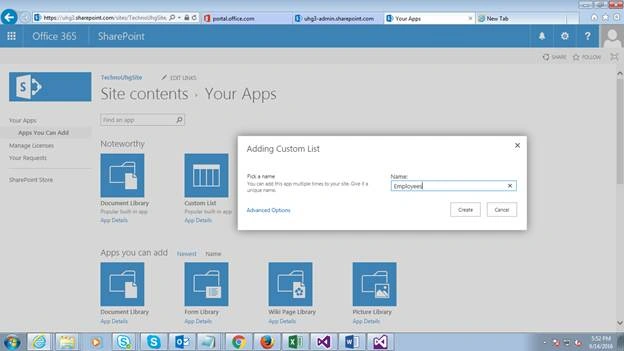
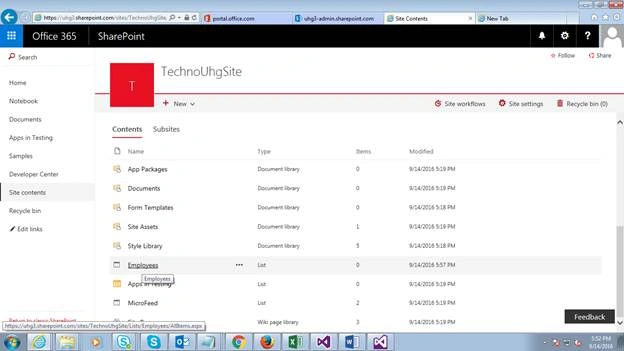
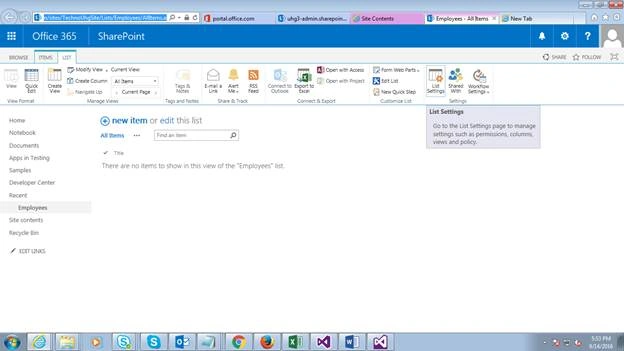
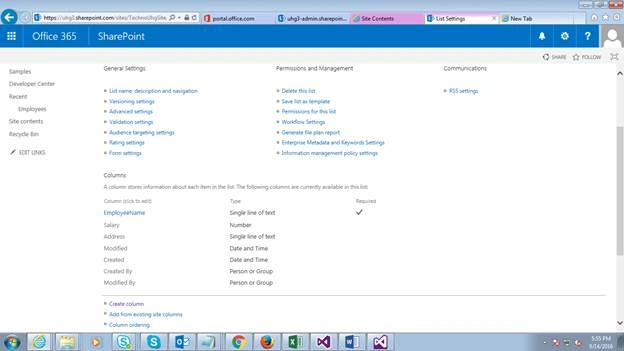
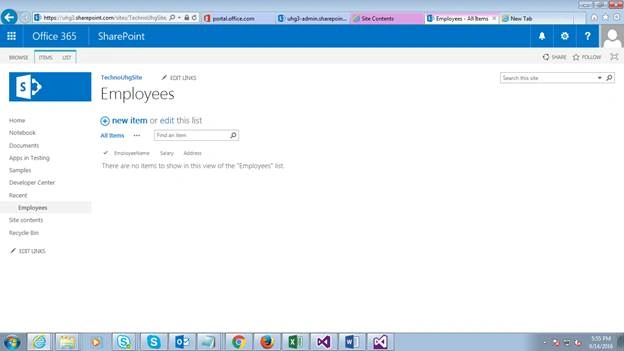
We have done creation of List with columns. Now, we have to insert the data to the list, using User Interface and business logic.
Step - 2 (Create Project in Visual Studio (Selecting SharePoint Hosted App)
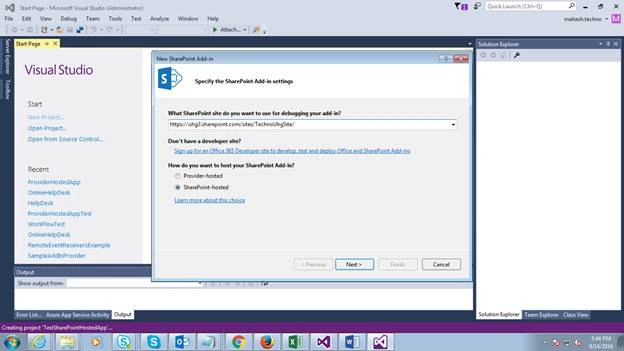
- Create a project name called ‘TestSharePointHostedApp’ by selecting SharePoint Add.
- Provide the office 365 SharePoint Url and select the SharePoint-Hosted App option.
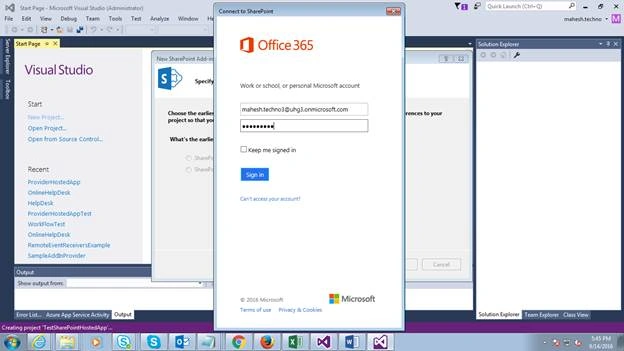
- It will ask credentials for authenticating the Site. Provide UserName and Password.
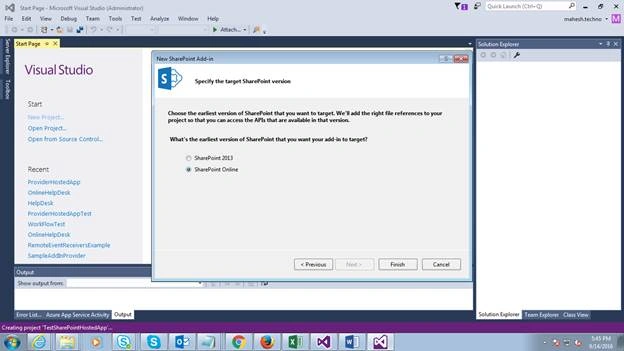
- It will automatically selects SharePoint Online and click on Finish button.
Below, find the Screenshots for creating the SharePoint Hosted App through Visual Studio, using SharePoint hosted app.
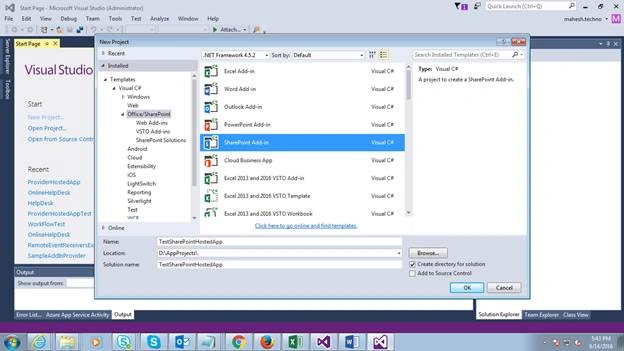
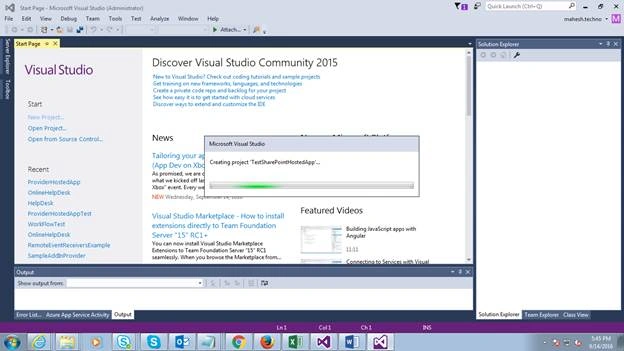
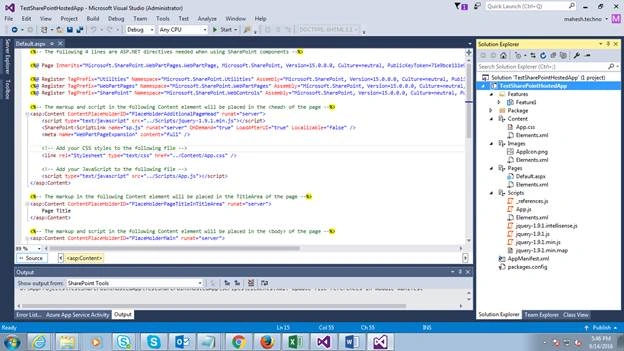
As of now, we have done creation of project through Visual studio. After creation of project, Project contains different hierarchy like pages, Scripts, AppManifest.xml and etc.
- Pages folder contains Default.aspx page.
- Scripts folder contains default scripts for usage of our pages.
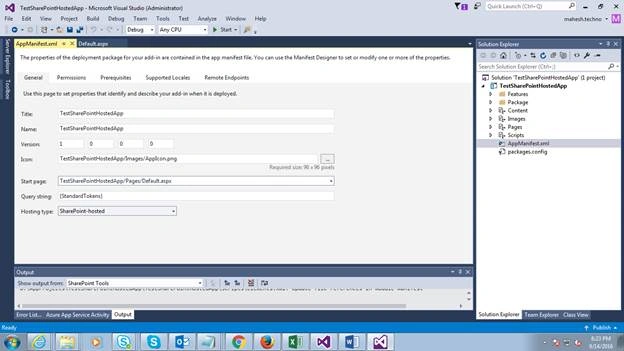
- AppManifest.xml explains general information about version, start page, permissions, language and etc.
Below find the screen shot for AppManifest.xml file.
Step - 3 (Provide User Interface)
We are going to provide some text boxes, labels, and buttons for Inserting and displaying the data.
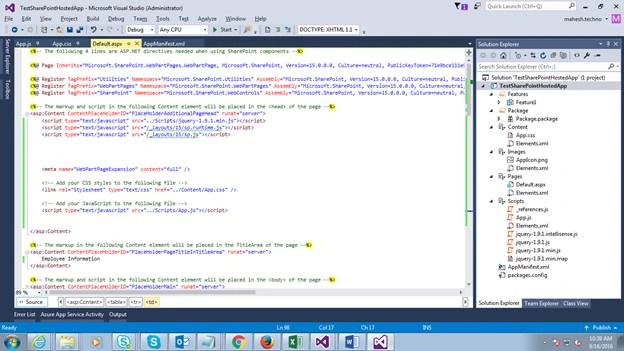
- Open default.aspx page under pages folder.
- You will find different sections, like PlaceHolderAdditionalPageHead, PlaceHolderPageTitleInTitleArea, PlaceHolderMain .
- Under PlaceHolderMain, write the below code for User Interface.
- <table class="centerTable">
- <tr>
- <td>
- <table>
- <tr>
- <td><span style="color: red; font: bold;"></span>EmployeeName </td>
- <td>
- <input type="text" id="empName" class="csValue" size="40" />
- </td>
- </tr>
- <tr>
- <td><span style="color: red; font: bold;"></span>Salary </td>
- <td>
- <input type="text" id="empSalary" class="csValue" size="40" />
- </td>
- </tr>
- <tr>
- <td><span style="color: red; font: bold;"></span>Address </td>
- <td>
- <%-- <input type="text" id="FeedBack" class="c1" />--%>
- <textarea name="Text1" cols="40" rows="5" id="empAddress" class="csValue"></textarea>
- </td>
- </tr>
- </table>
- </td>
- </tr>
- </table>
- <table>
- <tr>
- <td>
- <input type="button" value="Clear" id="btnClear" style="background-color: #4CAF50; border: none; color: white; padding: 7px 15px; text-align: center; text-decoration: none; display: inline-block; font-size: 14px; margin: 4px 2px; cursor: pointer;" />
- </td>
- <td>
- <input type="button" value="Submit" id="btnCreate" style="background-color: #4CAF50; border: none; color: white; padding: 7px 15px; text-align: center; text-decoration: none; display: inline-block; font-size: 14px; margin: 4px 2px; cursor: pointer;" />
- </td>
- </tr>
- </table>
- <table>
- <tr>
- <td></td>
- <td>
- <div id="dvMessage"></div>
- </td>
- </tr>
- </table>
- <table>
- <tr>
- <td>
- <table id="tblEmployees" class="mytable">
- </table>
- </td>
- </tr>
- </tabl
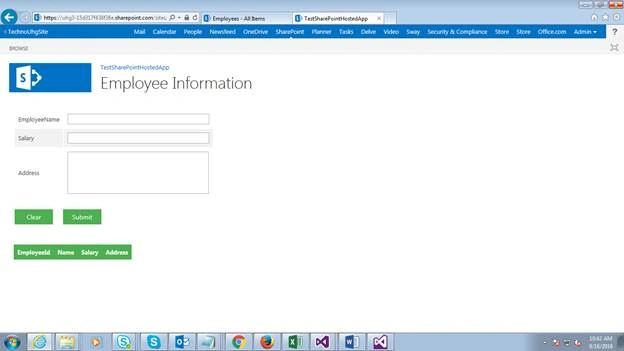
After writing the above code, User Interface will look like the below. You will not get a result immediately. Don’t bother about this. I have given this screenshot just for reference.
Step - 4 (Business logic under .js file (Insert and Display Data))
After completion of user Interface, we need to write the business logic for Insertion and Display operations. You can write business logic in App.js file or same page (default.aspx), or you can take separate .js file.
For this example, I am taking App.js file to write business logic. Please follow the below steps to write the code under App.js file.
- Write method for to get hostWebUrl, appWebUrl
- Method Name: manageQueryStringParameter(Parameter))
- tion manageQueryStringParameter(paramToRetrieve) {
- var params =
- document.URL.split("?")[1].split("&");
- var strParams = "";
- for (var i = 0; i < params.length; i = i + 1) {
- var singleParam = params[i].split("=");
- if (singleParam[0] == paramToRetrieve) {
- return singleParam[1];
- }
- }
- Write Methods for Inserting and Display operations.
Method names: DisplayEmployeeInfo(), InsertEmployeeInfo(), ClearEmployeeInfo() - Call the above methods for Insert, and Display buttons under $(document).ready(function () {}
- hostWebUrl = decodeURIComponent(manageQueryStringParameter('SPHostUrl'));
- appWebUrl = decodeURIComponent(manageQueryStringParameter('SPAppWebUrl'));
- DisplayEmployeeDetails();
- $("#btnCreate").on('click', function () {
- createEmployee();
- DisplayEmployeeDetails();
- });
- $("#btnClear").on('click', function () {
- $(".csValue").val('');
- });
The following method is used for retrieving data from the list and display in a table.
- //Get List items of Employee List
- function DisplayEmployeeDetails() {
- var contxt = new SP.ClientContext(appWebUrl);
- var appContxt = new SP.AppContextSite(contxt, hostWebUrl);
- var web = appContxt.get_web(); //Get the Web
- var list = web.get_lists().getByTitle("Employees"); //Get the List
- var empQuery = new SP.CamlQuery();
- empQuery.set_viewXml('<View><RowLimit></RowLimit>50</View>');
- var items = list.getItems(empQuery);
- contxt.load(list);
- contxt.load(items);
- var table = $("#tblEmployees");
- var html = "<thead><tr><th>EmployeeId</<th><th>Name</th><th>Salary</th><th>Address</th></tr></thead>";
- //Execute the Query Asynchronously
- contxt.executeQueryAsync(
- Function.createDelegate(this, function () {
- var itemInfo = '';
- var enumerator = items.getEnumerator();
- while (enumerator.moveNext()) {
- var currentEmpItem = enumerator.get_current();
- html += "<tr><td>" + currentEmpItem.get_item('ID') + "</td><td>" + currentEmpItem.get_item('Title') + "</td><td>" + currentEmpItem.get_item('Salary') + "</td><td>" + currentEmpItem.get_item('Address') + "</td></tr>";
- }
- table.html(html);
- }),
- Function.createDelegate(this, onQueryFailedGet)
- );
- }
- function onQueryFailedGet() {
- $("#dvMessage").text("Display failed " + arguments[1].get_message());
- }
- //Insert data into Employee List.
- function createEmployee() {
- var contxt = new SP.ClientContext(appWebUrl);
- var appContxt = new SP.AppContextSite(contxt, hostWebUrl);
- var web = appContxt.get_web(); //Get the Web
- var list = web.get_lists().getByTitle("Employees"); //Get the List
- var listCreationInformation = new SP.ListItemCreationInformation();
- var listItem = list.addItem(listCreationInformation);
- listItem.set_item("Title", $("#empName").val());
- listItem.set_item("Salary", $("#empSalary").val());
- listItem.set_item("Address", $("#empAddress").val());
- listItem.update(); //Update the list Item.
- contxt.load(listItem);
- //Execute the batch Asynchronously
- contxt.executeQueryAsync(
- Function.createDelegate(this, onQuerySucceededCreate),
- Function.createDelegate(this, onQueryFailedCreate));
- }
- function onQuerySucceededCreate() {
- $("#dvMessage").text("Employee Information Submitted Successfully");
- }
- function onQueryFailedCreate() {
- $("#dvMessage").text("Submission failed " + arguments[1].get_message());
- }
Open the Content-> App.css file and paste the below css.
- /* Place custom styles below */
- table.mytable {
- border-collapse: collapse;
- width: 100%;
- }
- th, td {
- text-align: left;
- padding: 8px;
- }
- tr:nth-child(even){background-color: #f2f2f2}
- th {
- background-color: #4CAF50;
- color: white;
- }
- //-------------------------------------------------------------------------------//
- 'use strict';
- var hostWebUrl;
- var appWebUrl;
- var context = SP.ClientContext.get_current();
- var user = context.get_web().get_currentUser();
- // This code runs when the DOM is ready and creates a context object which is needed to use the SharePoint object model
- $(document).ready(function () {
- hostWebUrl = decodeURIComponent(manageQueryStringParameter('SPHostUrl'));
- appWebUrl = decodeURIComponent(manageQueryStringParameter('SPAppWebUrl'));
- DisplayEmployeeDetails();
- $("#btnCreate").on('click', function () {
- createEmployee();
- DisplayEmployeeDetails();
- });
- $("#btnClear").on('click', function () {
- $(".csValue").val('');
- });
- });
- function manageQueryStringParameter(paramToRetrieve) {
- var params =
- document.URL.split("?")[1].split("&");
- var strParams = "";
- for (var i = 0; i < params.length; i = i + 1) {
- var singleParam = params[i].split("=");
- if (singleParam[0] == paramToRetrieve) {
- return singleParam[1];
- }
- }
- }
- //Get List items of Employee List
- function DisplayEmployeeDetails() {
- var contxt = new SP.ClientContext(appWebUrl);
- var appContxt = new SP.AppContextSite(contxt, hostWebUrl);
- var web = appContxt.get_web(); //Get the Web
- var list = web.get_lists().getByTitle("Employees"); //Get the List
- var empQuery = new SP.CamlQuery();
- empQuery.set_viewXml('<View><RowLimit></RowLimit>50</View>');
- var items = list.getItems(empQuery);
- contxt.load(list);
- contxt.load(items);
- var table = $("#tblEmployees");
- var html = "<thead><tr><th>EmployeeId</<th><th>Name</th><th>Salary</th><th>Address</th></tr></thead>";
- //Execute the Query Asynchronously
- contxt.executeQueryAsync(
- Function.createDelegate(this, function () {
- var itemInfo = '';
- var enumerator = items.getEnumerator();
- while (enumerator.moveNext()) {
- var currentEmpItem = enumerator.get_current();
- html += "<tr><td>" + currentEmpItem.get_item('ID') + "</td><td>" + currentEmpItem.get_item('Title') + "</td><td>" + currentEmpItem.get_item('Salary') + "</td><td>" + currentEmpItem.get_item('Address') + "</td></tr>";
- }
- table.html(html);
- }),
- Function.createDelegate(this, onQueryFailedGet)
- );
- }
- function onQueryFailedGet() {
- $("#dvMessage").text("Display failed " + arguments[1].get_message());
- }
- //Insert data into Employee List.
- function createEmployee() {
- var contxt = new SP.ClientContext(appWebUrl);
- var appContxt = new SP.AppContextSite(contxt, hostWebUrl);
- var web = appContxt.get_web(); //Get the Web
- var list = web.get_lists().getByTitle("Employees"); //Get the List
- var listCreationInformation = new SP.ListItemCreationInformation();
- var listItem = list.addItem(listCreationInformation);
- listItem.set_item("Title", $("#empName").val());
- listItem.set_item("Salary", $("#empSalary").val());
- listItem.set_item("Address", $("#empAddress").val());
- listItem.update(); //Update the list Item.
- contxt.load(listItem);
- //Execute the batch Asynchronously
- contxt.executeQueryAsync(
- Function.createDelegate(this, onQuerySucceededCreate),
- Function.createDelegate(this, onQueryFailedCreate));
- }
- function onQuerySucceededCreate() {
- $("#dvMessage").text("Employee Information Submitted Successfully");
- }
- function onQueryFailedCreate() {
- $("#dvMessage").text("Submission failed " + arguments[1].get_message());
- }
- // This function prepares, loads, and then executes a SharePoint query to get the current users information
- function getUserName() {
- context.load(user);
- context.executeQueryAsync(onGetUserNameSuccess, onGetUserNameFail);
- }
- // This function is executed if the above call is successful
- // It replaces the contents of the 'message' element with the user name
- function onGetUserNameSuccess() {
- $('#message').text('Hello ' + user.get_title());
- }
- // This function is executed if the above call fails
- function onGetUserNameFail(sender, args) {
- alert('Failed to get user name. Error:' + args.get_message());
- }
- //------------------------------------------------------------//
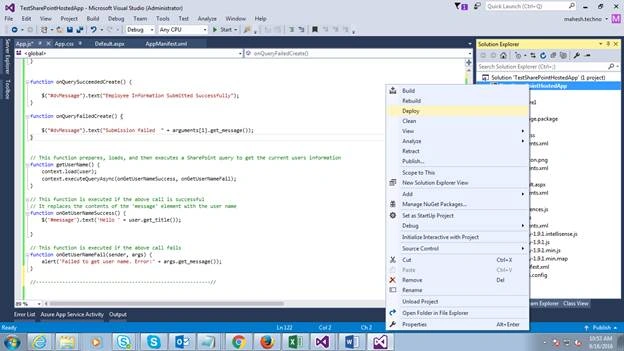
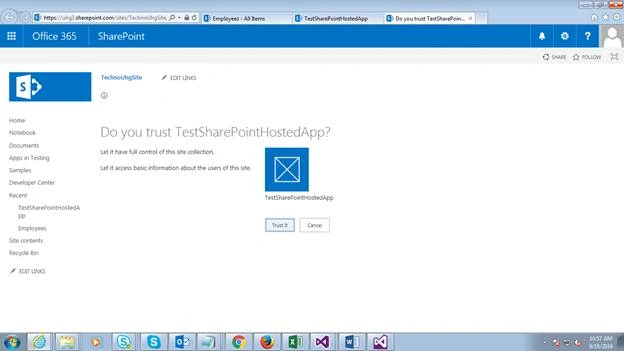
Deploy the solution to Office 365 site. Follow these steps to deploy the solution.
- Right click on project and select the option Deploy.
- Trust the App for the Site, Click on Trust it.
- Add the Employee Details like Employee Name, Salary, Address and then, click on Submit button.
- If you want, you can clear the data using Clear button.
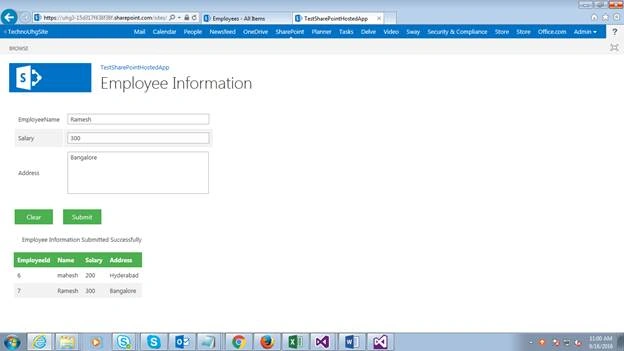
We have done the Share point hosted app basic operations, like Insertion and Display the data. Please let me know if you have any queries.
- Attaching code file as well. You can download and try it.
References used- https://msdn.microsoft.com/en-us/library/office/fp179930.aspx
Mohammed TahirPosted Mar 30, 2017, 2:04 AM
Nice Job dear mahesh,
Vipin TyagiPosted Sep 21, 2016, 8:19 AM
Nice article Mahesh. To get AppWebUrl or any query string value you can just use var appWebUrl=GetUrlKeyValue('SPAppWebUrl'); There is no need to write extra lines of code.Correct me if I'm wrong.
Tarun DPosted Sep 20, 2016, 6:39 AM
Good one..