

The Open Data Protocol (OData) is a protocol to request data through a query string.
The Open Data Protocol (OData) is a protocol to access data on the web. It provides a uniform way to query and manipulate data sets through CRUD operations.
This article shows how to create an OData v4 endpoint that supports Get operations.
This article has two sections:
- Creating OData serviceGet methods.
- Consuming OData service Get methods using AngularJS.
Why we need an OData Service?
Advantages
- OData is based on RESTful architecture, so we can retrieve data based on an URL query string.
- OData supports HTTP, Atom Pub as well as JSON format.
- It is very lightweight to use. Since it is lightweight, the performance is very good while interacting between client and service.
- It supports for any type of data source. Even you can use your own custom class as a data source.
- You can create your own custom methods and expose it.
- It supports different HTTP methods:
- GET: Gets one or many entries.
- POST: Create a new entry.
- PUT: Update an existing entry.
- DELETE: Remove an entry.
Limitations
- It is much less secure as it is purely URL based.
- As per my understanding, OData does not support every query operator in LINQ like Filter, Skip, Take etc.
Create the Visual Studio Project
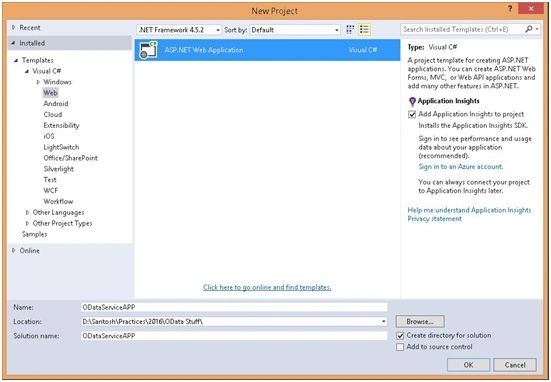
In Visual Studio, from the File menu, select New > Project.
Expand Installed > Templates > Visual C# > Web, and select the ASP.NET Web Application template. Name the project "ODataServiceApp".
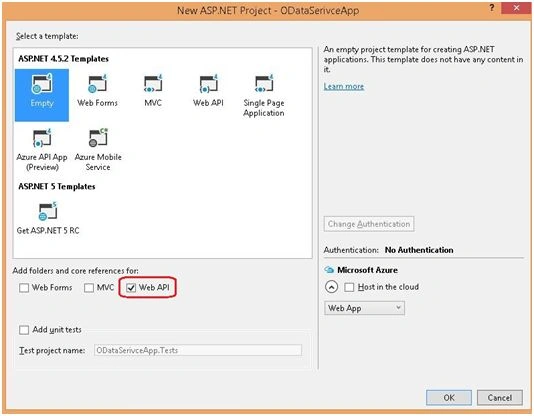
In the New Project dialog, select the Empty template. Click Web APIcheckbox. Click OK.
Install the OData Packages
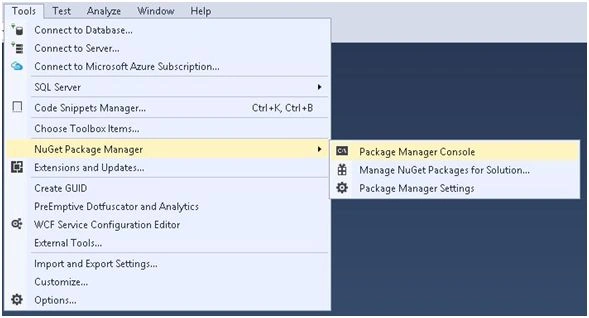
From the Tools menu, select NuGet Package Manager > Package Manager Console. Run the following command in the Package Manager Console.
PM> Install-Package Microsoft.AspNet.OData
This command installs the latest OData NuGet packages.
Note: You can install OData either from Package Manager Console or Package Manager Console for Solution.
Add Model Classes
A model is a class that contains data entity in the application.
In Solution Explorer, Right-click the Model folder. From the context menu, select Add > Class.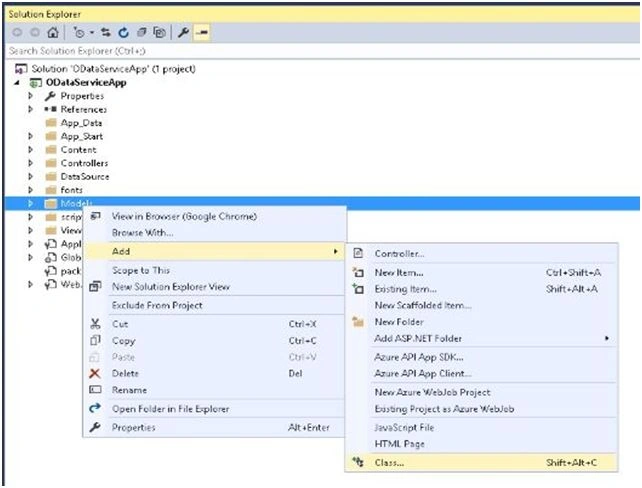
Add two model class Course.cs and Subject.cs under Model folder.
- using System;
- using System.Collections.Generic;
- using System.Linq;
- using System.Web;
- using System.ComponentModel.DataAnnotations;
- namespace ODataServiceApp.Models
- {
- publicclassCourse
- {
- [Key]
- publicString ID
- {
- get;
- set;
- }
- [Required]
- publicString Name
- {
- get;
- set;
- }
- publicString Description
- {
- get;
- set;
- }
- publicList < Subject > Subjects
- {
- get;
- set;
- }
- }
- }
- using System;
- using System.Collections.Generic;
- using System.ComponentModel.DataAnnotations;
- using System.Linq;
- using System.Web;
- namespace ODataServiceApp.Models
- {
- publicclassSubject
- {
- [Key]
- publicString ID
- {
- get;
- set;
- }
- [Required]
- publicString Name
- {
- get;
- set;
- }
- }
- }
Inline data source
This example uses inline data sources. The below steps describe how to to create the inline data source.
Add a folder DataSource and add a class with name SampleDataSources.cs with the code below:
- using System;
- using System.Collections.Generic;
- using System.Linq;
- using System.Web;
- using ODataServiceApp.Models;
- namespace ODataServiceApp.DataSource
- {
- publicclassDemoDataSources
- {
- privatestaticDemoDataSources instance
- = null;
- publicstaticDemoDataSources Instance
- {
- get
- {
- if (instance == null)
- {
- instance = newDemoDataSources();
- }
- return instance;
- }
- }
- publicList < Course > Courses
- {
- get;
- set;
- }
- publicList < Subject > Subjects
- {
- get;
- set;
- }
- private DemoDataSources()
- {
- this.Reset();
- this.Initialize();
- }
- publicvoid Reset()
- {
- this.Courses = newList < Course >
- ();
- this.Subjects = newList < Subject >
- ();
- }
- publicvoid Initialize()
- {
- this.Subjects.AddRange(newList <
- Subject > ()
- {
- newSubject()
- {
- ID = "0",
- Name = "C"
- },
- newSubject()
- {
- ID = "1",
- Name = "C++"
- },
- newSubject()
- {
- ID = "2",
- Name = "Data Structure"
- },
- newSubject()
- {
- ID = "3",
- Name = ".Net"
- }
- });
- this.Courses.AddRange(newList <
- Course >
- {
- newCourse()
- {
- ID = "001",
- Name = "MCA",
- Subjects = newList < Subject >
- {
- Subjects[0],
- Subjects[1]
- },
- Description =
- "Master of Computer Application"
- },
- newCourse()
- {
- ID = "002",
- Name = "MBA",
- Description =
- "Master of Business Application",
- Subjects = newList < Subject >
- {
- Subjects[2],
- Subjects[3]
- }
- },
- newCourse()
- {
- ID = "003",
- Name = "CA",
- Description =
- "Chartered Accountant",
- },
- newCourse()
- {
- ID = "004",
- Name = "MA"
- }
- });
- }
- }
- }
Add two controller classes under the folder Controllers
First is controller for Courses,
- using System;
- using System.Collections.Generic;
- using System.Linq;
- using System.Web;
- using System.Web.Mvc;
- using ODataServiceApp.DataSource;
- using System.Web.Http;
- using System.Web.OData;
- namespace ODataServiceApp.Controllers
- {
- [EnableQuery]
- publicclassCourseController:
- ODataController
- {
- publicIHttpActionResult Get()
- {
- return Ok(DemoDataSources.Instance
- .Courses.AsQueryable());
- }
- }
- }
- using System;
- using System.Collections.Generic;
- using System.Linq;
- using System.Web;
- using System.Web.Mvc;
- using ODataServiceApp.DataSource;
- using System.Web.Http;
- using System.Web.OData;
- namespace ODataServiceApp.Controllers
- {
- [EnableQuery]
- publicclassSubjectsController:
- ODataController
- {
- publicIHttpActionResult Get()
- {
- return Ok(DemoDataSources.Instance
- .Subjects.AsQueryable());
- }
- }
- }
Modify the WebApiConfig.cs file under App_Startto configure the Endpoints.
- using System;
- using System.Collections.Generic;
- using System.Linq;
- using System.Web.Http;
- using ODataServiceApp.Models;
- using Microsoft.OData.Edm;
- using System.Web.OData.Batch;
- using System.Web.OData.Builder;
- using System.Web.OData.Extensions;
- namespace ODataServiceApp
- {
- publicstaticclassWebApiConfig
- {
- publicstaticvoid Register(
- HttpConfiguration config)
- {
- config.MapODataServiceRoute("odata",
- null, GetEdmModel(),
- newDefaultODataBatchHandler(
- GlobalConfiguration.DefaultServer
- ));
- config.EnsureInitialized();
- }
- privatestaticIEdmModel GetEdmModel()
- {
- ODataConventionModelBuilder builder
- = newODataConventionModelBuilder();
- builder.Namespace =
- "ODataServiceApp";
- builder.ContainerName =
- "DefaultContainer";
- builder.EntitySet < Course > (
- "Courses");
- builder.EntitySet < Subject > (
- "Subjects");
- var edmModel = builder.GetEdmModel();
- return edmModel;
- }
- }
- }
- Service document
http://localhost:[portNumber]/
- Service metadata
http://localhost:[portNumber]/$metadata
- Get Courses
http://localhost:[portNumber]/Courses
- Get Subjects
http://localhost:[portNumber]/Subjects
- Queries
http://localhost:[portNumber]/Courses?$filter=contains(Description,'Computer')
http://localhost:[portNumber]/Courses?$select=Name
http://localhost:[portNumber]/Courses?$expand=Subjects
http://localhost:[portNumber]/Subjects?$filter=contains(Name,'Structure')http://localhost:[portNumber]/Subjects?$select=Name
OData service creation is completed and now it’s time to consume it. It can be consumed in different ways; either using web application or web site etc. Scripting languages or frameworks can be used to consume the OData services. In the below example, websiteandAngularJS framework are used to consume OData service.
Consuming OData service Get methods
Steps to consume OData service Get methods
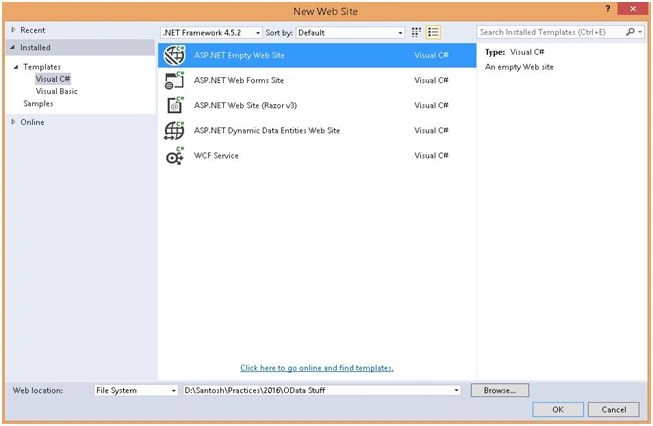
In Visual Studio, from the File menu, select New > Web Site.
Expand Installed > Templates > Visual C# > Web, and select the ASP.NET Empty Web Site template. Name the project "ODataWebAppClient".
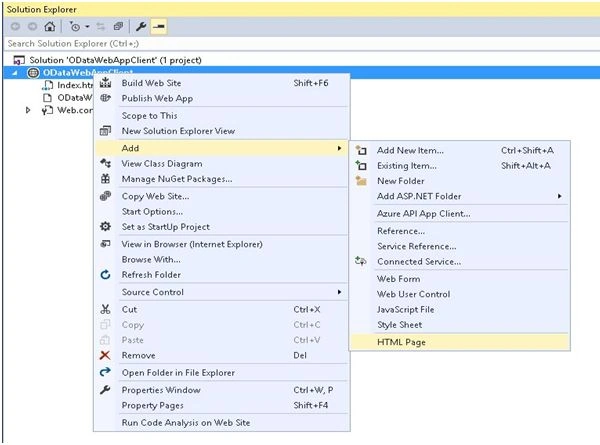
In Solution Explorer, Right-click and select Add > HTML Page and name it as “Index.html”.
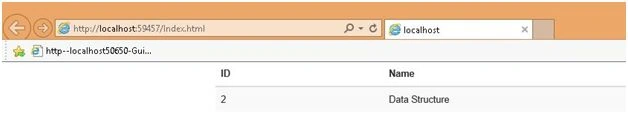
Index.htmlwith the code below:
- <!DOCTYPEhtml>
- <html>
- <head>
- <title></title>
- <metacharset="utf-8" />
- <linkrel="stylesheet" href="//maxcdn.bootstrapcdn.com/bootstrap/3.3.2/css/bootstrap.min.css">
- <scriptsrc="//code.jquery.com/jquery-2.1.3.min.js">
- </script>
- <scriptsrc="//ajax.googleapis.com/ajax/libs/angularjs/1.3.11/angular.min.js">
- </script>
- <scriptsrc="//cdnjs.cloudflare.com/ajax/libs/angular-ui-bootstrap/0.12.0/ui-bootstrap.min.js">
- </script>
- <scripttype="text/javascript">
- 'use strict'; var app = angular.module('OData',
- []); app.controller("ODataController",
- ['$scope', '$http', function ($scope,
- $http) { $scope.SubjectList = []; $scope.GetSubjectList
- = function () { $http({ method: 'GET',
- url: "http://localhost:52766/Subjects?$filter=contains(Name,'Structure')",
- async: true, cache: true, headers:
- { 'Content-Type': "application/json;
- charset=utf-8" } }) .success(function
- (data) { $scope.SubjectList = data.value;
- }) .error(function (data, status, headers,
- config) { alert(data.error.trim());
- }) }; $scope.GetSubjectList(); }]);
- </script>
- </head>
- <bodyng-app="OData" class="container">
- <divng-controller="ODataController" ng-class="row">
- <tableclass="table table-striped">
- <thead>
- <tr>
- <th>ID</th>
- <th>Name</th>
- </tr>
- </thead>
- <tbody>
- <trng-repeat="iteminSubjectList">
- <td>{{item.ID}}</td>
- <td>{{item.Name}}</td>
- </tr>
- </tbody>
- </table>
- </div>
- </body>
- </html>
- <linkrel="stylesheet" href="//maxcdn.bootstrapcdn.com/bootstrap/3.3.2/css/bootstrap.min.css">
- <scriptsrc="//code.jquery.com/jquery-2.1.3.min.js">
- </script>
- <scriptsrc="//ajax.googleapis.com/ajax/libs/angularjs/1.3.11/angular.min.js">
- </script>
- <scriptsrc="//cdnjs.cloudflare.com/ajax/libs/angular-ui-bootstrap/0.12.0/ui-bootstrap.min.js">
- </script>
Santosh Kumar AdidawarpuPosted May 11, 2016, 5:17 AM
Thanks everyone
Sr KarthigaPosted May 6, 2016, 9:04 PM
good one
Mithun PradhanPosted May 5, 2016, 4:43 AM
This article is very helpful...
Vivek KumarPosted Mar 23, 2016, 1:18 PM
Nice article santosh
siva rayiPosted Mar 6, 2016, 8:19 AM
Good one Santosh. Keep it up!
Sonu ChaudharyPosted Mar 5, 2016, 12:19 PM
Good one
Nitesh JhaPosted Mar 5, 2016, 4:12 AM
Good explanation Santosh
Kishan TheratipallyPosted Mar 4, 2016, 12:01 PM
Nice santhosh
Satya ReddyPosted Mar 4, 2016, 4:23 AM
Thanks for sharing and keep continue...
Amit Kumar SinghPosted Mar 4, 2016, 4:21 AM
Nice
Ranjeet PatraPosted Mar 4, 2016, 2:25 AM
Nice article to start with ODP
Always FRIENDPosted Mar 4, 2016, 2:18 AM
Nice article to learn and good explanation
Gowtham RajamanickamPosted Mar 4, 2016, 1:39 AM
Good one..
Ammar ShaukatPosted Mar 3, 2016, 1:00 PM
Nice share.
Raja TPosted Mar 3, 2016, 6:51 AM
Nice, Thanks for sharing
Vignesh ManiPosted Mar 3, 2016, 6:20 AM
NIce