

- Code First Approach.
- Model First Approach.
- Database First Approach.
Today, I shall be demonstrating a simple Code First approach, using an Entity Framework in ASP.NET MVC5 platform.
Some prerequisites are given below before you proceed further in this tutorial:
- Knowledge of ASP.NET MVC5.
- Knowledge of HTML.
- Knowledge of JavaScript.
- Knowledge of Bootstrap.
- Knowledge of jQuery.
- Knowledge of C# Programming.
You can download the complete source code for this tutorial or you can follow the step by step discussion given below. The sample code is being developed in Microsoft Visual Studio 2013 Ultimate.
Let's begin now.
Step 1
Create a new MVC project in Visual Studio and name it EFCodeFirstMvc.
Step 2
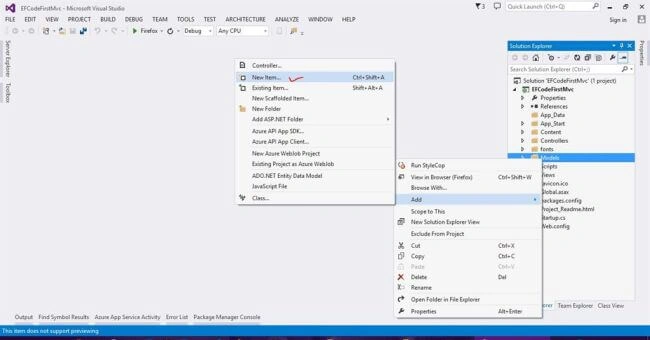
On Models folder, right click and click New Item, as shown below i.e.
Step 3
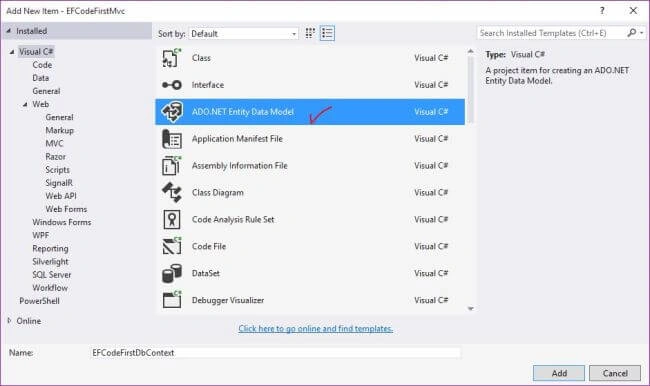
Now, click ADO.NET Entity Data Model and name it EFCodeFirstDbContext, as shown below i.e.
Step 4
Choose Empty Code First model and click finish, as shown below i.e.
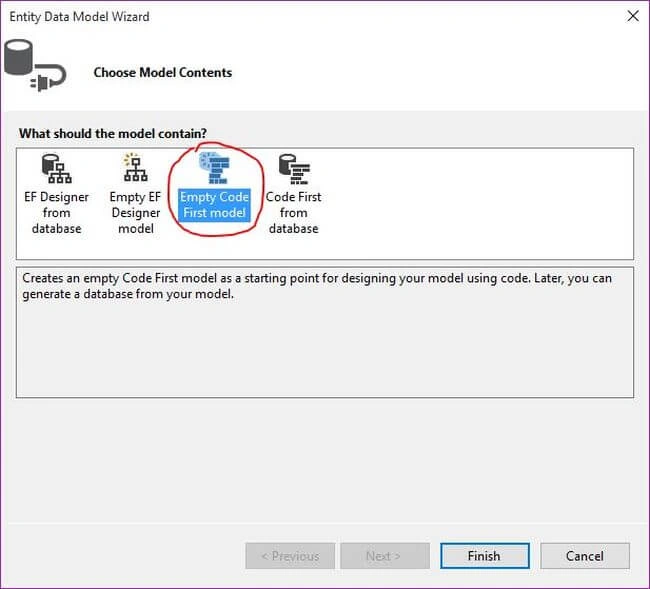
You will see that EFCodeFirstDbContext.cs file has been created under Models folder. We will change it later in this tutorial.
Step 5
Let's create our empty database without any tables into SQL Server database engine. I am using the script given below to create an empty database named db_code_first i.e.
- USE [master]
- GO
- /****** Object: Database [db_code_first] Script Date: 30-Mar-17 9:34:12 PM ******/
- IF EXISTS (SELECT name FROM sys.databases WHERE name = N'db_code_first')
- DROP DATABASE [db_code_first]
- GO
- /****** Object: Database [db_code_first] Script Date: 30-Mar-17 9:34:12 PM ******/
- IF NOT EXISTS (SELECT name FROM sys.databases WHERE name = N'db_code_first')
- BEGIN
- CREATE DATABASE [db_code_first]
- CONTAINMENT = NONE
- ON PRIMARY
- ( NAME = N'db_code_first', FILENAME = N'C:\SQL Server DATA Path\db_code_first.mdf' , SIZE = 3072KB , MAXSIZE = UNLIMITED, FILEGROWTH = 1024KB )
- LOG ON
- ( NAME = N'db_code_first_log', FILENAME = N'C:\SQL Server DATA Path\db_code_first_log.ldf' , SIZE = 1024KB , MAXSIZE = 2048GB , FILEGROWTH = 10%)
- END
- GO
- ALTER DATABASE [db_code_first] SET COMPATIBILITY_LEVEL = 120
- GO
- IF (1 = FULLTEXTSERVICEPROPERTY('IsFullTextInstalled'))
- begin
- EXEC [db_code_first].[dbo].[sp_fulltext_database] @action = 'enable'
- end
- GO
- ALTER DATABASE [db_code_first] SET ANSI_NULL_DEFAULT OFF
- GO
- ALTER DATABASE [db_code_first] SET ANSI_NULLS OFF
- GO
- ALTER DATABASE [db_code_first] SET ANSI_PADDING OFF
- GO
- ALTER DATABASE [db_code_first] SET ANSI_WARNINGS OFF
- GO
- ALTER DATABASE [db_code_first] SET ARITHABORT OFF
- GO
- ALTER DATABASE [db_code_first] SET AUTO_CLOSE OFF
- GO
- ALTER DATABASE [db_code_first] SET AUTO_SHRINK OFF
- GO
- ALTER DATABASE [db_code_first] SET AUTO_UPDATE_STATISTICS ON
- GO
- ALTER DATABASE [db_code_first] SET CURSOR_CLOSE_ON_COMMIT OFF
- GO
- ALTER DATABASE [db_code_first] SET CURSOR_DEFAULT GLOBAL
- GO
- ALTER DATABASE [db_code_first] SET CONCAT_NULL_YIELDS_NULL OFF
- GO
- ALTER DATABASE [db_code_first] SET NUMERIC_ROUNDABORT OFF
- GO
- ALTER DATABASE [db_code_first] SET QUOTED_IDENTIFIER OFF
- GO
- ALTER DATABASE [db_code_first] SET RECURSIVE_TRIGGERS OFF
- GO
- ALTER DATABASE [db_code_first] SET DISABLE_BROKER
- GO
- ALTER DATABASE [db_code_first] SET AUTO_UPDATE_STATISTICS_ASYNC OFF
- GO
- ALTER DATABASE [db_code_first] SET DATE_CORRELATION_OPTIMIZATION OFF
- GO
- ALTER DATABASE [db_code_first] SET TRUSTWORTHY OFF
- GO
- ALTER DATABASE [db_code_first] SET ALLOW_SNAPSHOT_ISOLATION OFF
- GO
- ALTER DATABASE [db_code_first] SET PARAMETERIZATION SIMPLE
- GO
- ALTER DATABASE [db_code_first] SET READ_COMMITTED_SNAPSHOT OFF
- GO
- ALTER DATABASE [db_code_first] SET HONOR_BROKER_PRIORITY OFF
- GO
- ALTER DATABASE [db_code_first] SET RECOVERY FULL
- GO
- ALTER DATABASE [db_code_first] SET MULTI_USER
- GO
- ALTER DATABASE [db_code_first] SET PAGE_VERIFY CHECKSUM
- GO
- ALTER DATABASE [db_code_first] SET DB_CHAINING OFF
- GO
- ALTER DATABASE [db_code_first] SET FILESTREAM( NON_TRANSACTED_ACCESS = OFF )
- GO
- ALTER DATABASE [db_code_first] SET TARGET_RECOVERY_TIME = 0 SECONDS
- GO
- ALTER DATABASE [db_code_first] SET DELAYED_DURABILITY = DISABLED
- GO
- EXEC sys.sp_db_vardecimal_storage_format N'db_code_first', N'ON'
- GO
- ALTER DATABASE [db_code_first] SET READ_WRITE
- GO
This script is auto-generated from SQL Server. You need to replace SQL Server DATA Path with your SQL Server data storage path in the script given above.
Step 6
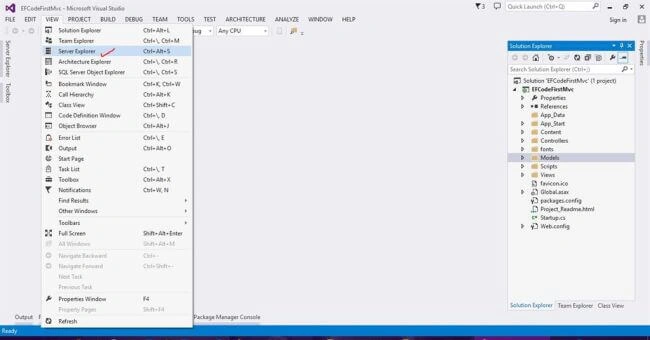
On View menu, click Server Explorer, as shown below i.e.
Step 7
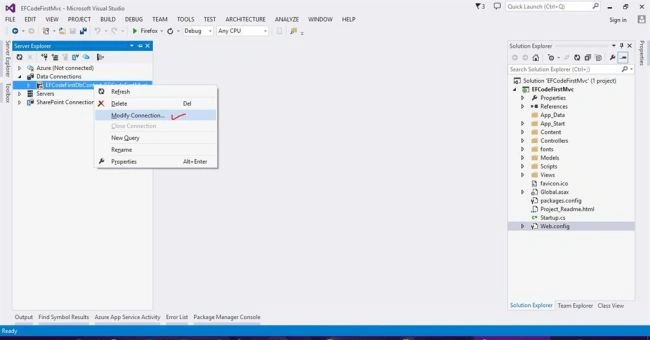
Let's modify our database connection settings, so that when we create our schema from the code, it will be automatically updated into SQL Server database. On Server Explorer Window, right click EFCodeFirstDbContext connection and click Modifying connection, as shown below i.e.
Step 8
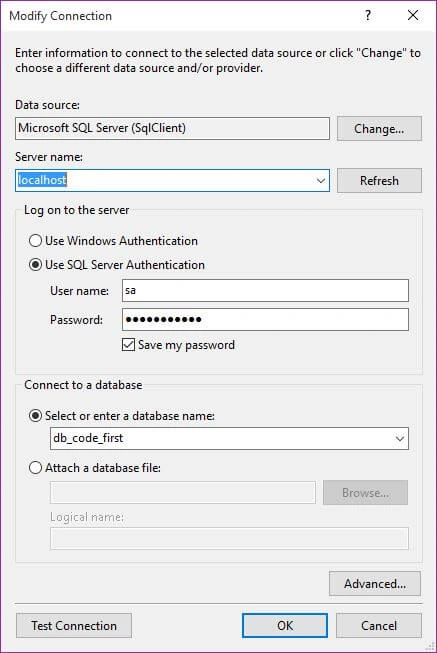
Provide your connection settings into connection settings Window and click OK i.e.
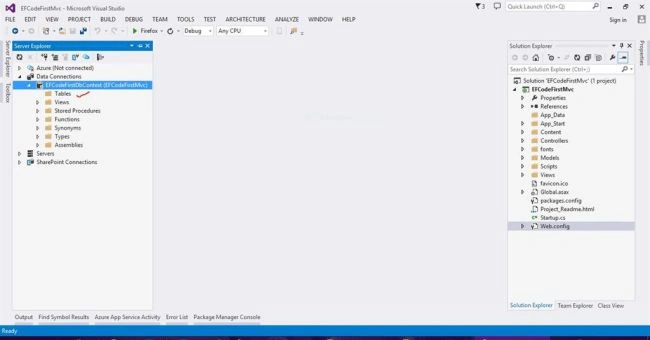
You will notice that your database is empty and there is no table currently existing, as shown below i.e.
Step 9
Open the EFCodeFirstDbContext.cs file and replace the code given below in it i.e.
- namespace EFCodeFirstMvc.Models
- {
- using System;
- using System.ComponentModel.DataAnnotations;
- using System.Data.Entity;
- using System.Linq;
- public class EFCodeFirstDbContext : DbContext
- {
- // Your context has been configured to use a 'EFCodeFirstModel' connection string from your application's
- // configuration file (App.config or Web.config). By default, this connection string targets the
- // 'EFCodeFirstMvc.Models.EFCodeFirstModel' database on your LocalDb instance.
- //
- // If you wish to target a different database and/or database provider, modify the 'EFCodeFirstModel'
- // connection string in the application configuration file.
- public EFCodeFirstDbContext()
- : base("name=EFCodeFirstDbContext")
- {
- }
- // Add a DbSet for each entity type that you want to include in your model. For more information
- // on configuring and using a Code First model, see http://go.microsoft.com/fwlink/?LinkId=390109.
- public virtual DbSet<LoginEntity> LoginEntities { get; set; }
- }
- public class LoginEntity
- {
- [Display(Name = "Id")]
- public int Id { get; set; }
- [Display(Name = "Enter Username")]
- public string Username { get; set; }
- [Display(Name = "Enter Password")]
- public string Password { get; set; }
- //[Display(Name = "Enter Full Name")]
- //public string FullName { get; set; }
- }
- }
In the code given above, we have created our table called LoginEntities and it tells our DB context about our table with the line given below i.e.
- public virtual DbSet<LoginEntity> LoginEntities { get; set; }
Notice, in our class LoginEntity, we have commented out last property. I will come back to this property when we perform table schema changes via code in Code First approach.
Step 10
Now, create a Controller and name it AccountController.cs under Controllers folder. Replace it with the code given below.
- using System;
- using System.Globalization;
- using System.Linq;
- using System.Security.Claims;
- using System.Threading.Tasks;
- using System.Web;
- using System.Web.Mvc;
- using Microsoft.AspNet.Identity;
- using Microsoft.AspNet.Identity.Owin;
- using Microsoft.Owin.Security;
- using EFCodeFirstMvc.Models;
- namespace EFCodeFirstMvc.Controllers
- {
- [Authorize]
- public class AccountController : Controller
- {
- public AccountController()
- {
- }
- //
- // GET: /Account/Register
- [AllowAnonymous]
- public ActionResult Register()
- {
- // Initialization.
- AccountViewModel model = new AccountViewModel();
- ////// DB Context.
- ////EFCodeFirstDbContext db = new EFCodeFirstDbContext();
- ////// Get Result
- ////model.ResultList = db.LoginEntities.Select(p => p).ToList();
- return View(model);
- }
- //
- // POST: /Account/Register
- [HttpPost]
- [AllowAnonymous]
- [ValidateAntiForgeryToken]
- public ActionResult Register(AccountViewModel model)
- {
- if (ModelState.IsValid)
- {
- // DB Context.
- EFCodeFirstDbContext db = new EFCodeFirstDbContext();
- // Setting.
- int idVal = db.LoginEntities.Select(p => p).ToList().Count > 0
- ? (db.LoginEntities.OrderByDescending(p => p.Id).Select(p => p.Id).FirstOrDefault()) + 1
- : 1;
- // Inserting.
- model.LoginEntityModel.Id = idVal;
- db.LoginEntities.Add(model.LoginEntityModel);
- db.SaveChanges();
- // Get Result
- model.ResultList = db.LoginEntities.Select(p => p).ToList();
- }
- // If we got this far, something failed, redisplay form
- return View(model);
- }
- }
- }
In the code given above, we have written both HTTP GET and HTTP POST methods for our Register action. You can see some commented out code in HTTP GET method. I will come back to it, while in the HTTP POST method, I have added a simple logic to add my account information into my database by using Code First approach.
Step 11
Create a new model called AccountViewModel.cs under Models folder and replace it with the the code given below.
- using System;
- using System.Collections.Generic;
- using System.Linq;
- using System.Web;
- namespace EFCodeFirstMvc.Models
- {
- public class AccountViewModel
- {
- public LoginEntity LoginEntityModel { get; set; }
- public List<LoginEntity> ResultList { get; set; }
- }
- }
The code given above is a simple model, which I will attach with my account registration view.
Step 12
Now, create Register.cshtml file under Views\Account folder and replace the code with the code, as shown below.
- @model EFCodeFirstMvc.Models.AccountViewModel
- @{
- ViewBag.Title = "Register";
- }
- <h2>@ViewBag.Title.</h2>
- @using (Html.BeginForm("Register", "Account", FormMethod.Post, new { @class = "form-horizontal", role = "form" }))
- {
- @Html.AntiForgeryToken()
- <h4>Create a new account.</h4>
- <hr />
- @Html.ValidationSummary("", new { @class = "text-danger" })
- <div class="form-group">
- @Html.LabelFor(m => m.LoginEntityModel.Username, new { @class = "col-md-2 control-label" })
- <div class="col-md-10">
- @Html.TextBoxFor(m => m.LoginEntityModel.Username, new { @class = "form-control" })
- </div>
- </div>
- <div class="form-group">
- @Html.LabelFor(m => m.LoginEntityModel.Password, new { @class = "col-md-2 control-label" })
- <div class="col-md-10">
- @Html.PasswordFor(m => m.LoginEntityModel.Password, new { @class = "form-control" })
- </div>
- </div>
- @*<div class="form-group">
- @Html.LabelFor(m => m.LoginEntityModel.FullName, new { @class = "col-md-2 control-label" })
- <div class="col-md-10">
- @Html.TextBoxFor(m => m.LoginEntityModel.FullName, new { @class = "form-control" })
- </div>
- </div>*@
- <div class="form-group">
- <div class="col-md-offset-2 col-md-10">
- <input type="submit" class="btn btn-default" value="Register" />
- </div>
- </div>
- }
- <h2>Result List</h2>
- @if (Model.ResultList != null)
- {
- for (int i = 0; i < Model.ResultList.Count; i++)
- {
- <div class="row">
- <div class="col-md-2">
- <p>@Model.ResultList[i].Id</p>
- </div>
- <div class="col-md-2">
- <p>@Model.ResultList[i].Username</p>
- </div>
- <div class="col-md-2">
- <p>@Model.ResultList[i].Password</p>
- </div>
- @*<div class="col-md-2">
- <p>@Model.ResultList[i].FullName</p>
- </div>*@
- </div>
- }
- }
- @section Scripts {
- @Scripts.Render("~/bundles/jqueryval")
- }
In the above code, I have created a simple form for account registration and a result list which will display my data from "LoginEntities" table. You will see commented out property which we will come back to soon.
Step 13
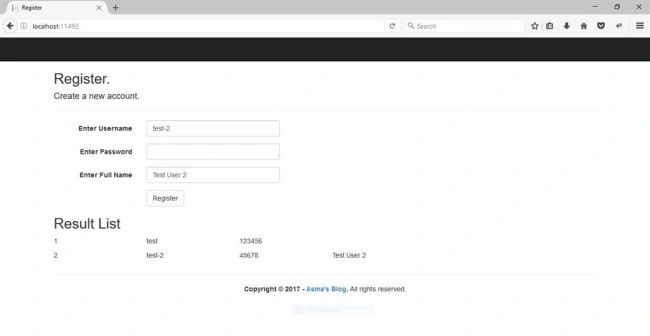
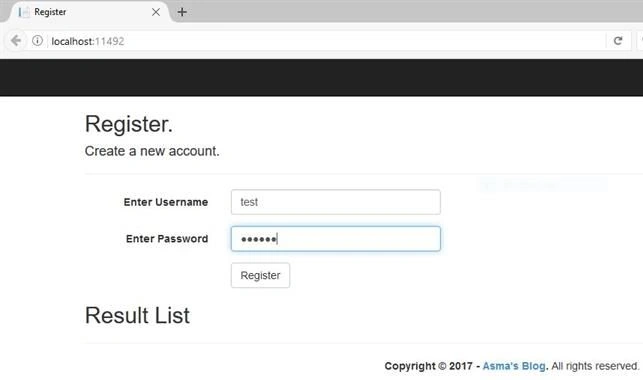
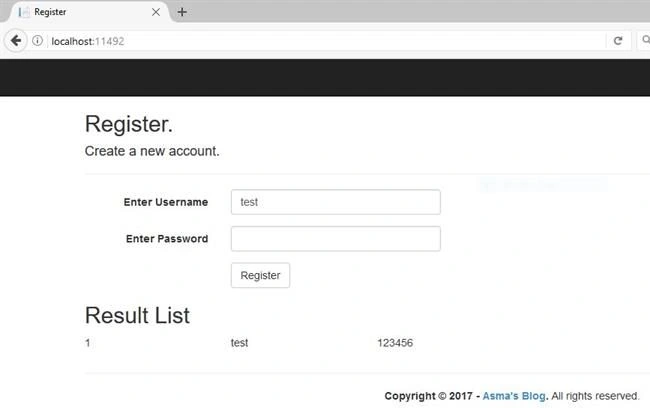
Let's first execute the project and create a sample account. You will see the output, as shown below.
Step 14
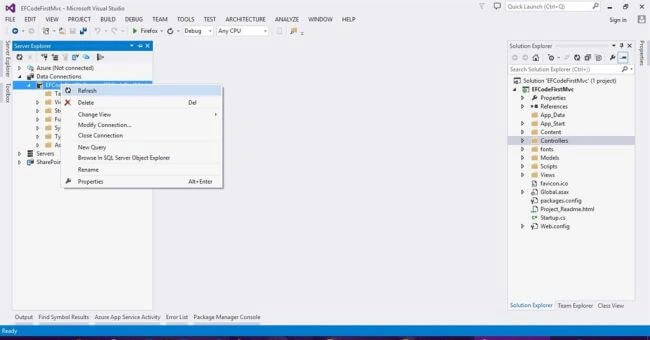
As we have added a new account, let's see, if our table has been created in the database or not, so refresh the database connection in Server Explorer and expand Tables folder. You will notice that two tables have been created, as shown below i.e.
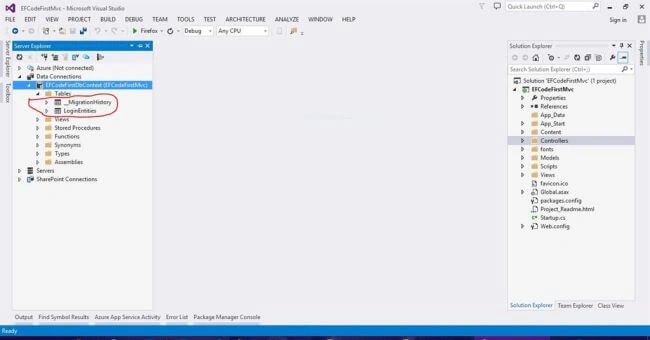
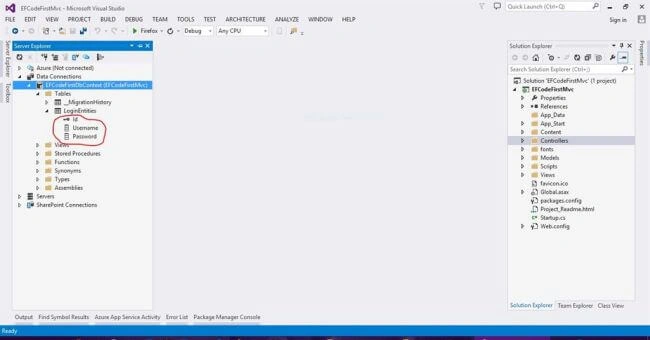
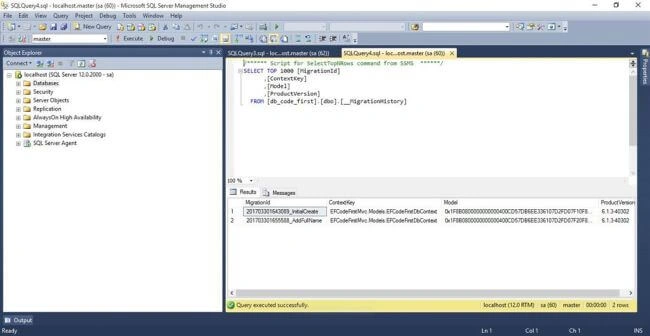
You will notice that there are two tables, which have been created; where one is the table; which we have defined at the code level and other is the migration history table. The migration history table will keep the history version of the changes, which you have made into the database tables and its structure.
When you expand your table, you will see your defined columns via code, as shown below.
Step 15
Now, let's add a new property into our table via code and by Entity Framework provided migration commands, we will signal our physical database about schema changes. Thus, uncomment all the code, which I have mentioned previously about being commented out in the Models, Views & Controllers folders.
Step 16
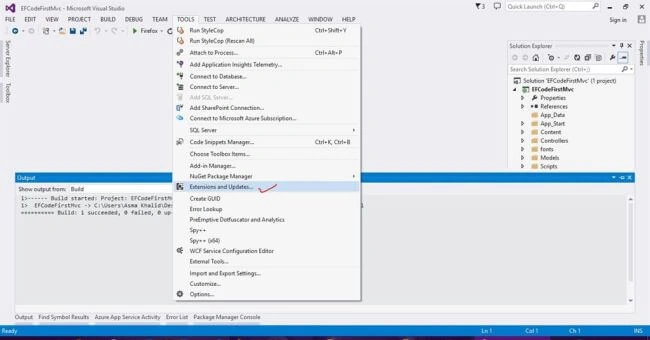
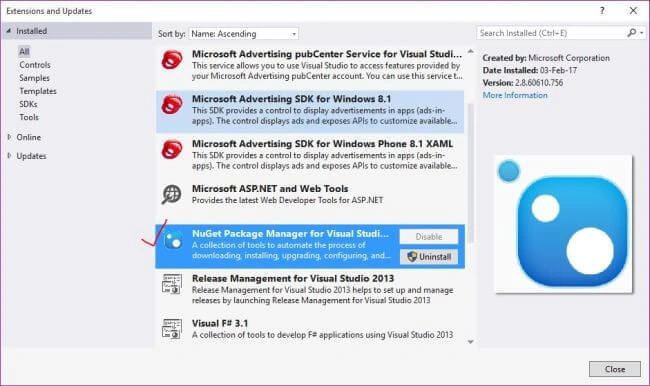
Let's signal our SQL Server about this schema. Prior to it, make sure that your NuGet Package is installed. If it is not installed, then install it via Tools-> Extensions & Updates, as shown below.
Step 17
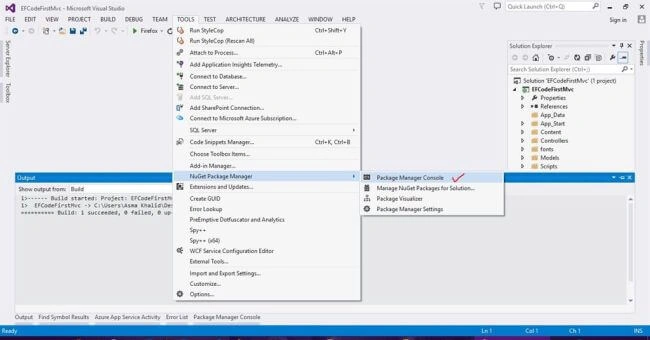
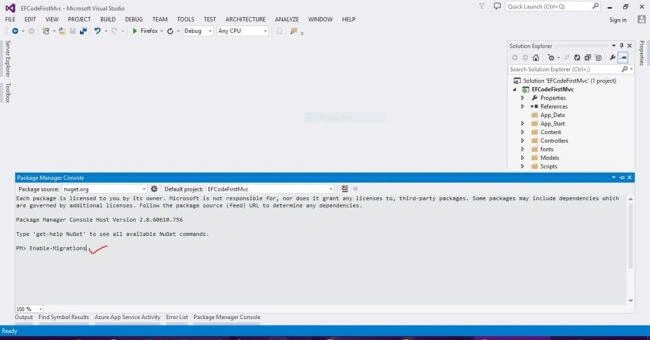
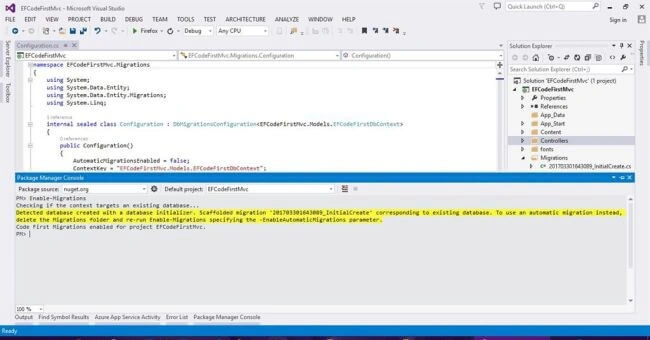
Now, open Package Manager Console via Tools->Package Manager Console and type Enable-Migrations command. Hit enter and you will see the details, as shown below.
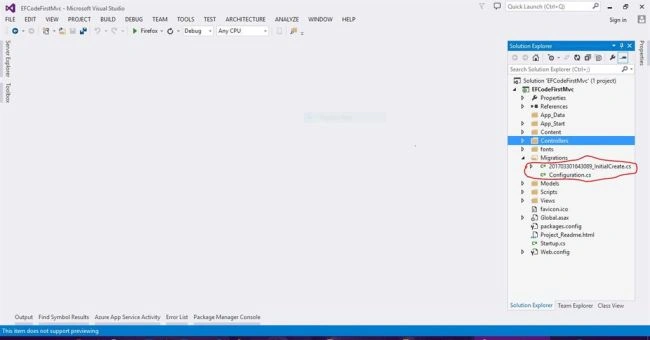
You will notice that a Migration folder has been created with a history version .cs file and configuration.cs file, which will maintain migration history at the code level and migration command settings in configuration file.
Step 18
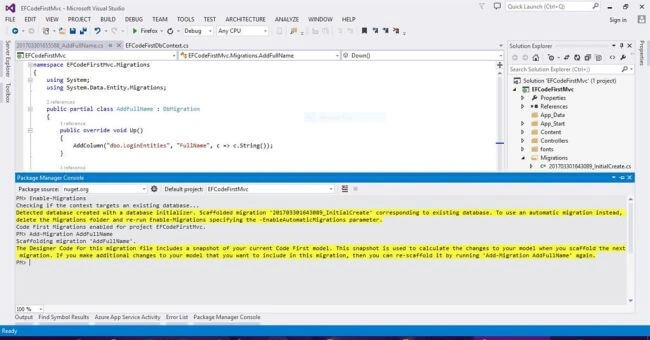
Now, enter Add-Migration AddFullName command and you will see the result, as shown below.
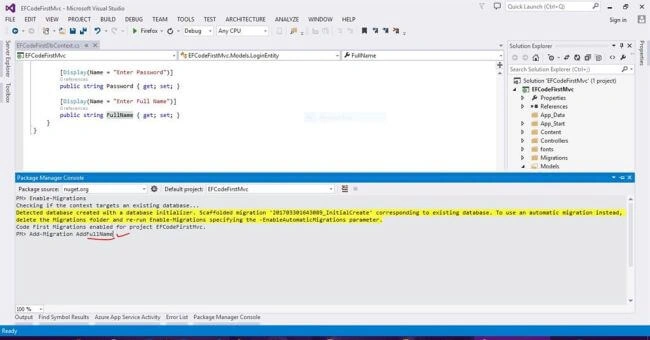
In the command given above, notice that at AddFullName portion, we have written the name of our new column property after Add keyword i.e. FullName.
Step 19
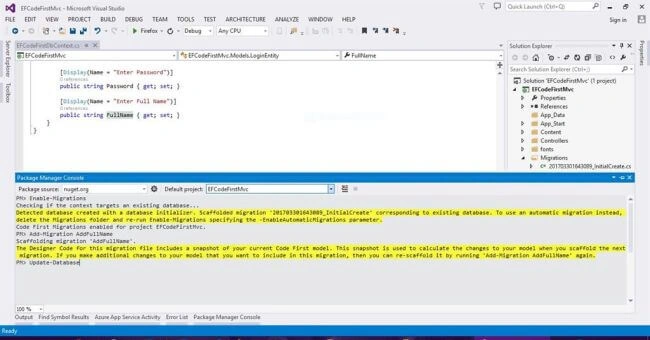
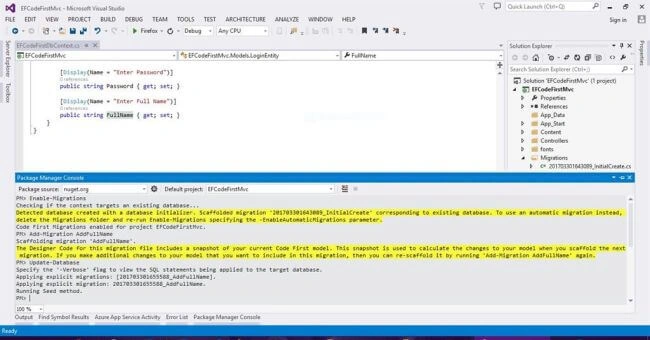
Finally, we will update SQL Server database about the schema changes by entering Update-Database command.
Step 20
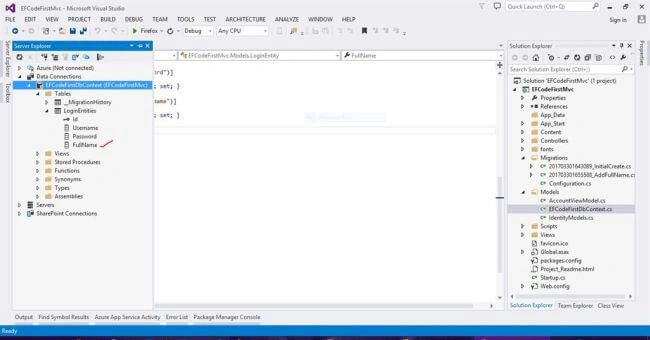
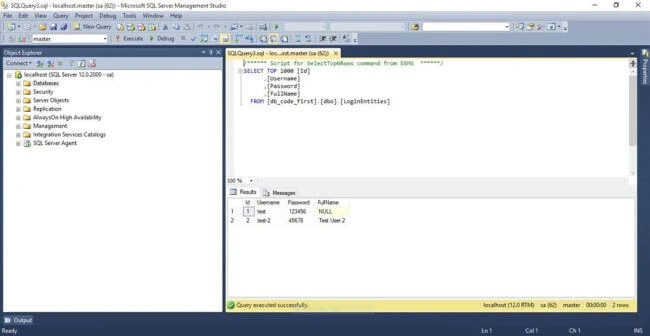
Refresh SQL Server connection and you will see that our new column is being reflected in SQL Server database, as shown below.
Step 21
Now, execute the project and register new account. You will see the result given below.
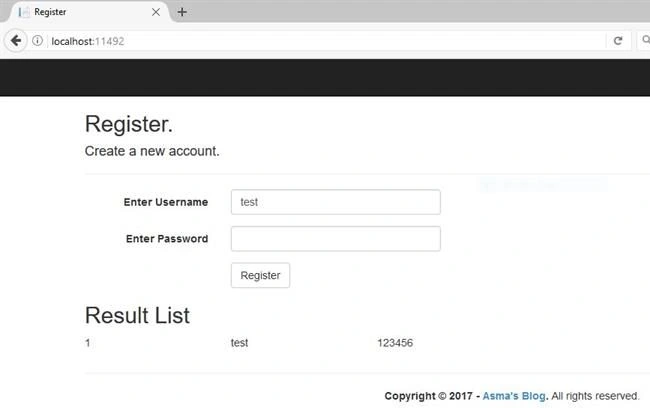
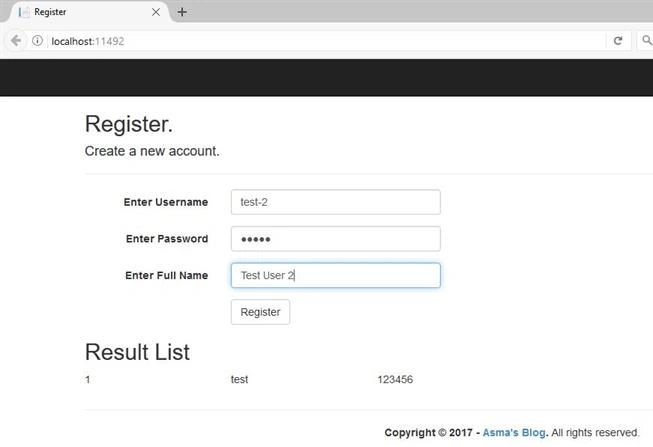
Step 22
Checkout your database in SQL Server. It will show your register accounts and migration history given below.
Conclusion
In this article, you will learn about an Entity Framework Code First approach in ASP.NET MVC5 platform. You will also learn about creating table schema via code and making table schema changes via code alongwith Entity Framework migration commands.
Muhammad Aqib ShehzadPosted Apr 4, 2017, 2:37 AM
Well detail and descriptive write. Thanks for sharing the nice stuff
Rajesh KadamPosted Apr 4, 2017, 2:23 AM
Good article, could have been much better if the screenshots attached to it are good one..