

Introduction
As I mentioned in my earlier article about NATS Jetstream Implementation, in this article, we are going to deep-dive into the Authentication and Authorisation module to connect NATS. Since we are moving toward digitalization, we need to make sure about access grants and resource usage. We shouldn't allow unauthenticated users or systems to access our system or message queue, and this applies to internal and external networks.
I mean internal network, as you create a product on your premises, which acts as a global product. You have to make sure in your line of business who should access this product. In this case, we should be aware of how many requests we are getting from each system so that we can caveat the product scalability, performance upgrade, etc.,
In this digital world and distributed system, secure communication is non-negotiable. This article dives into NATS authentication, ensuring secure messaging and reliable system integrity.
NATS has a built-in authentication mechanism; it supports multiple types of authentication and can be extended with custom solutions.
Types of Authentication
- Username and Password Authentication
- Token-based Authentication
- NKEYS
- JWT Authentication
- Customize Authentication
Hierarchy Flow of NATS Authentication
In NATS, these are the three account hierarchies, and the benefits of this model are multi-tenancy, resource isolation, and fine-grain access control.
- Operator
- An Operator is the top-level entity in the NATS security model. It governs the overall system and is responsible for managing accounts.
- It represents the administrator or organization controlling the NATS deployment.
- Manages trust between accounts by issuing signed JWTs.
- Account
- An Account is a logical grouping of Users under the Operator. It is used to isolate resources and services within a NATS deployment.
- Defines scoped permissions for users and services (e.g., what subjects they can publish or subscribe to).
- Facilitates multi-tenancy, where different accounts can share the same NATS infrastructure without interfering with one another.
- User
- A User is an entity (e.g., a client or a service) that connects to the NATS server under an Account. Users are authenticated and authorized based on their credentials and the account's permissions.
- Each user has unique credentials, and we can define the same account permissions or add granular-level permissions so that the user can access only a particular subject in the account.
- For example, In Account, you can access orders in your account. Booking. However, you could be more granular at the user level, like orders. Booking.status*
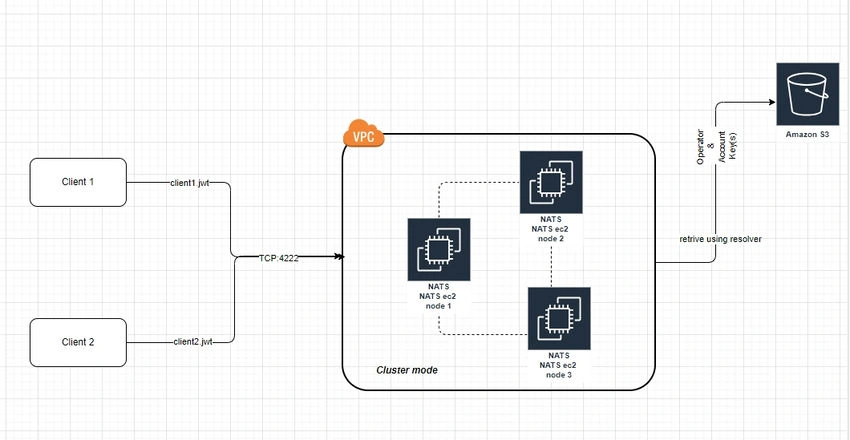
Environment Setup HLD
In this proof of concept, we use the three free-tier AWS ec2 instances to make a cluster NATS environment.
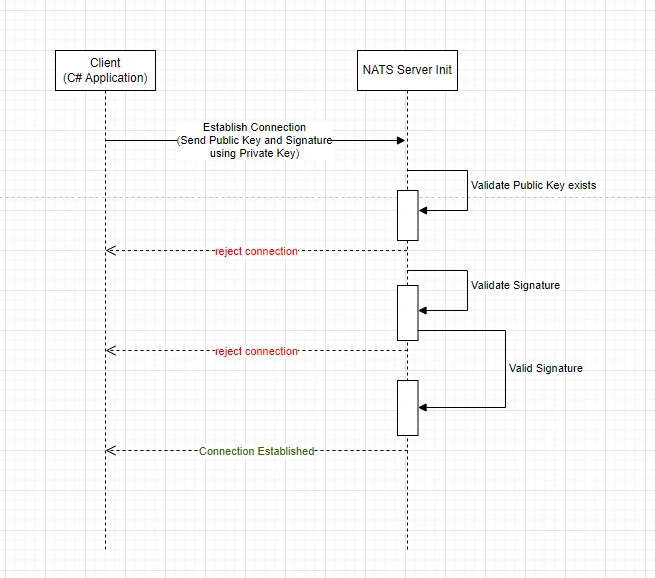
Authentication Sequence Diagram
Authentication Keys Generation
In NATS, we can configure or customize configuration using.conf file and this needs to be a parameter while starting the NATS server. For example, we need to use this command to start "nats-server -c nats-server.conf"
Username and Password Authentication
Basic Authentication
# NATS Server Configuration
authorization {
    users = [
        { user: "client1", password: "client1" }
        { user: "client2", password: "client2", permissions: {
            publish = ["orders.>"]
            subscribe = ["payments.>"]
        }}
    ]
}
Client Side Code
var opts = ConnectionFactory.GetDefaultOptions();

// Specify the server URL
opts.Url = "nats://localhost:4222";
// Set the username and password
opts.User = "client1";
opts.Password = "client1";
TokenBased Authentication
It's easy to configure and ready to use; there is no need to manage individual user credentials. This JWT needs to be shared with the client side.
# NATS Server Configuration
authorization {
    token: "jwt_secure_token"
}
Client-Side Code
var opts = ConnectionFactory.GetDefaultOptions();
// Specify the server URL
opts.Url = "nats://localhost:4222";
// Set the token
opts.Token = "my_secure_token";
NKEY Authentication
Prerequisites
- Install NATS and NSC CLI
- Generate NKEY(s)
- NKEYs are public/private key pairs.
- Public Key: Used by NATS servers for authentication.
- Private Key (Seed): Kept secret and used to sign JWTs or authenticate.
- Structure of NKeys
- Public Keys: Start with `O`, `A`, or `U` and are used by the NATS server for verification.
- Private Key (Seeds): Start with `SO`, `SA`, or `SU` and are used for signing JWTs or client authentication. These must be kept secure. I mean it should be in client-side and not transmitted in wire, only signature need to transmit while establishing connection.
- Please note. the format of NKEYs is determined by the prefix
- Operator NKEYs: Begin with `O` for Operator.
- Account NKEYs: Begin with `A` for Account.
- User NKEYs: Begin with U for Account.
- Command to generate NKEY
- To generate the Operator key, use the below command
- nsc add operator --generate
- To generate an Account Key, use the below command
- nsc add account --name <account_name>
- nsc describe account --name <account_name>
- nsc add account --name <account_name> --generate
- To generate a User key, use the below command
- nsc add user --name <user_name> --account <account_name>
- nsc describe user --name <user_name> --account <account_name>
- To generate the Operator key, use the below command
Please note. Always use a JWT in the operator configuration. Accounts and users could use either their NKEYs directly or their JWTs for a more flexible setup.
No additional NKEY generation is required after adding the user. The user’s NKEY is automatically generated and can be viewed using the nsc describe command.
# Define operator
operator: "/path/to/operator.nk"

# Define resolver for accounts and users
resolver: {
    type: "MEMORY" # This is in-memory, we also have another option called as File
    accounts: {
        "MyAccount": {
            nkey: "ADAAAAA...AAAA", # Account NKEY / Public Key
            users: [
                {
                    nkey: "UDAAAAA...AAAA", # User NKEY
                    permissions: {
                        publish: ["orders.>"],      # User can publish to "orders.>"
                        subscribe: ["orders.booking"]  # User can subscribe to "orders.booking"
                    }
                },
                {
                    nkey: "UDBBBBB...BBBB", # Another User NKEY
                    permissions: {
                        publish: ["orders.*"],
                        subscribe: ["orders.*"]
                    }
                }
            ]
        }
    }
}
Client-Side Code
 var options = ConnectionFactory.GetDefaultOptions();
 options.Url = "nats://localhost:4222"; // NATS server URL
 // Set up NKEY authentication
 options.NKey = nkeyPublic;
 options.NKeySeed = nkeySeed;
JWT Authentication
Prerequisite
- Install NATS and NSC CLI
- Generate JWT Keys using NSC CLI, and ensure it is 2.0 or later.
- Create a New Operator
- nsc add operator --name <MyOperator>
- Create an Account
- nsc add account --name <MyAccount>
- nsc edit account <MyAccount> --allow-pub "*" --allow-sub "*"
- Note
- Set Permissions is optional
- This allows publication and subscription on specific subjects to
--allow-pub "foo.>"
--allow-sub "bar.>"
- Create a User
- nsc add user --name MyUser --account MyAccount
- nsc edit user MyUser --allow-pub "*" --allow-sub "*"
- Note
- Set Permissions is optional
- This allows publication and subscription on specific subjects to
--allow-pub "foo.>"
--allow-sub "bar.>"
- Generate JWT
- nsc generate creds --account MyAccount
- This will generate an Account and User JWT Token
- User JWT needs to share the I,t client.
- nsc generate creds --account MyAccount
Please note. As per the above HLD, we need to store this Account.jwt and Operator.jwt in S3, and Account.jwt should be key like <NKEY>.jwt
Please find the sample user.jwt format
-----BEGIN NATS USER JWT-----
eyJ0eXAiOiJKV1QiLCJhbGciOiAiUlMyNTYiL...<JWT>
-----END NATS USER JWT-----
-----BEGIN NATS USER SIGNATURE-----
i0Wx7NRo1K...g... <NKEY>
-----END NATS USER SIGNATURE-----
# Path to the operator JWT file
operator: "/path/to/operator.jwt" //s3 path

# Use File Resolver
resolver: {
    type: "FILE",  # Specify the resolver type as FILE
    config: "/path/to/accounts"  # S3 Directory containing account files
}
Client-side Code
// Path to the credentials file
string credFilePath = "path/to/user.cred";

// Load the credentials
var userCreds = LoadUserCreds(credFilePath);

// Create a NATS connection options with the credentials
var options = ConnectionFactory.GetDefaultOptions();
options.Url = "nats://localhost:4222"; // Change to your NATS server URL
options.UserCredentials = userCreds;
Custom Authentication
We could integrate with Identity Server; let us dive deep into this specific topic in another article.
Best Practices
- Use NKEYS or JWT for production.
- Avoid hardcoding credentials.
- Enable TLS encryption alongside authentication.
- Regularly rotate tokens or credentials.
Summary
Thank you for reading this article. I hope it provides valuable insights for your time. Whether you are building new applications or enhancing existing ones, the information shared here will help you make informed decisions regarding authentication strategies in NATS.
In this article, we explored various types of authentication methods available in NATS. It’s essential to choose the approach that aligns with your business needs, application security requirements, and overall architecture. By carefully considering these factors, you can select the most appropriate solution to ensure a secure and efficient messaging system.
Reference
Join the conversation! Your thoughts help the community grow.