

Introduction

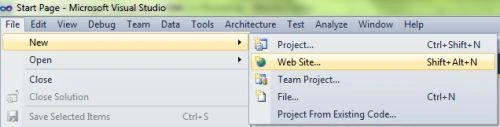
- Go to Solution Explorer
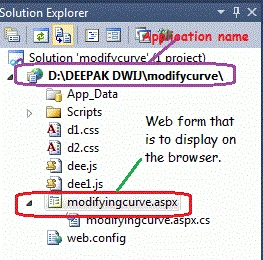
- Right-click on the Application name
- Select Add-->add new item
- Now in the window that opens, select an HTML page or new Webform
- Rename it by modifyingcurve.aspx
- body {
- background: #FFFF99;
- color: #fff;
- font: 300 100.1% "Helvetica Neue" , Helvetica, "Arial Unicode MS" , Arial, sans-serif;
- }
- #holder {
- height: 442px;
- left: 42%;
- margin: -240px 0 0 -320px;
- position: absolute;
- top: 57%;
- width: 842px;
- font-size: x-large;
- background-color: #008000;
- }
- #duplicate {
- bottom: 0;
- font: 300 .7em "Helvetica Neue", Helvetica,;
- position: absolute;
- right: 1em;
- text-align: right;
- }
- #duplicate d {
- color: #fff;
- }
- d2.css scripting.body {
- background: #fff;
- color: #000;
- font: 100.1% "Comic Sans MS", Lucida, Verdana, sans-serif;
- }
- #holder {
- height: 480px;
- left: 50%;
- margin: 0 0 0 -320px;
- position: absolute;
- top: 0;
- width: 640px;
- }
- #duplicate {
- bottom: 0;
- font-size: .7em;
- position: absolute;
- right: 1em;
- text-align: right;
- }
Step 3: In this part, we need to work on some JavaScript over here. For understanding the full working of JavaScript download the attached .rar file and run the modifycurve application.
The whole JavaScript looks like as
follow.
- window.onload = function() {
- var dragger = function() {
- this.ox = this.type == "rect" ? this.attr("x") : this.attr("cx");
- this.oy = this.type == "rect" ? this.attr("y") : this.attr("cy");
- this.animate({
- "fill-opacity": .2
- }, 500);
- },
- move = function(dx, dy) {
- var att = this.type == "rect" ? {
- x: this.ox + dx,
- y: this.oy + dy
- } : {
- cx: this.ox + dx,
- cy: this.oy + dy
- };
- this.attr(att);
- for (var i = connections.length; i--;) {
- r.connection(connections[i]);
- }
- },
- up = function() {
- this.animate({
- "fill-opacity": 0
- }, 500);
- },
- r = Color("holder", 640, 480),
- connections = [],
- shapes = [r.ellipse(190, 100, 30, 20),
- r.rect(290, 80, 60, 40, 10),
- r.rect(290, 180, 60, 40, 2),
- r.ellipse(450, 100, 20, 20)
- ];
- for (var i = 0, ii = shapes.length; i < ii; i++) {
- var color = Color.getColor();
- shapes[i].attr({
- fill: color,
- stroke: color,
- "fill-opacity": 0,
- "stroke-width": 2,
- cursor: "move"
- });
- shapes[i].drag(move, dragger, up);
- }
- connections.push(r.connection(shapes[0], shapes[1], "#fff"));
- connections.push(r.connection(shapes[1], shapes[2], "#fff", "#fff|5"));
- connections.push(r.connection(shapes[1], shapes[3], "#000", "#fff"));
- };
Step
4: In this section, we are going to become familiar with the body part of
HTML scripting. Replace this script from the body section of the
roundaboutpointer.aspx page.
Here we pass a #holder in the div id that is
defined in the d1.css file.
Step 5: The Complete code for Playground application.
Step 6 :
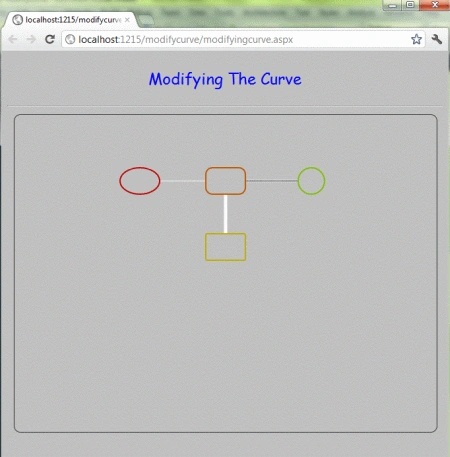
Output Press F5
Note: For the accurate output of HTML5 applications, you must have the
Google Chrome browser on your PC. You can change the position by dragging the pointer to any rectangular boxes, ellipse, and circle as shown in the figure.
- <body>
- <p>
- Modifying The Curve
- </p>
- <hr>
- <div id="holder"></div>
- </body>
- <%@ Page Language="C#" AutoEventWireup="true" CodeFile="modifyingcurve.aspx.cs" Inherits="_Default" %>
- <!DOCTYPE html PUBLIC "-//W3C//DTD XHTML 1.0 Transitional//EN" "http://www.w3.org/TR/xhtml1/DTD/xhtml1-transitional.dtd">
- <html
- xmlns="http://www.w3.org/1999/xhtml">
- <head runat="server">
- <link rel="stylesheet" href="d1.css" type="text/css" media="screen">
- <link rel="stylesheet" href="d2.css" type="text/css" media="print">
- <script src="dee.js" type="text/javascript" charset="utf-8"></script>
- <script src="dee1.js" type="text/javascript" charset="utf-8"></script>
- <style type="text/css" media="screen">
- #holder
- {
- -moz-border-radius: 10px;
- -webkit-border-radius: 10px;
- border: solid 1px #333;
- }
- p
- {
- text-align: center;
- }
- </style>
- </head>
- <body>
- <p>
- Modifying The Curve
- </p>
- <hr>
- <div id="holder"></div>
- </body>
- </html>
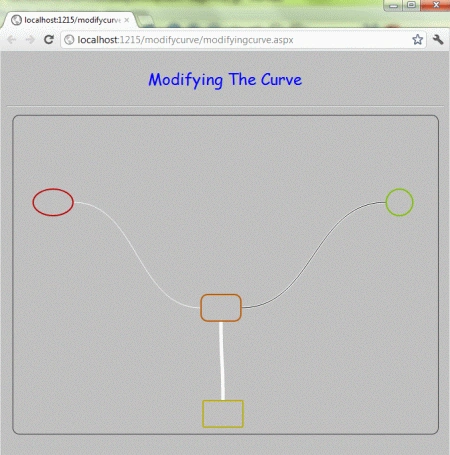
After Changing the curve the figure looks as given.
 Here are some useful resources
Change the Curve Position
Using HTML 5
How to Draw the Bézier curve in Windows Phone 7
Using Powershell create, modify and delete search scope display group in
SharePoint 2010
Selecting and Modifying elements using JQuery
Drawing Bezier Curves in WPF
Here are some useful resources
Change the Curve Position
Using HTML 5
How to Draw the Bézier curve in Windows Phone 7
Using Powershell create, modify and delete search scope display group in
SharePoint 2010
Selecting and Modifying elements using JQuery
Drawing Bezier Curves in WPF
Join the conversation! Your thoughts help the community grow.