

Introduction
Dependency Injection (DI) is a software development design pattern that aims to achieve loose coupling between components and enhance the maintainability, testability, and scalability of applications. In the context of C#, DI is commonly implemented using frameworks like .NET Core's built-in Dependency Injection (DI) container or third-party libraries such as Autofac, Ninject, or Unity.
At its core, Dependency Injection involves injecting dependencies (i.e., objects that a class relies on to perform its tasks) into a class instead of the class creating its own dependencies. This is typically achieved by passing dependencies into a class's constructor, method, or property rather than instantiating them directly within the class.
Here is an overview of how Dependency Injection works in C#:
Dependency injection container
- Service registration: Dependencies are registered with a DI container, usually in the application's composition root. These registrations define how dependencies should be created and managed by the container.
- Dependency resolution: When a component requests a dependency, the DI container resolves the dependency by providing an instance of the registered type.
Types of Dependency Injection
- Constructor injection: Dependencies are provided to a class through its constructor. This is the most common and recommended form of DI.
- Method injection: Dependencies are passed to a method as parameters.
- Property injection: Dependencies are assigned to properties of a class. This approach is less common and often considered less preferable than constructor injection due to its potential for introducing hidden dependencies.
The benefits of dependency injection
- Loose coupling: Components are decoupled from their dependencies, making them easier to maintain, test, and reuse.
- Testability: Dependencies can be easily replaced with mock or stub implementations during unit testing, allowing for more isolated and meaningful tests.
- Flexibility and scalability: Dependency Injection allows for the creation of flexible and scalable applications by combining smaller, interchangeable components. This makes it simpler to modify and expand the application as needed.
- Separation of concerns: The separation of concerns is also promoted through Dependency Injection. By separating the creation and management of dependencies from the components that utilize them, the codebase is organized and focused on specific tasks.
Dependency Injection is a valuable technique for managing dependencies and fostering modular and maintainable software architecture in C# and other object-oriented programming languages.
In Dependency Injection (DI), the terms "scoped", "transient", and "singleton" are used to describe the different lifetimes or lifecycles of objects managed by the DI container. These lifetimes determine how instances of dependencies are created and managed by the container.
- Scoped: Scoped dependencies are created once per request or lifetime scope. This means that within the scope of a single request or operation, the container will provide the same instance of a scoped dependency. Scoped dependencies are commonly used in web applications to maintain the consistency of a dependency throughout a web request
- Transient: Transient dependencies are created each time they are requested from the container. This means that a new instance of a transient dependency is created every time it is needed. Transient dependencies are typically used for lightweight, stateless services or components.
- Singleton: Singleton dependencies are created once and shared throughout the lifetime of the application. This means that the container will provide the same instance of a singleton dependency for all requests made during the application's lifetime. Singleton dependencies are commonly used for stateful services or components that need to be shared across the entire application.
An illustration of the three different life cycle types mentioned above.
using System;
using System.Collections.Generic;
using System.Linq;
using System.Text;
using System.Threading.Tasks;
namespace WPFExamples
{
    public void ConfigureServices(IServiceCollection services)
    {
        // Scoped registration
        services.AddScoped<IMyScopedService, MyScopedService>();
        // Transient registration
        services.AddTransient<IMyTransientService, MyTransientService>();
        // Singleton registration
        services.AddSingleton<IMySingletonService, MySingletonService>();
    }
}
To set up dependency injection (DI) in WPF applications using Microsoft.Extensions.DependencyInjection library, follow these steps.
Step 1. Installing the NuGet Package
Begin by installing the Microsoft.Extensions.DependencyInjection NuGet package if you haven't done so already. This can be accomplished through the NuGet Package Manager or by executing the following command in the Package Manager Console.
NuGet\Install-Package Microsoft.Extensions.DependencyInjection -Version 8.0.0
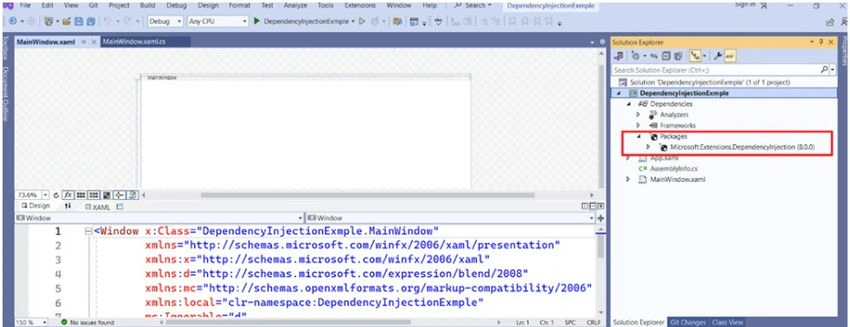
Step 2. Set Up DI Container in App.xaml.cs
In the App.xaml.cs file, set up the DI container (IServiceCollection) in the App class constructor.
using DependencyInjectionExmple.Implementation;
using DependencyInjectionExmple.Interfaces;
using Microsoft.Extensions.DependencyInjection;
using System.Windows;
namespace DependencyInjectionExmple
{
    /// <summary>
    /// Interaction logic for App.xaml
    /// </summary>
    public partial class App : Application
    {
        public static IServiceProvider serviceProvider;
        public App()
        {
            // Set up DI container
            var serviceCollection = new ServiceCollection();
            ConfigureServices(serviceCollection);
            // Build the service provider
            serviceProvider = serviceCollection.BuildServiceProvider();
        }
        private void ConfigureServices(IServiceCollection services)
        {
            services.AddTransient<MainWindowViewModel>();
            // Register your services and dependencies here
            services.AddSingleton<ITestingService, TestingService>(); // Example registration
        }
    }
}
Step 3. Service and Dependency Definition
To define your services and their dependencies, it is recommended to use interfaces and classes. You can register them in the ConfigureServices method of the App class. You can create classes and interfaces like below.
using DependencyInjectionExmple.Interfaces;
using System.Windows;
namespace DependencyInjectionExmple.Implementation
{
    internal class TestingService : ITestingService
    {
        public void TestService()
        {
            MessageBox.Show("Dependency Injection Service implementation");
        }
    }
}
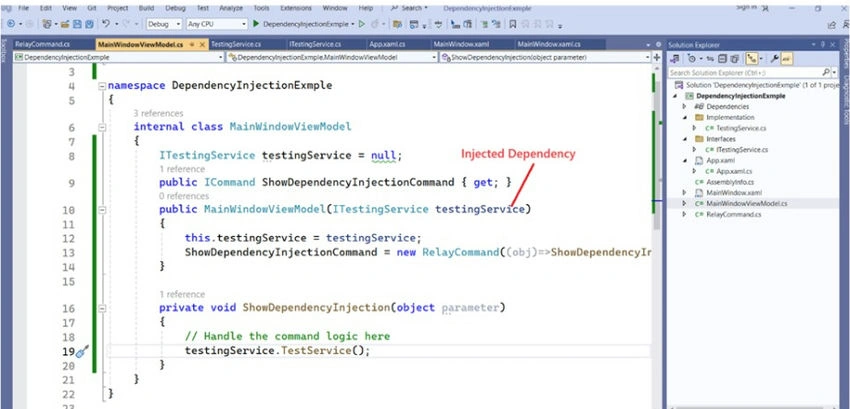
Step 4. Integrate Dependencies into Classes
Integrate dependencies into classes that necessitate them using constructor injection.
using DependencyInjectionExmple.Interfaces;
using System.Windows.Input;
namespace DependencyInjectionExmple
{
    internal class MainWindowViewModel
    {
        private readonly ITestingService testingService = null;
        public ICommand ShowDependencyInjectionCommand { get; }
        public MainWindowViewModel(ITestingService testingService)
        {
            this.testingService = testingService;
            ShowDependencyInjectionCommand = new RelayCommand((obj) => ShowDependencyInjection(obj));
        }
        private void ShowDependencyInjection(object parameter)
        {
            // Handle the command logic here
            testingService.TestService();
        }
    }
}
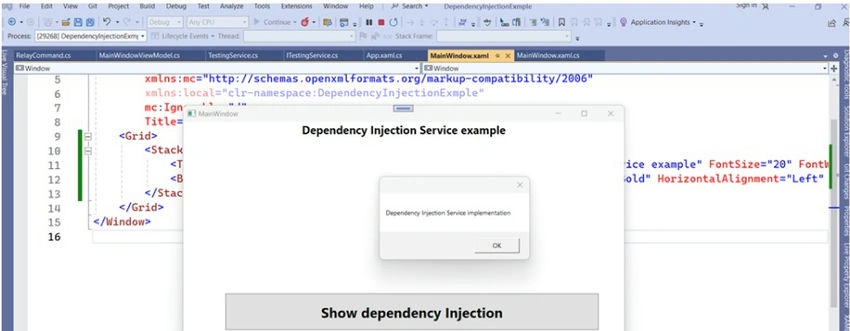
Step 5. Implementation's appearance during runtime
Repository path: https://github.com/OmatrixTech/DependencyInjectionExmple
Join the conversation! Your thoughts help the community grow.