

Basic Introduction
Let’s first establish what the purpose of the code is in the first place. For this article, the purpose of the code is to create a Login & Registration functionality in Xamarin.Android. I will divide this article into three phases.
Let’s first establish what the purpose of the code is in the first place. For this article, the purpose of the code is to create a Login & Registration functionality in Xamarin.Android. I will divide this article into three phases.
- In the first phase, we will discuss "How to implement login functionality in Xamarin.Android".
- In the second phase, we will discuss "How to integrate services for login & registration functionality by using WEB API".
- In the third phase, we will discuss "How to implement registration functionality in Xamarin.Android".
So here, I go to highlight some points.
- First of all, we create an empty Android project in Visual Studio 2017.
- Then, we design a simple login form.
- After that, we call (integrate) login service (which is created using web API (which is created in .NET MVC) and I also explained how to create it in my phase two).
- We call (integrate) login service by using "RestSharp" (RestSharp is an open-source HTTP client library that works with all kinds of .NET technologies). You can learn more about RestSharp by using the following link. http://restsharp.org
STEP 01 - Create a new blank app (Android) project.
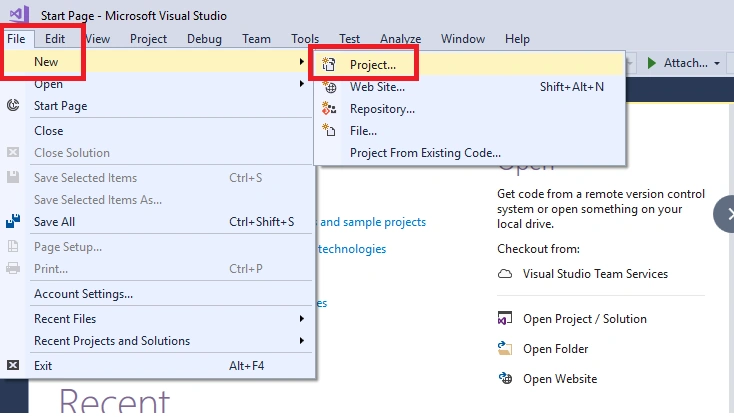
- On the File menu, click "New Project".
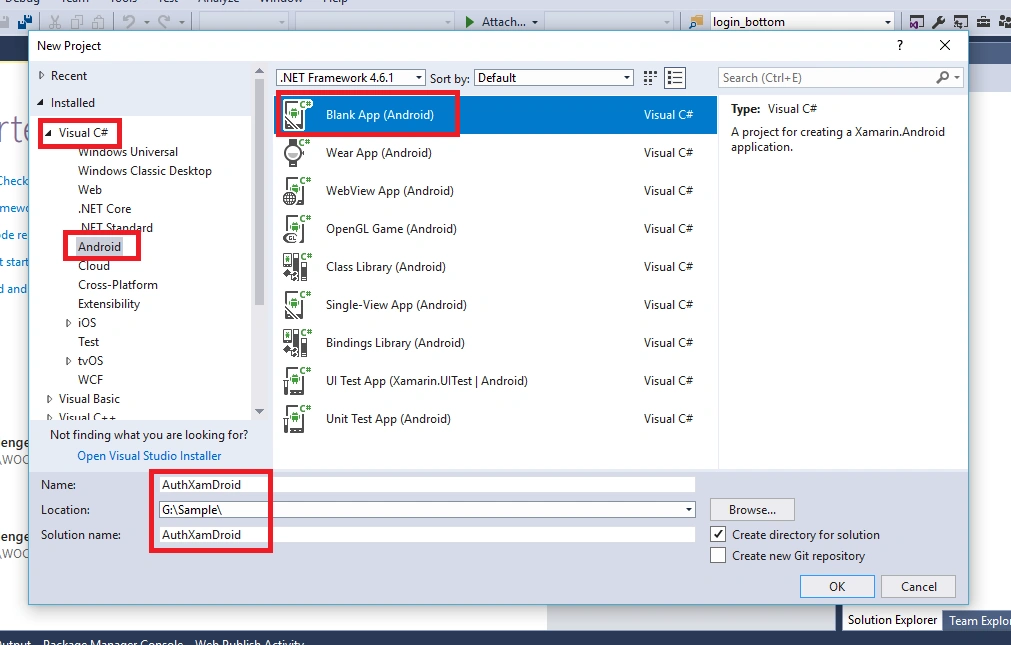
- In the New Project dialog box, under Installed, expand Visual C#, and then click on Android, then select Blank App (Android). In the Name box, type "AuthXamDroid" and click OK.
STEP 02 - Add a new activity & layout for login screen.
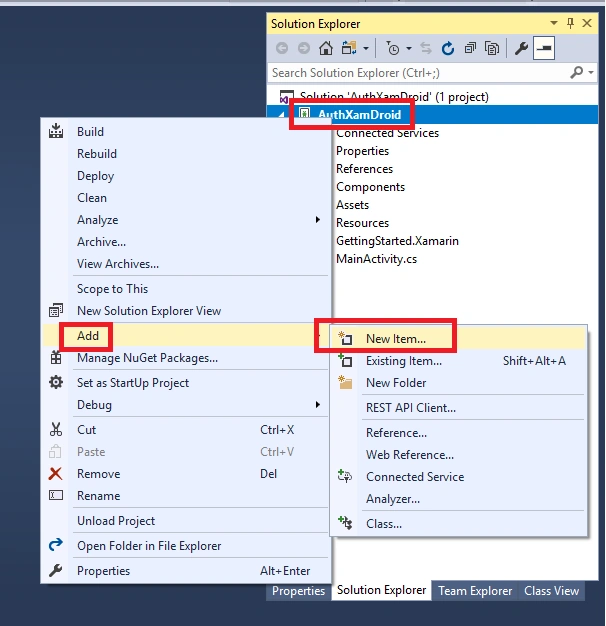
- Add a new Activity named as "LoginActivity". Right click on "AuthXamDroid" then click on "Add" and click on "New Item...".
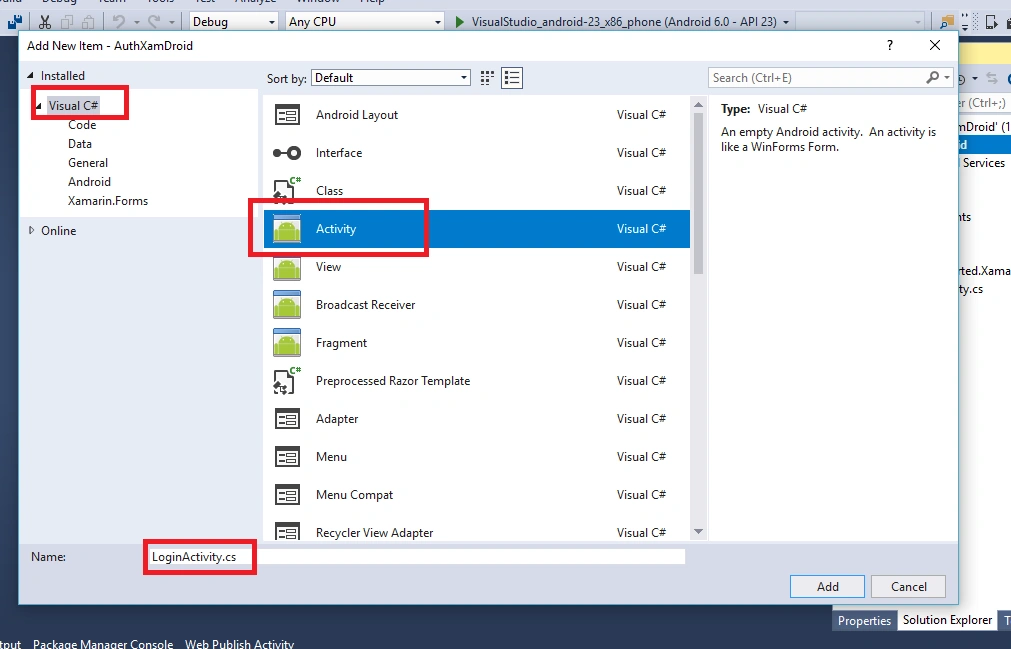
- In "Add New Item" popup, select "Activity" and name it as "LoginActivity". Click "Add".
- Same as add a new Layout in "layout folder" under "Resources folder" name it as "Login.axml".
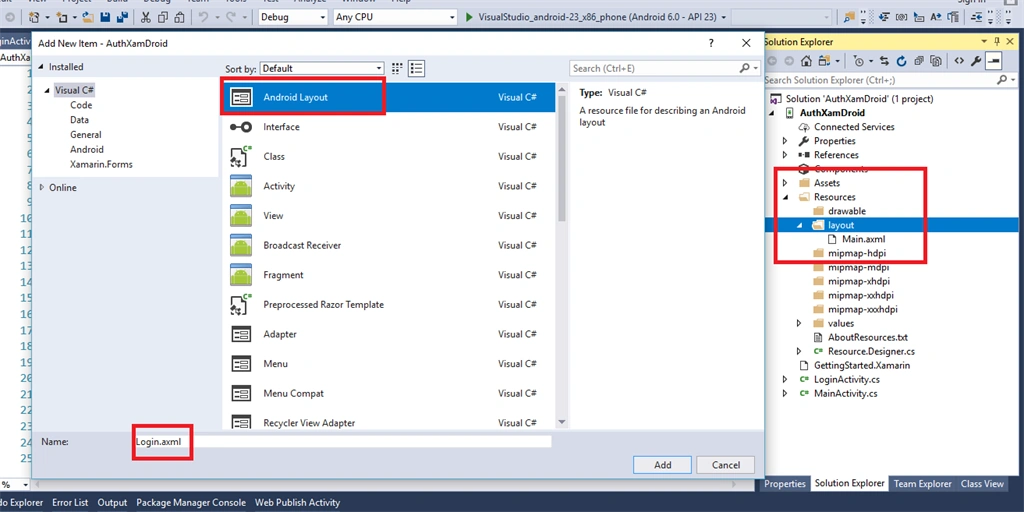
- Now design the login screen.
For Login screen design I already created some images in png format. So download below file and paste these images on your "Resources" folder.
I created design resources respective to all size devices like hdpi/mdpi/xhdpi/xxhdpi/xxxhdpi
You can find all the design from the attached document of code.
@Thanks to my designer "Ankit Kanojia" who helps me for create such a beautiful login screen design.
- Now, you can see our login screen which have default android theme.
So, first we create our custom theme. For creating a custom theme we need to add "Android Support Design Library". For this right click on "Components" and select "Get More Components..."
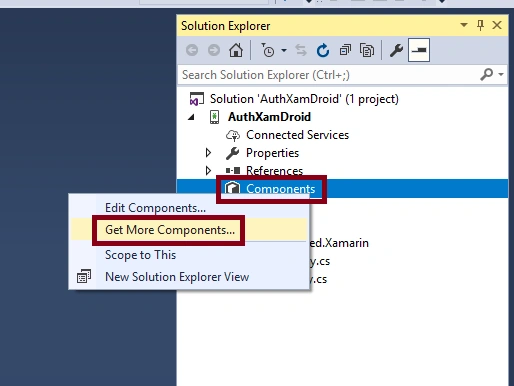
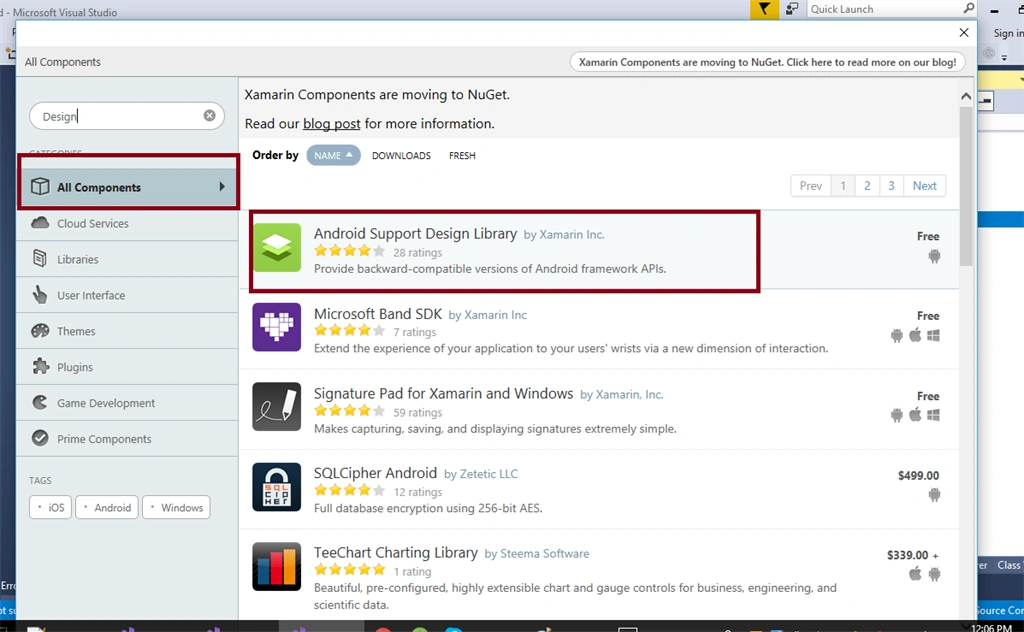
- Now search "Design Library" in searchbox and select "Android Support Design Library" from result.
Note
You need to login with your xamarin account for gettting more components.
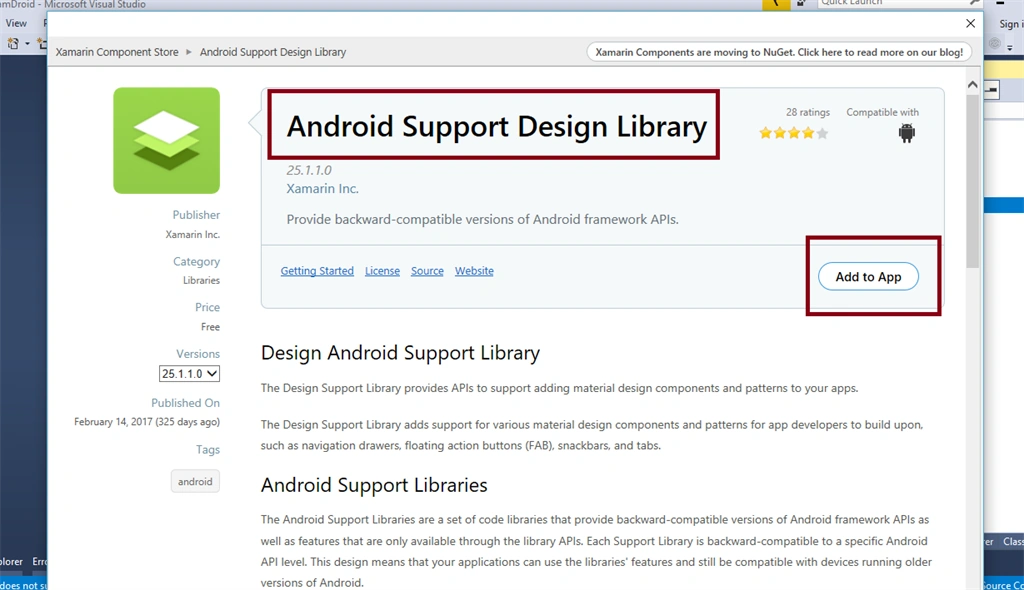
- Then click on "Add to App" for install the "Android Support Design Library".
- Its time to create a custom theme. Create a "styles.xml" in "Values folder" which is under the "Resources folder". After creating style.xml paste the below code in your "styles.xml"
- <?xml version="1.0" encoding="utf-8" ?>
- <resources>
- <style name="MyTheme.Base" parent="Theme.AppCompat.Light">
- </style>
- <style name="MyTheme" parent="MyTheme.Base">
- </style>
- <!--Loing & Registration-->
- <style name="MyTheme.Login" parent="Theme.AppCompat.Light.NoActionBar">
- <item name="android:windowNoTitle">true</item><item name="android:windowFullscreen">true</item>
- </style>
- <!--White Textbox-->
- <style name="EditTextWhite" parent="MyTheme.Login">
- <item name="colorControlNormal">@color/white</item><item name="colorControlActivated">@color/white</item><item name="colorControlHighlight">@color/white</item>< !--<item name="android:textColorHint">@color/white</item>--><item name="android:textColor">@color/white</item>
- </style>
- </resources>
- For login screen design Paste below code in your Login.axml file
- <?xml version="1.0" encoding="utf-8"?>
- <RelativeLayout xmlns:android="http://schemas.android.com/apk/res/android" xmlns:app="http://schemas.android.com/apk/res-auto" xmlns:tools="http://schemas.android.com/tools" android:orientation="vertical" android:layout_width="match_parent" android:layout_height="match_parent">
- <LinearLayout android:layout_width="match_parent" android:layout_height="wrap_content" android:orientation="vertical">
- <FrameLayout android:layout_width="match_parent" android:layout_height="wrap_content" android:background="@drawable/login_top">
- <LinearLayout android:layout_width="match_parent" android:layout_height="wrap_content" android:orientation="vertical" android:layout_margin="30dp">
- <EditText android:id="@+id/txtEmail" android:layout_width="match_parent" android:layout_height="wrap_content" android:hint="Email" android:theme="@style/EditTextWhite" android:inputType="textEmailAddress" android:drawableLeft="@drawable/ic_lock" />
- <EditText android:id="@+id/txtPassword" android:layout_marginTop="40dp" android:layout_width="match_parent" android:layout_height="wrap_content" android:hint="Password" android:theme="@style/EditTextWhite" android:inputType="textPassword" android:drawableLeft="@drawable/ic_key" /> </LinearLayout>
- </FrameLayout>
- <FrameLayout android:layout_width="match_parent" android:layout_height="wrap_content" android:background="@drawable/login_bottom">
- <android.support.design.widget.FloatingActionButton android:id="@+id/btnLogin" android:layout_width="wrap_content" android:layout_height="wrap_content" android:layout_gravity="top" android:layout_marginStart="40dp" app:backgroundTint="#003157" app:srcCompat="@drawable/ic_right_arrow" /> </FrameLayout>
- </LinearLayout>
- </RelativeLayout>
- Now, currently default "MainLauncher" is enable on "MainActivity" so we need to change "MainLauncher" to our "LoginActivity" so that we can set default screen as our "Login Screen". So add below line in your "LoginActivity".
- [Activity(Theme = "@style/MyTheme.Login", MainLauncher = true, Icon = "@mipmap/ic_launcher")]
- public class LoginActivity: Activity {
- protected override void OnCreate(Bundle savedInstanceState) {
- base.OnCreate(savedInstanceState);
- //Set layout content
- SetContentView(Resource.Layout.Login);
- }
- }
Theme = "@style/MyTheme.Login" ==> We can set our custom style which is created earlierMainLauncher = true ==> We can set the default screen as "Login Screen"Icon = "@mipmap/ic_launcher" ==> Set our custom luncher icon
Run the application so that you can see the below LOGIN SCREEN.
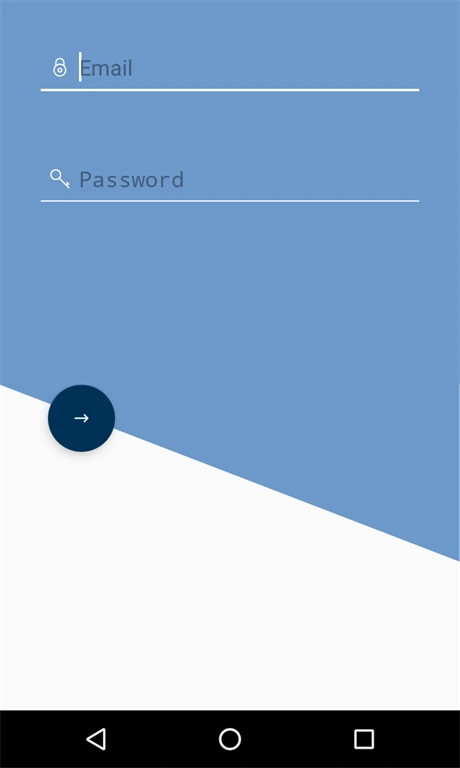
- Now, get the value from Email & Password edittext and validate it.
//Get email & password values from edit textvar email = FindViewById<EditText>(Resource.Id.txtEmail);var password = FindViewById<EditText>(Resource.Id.txtPassword);
- Paste the below code to Login Activity.
NOTE
WE ARE CURRRENTLY GOING TO ADD STATIC CODE IN MY PHASE () TWO I WILL CHANGE THIS CODE TO DYNAMIC BECAUSE FOR DYNAMIC CODE WE NEED TO CRAETE WEB API FOR SAME- public class LoginActivity: Activity {
- EditText email;
- EditText password;
- protected override void OnCreate(Bundle savedInstanceState) {
- base.OnCreate(savedInstanceState);
- SetContentView(Resource.Layout.Login);
- //Get email & password values from edit text
- email = FindViewById < EditText > (Resource.Id.txtEmail);
- password = FindViewById < EditText > (Resource.Id.txtPassword);
- //Trigger click event of Login Button
- var button = FindViewById < FloatingActionButton > (Resource.Id.btnLogin);
- button.Click += DoLogin;
- }
- public void DoLogin(object sender, EventArgs e) {
- //NOTE: WE ARE CURRRENTLY GOING TO ADD STATIC CODE
- //IN MY PHASE () TWO I WILL CHANGE THIS CODE TO DYNAMIC
- //BECAUSE FOR DYNAMIC CODE WE NEED TO CRAETE WEB API FOR SAME
- //STATIC CODE FOR PHASE ONE ONLY. WE WILL CHANGE IT TO DYNAMIX IN PHASE TWO
- if (email.Text == "****@gmail.com" && password.Text == "12345") {
- Toast.MakeText(this, "Login successfully done!", ToastLength.Long).Show();
- StartActivity(typeof(MainActivity));
- } else {
- //Toast.makeText(getActivity(), "Wrong credentials found!", Toast.LENGTH_LONG).show();
- Toast.MakeText(this, "Wrong credentials found!", ToastLength.Long).Show();
- }
- }
- }
We are finished.
Dr.Khalid WaleedPosted Oct 29, 2020, 5:49 AM
Hi Ankit this solution (your code) not work because has old version of xamarin and needs to remove some of references as xamarin request, we hope to update it
Eladji AmadouPosted Aug 21, 2019, 9:13 PM
Hello Ankit, is there a way I can get help for the part 2 and 3 of your post? Thank you!
Eladji AmadouPosted Aug 21, 2019, 10:48 AM
Hello Ankit,
Sai Sudhakar PaluriPosted May 10, 2018, 7:13 AM
Please share us the phase 2
Akhilesh AkolkarPosted Mar 15, 2018, 6:05 AM
Sir where is the phase two can you share it with me
siva prasadPosted Mar 8, 2018, 7:09 AM
Its good practice thanks
Sagar Pandurang KapPosted Jan 8, 2018, 12:40 AM
Superb atuff.Very nice..