

List
A container that presents rows of data arranged in a single column.
Instead, SwiftUIs are designed for composability - SwiftUI has us build small views that know how to configure themselves as list rows, then use those.
Example
Landmark.swift declares a landmarks structure that stores all of the landmark information that the app needs to display, and that imports an array of landmark data from landmarkData.json.
Step 1
- [
- {
- "name": "Turtle Rock",
- "category": "Featured",
- "city": "Twentynine Palms",
- "state": "California",
- "id": 1001,
- "park": "Joshua Tree National Park",
- "coordinates": {
- "longitude": -116.166868,
- "latitude": 34.011286
- },
- "imageName": "turtlerock"
- },
- {
- "name": "Silver Salmon Creek",
- "category": "Lakes",
- "city": "Port Alsworth",
- "state": "Alaska",
- "id": 4,
- "park": "Lake Clark National Park and Preserve",
- "coordinates": {
- "longitude": -152.665167,
- "latitude": 59.980167
- },
- "imageName": "silversalmoncreek"
- }
- ]
Step 2 - Create a Landmark Row
Here, we created a list landmark custom row which contains an image and text.
- import SwiftUI
- struct LandmarkRow: View {
- var landmark: Landmark
- var body: some View {
- HStack {
- landmark.image
- .resizable()
- .frame(width: 50, height: 50)
- Text(verbatim: landmark.name)
- Spacer()
- }
- }
- }
- #if DEBUG
- struct LandmarkRow_Previews: PreviewProvider {
- static var previews: some View {
- Group {
- LandmarkRow(landmark: landmarkData[0])
- }
- .previewLayout(.fixed(width: 300, height: 70))
- }
- }
- #endif
In the above code of LandmarkRow_Previews, update the landmark parameter to be the second element in the landmarkData array.
Use the previewLayout(_: ) modifier to set a size that approximates a row in a list.
You can use a Group to return multiple previews from the preview provider.
Step 3 - Make the list Dynamic
- import SwiftUI
- import CoreLocation
- struct Landmark: Hashable, Codable, Identifiable {
- var id: Int
- var name: String
- fileprivate var imageName: String
- fileprivate var coordinates: Coordinates
- var state: String
- var park: String
- var category: Category
- var locationCoordinate: CLLocationCoordinate2D {
- CLLocationCoordinate2D(
- latitude: coordinates.latitude,
- longitude: coordinates.longitude)
- }
- }
- extension Landmark {
- var image: Image {
- ImageStore.shared.image(name: imageName)
- }
- }
- struct Coordinates: Hashable, Codable {
- var latitude: Double
- var longitude: Double
- }
Step 4 - Set Up Navigation between List and Detail
- import SwiftUI
- struct LandmarkList: View {
- var body: some View {
- NavigationView{
- List(landmarkData){ dataObj in
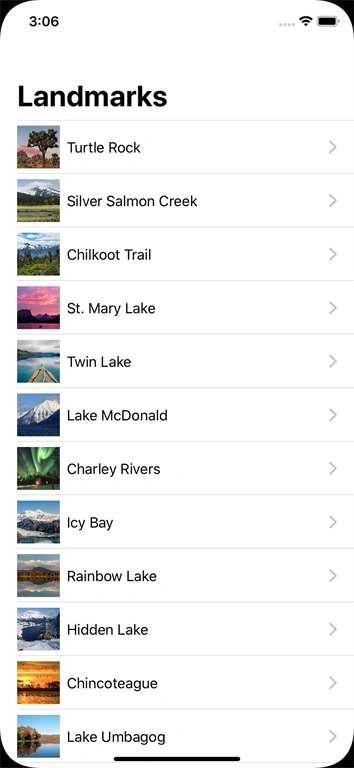
- NavigationLink(destination: LandmarkDetail(landmark: dataObj)) {
- LandmarkRow(landmark: dataObj)
- }
- }
- .navigationBarTitle(Text("Landmarks"), displayMode: .large)
- }
- }
- }
- #if DEBUG
- struct LandmarkList_Previews: PreviewProvider {
- static var previews: some View {
- LandmarkList()
- }
- }
- #endif
Note
You need to set up a root view on sceneDelegate.

App screenshot
Join the conversation! Your thoughts help the community grow.