

Many years ago, I created a simple demo about “Creating a Simple Registration Form using the ADO.NET way”. In this article, we’re going to look at how to create a simple form that would allow users to perform basic database operations, such as fetch, insert, update and delete using L2S.
As an overview, LINQ to SQL is a technology that allows you to query SQL Server database. LINQ to SQL is an O/RM (object relational mapping) implementation that ships in the .NET Framework "Orcas" release, and which allows you to model a relational database using .NET classes. You can then query the database using LINQ, as well as update/insert/delete data from it.
I will not cover much on details about it in this article. So, if you need to know more about this technology, then you can refer to this link.
Let’s Get Started!
To get started, let’s go ahead and fire up Visual Studio and create a new WebSite by selecting File > New WebSite.
Adding a DBML File
Since we are going to use L2S, we need to add a .dbml file. To do this, just right click on the application root and select Add New Item. On the template, select LINQ to SQL Classes file, just like in the figure shown below,
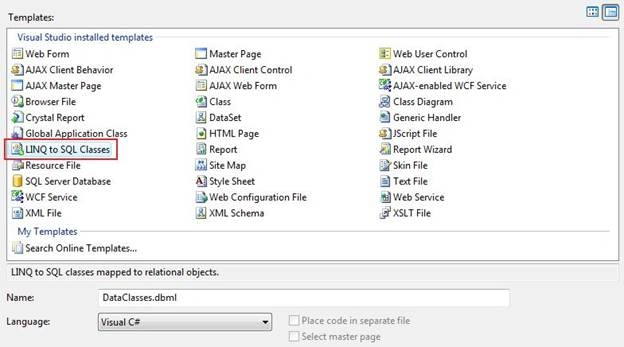
Rename your .dbml file the way you want it and then click OK. Note that I’m using the Northwind database for this particular demo, and on that account, I have renamed the .dbml file to Northwind for simplicity.
Now, open up server explorer in Visual Studio and browse the database that you want to work on (in this case, the Northwind database). Just for the purpose of this example, we’re going to use the Customers table from the Northwind database. Drag and drop the aforementioned table to the Northwind.dbml design surface. See the screenshot below,
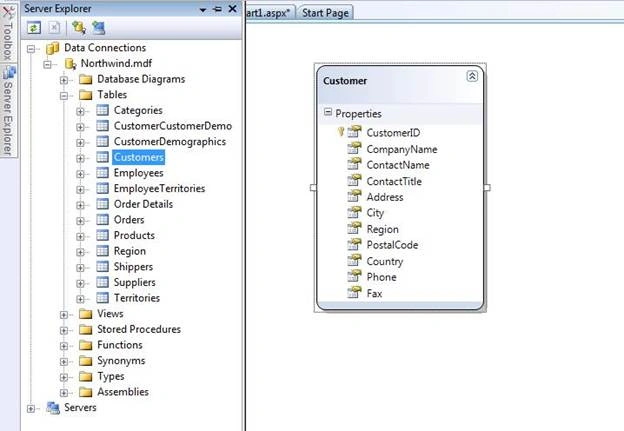
What happened there is that by the time you drag a table in the design surface, L2S will automatically generate the business object for you within the DataContext, and let you query against it. The DataContext is the main gateway by which you retrieve objects from the database and resubmit changes. You use it in the same way that you would use an ADO.NET Connection. In fact, the DataContext is initialized with a connection or connection string you supply. The purpose of the DataContext is to translate your requests for objects into SQL queries made against the database and then assemble objects out of the results. The DataContext enables language-integrated query (LINQ) by implementing the same operator pattern as the standard query operators, such as Where and Select.
Setting Up the GUI
Now, let’s go ahead and create a new WebForm’s page for data entry. For the simplicity of this demo, I just set up the form like below:
- <html xmlns="http://www.w3.org/1999/xhtml">
- <head runat="server">
- <title>LINQ to SQL Demo</title>
- <style type="text/css">
- .style1 {
- width: 400px;
- }
- .style1 td {
- width: 200px;
- }
- </style>
- </head>
- <body>
- <form id="form1" runat="server">
- <asp:Literal ID="LiteralMessage" runat="server"></asp:Literal>
- <table class="style1">
- <tr>
- <td>Company ID</td>
- <td><asp:TextBox ID="TextBoxID" runat="server" /></td>
- </tr>
- <tr>
- <td>Company Name</td>
- <td><asp:TextBox ID="TextBoxCompanyName" runat="server" /></td>
- </tr>
- <tr>
- <td>Contact Name</td>
- <td><asp:TextBox ID="TextBoxContactName" runat="server" /></td>
- </tr>
- <tr>
- <td>Contact Title</td>
- <td><asp:TextBox ID="TextBoxContactTitle" runat="server" /></td>
- </tr>
- <tr>
- <td>Address</td>
- <td><asp:TextBox ID="TextBoxAddress" runat="server" /></td>
- </tr>
- <tr>
- <td>City</td>
- <td><asp:TextBox ID="TextBoxCity" runat="server" /></td>
- </tr>
- <tr>
- <td>Region</td>
- <td><asp:TextBox ID="TextBoxRegion" runat="server" /></td>
- </tr>
- <tr>
- <td>Postal Code</td>
- <td><asp:TextBox ID="TextBoxPostalCode" runat="server" /></td>
- </tr>
- <tr>
- <td>Country</td>
- <td><asp:TextBox ID="TextBoxCountry" runat="server" /></td>
- </tr>
- </table>
- <asp:Button ID="Button1" runat="server" Text="Save" onclick="Button1_Click" />
- </form>
- </body>
- </html>
Perform Insert
After setting up our GUI, let’s go ahead and create the method for inserting the data to the database using L2S. Here’s the full code block below:
- using System;
- using System.Configuration;
- using System.Data;
- using System.Linq;
- using System.Web;
- using System.Web.UI;
- using System.Web.UI.HtmlControls;
- using System.Web.UI.WebControls;
- using System.Xml.Linq;
- public partial class _Default : System.Web.UI.Page
- {
- protected void Button1_Click(object sender, EventArgs e)
- {
- SaveCustomerInfo();
- }
- private void SaveCustomerInfo()
- {
- using (NorthwindDataContext context = new NorthwindDataContext())
- {
- //Create a new instance of the Customer object
- Customer cust = new Customer();
- //Add new values to each fields
- cust.CustomerID = TextBoxID.Text;
- cust.CompanyName = TextBoxCompanyName.Text;
- cust.ContactName = TextBoxContactName.Text;
- cust.ContactTitle = TextBoxContactTitle.Text;
- cust.Address = TextBoxAddress.Text;
- cust.City = TextBoxCity.Text;
- cust.Region = TextBoxRegion.Text;
- cust.PostalCode = TextBoxPostalCode.Text;
- cust.Country = TextBoxCountry.Text;
- //Insert the new Customer object
- context.Customers.InsertOnSubmit(cust);
- //Sumbit changes to the database
- context.SubmitChanges();
- //Display a message for successful operation
- LiteralMessage.Text = "<p style='color:Green;'>Information Successfully saved!</p>";
- }
- }
- }
Note: The Customer and Customer's objects are automatically created once you’ve added the Customer table in the .dmbl design surface.
Testing the App
Running the code will result to something like this:
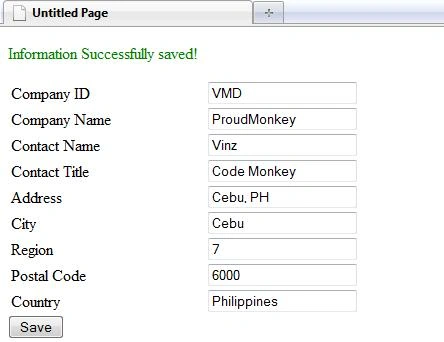
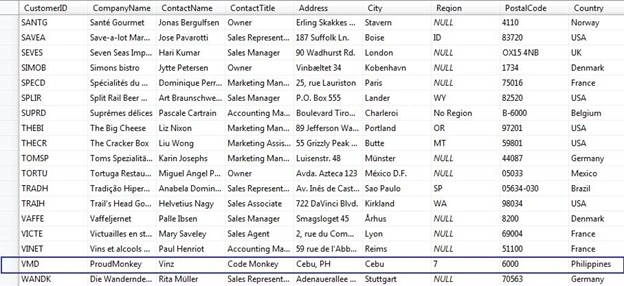
From there, we can fill in those fields with values we want. Just for this demo, notice that I have filled in the fields with a sample data. Hitting the save button will invoke the method SaveCustomerInfo() which is responsible for doing the insert operation. Now, if we look at the database, we can see that the data we entered was being saved successfully to the database. See the screenshot below,
Pretty simple!
Okay, I know that you have few questions that pops in your mind now and these are,
- What happened behind the scene? How does it actually save the data to the database?
- How does the query being constructed? Does it handle SQL Injection?
- How does the connection string being set up? What If I want to set the connection string manually?
- Does L2S always open the connection to the database once we created a new instance of the DataContext?
To answer the questions that you have in mind then I would suggest you to give this FAQ a read.
Performing Fetch and Filter
Now that we’ve learned the basics on performing an insert to our database, it’s time for us to move one step further. We’ll see how to fetch and filter data from database and fill the fields in the form using L2S.
Setting Up the GUI
Okay, add a new WebForm to your application and set up the GUI. Again, just for the simplicity of this demo, let’s just setup the form like this,
- <html xmlns="http://www.w3.org/1999/xhtml">
- <head runat="server">
- <title>LINQ to SQL Demo</title>
- <style type="text/css">
- .style1 {
- width: 400px;
- }
- .style1 td {
- width: 200px;
- }
- </style>
- </head>
- <body>
- <form id="form1" runat="server">
- <asp:DropDownList ID="DropDownListCustomerID" runat="server"
- AutoPostBack="true"
- onselectedindexchanged="DropDownListCustomerID_SelectedIndexChanged">
- </asp:DropDownList>
- <br />
- <table class="style1">
- <tr>
- <td>Company Name</td>
- <td><asp:TextBox ID="TextBoxCompanyName" runat="server" ReadOnly="true" /></td>
- </tr>
- <tr>
- <td>Contact Name</td>
- <td><asp:TextBox ID="TextBoxContactName" runat="server" ReadOnly="true" /></td>
- </tr>
- <tr>
- <td>Contact Title</td>
- <td><asp:TextBox ID="TextBoxContactTitle" runat="server" ReadOnly="true" /></td>
- </tr>
- <tr>
- <td>Address</td>
- <td><asp:TextBox ID="TextBoxAddress" runat="server" ReadOnly="true" /></td>
- </tr>
- <tr>
- <td>City</td>
- <td><asp:TextBox ID="TextBoxCity" runat="server" ReadOnly="true" /></td>
- </tr>
- <tr>
- <td>Region</td>
- <td><asp:TextBox ID="TextBoxRegion" runat="server" ReadOnly="true" /></td>
- </tr>
- <tr>
- <td>Postal Code</td>
- <td><asp:TextBox ID="TextBoxPostalCode" runat="server" ReadOnly="true" /></td>
- </tr>
- <tr>
- <td>Country</td>
- <td><asp:TextBox ID="TextBoxCountry" runat="server" ReadOnly="true" /></td>
- </tr>
- </table>
- </form>
- </body>
- </html>
Populating the DropDownList with the List of Customers
Now, switch to our code behind page and create the method for fetching the list of customers. Here’s the code block below:
- private List<Customer> GetCustomers()
- {
- using (NorthwindDataContext context = new NorthwindDataContext())
- {
- return (from c in context.Customers select c).ToList();
- }
- }
Since we are done creating the method for fetching the list of customers, we can simply call the method above and populate the DropDownList control with the results. Typically we do this at Page_Load event within Not IsPostBack block like below,
- protected void Page_Load(object sender, EventArgs e)
- {
- if (!Page.IsPostBack)
- {
- DropDownListCustomerID.DataSource = GetCustomers();
- DropDownListCustomerID.DataTextField = "ContactName";
- DropDownListCustomerID.DataValueField = "CustomerID";
- DropDownListCustomerID.DataBind();
- }
- }
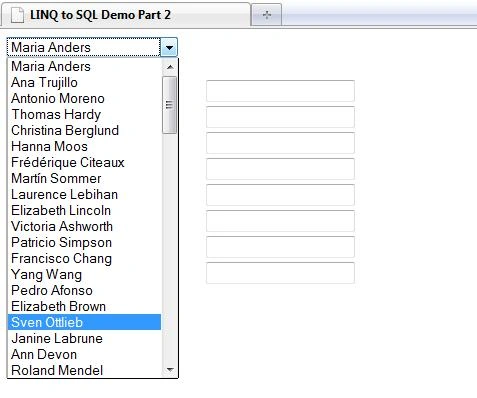
Let’s proceed and continue on the next step.
Populating the Form with Customer’s Information
The next step is to populate the form with the customer information based on the CustomerID selected from the DropDownList.
Note: Since the form will be populated based on the selected item from the DropDownList, then you’ll need to set the AutoPostBack attribute to TRUE in the DropDownList so that the SelectedIndexChanged event will fire up.
Here’s the code block below for fetching the customer information based on the CustomerID,
- private List<Customer> GetCustomerInfo(string customerID)
- {
- using (NorthwindDataContext context = new NorthwindDataContext())
- {
- return (from c in context.Customers
- where c.CustomerID == customerID
- select c).ToList();
- }
- }
One of the cool things about L2S is that we don’t need to worry how the query is being constructed because L2S will take care of that for you including mapping of the data types from your table columns, mapping relationships between tables, etcetera, etcetera and etcetera. Always keep in mind that L2S is an ORM (Object Relational Mapper), and so we don’t need to deal directly with databases, tables and columns but instead, we deal with the objects that are in the DataContext and query the data against it using LINQ syntax.
Populating the Forms with Data
The final step is to populate our form with data based on the selected value from the DropDownList. To do this, we can simply call the method GetCustomerInfo() at the SelectedIndexChanged event of DropDownList like below:
- protected void DropDownListCustomerID_SelectedIndexChanged(object sender, EventArgs e)
- {
- var customerInfo = GetCustomerInfo(DropDownListCustomerID.SelectedValue);
- TextBoxCompanyName.Text = customerInfo[0].CompanyName;
- TextBoxContactName.Text = customerInfo[0].ContactName;
- TextBoxContactTitle.Text = customerInfo[0].ContactTitle;
- TextBoxAddress.Text = customerInfo[0].Address;
- TextBoxCity.Text = customerInfo[0].City;
- TextBoxRegion.Text = customerInfo[0].Region;
- TextBoxPostalCode.Text = customerInfo[0].PostalCode;
- TextBoxCountry.Text = customerInfo[0].Country;
- }
When you run the code above and select an item in the DropDownList, you will see that the textbox fields will be populated with the data based from what you have selected in the DropDownList:
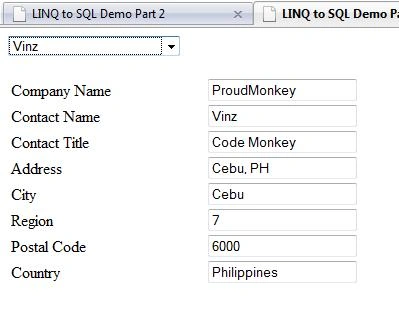
That simple!
Performing Edit and Update
Up to this point, we’ve learned how to insert, fetch and filter data from our database using L2S. In this section, we’re going to see the basic way on how to edit and update the data
Setting Up the GUI
Now create another page and replace the markup with the following,
- <html xmlns="http://www.w3.org/1999/xhtml">
- <head runat="server">
- <title>LINQ to SQL Demo</title>
- <style type="text/css">
- .style1 {
- width: 400px;
- }
- .style1 td {
- width: 200px;
- }
- </style>
- </head>
- <body>
- <form id="form1" runat="server">
- <asp:DropDownList ID="DropDownListCustomerID" runat="server"
- AutoPostBack="true"
- onselectedindexchanged="DropDownListCustomerID_SelectedIndexChanged">
- </asp:DropDownList>
- <br />
- <asp:Literal ID="LiteralMessage" runat="server"></asp:Literal><br />
- <asp:Button ID="ButtonEdit" runat="server" Text="Edit" Enabled="false" onclick="ButtonEdit_Click" />
- <asp:Button ID="ButtonDelete" runat="server" Text="Delete" Enabled="false" />
- <asp:Button ID="ButtonUpdate" runat="server" Text="Update" Enabled="false" />
- <asp:Button ID="ButtonCancel" runat="server" Text="Cancel" Enabled="false" />
- <asp:Panel ID="PanelCustomerInfo" runat="server" Enabled="false">
- <table class="style1">
- <tr>
- <td>Company Name</td>
- <td><asp:TextBox ID="TextBoxCompanyName" runat="server" /></td>
- </tr>
- <tr>
- <td>Contact Name</td>
- <td><asp:TextBox ID="TextBoxContactName" runat="server" /></td>
- </tr>
- <tr>
- <td>Contact Title</td>
- <td><asp:TextBox ID="TextBoxContactTitle" runat="server" /></td>
- </tr>
- <tr>
- <td>Address</td>
- <td><asp:TextBox ID="TextBoxAddress" runat="server" /></td>
- </tr>
- <tr>
- <td>City</td>
- <td><asp:TextBox ID="TextBoxCity" runat="server" /></td>
- </tr>
- <tr>
- <td>Region</td>
- <td><asp:TextBox ID="TextBoxRegion" runat="server" /></td>
- </tr>
- <tr>
- <td>Postal Code</td>
- <td><asp:TextBox ID="TextBoxPostalCode" runat="server" /></td>
- </tr>
- <tr>
- <td>Country</td>
- <td><asp:TextBox ID="TextBoxCountry" runat="server" /></td>
- </tr>
- </table>
- </asp:Panel>
- </form>
- </body>
- </html>
Populating the Forms
Now, just like the previous section above, let’s populate the DropDownList with the list of customers and populate the form with the customer’s information based on the CustomerID selected from the DropDownList. Here is the code block below,
- private List<Customer> GetCustomers()
- {
- using (NorthwindDataContext context = new NorthwindDataContext())
- {
- return (from c in context.Customers select c).ToList();
- }
- }
- private List<Customer> GetCustomerInfo(string customerID)
- {
- using (NorthwindDataContext context = new NorthwindDataContext())
- {
- return (from c in context.Customers
- where c.CustomerID == customerID
- select c).ToList();
- }
- }
- private void BindCustomersToList()
- {
- DropDownListCustomerID.DataSource = GetCustomers();
- DropDownListCustomerID.DataTextField = "ContactName";
- DropDownListCustomerID.DataValueField = "CustomerID";
- DropDownListCustomerID.DataBind();
- }
- protected void Page_Load(object sender, EventArgs e)
- {
- if (!Page.IsPostBack)
- {
- BindCustomersToList();
- }
- }
- protected void DropDownListCustomerID_SelectedIndexChanged(object sender, EventArgs e)
- {
- var customerInfo = GetCustomerInfo(DropDownListCustomerID.SelectedValue);
- TextBoxCompanyName.Text = customerInfo[0].CompanyName;
- TextBoxContactName.Text = customerInfo[0].ContactName;
- TextBoxContactTitle.Text = customerInfo[0].ContactTitle;
- TextBoxAddress.Text = customerInfo[0].Address;
- TextBoxCity.Text = customerInfo[0].City;
- TextBoxRegion.Text = customerInfo[0].Region;
- TextBoxPostalCode.Text = customerInfo[0].PostalCode;
- TextBoxCountry.Text = customerInfo[0].Country;
- ButtonEdit.Enabled = true;
- ButtonDelete.Enabled = true;
- }
Running the code above will show something like this in the browser,
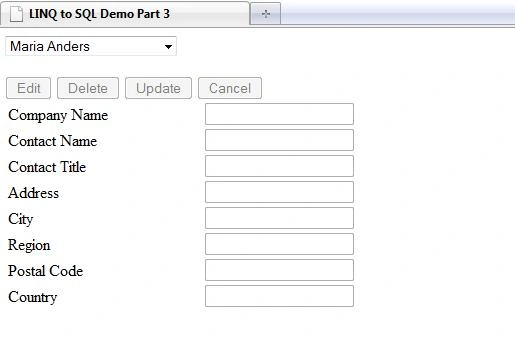
Selecting a customer from the DropDownList
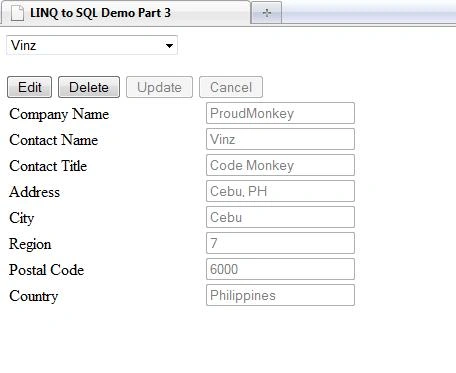 .
.After selecting a customer from the DropDownList.
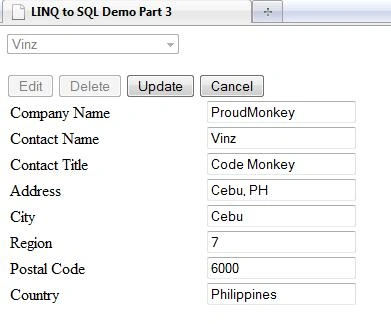
Notice the change of the buttons enabled property after we select a customer.
Here’s the code for the Edit Button,
- protected void ButtonEdit_Click(object sender, EventArgs e)
- {
- PanelCustomerInfo.Enabled = true;
- DropDownListCustomerID.Enabled = false;
- ButtonEdit.Enabled = false;
- ButtonDelete.Enabled = false;
- ButtonUpdate.Enabled = true;
- ButtonCancel.Enabled = true;
- LiteralMessage.Text = string.Empty;
- }
Here’s the code for the Update Button,
- private void UpdateCustomerInfo(string ID)
- {
- using (NorthwindDataContext context = new NorthwindDataContext())
- {
- var customer = (from c in context.Customers
- where c.CustomerID == ID
- select c).Single();
- customer.CompanyName = TextBoxCompanyName.Text;
- customer.ContactName = TextBoxContactName.Text;
- customer.ContactTitle = TextBoxContactTitle.Text;
- customer.Address = TextBoxAddress.Text;
- customer.City = TextBoxCity.Text;
- customer.Region = TextBoxRegion.Text;
- customer.PostalCode = TextBoxPostalCode.Text;
- customer.Country = TextBoxCountry.Text;
- context.SubmitChanges();
- LiteralMessage.Text = "<p style='color:Green;'>Information Updated!</p>";
- }
- }
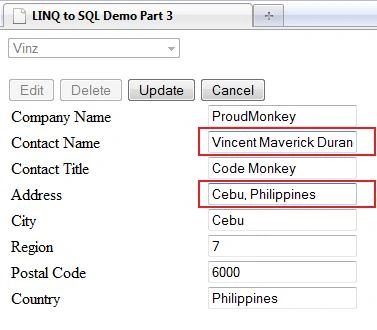
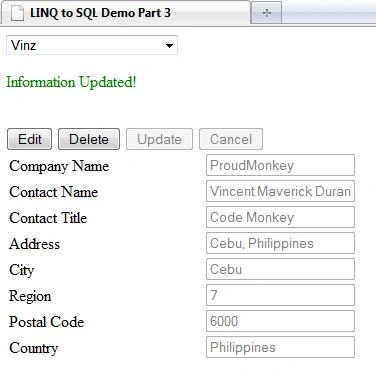
From there, we can then assign the customer fields based on the TextBox values and then call the context.SubmitChanges() method to update the database with the changes we made.
Now, let’s try to run the code and see what will happen,
On editing,
After invoking the Update Button,
That's simple! Now, we’re down to the last and final step in this article.
Perform Delete
Here’s the code block for the Delete Button,
- private void DeleteCustomerInfo(string ID)
- {
- using (NorthwindDataContext context = new NorthwindDataContext())
- {
- var customer = (from c in context.Customers
- where c.CustomerID == ID
- select c).First();
- context.Customers.DeleteOnSubmit(customer);
- context.SubmitChanges();
- LiteralMessage.Text = "<p style='color:Green;'>Information Deleted!</p>";
- }
- }
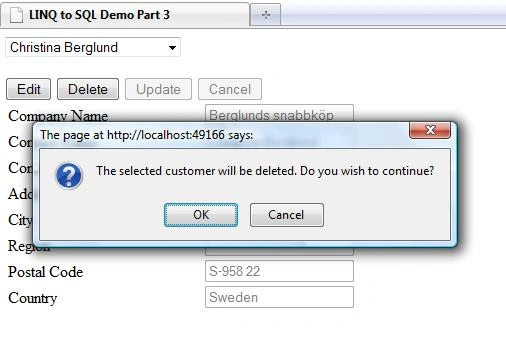
Since we don’t want users to delete the information right away, we need to prompt them with a confirmation message if they wish to continue the deletion or not. To do this, we could simply hook up a JavaScript Confirm function in the delete button. Take a look at the highlighted code below,
- <asp:Button ID="ButtonDelete" runat="server" Text="Delete" Enabled="false"
- onclick="ButtonDelete_Click" OnClientClick="return confirm('The selected customer will be deleted. Do you wish to continue?');return false;" />
- private static void ClearFormFields(Control Parent)
- {
- if (Parent is TextBox)
- { (Parent as TextBox).Text = string.Empty; }
- else
- {
- foreach (Control c in Parent.Controls)
- ClearFormFields(c);
- }
- }
- protected void ButtonDelete_Click(object sender, EventArgs e)
- {
- //Call the DELETE Method
- DeleteCustomerInfo(DropDownListCustomerID.SelectedValue);
- //Rebind the DropDownList to reflect the changes after deletion
- BindCustomersToList();
- //Clear the fields
- ClearFormFields(Page);
- }
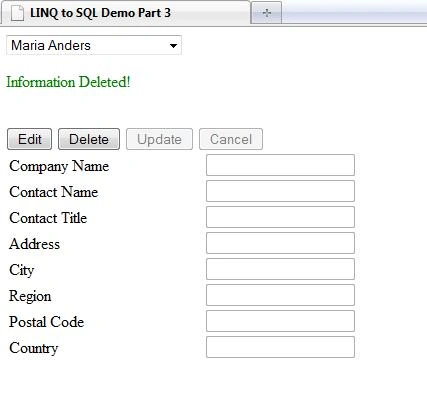
On Deletion,
After Deletion,
Here’s the code for the Cancel Button,
- protected void ButtonCancel_Click(object sender, EventArgs e)
- {
- PanelCustomerInfo.Enabled = false;
- DropDownListCustomerID.Enabled = true;
- ButtonEdit.Enabled = true;
- ButtonDelete.Enabled = true;
- ButtonUpdate.Enabled = false;
- ButtonCancel.Enabled = false;
- }
Summary
In this article, we have learned about the basics of how to perform Insert, Fetch, Filter, Edit, Update and Delete using the LINQ to SQL.
Join the conversation! Your thoughts help the community grow.