

Life Cycle Method
In Angular, every component has a life-cycle, a number of different stages it goes through from initializing to destroying. There are 8 different stages in the component lifecycle. Every stage is called life cycle hook events. So, we can use these hook events in different phases of our application to obtains fine controls on the components. Since a component is a typescript class, for that reason every component must have a constructor method. The constructor of the component class executes first before the execution of any other life cycle hook event. If we need to inject any dependencies into the component, then the constructor is the best place to inject that dependency. After executing the constructor, Angular executes its life cycle hook methods in a specific order.
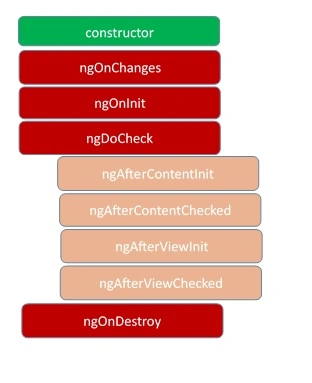
These stages are mainly divided into two phases – one is linked to the component itself and another is linked to the children of that component.
- ngOnChanges
This event executes every time when a value of an input control within the component has been changed. Actually, this event fires first when a value of a bound property has been changed. It always receives a changed data map, containing the current and previous value of the bound property wrapped in a SimpleChange.- {"name":{"previousValue":"","currentValue":"Amit"}}
In this example above, one value change has been detected to the input property name. The value of this property has been changed from an empty string to a string value “Amit”.
- ngOnInit
This event initializes after angular first displays the data-bound properties or when the component has been initialized. This event basically is called only once just after the ngOnChanges() events. This event is mainly used for initializing data in a component. - ngDoCheck
This event is triggered every time when the input properties of a component are checked. We can use this hook method to implement the check with our own logic check. Basically, this method allows us to implement our own custom change detection logic or algorithm for any component. - ngAfterContentInit
This lifecycle method is executed when Angular performs any content projection within the component views. This method executes only for the first time when all the bindings of the component need to be checked for the first time. This event executes just after the ngDoCheck() method. This method is basically linked with the child component initializations. - ngAfterContentChecked
This lifecycle hook method executes every time when the content of the component has been checked by the change detection mechanism of the Angular. This method called after ngAfterContentInit() method. This method is also called on every subsequent execution of ngDoCheck(). This method is also mainly linked with the child component initializations. - ngAfterViewInit
This lifecycle hook method executes when the component’s view has been fully initialized. This method is initialized after Angular initializes the component’s view and child views. It is called only the first time after ngAfterContentChecked(). This lifecycle hook method only applies to components. - ngAfterViewChecked
This method is just called after the ngAterViewInit() method. It is executed every time the when the view of the given component has been checked by the change detection algorithm of Angular. This method executes every subsequence execution of the ngAfterContentChecked(). This method also executes when any binding of the children directives has been changed. So this method is very useful when the component waits for some value which is coming from its child components. - ngOnDestroy
This method will be executed just before Angular destroys the components. This method is very useful for unsubscribing the observables and detaching the event handlers to avoid memory leaks. Actually, it is called just before the instance of the component is finally destroyed. This method called only once just before the component is removed from the DOM.
Interfaces
As per the above discussion, we can just define the life cycle hook methods directly on the component class, but we can use the advantage of the interface. Since each of these lifecycle hook methods has an associated typescript interface, the name of those interfaces is the same name just without the ng prefix like ngOnInit has an interface called OnInit. Each interface defines just one life cycle hook method. One more important note that the browser-based TypeScript compiler does not raise a compilation error when we don’t implement interface functions in our class. But, in the compiling time of the typescript code, it will throw an error.
- import {
- OnChanges,
- OnInit,
- DoCheck,
- AfterContentInit,
- AfterContentChecked,
- AfterViewInit,
- AfterViewChecked,
- OnDestroy
- } from '@angular/core';
- class SampleComponent implements
- OnChanges,
- OnInit,
- DoCheck,
- AfterContentInit,
- AfterContentChecked,
- AfterViewInit,
- AfterViewChecked,
- OnDestroy {
- ...
- }
- import { Component } from '@angular/core';
- @Component({
- moduleId: module.id,
- selector: 'lifecycle-sample',
- templateUrl: 'app.component.lifecycle.html'
- })
- export class LifeCycleComponent {
- data:number=100;
- constructor() {
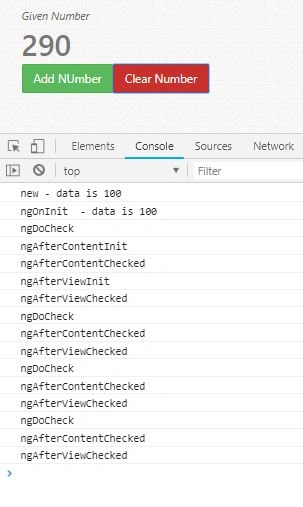
- console.log(`new - data is ${this.data}`);
- }
- ngOnChanges() {
- console.log(`ngOnChanges - data is ${this.data}`);
- }
- ngOnInit() {
- console.log(`ngOnInit - data is ${this.data}`);
- }
- ngDoCheck() {
- console.log("ngDoCheck")
- }
- ngAfterContentInit() {
- console.log("ngAfterContentInit");
- }
- ngAfterContentChecked() {
- console.log("ngAfterContentChecked");
- }
- ngAfterViewInit() {
- console.log("ngAfterViewInit");
- }
- ngAfterViewChecked() {
- console.log("ngAfterViewChecked");
- }
- ngOnDestroy() {
- console.log("ngOnDestroy");
- }
- fnAddNumber():void{
- this.data+=100;
- }
- deleteNumber():void{
- this.data -=10;
- }
- }
- <span class="setup">Given Number</span>
- <h1 class="punchline">{{ data }}</h1>
- <button type="button" class="btn btn-success"
- (click)="fnAddNumber()">Add NUmber
- </button>
- <button type="button"
- class="btn btn-danger"
- (click)="deleteNumber()">Clear Number
- </button>
Ramzanali MominPosted Jul 16, 2019, 7:13 AM
Superb Article
Krishan DuttPosted May 29, 2019, 12:51 PM
Great ....
Farhan AhmedPosted Jul 24, 2018, 12:16 AM
Great.....
Jignesh KumarPosted Jul 23, 2018, 9:41 PM
Nice article.