

Introduction
This article demonstrates MVC using angular file upload using bootstrap file style in Visual Studio 2017.
Angular File Upload
Angular file upload supports native Html5 uploads. It works with any server side platform which supports standard html form uploads. When file is added to the queue, it creates file item and uploader options are into this object. After, the items in the queue are ready for uploading.
Features
- Drag-n-drop upload
- Upload progress
- Validation file filter
- File upload queue
Follow the steps you can use angular file upload in angular JS in MVC
- Create MVC Project
- Configure Angular file upload & Bootstrap filestyle
- Work in Angular file upload
Create MVC Project
Open the visual studio 2017
Go to New menu >Click New & project. Now it will open New Project Window
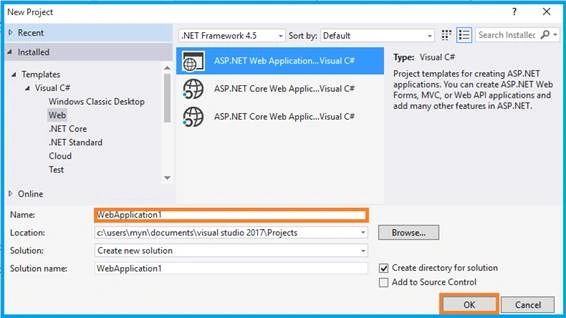
You can select ASP.NET Web Application on Framework 4.5. Enter the name of project in “Solution name” textbox then click ok button.
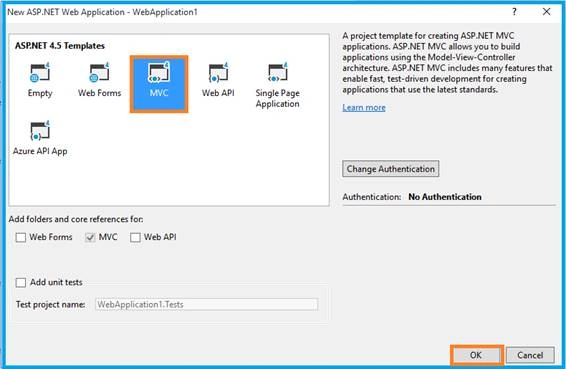
One more window should be appearing. Select MVC Template in this popup & Click ok button. Now start cropping image.
Configure Angular File Upload & Bootstrap Filestyle
Right click above the project and go to the NuGet package manager then search ‘angularfileupload’ in browse tab & install it.
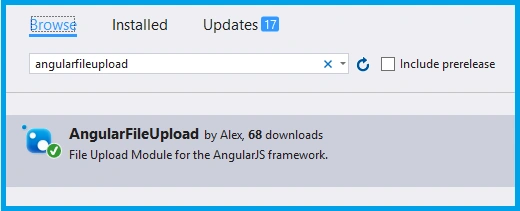
OR You can download the plug in from
Open the _Layout.cshtml and must refer the .js file from downloaded folder to this view page
- <script src="~/Plugin/angular/angular.min.js"></script>
- <script src="~/Plugin/angular-ui-router/release/angular-ui-router.min.js"></script>
- <script src="~/Plugin/angular-file-upload/dist/angular-file-upload.min.js"></script>
- <script src="~/Plugin/bootstrap-filestyle/src/bootstrap-filestyle.js"></script>
Link your angular configurable file, whatever you give as the name
- <script src="~/App/App.module.js"></script>
- <script src="~/App/App.config.js"></script>
- <script src="~/App/IUController.js"></script>
Angular Module
You will need to include the module as a dependency on your application.
- var uiroute = angular
- .module('uiroute', ['ui.router','angularFileUpload']);
If you have any doubts in configuration, visit my articles,
- Learn Basics Of MVC Using AngularJS
- Learn MVC Using Angular UI-Route
- Learn MVC Using Angular Role Based Login
- Learn MVC Using Angular Datatable
- Learn MVC Using Angular Crystal Report
- Learn MVC Using Angular Pie Chart
- Learn MVC Using Angular Flot Chart
- Learn MVC Using Angular xEditable
- Learn MVC Using Angular Idle
- Learn MVC Using Angular Wizard
- Learn MVC Using Angular - Maps
- Learn MVC Using Angular Bootstrap Nav Tree
- Learn MVC Using Angular Image Crop
Work in Angular image Upload
Using bootstrap file style directive make it as a single uploading attribute. Based on attribute you can set
- <input filestyle="" type="file" data-icon-name="icon-upload" data-button-text="Single" data-class-button="btn btn-default" data-classinput="form-control inline" nv-file-select="" uploader="uploader" class="form-control" />
Html Code
- <div ng-controller="FileUploadController" nv-file-drop="" uploader="uploader" filters="queueLimit, customFilter">
- <div class="container-fluid">
- <div class="row">
- <div class="col-md-3">
- <div class="panel">
- <div class="panel-body">
- <h4 class="page-header mt0">Select files</h4>
- <div ng-show="uploader.isHTML5">
- <!-- 3. nv-file-over uploader="link" over-class="className"-->
- <div nv-file-over="" uploader="uploader" over-class="bg-info" class="box-placeholder my-drop-zone">Base drop zone</div>
- <!-- Example: nv-file-drop="" uploader="{Object}" options="{Object}" filters="{String}"-->
- <div nv-file-drop="" uploader="uploader" options="{ url: '/foo' }">
- <div nv-file-over="" uploader="uploader" over-class="bg-purple" class="box-placeholder my-drop-zone">Another drop zone with its own settings</div>
- </div>
- </div>
- <!-- Example: nv-file-select="" uploader="{Object}" options="{Object}" filters="{String}"-->
- <hr />
- <input filestyle="" type="file" data-icon-name="icon-upload" data-button-text="Multiple" data-class-button="btn btn-default" data-class-input="form-control inline" nv-file-select="" uploader="uploader" multiple="" class="form-control" />
- <br />
- <input filestyle="" type="file" data-icon-name="icon-upload" data-button-text="Single" data-class-button="btn btn-default" data-classinput="form-control inline" nv-file-select="" uploader="uploader" class="form-control" />
- </div>
- </div>
- </div>
- <div style="margin-bottom: 40px" class="col-md-9">
- <div class="panel">
- <div class="panel-body">
- <p ng-if="uploader.queue.length" class="pull-right label label-info">Queue length: {{ uploader.queue.length }}</p>
- <h4 class="page-header mt0">Upload queue</h4>
- <p ng-if="!uploader.queue.length" class="lead text-center">No files in queue. Start adding some..</p>
- <div ng-if="uploader.queue.length">
- <table ng-if="uploader.queue.length" class="table">
- <thead>
- <tr>
- <th width="50%">Name</th>
- <th ng-show="uploader.isHTML5">Size</th>
- <th ng-show="uploader.isHTML5">Progress</th>
- <th>Status</th>
- <th>Actions</th>
- </tr>
- </thead>
- <tbody>
- <tr ng-repeat="item in uploader.queue">
- <td>
- <strong>{{ item.file.name }}</strong>
- </td>
- <td ng-show="uploader.isHTML5" nowrap="">{{ item.file.size/1024/1024|number:2 }} MB</td>
- <td ng-show="uploader.isHTML5">
- <div style="margin-bottom: 0;" class="progress progress-xs">
- <div role="progressbar" ng-style="{ 'width': item.progress + '%' }" class="progress-bar"></div>
- </div>
- </td>
- <td class="text-center">
- <span ng-show="item.isSuccess">
- <em class="fa fa-check fa-fw"></em>
- </span>
- <span ng-show="item.isCancel">
- <em class="fa fa-ban-circle fa-fw"></em>
- </span>
- <span ng-show="item.isError">
- <em class="fa fa-times fa-fw"></em>
- </span>
- </td>
- <td nowrap="">
- <button type="button" ng-click="item.upload()" ng-disabled="item.isReady || item.isUploading || item.isSuccess" class="btn btn-info btn-xs">
- <span class="icon-cloud-upload mr"></span>Upload
- </button>
- <button type="button" ng-click="item.cancel()" ng-disabled="!item.isUploading" class="btn btn-warning btn-xs">
- <span class="icon-cross mr"></span>Cancel
- </button>
- <button type="button" ng-click="item.remove()" class="btn btn-danger btn-xs">
- <span class="icon-trash mr"></span>Remove
- </button>
- </td>
- </tr>
- </tbody>
- </table>
- </div>
- </div>
- </div>
- <div class="panel">
- <div class="panel-body">
- <div>
- <p>Queue progress:</p>
- <div style="" class="progress progress-xs">
- <div role="progressbar" ng-style="{ 'width': uploader.progress + '%' }" class="progress-bar"></div>
- </div>
- </div>
- <button type="button" ng-click="uploader.uploadAll()" ng-disabled="!uploader.getNotUploadedItems().length" class="btn btn-info btn-s">
- <span class="icon-cloud-upload mr"></span>Upload all
- </button>
- <button type="button" ng-click="uploader.cancelAll()" ng-disabled="!uploader.isUploading" class="btn btn-warning btn-s">
- <span class="icon-cross mr"></span>Cancel all
- </button>
- <button type="button" ng-click="uploader.clearQueue()" ng-disabled="!uploader.queue.length" class="btn btn-danger btn-s">
- <span class="icon-trash mr"></span>Remove all
- </button>
- </div>
- </div>
- </div>
- </div>
- </div>
- </div>
Angular Controller
Initiate the Fileuploader to object. This object will load the predefined function.
- function FileUploadController(FileUploader) {
- var uploader = $scope.uploader = new FileUploader({
- url: 'server call'
- });
- uploader.filters.push({
- name: 'customFilter',
- fn: function (item, options) {
- return this.queue.length < 10;
- }
- });
- uploader.onWhenAddingFileFailed = function (item, filter, options) {
- console.info('onWhenAddingFileFailed', item, filter, options);
- };
- uploader.onAfterAddingFile = function (fileItem) {
- console.info('onAfterAddingFile', fileItem);
- };
- uploader.onAfterAddingAll = function (addedFileItems) {
- console.info('onAfterAddingAll', addedFileItems);
- };
- uploader.onBeforeUploadItem = function (item) {
- console.info('onBeforeUploadItem', item);
- };
- uploader.onProgressItem = function (fileItem, progress) {
- console.info('onProgressItem', fileItem, progress);
- };
- uploader.onProgressAll = function (progress) {
- console.info('onProgressAll', progress);
- };
- uploader.onSuccessItem = function (fileItem, response, status, headers) {
- console.info('onSuccessItem', fileItem, response, status, headers);
- };
- uploader.onErrorItem = function (fileItem, response, status, headers) {
- console.info('onErrorItem', fileItem, response, status, headers);
- };
- uploader.onCancelItem = function (fileItem, response, status, headers) {
- console.info('onCancelItem', fileItem, response, status, headers);
- };
- uploader.onCompleteItem = function (fileItem, response, status, headers) {
- console.info('onCompleteItem', fileItem, response, status, headers);
- };
- uploader.onCompleteAll = function () {
- console.info('onCompleteAll');
- };
- console.info('uploader', uploader);
Angular Directive
You can use bootstrap filestyle as angular directive. When you select the image using filestyle, set the element to the <img-crop> directive
- .directive('filestyle', filestyle);
- function filestyle() {
- controller.$inject = ['$scope', '$element'];
- return {
- restrict: 'A',
- controller: controller
- };
- function controller($scope, $element) {
- var options = $element.data();
- options.classInput = $element.data('classinput') || options.classInput;
- $element.filestyle(options);
- }
- }
Click F5 button and Run the Application. Now it will appear in the browser and you can see the result.
Output 1
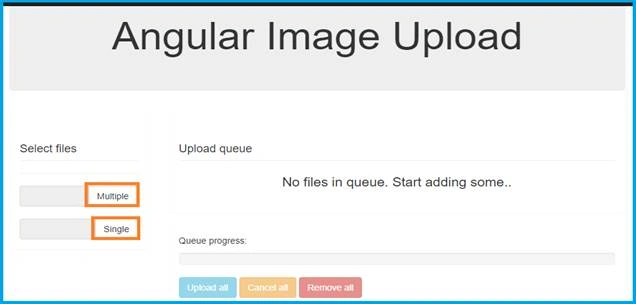
When you selected or dropped into the component, one or more filters are applied. Files which pass all filters are added to the queue.
Output 2
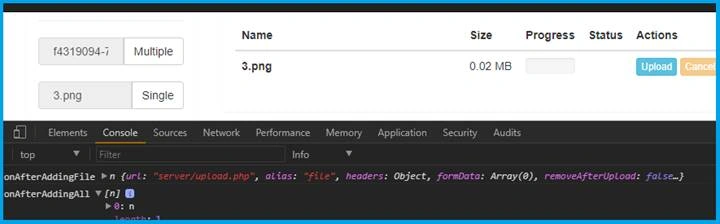
This creates instance uploaders which are copied into the object.
Output 3
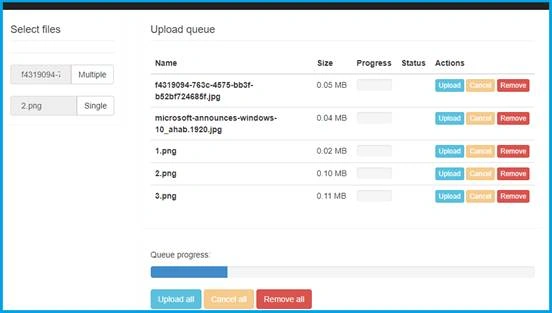
Image queue is ready to upload the selected image.
Conclusion
In this article, we have learned about mvc using angular file upload using bootstrap file style. If you have any queries, please tell me through the comments section, because your comments are very valuable.
Happy Coding!...
Prakash SFDCPosted Nov 20, 2019, 1:04 PM
How to download code??????????????????????????
clifford kwadwo owusu yeboahPosted Apr 15, 2018, 2:31 PM
How can i receive the file on server side. I get an error of "cannot find file....".
Klent DiamondPosted Jan 14, 2018, 9:11 PM
How to upload files to folder in asp mvc controller?
Raj KumarPosted Jun 25, 2017, 8:14 PM
Good article ... keep it up.
Vignesh ManiPosted Jun 23, 2017, 5:14 AM
Good article Bro. Thanks for sharing..