
Introduction
This article explains how to dynamically create the layout in Android. Android Studio is used for the sample.
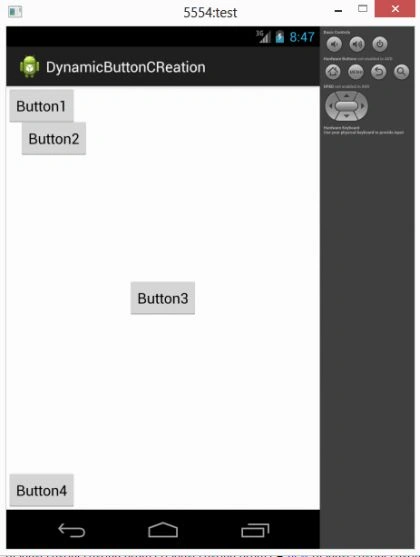
Typically we develop the layout for an Android application by creating the XML file. But in this, we will create the layout for the activity using code in the class file. In this, I have created four buttons inside a RelativeLayout that uses methods and variables to change their layout. First, you will create the Relativelayout and call LayoutParams to set the parameters as in the following:
- // Creating a new RelativeLayout
- RelativeLayout relativeLayout = new RelativeLayout(this);
- // Defining the RelativeLayout layout parameters with Fill_Parent
- RelativeLayout.LayoutParams relativeLayoutParams = new RelativeLayout.LayoutParams(RelativeLayout.LayoutParams.FILL_PARENT, RelativeLayout.LayoutParams.FILL_PARENT);
Now you will create the buttons that you want to show on screens as in the following:
- // Creating a new Left Button
- Button button1 = new Button(this);
- button1.setText("Button1");
- // Creating a new Left Button with Margin
- Button button2 = new Button(this);
- button2.setText("Button2");
- // Creating a new Center Button
- Button button3 = new Button(this);
- button3.setText("Button3");
- // Creating a new Bottom Button
- Button button4 = new Button(this);
- button4.setText("Button4");
Step 1
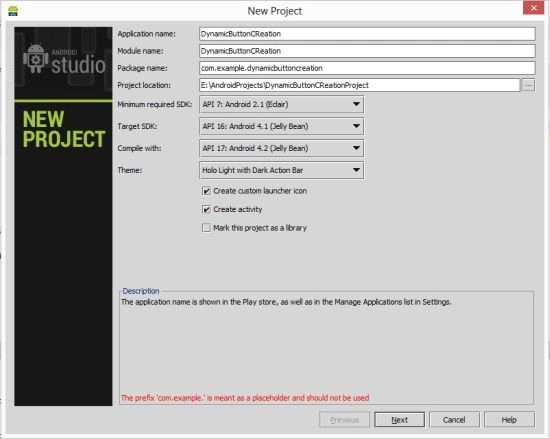
Step 2
Default XML file
- <RelativeLayout xmlns:android="http://schemas.android.com/apk/res/android"
- xmlns:tools="http://schemas.android.com/tools"
- android:layout_width="match_parent"
- android:layout_height="match_parent"
- android:paddingLeft="@dimen/activity_horizontal_margin"
- android:paddingRight="@dimen/activity_horizontal_margin"
- android:paddingTop="@dimen/activity_vertical_margin"
- android:paddingBottom="@dimen/activity_vertical_margin"
- tools:context=".MainActivity">
- <TextView
- android:layout_width="wrap_content"
- android:layout_height="wrap_content"
- android:text="@string/hello_world" />
- </RelativeLayout>
Step 3
Create a Java file and provide this in it:
- package com.dynamicbuttoncreation;
- import android.app.Activity;
- import android.os.Bundle;
- import android.widget.Button;
- import android.widget.RelativeLayout;
- import android.content.ContentValues;
- import android.content.Context;
- import android.database.Cursor;
- import android.database.sqlite.SQLiteDatabase;
- import android.database.sqlite.SQLiteOpenHelper;
- import android.graphics.Color;
- import android.os.Bundle;
- import android.app.Activity;
- import android.view.Menu;
- import android.widget.Button;
- import android.widget.RelativeLayout;
- public class MainActivity extends Activity
- {
- @Override
- public void onCreate(Bundle savedInstanceState)
- {
- super.onCreate(savedInstanceState);
- RelativeLayout relativeLayout = new RelativeLayout(this);
- RelativeLayout.LayoutParams relativeLayoutParams = new RelativeLayout.LayoutParams(RelativeLayout.LayoutParams.FILL_PARENT, RelativeLayout.LayoutParams.FILL_PARENT);
- Button button1 = new Button(this);
- button1.setText("Button1");
- Button button2 = new Button(this);
- button2.setText("Button2");
- Button button3 = new Button(this);
- button3.setText("Button3");
- Button button4 = new Button(this);
- button4.setText("Button4");
- AddButtonLayout(button1, RelativeLayout.ALIGN_PARENT_LEFT);
- AddButtonLayout(button3, RelativeLayout.CENTER_IN_PARENT);
- AddButtonLayout(button4, RelativeLayout.ALIGN_PARENT_BOTTOM);
- LayoutAddButton(button2, RelativeLayout.ALIGN_PARENT_LEFT, 30, 80, 0, 0);
- relativeLayout.addView(button1);
- relativeLayout.addView(button3);
- relativeLayout.addView(button4);
- relativeLayout.addView(button2);
- setContentView(relativeLayout, relativeLayoutParams);
- }
- private void LayoutAddButton(Button button, int centerInParent, int marginLeft, int marginTop, int marginRight, int marginBottom)
- {
- RelativeLayout.LayoutParams buttonLayoutParameters = new RelativeLayout.LayoutParams(RelativeLayout.LayoutParams.WRAP_CONTENT, RelativeLayout.LayoutParams.WRAP_CONTENT);
- buttonLayoutParameters.setMargins(marginLeft, marginTop, marginRight, marginBottom);
- buttonLayoutParameters.addRule(centerInParent);
- button.setLayoutParams(buttonLayoutParameters);
- }
- private void AddButtonLayout(Button button, int centerInParent)
- {
- LayoutAddButton(button, centerInParent, 0, 0, 0, 0);
- }
- }
Step 4
Android Manifest.xml file
- <?xml version="1.0" encoding="utf-8"?>
- <manifest xmlns:android="http://schemas.android.com/apk/res/android"
- package="com.dynamicbuttoncreation"
- android:versionCode="1"
- android:versionName="1.0" >
- <uses-sdk
- android:minSdkVersion="7"
- android:targetSdkVersion="16" />
- <application
- android:allowBackup="true"
- android:icon="@drawable/ic_launcher"
- android:label="@string/app_name"
- android:theme="@style/AppTheme" >
- <activity
- android:name="com.dynamicbuttoncreation.MainActivity"
- android:label="@string/app_name" >
- <intent-filter>
- <action android:name="android.intent.action.MAIN" />
- <category android:name="android.intent.category.LAUNCHER" />
- </intent-filter>
- </activity>
- </application>
- </manifest>
Step 5
Output
Join the conversation! Your thoughts help the community grow.