

This article will show you how to get the Kendo UI support to work with widget using AngularJS and ASP.NET WEB API. This article flow as follows,
- Creating an ASP.NET Web API application.
- Creating a Controller.
- Testing the API.
- Implementing the Kendo List View with paging using AngularJS with the REST API.
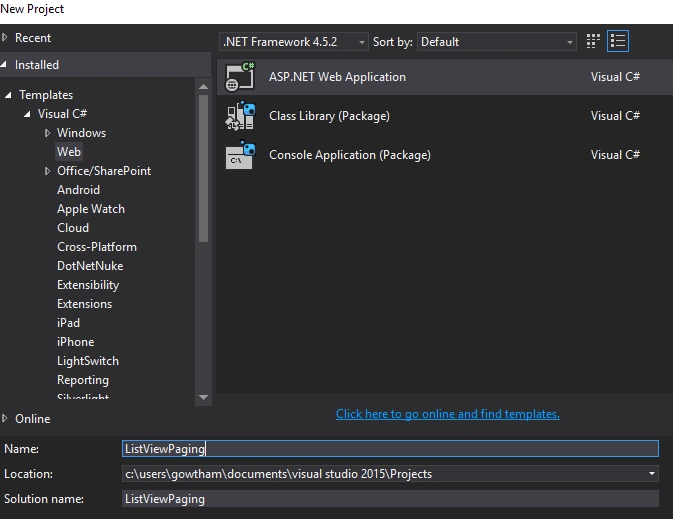
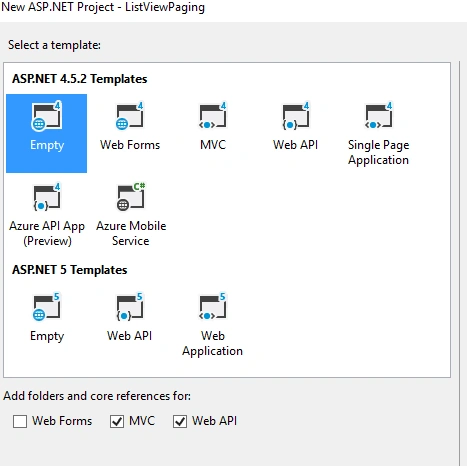
1.Creating a Web API application using an installed web template in Visual Studio as in the following figures,
Creating a Model Classes:
In the Solution Explorer, right click the model folder, Add-> Class and name it as Employee.
Employee.cs
- public class Employee
- {
- public Employee(int Id, string Name,string Designation, string Image )
- {
- this.EmployeeID= Id;
- this.EmployeeName=Name;
- this.Designation=Designation;
- this.EmployeeImage = Image;
- }
- public int EmployeeID { get; set; }
- public string EmployeeName { get; set; }
- public string Designation { get; set; }
- public string EmployeeImage { get; set; }
- }
2. Creating WEB API Controller:
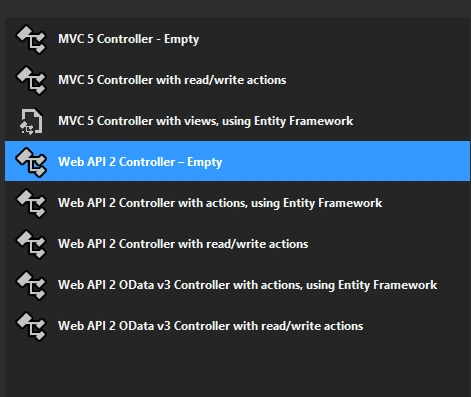
In Solution Explorer, right-click the Controller folder. Select Add -> Controller ->Web API 2 Controller-Empty name it as EmployeeController.cs,
EmployeeController.cs
- [RoutePrefix("api/Employee")]
- public class EmployeeController : ApiController
- {
- [HttpGet]
- [AllowAnonymous]
- [Route("EmployeeList")]
- public HttpResponseMessage GetEmployee()
- {
- try {
- List<Employee> EmpLists = new List<Employee>();
- EmpLists.Add(new Employee(1, "Govind Raj", "Business Analyst", "/Images/Img.png"));
- EmpLists.Add(new Employee(2, "Krishn Mahato", "Development", "/Images/Img.png"));
- EmpLists.Add(new Employee(3, "Bob Ross", "Testing", "/Images/Img.png"));
- EmpLists.Add(new Employee(4, "Steve Davis", "Development", "/Images/Img.png"));
- EmpLists.Add(new Employee(5, "Dave Tucker", "Infrastructure", "/Images/Img.png"));
- EmpLists.Add(new Employee(6, "James Anderson", "HR", "/Images/Img.png"));
- EmpLists.Add(new Employee(7, "Arun Kumar", "Testing", "/Images/Img.png"));
- EmpLists.Add(new Employee(8, "Gowtham Kumar", "Testing", "/Images/Img.png"));
- return Request.CreateResponse(HttpStatusCode.OK, EmpLists, Configuration.Formatters.JsonFormatter);
- }
- catch(Exception ex)
- {
- return Request.CreateResponse(HttpStatusCode.OK, ex.Message, Configuration.Formatters.JsonFormatter);
- }
- }
- }
3. Testing the API
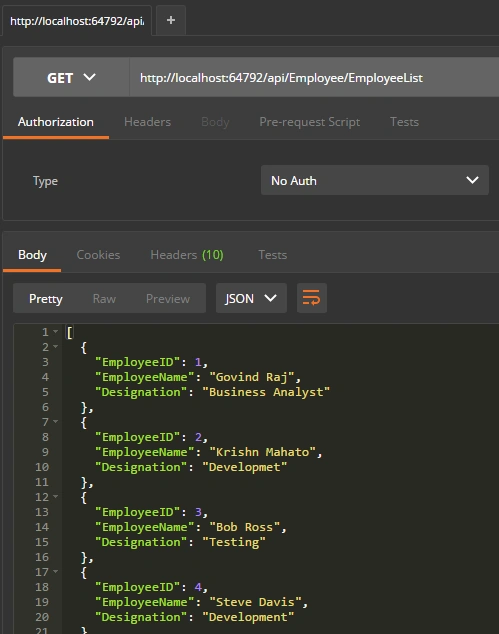
Test the API using the POSTMAN/Fiddler as in the following figures,
API End Point: /api/Employee/EmployeeList.
Type : GET
4. Implementing the Kendo List View with paging using AngularJS with the REST API.
Creating a HTML page
Create a new HTML page in the project.
Design:
- <!DOCTYPE html>
- <html>
- <head>
- <title>List View</title>
- <meta charset="utf-8" />
- <link rel="stylesheet" href="http://kendo.cdn.telerik.com/2016.1.412/styles/kendo.common.min.css">
- <link rel="stylesheet" href="http://kendo.cdn.telerik.com/2016.1.412/styles/kendo.rtl.min.css">
- <link rel="stylesheet" href="http://kendo.cdn.telerik.com/2016.1.412/styles/kendo.default.min.css">
- <link rel="stylesheet" href="http://kendo.cdn.telerik.com/2016.1.412/styles/kendo.mobile.all.min.css">
- <script src="http://code.jquery.com/jquery-1.9.1.min.js"></script>
- <script src="http://kendo.cdn.telerik.com/2016.1.412/js/angular.min.js"></script>
- <script src="http://kendo.cdn.telerik.com/2016.1.412/js/jszip.min.js"></script>
- <script src="http://kendo.cdn.telerik.com/2016.1.412/js/kendo.all.min.js"></script>
- </head>
- <body>
- <div id="EmpList" ng-app="EmployeeModule">
- <div ng-controller="EmployeeCtrl">
- <h3 style="font-style:italic;color:darkslategrey;margin-left:400px"> Kendo List View with AngularJS and ASP.NET WEBAPI</h3>
- <div class="row" style="margin-left:400px">
- <div class="col-sm-6">
- <div class="demo-section k-content wide">
- <div kendo-list-view id="listView" k-data-source="source" style="width:64.5%">
- <div class="Employee" k-template>
- <img ng-src="{{dataItem.EmployeeImage}}" alt="{{dataItem.EmployeeName}}" image" />
- <h3>{{dataItem.EmployeeName}}</h3>
- <h3>{{dataItem.Designation}}</h3>
- </div>
- </div>
- </div>
- </div>
- </div>
- <div class="row">
- <div class="col-sm-6" style="width:76%">
- <div kendo-pager k-data-source="source" style="margin-left:400px"></div>
- </div>
- </div>
- <script type="text/x-kendo-angular-template" id="template">
- </script>
- <style>
- #listView {
- padding: 10px 5px;
- margin-bottom: -1px;
- min-height: 200px;
- }
- .Employee {
- float: left;
- position: relative;
- width: 250px;
- height: 200px;
- margin: 0 5px;
- padding: 0;
- }
- .Employee img {
- width: 150px;
- height: 150px;
- }
- .Employee h3 {
- margin: 0;
- padding: 3px 5px 0 0;
- max-width: 200px;
- overflow: hidden;
- line-height: 1.1em;
- font-size: .9em;
- font-weight: normal;
- text-transform: uppercase;
- color: #999;
- }
- .Employee p {
- visibility: hidden;
- }
- .k-listview:after {
- content: ".";
- display: block;
- height: 0;
- clear: both;
- visibility: hidden;
- }
- </style>
- </div>
- </div>
- <script>
- angular.module("EmployeeModule", [ "kendo.directives" ])
- .controller("EmployeeCtrl", function($scope){
- $scope.source = new kendo.data.DataSource({
- schema: {
- model: {
- id: "EmployeeID"
- }
- },
- transport: {
- read: {
- url: "/api/Employee/EmployeeList",
- dataType: "json"
- },
- },
- pageSize: 4
- });
- })
- </script>
- </body>
- </html>
Please go through my previous article to get more details on integrating the kendo UI widget with AngularJS
Page 2:
Conclusion:
We have seen how to work with Kendo list view with AngularJS and ASP.NET WEB API with paging, which is really useful to build an application with ease
References:
Amit DavePosted May 3, 2016, 10:27 AM
Keep up the Good work!
Bhavik PatelPosted May 2, 2016, 10:23 PM
good one
Vignesh ManiPosted May 2, 2016, 12:01 PM
Nice
Debasis SahaPosted May 2, 2016, 10:09 AM
Nice One..
Bhuvanesh MohankumarPosted May 2, 2016, 6:51 AM
Good one
Sonu ChaudharyPosted May 2, 2016, 5:51 AM
nice one
Gowtham RajamanickamPosted May 2, 2016, 5:04 AM
good one..