

Introduction
But wait! Does our application really need a translation or conversion to any other languages? Well, the answer is Yes. Because if your application or website is just in English then possibly you are missing out on a big audience. Below is the chart of languages by the proportion of native speakers.
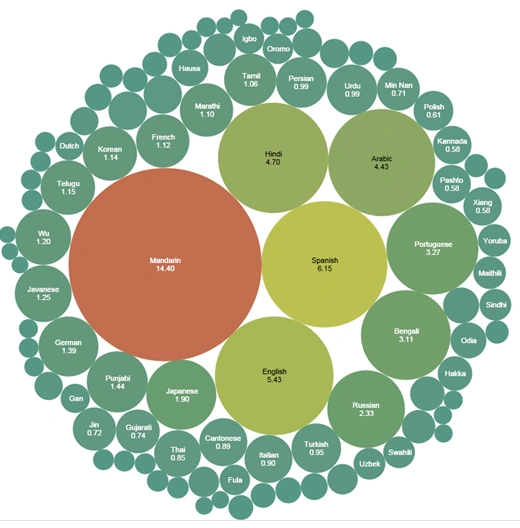
(image source: Wikipedia )
So, any time, if we hear multiple language support, the first thing which comes in our mind is something called localization and internationalization. Right? People often used these two words interchangeably, but actually they are slightly different in meaning.
Internationalization
Internationalization is the process of designing and preparing your app to be usable in different languages. Localization is the process of translating your internationalized app into specific languages for particular locales.
Internationalization deals with the following aspects,
- Displaying dates, numbers, percentages, and currencies in a local format.
- Preparing text in component templates for translation.
- Handling plural forms of words.
- Handling alternative text.
Whereas Localization actually translates to the actual text.
(Source: angular.io )
So now let’s start with an example, I had created the blank new application with angular CLI. And changed my app.component.html as shown below,
- <h1 i18n="@@welcome" >Hello World!!</h1>
- <h1 i18n="@@sampletext" >This is just a demo of how to use i18n in angular application. </h1>
We can generate the translation file using angular cli, below is the command.
ng xi18n --output-path src\locale
In the above command we can specify the path where we actually want to create translation file, below is the how generated file will look like,
messages.xlf
- <?xml version="1.0" encoding="UTF-8" ?>
- <xliff version="1.2" xmlns="urn:oasis:names:tc:xliff:document:1.2">
- <file source-language="en" datatype="plaintext" original="ng2.template">
- <body>
- <trans-unit id="welcome" datatype="html">
- <source>Hello World!!</source>
- <context-group purpose="location">
- <context context-type="sourcefile">src/app/app.component.html</context>
- <context context-type="linenumber">1</context>
- </context-group>
- </trans-unit>
- <trans-unit id="sampletext" datatype="html">
- <source>This is just a demo of how to use i18n in angular application.</source>
- <context-group purpose="location">
- <context context-type="sourcefile">src/app/app.component.html</context>
- <context context-type="linenumber">2</context>
- </context-group>
- </trans-unit>
- </body>
- </file>
- </xliff>
Messages.hi.xlf
- <?xml version="1.0" encoding="UTF-8" ?>
- <xliff version="1.2" xmlns="urn:oasis:names:tc:xliff:document:1.2">
- <file source-language="en" datatype="plaintext" original="ng2.template">
- <body>
- <trans-unit id="welcome" datatype="html">
- <source>Hello World!!</source>
- <target>नमस्ते दुनिया!</target>
- <context-group purpose="location">
- <context context-type="sourcefile">src/app/app.component.html</context>
- <context context-type="linenumber">1</context>
- </context-group>
- </trans-unit>
- <trans-unit id="sampletext" datatype="html">
- <source>This is just a demo of how to use i18n in angular application.</source>
- <target>यह कोणीय अनुप्रयोग में i18n का उपयोग करने के तरीके का सिर्फ एक डेमो है।</target>
- <context-group purpose="location">
- <context context-type="sourcefile">src/app/app.component.html</context>
- <context context-type="linenumber">2</context>
- </context-group>
- </trans-unit>
- </body>
- </file>
- </xliff>
- <?xml version="1.0" encoding="UTF-8" ?>
- <xliff version="1.2" xmlns="urn:oasis:names:tc:xliff:document:1.2">
- <file source-language="en" datatype="plaintext" original="ng2.template">
- <body>
- <trans-unit id="welcome" datatype="html">
- <source>Hello World!!</source>
- <target>હેલો વર્લ્ડ!</target>
- <context-group purpose="location">
- <context context-type="sourcefile">src/app/app.component.html</context>
- <context context-type="linenumber">1</context>
- </context-group>
- </trans-unit>
- <trans-unit id="sampletext" datatype="html">
- <source>This is just a demo of how to use i18n in angular application.</source>
- <target>આ કોણીય એપ્લિકેશનમાં i18n નો ઉપયોગ કેવી રીતે કરવો તેનો ફક્ત એક ડેમો છે.</target>
- <context-group purpose="location">
- <context context-type="sourcefile">src/app/app.component.html</context>
- <context context-type="linenumber">2</context>
- </context-group>
- </trans-unit>
- </body>
- </file>
- </xliff>
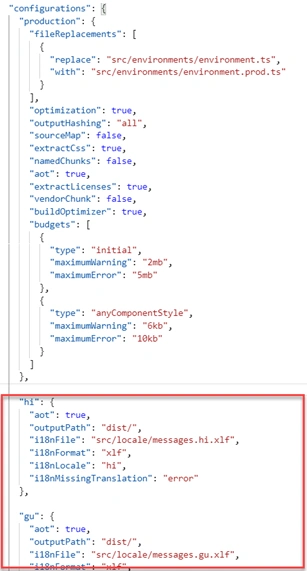
Here is the overall angular.json file,
- {
- "$schema": "./node_modules/@angular/cli/lib/config/schema.json",
- "version": 1,
- "newProjectRoot": "projects",
- "projects": {
- "ngInternationalizationDemo": {
- "projectType": "application",
- "schematics": {},
- "root": "",
- "sourceRoot": "src",
- "prefix": "app",
- "architect": {
- "build": {
- "builder": "@angular-devkit/build-angular:browser",
- "options": {
- "outputPath": "dist/",
- "index": "src/index.html",
- "main": "src/main.ts",
- "polyfills": "src/polyfills.ts",
- "tsConfig": "tsconfig.app.json",
- "aot": false,
- "assets": [
- "src/favicon.ico",
- "src/assets"
- ],
- "styles": [
- "src/styles.css"
- ],
- "scripts": []
- },
- "configurations": {
- "production": {
- "fileReplacements": [
- {
- "replace": "src/environments/environment.ts",
- "with": "src/environments/environment.prod.ts"
- }
- ],
- "optimization": true,
- "outputHashing": "all",
- "sourceMap": false,
- "extractCss": true,
- "namedChunks": false,
- "aot": true,
- "extractLicenses": true,
- "vendorChunk": false,
- "buildOptimizer": true,
- "budgets": [
- {
- "type": "initial",
- "maximumWarning": "2mb",
- "maximumError": "5mb"
- },
- {
- "type": "anyComponentStyle",
- "maximumWarning": "6kb",
- "maximumError": "10kb"
- }
- ]
- },
- "production-hi": {
- "fileReplacements": [
- {
- "replace": "src/environments/environment.ts",
- "with": "src/environments/environment.prod.ts"
- }
- ],
- "optimization": true,
- "outputHashing": "all",
- "sourceMap": false,
- "extractCss": true,
- "namedChunks": false,
- "aot": true,
- "extractLicenses": true,
- "vendorChunk": false,
- "buildOptimizer": true,
- "outputPath": "dist/",
- "i18nFile": "src/locale/messages.hi.xlf",
- "i18nFormat": "xlf",
- "i18nLocale": "hi",
- "i18nMissingTranslation": "error"
- },
- "hi": {
- "aot": true,
- "outputPath": "dist/",
- "i18nFile": "src/locale/messages.hi.xlf",
- "i18nFormat": "xlf",
- "i18nLocale": "hi",
- "i18nMissingTranslation": "error"
- },
- "production-gu": {
- "fileReplacements": [
- {
- "replace": "src/environments/environment.ts",
- "with": "src/environments/environment.prod.ts"
- }
- ],
- "optimization": true,
- "outputHashing": "all",
- "sourceMap": false,
- "extractCss": true,
- "namedChunks": false,
- "aot": true,
- "extractLicenses": true,
- "vendorChunk": false,
- "buildOptimizer": true,
- "outputPath": "dist/",
- "i18nFile": "src/locale/messages.gu.xlf",
- "i18nFormat": "xlf",
- "i18nLocale": "gu",
- "i18nMissingTranslation": "error"
- },
- "gu": {
- "aot": true,
- "outputPath": "dist/",
- "i18nFile": "src/locale/messages.gu.xlf",
- "i18nFormat": "xlf",
- "i18nLocale": "gu",
- "i18nMissingTranslation": "error"
- }
- }
- },
- "serve": {
- "builder": "@angular-devkit/build-angular:dev-server",
- "options": {
- "browserTarget": "ngInternationalizationDemo:build"
- },
- "configurations": {
- "production": {
- "browserTarget": "ngInternationalizationDemo:build:production"
- },
- "hi":{
- "browserTarget": "ngInternationalizationDemo:build:hi"
- },
- "gu":{
- "browserTarget": "ngInternationalizationDemo:build:gu"
- }
- }
- },
- "extract-i18n": {
- "builder": "@angular-devkit/build-angular:extract-i18n",
- "options": {
- "browserTarget": "ngInternationalizationDemo:build"
- }
- },
- "test": {
- "builder": "@angular-devkit/build-angular:karma",
- "options": {
- "main": "src/test.ts",
- "polyfills": "src/polyfills.ts",
- "tsConfig": "tsconfig.spec.json",
- "karmaConfig": "karma.conf.js",
- "assets": [
- "src/favicon.ico",
- "src/assets"
- ],
- "styles": [
- "src/styles.css"
- ],
- "scripts": []
- }
- },
- "lint": {
- "builder": "@angular-devkit/build-angular:tslint",
- "options": {
- "tsConfig": [
- "tsconfig.app.json",
- "tsconfig.spec.json",
- "e2e/tsconfig.json"
- ],
- "exclude": [
- "**/node_modules/**"
- ]
- }
- },
- "e2e": {
- "builder": "@angular-devkit/build-angular:protractor",
- "options": {
- "protractorConfig": "e2e/protractor.conf.js",
- "devServerTarget": "ngInternationalizationDemo:serve"
- },
- "configurations": {
- "production": {
- "devServerTarget": "ngInternationalizationDemo:serve:production"
- }
- }
- }
- }
- }},
- "defaultProject": "ngInternationalizationDemo"
- }

ng serve --configuration=gu


Now that is simple, isn’t it? But the demo we had developed will work only for a production environment or only for the local machines. But what if we want to use the same demo in a real application? Because once our application is deployed or live on the server, we just cannot change its configurations. Well, there are certain ways by which we do the above-said task, but my personal choice will be creating separate builds for separate languages, say for example if someone wants to run the Hindi version of my application then the path would be, www.xyz.com/hi and the same case for other languages also.
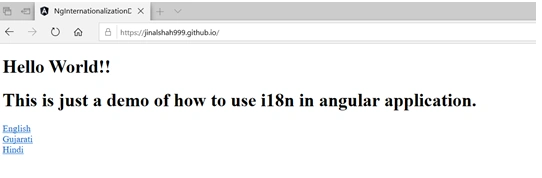
So before deploying our application to the server let’s add 3 different languages button which we want to support.so modify app.component.html as shown below,
- <h1 i18n="@@welcome" >Hello World!!</h1>
- <h1 i18n="@@sampletext" >This is just a demo of how to use i18n in angular application.</h1>
- <a href="\">English</a>
- <br>
- <a href="\gu">Gujarati</a>
- <br>
- <a href="\hi">Hindi</a>
That’s it we are all done and now it's time to generate deployment build. We can generate a simple English build, which is a by default language using the following command.
ng build --prod
This will generate our build deployment build inside the dist directory which we can then publish to our server.
So now again we have to generate a separate build for hindi and gujarati languages. We can do it by following commands,
ng build --prod --i18n-locale hi --i18n-format xlf --i18n-file src/locale/messages.hi.xlf --output-path=dist/hi --baseHref /hi/
So as you can see we are specifying i18n-locale parameter to Hindi (hi), we are also providing the source file location and we are setting output directory where our build should be created to dist/hi and most important parameter baseHref from where we want to serve our local language angular application.
We can run the same command for other languages.
ng build --prod --i18n-locale gu --i18n-format xlf --i18n-file src/locale/messages.gu.xlf --output-path=dist/gu --baseHref /gu/
Now our dist directory should look like this,
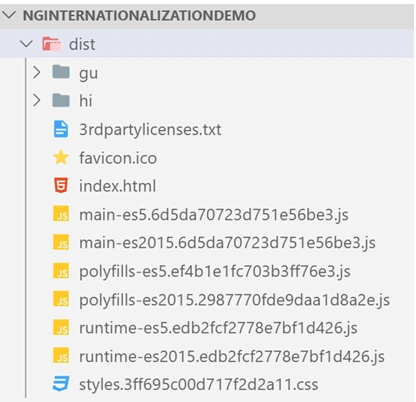
So now we are ready to deploy our application to github pages, but before deploying to github pages we must remove dist directory from .gitignore file.
Create the Repository
- Go to github.com
- Create the new repository and name it as shown below
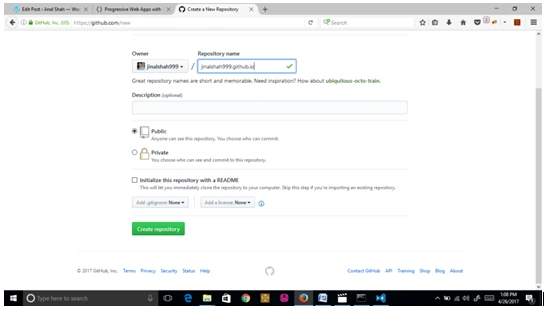
Copy Remote Server URL
It will be required when we will upload the dist folder.
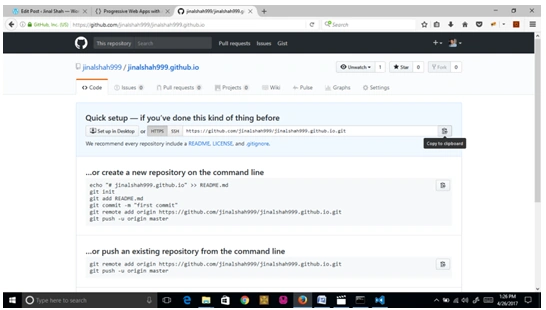
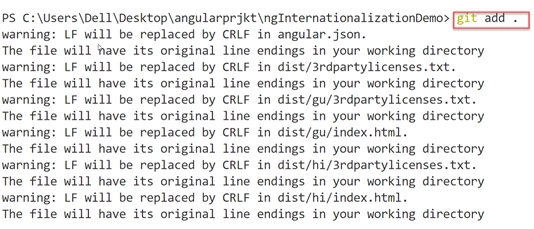
Now Open the Command Prompt and navigate to the source directory and follow the steps

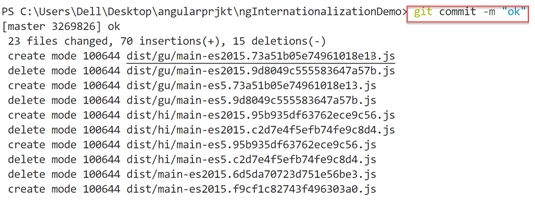
 git commit –m “message”
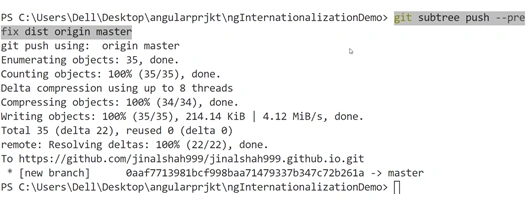
git subtree push --prefix dist origin master git remote add origin CopiedURL
git add


Summary
In this article, we learned about Internationalization.
shankar jhaPosted Nov 15, 2019, 5:44 AM
Hi Jinal, how to integrate it with webpack integraed project.
Mageshwaran RPosted Nov 14, 2019, 11:46 PM
Nice Article..
Sourav Kumar DasPosted Nov 14, 2019, 10:44 PM
Superb Article Sir.